Henrhyd Falls - Build Log #005: Woodland & Vegetation
Bringing the Welsh Temperate Rainforest to Life
Timeline: 16 November 2025 Focus: Creating authentic ancient woodland character with diverse vegetation
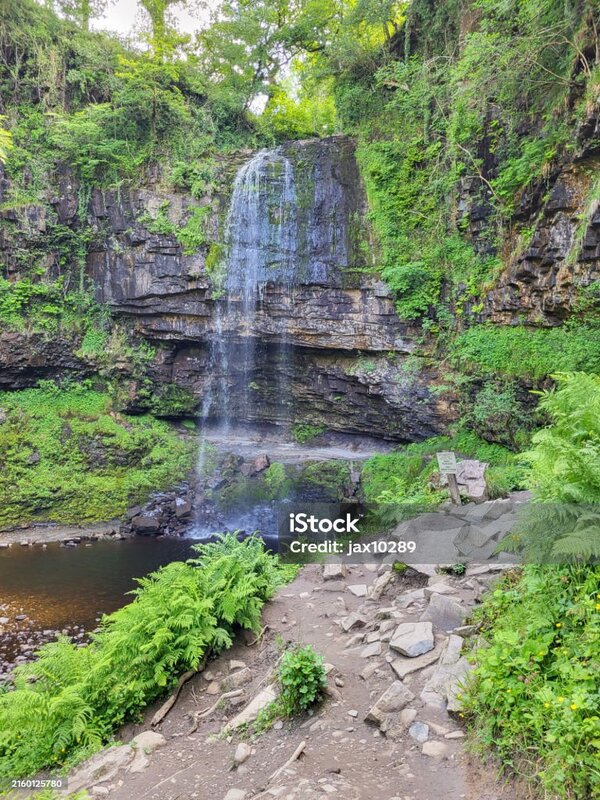
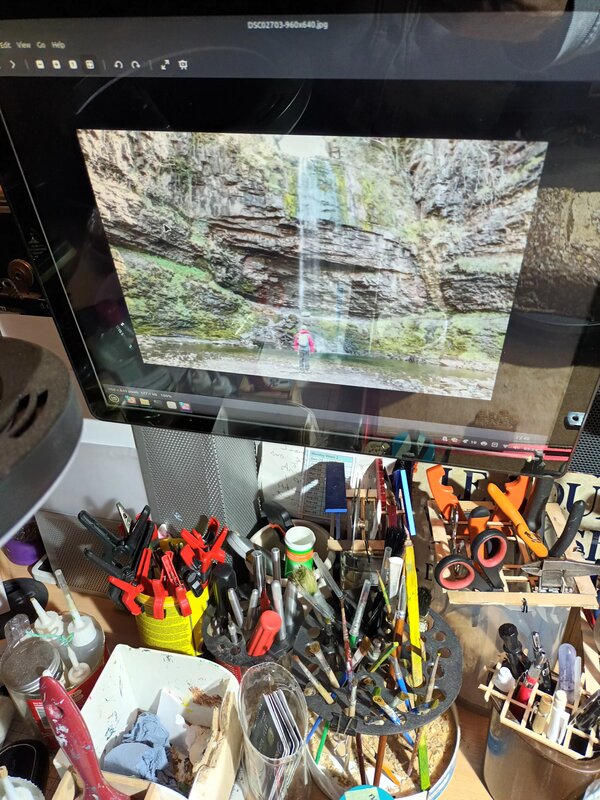
The Henrhyd Falls gorge supports ancient woodland thriving in a rare UK temperate rainforest microclimate. The constant moisture from waterfall spray, sheltered environment, and high humidity create conditions for exceptionally lush vegetation - sessile oak and ash dominate the canopy, with rich undergrowth of ferns, mosses, lichens, and seasonal plants carpeting the forest floor.
This phase would transform the rocky gorge with its waterfall into a living, breathing woodland environment. The challenge: achieving diversity and realism at 1:250 scale while ensuring the vegetation enhanced rather than overwhelmed the dramatic waterfall feature.
Welsh Woodland Character - Reference Analysis
The reference collection of Welsh woodland photographs revealed essential characteristics to replicate:
Ancient Oak and Beech Forests
The Welsh woodlands show mature trees with distinctive traits:
Trunk Characteristics:
- Colors ranging from dark gray-brown to lighter gray bark
- Rugged, furrowed texture on oaks indicating great age
- Smoother, paler bark on beech trees
- Gnarled, twisted forms with character
Branching Patterns:
- Complex, asymmetrical structures reaching skyward
- Intricate patterns creating layered canopies
- Some trunks splitting into multiple main limbs
- Others with singular columnar structures
Foliage Characteristics:
- Dense, layered canopy creating filtered light
- Vibrant greens ranging from deep to lighter shades
- Mixed deciduous and conifer varieties for visual interest
Understory Character:
- Ferns thriving in moist, shaded conditions
- Moss covering rocks, trunks, and ground
- Lichens indicating clean air and high humidity
- Layered depth from tall canopy to ground cover
This atmospheric quality - dappled sunlight through dense foliage, lush ground cover, sense of ancient timelessness - needed to be captured at miniature scale.
Building the Tree Collection
The tree collection combined two approaches: commercially available plastic trees for variety and convenience, and handmade wire-frame trees where I wanted specific forms and textures that commercial products couldn’t provide.
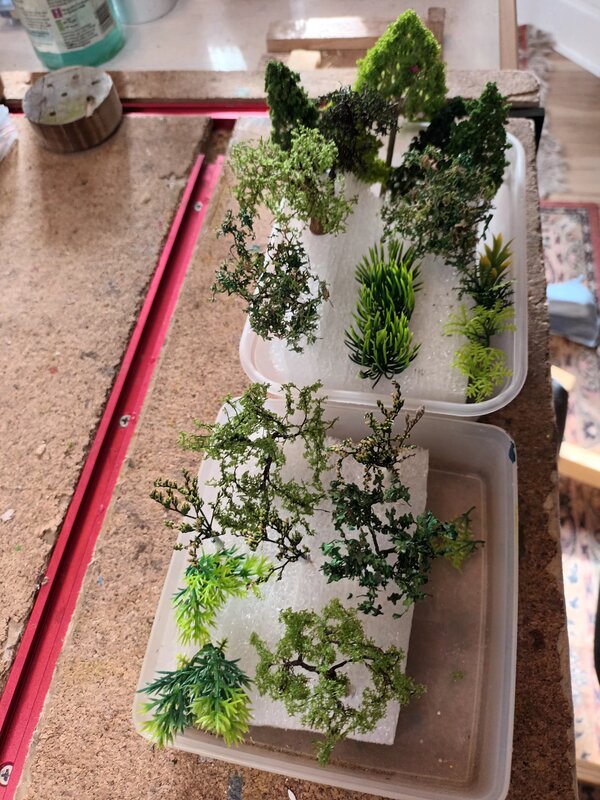 Intermediate stage of vegetation construction showing the modular approach. The collection includes a mix of commercial plastic trees and materials for handmade specimens. Commercial trees provide instant variety in form and foliage, while wire armatures, paste materials, and hollowfibre with colored sawdust allow custom tree construction. Visible here are ferns with feathery fronds, moss materials, various tree forms in different sizes, and ground cover components - all prepared for strategic placement. This hybrid approach proved effective: commercial trees for consistency and speed, handmade trees for unique character and specific positioning needs. The variety shown here - approximately 9 trees total representing 6 distinct forms - would create the diverse woodland atmosphere essential for Welsh temperate rainforest character. Rating 7-8/10 for construction technique.
Handmade Trees - Wire Frame Construction
For the two central trees positioned next to the river at the cliff top, I built them from scratch to achieve specific characteristics:
Wire Frame Foundation:
- Started with wire armatures forming the basic trunk and main branch structure
- Allowed me to create the exact height, angles, and branching patterns needed for the composition
- Positioned these trees to frame the waterfall source
Branch and Trunk Development:
- Thickened the wire branches by applying paste mixture (modelling paste thickened with filler)
- Built up the paste in thin layers, shaping and texturing as it dried
- Created natural-looking branch taper from thick trunk to thinner branches
Surface Treatment:
- Painted the trunks and branches light grey to suggest mature tree bark
- The pale coloring worked well against the darker rocks and green foliage
Foliage Application:
- Used hollowfibre (the same pillow filling material used for waterfall mist effects)
- Mixed colored sawdust into the hollowfibre to create small leaf texture
- This combination produced delicate, scale-appropriate foliage
- The technique allowed control over foliage density and distribution
- Created an airy, naturalistic appearance rather than solid commercial foliage clumps
Commercial Plastic Trees
For the trees positioned at the cliff top left and right sides, I used commercially available plastic trees:
Advantages of Commercial Trees:
- Instant variety in form, size, and foliage types
- Consistent quality and realistic pre-made textures
- Time-efficient for populating the scene with multiple specimens
- Provided the bushy, rounded forms and various conifer styles visible in the final diorama
Integration Approach:
- Selected trees with varied heights (ranging from 2.5cm to 10cm scale)
- Chose different foliage colors (light green, medium green, dark green, vibrant green) for natural diversity
- Mixed coniferous and deciduous-looking forms
- Positioned to frame the scene and create depth without overwhelming the waterfall
Tree Types and Quantities
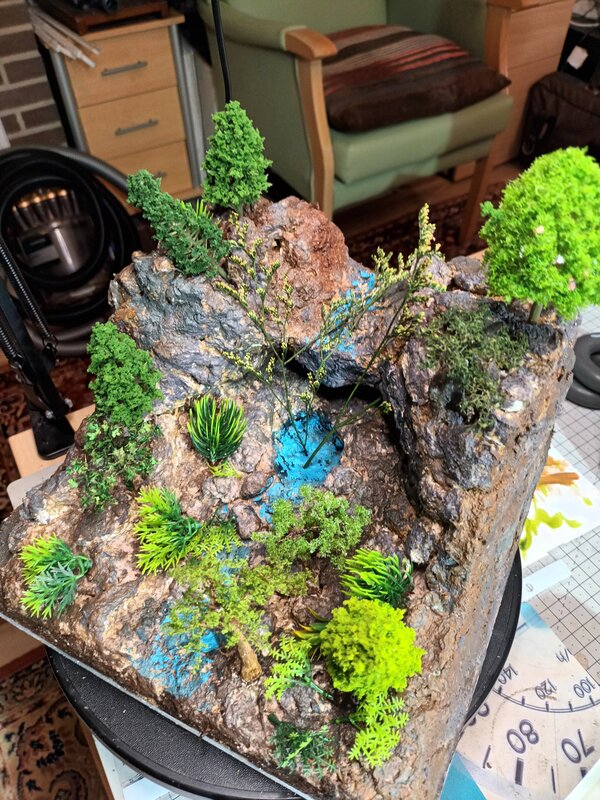
 The complete tree collection in context. Analysis reveals 9 trees total representing 6 distinct forms, creating the diverse woodland character essential for Welsh gorge atmosphere. Notice the varied heights (tallest reaching 10cm scale representing mature trees), different foliage densities (from dense bushy forms to more open airy structures), and color range (light green, medium green, dark green, vibrant fluorescent green). The central tall columnar tree provides vertical accent and height reference. Three identical rounded light green bushes to the left create visual rhythm. Two matching vibrant green spreading trees in the right foreground add consistency while maintaining variety. Individual unique forms (delicate lacy-leaved specimen, compact mossy-textured shrub, slender-stemmed tree) provide additional diversity. Rather than attempting specific species identification, this collection succeeds through varied forms, textures, colors, and scales working together.
The final woodland comprises 9 trees total, representing 6 distinct forms:
Form 1 (3 specimens):
- Smaller rounded bushes with dense fuzzy foliage
- Light green coloring
- Low-growing coniferous appearance
- Positioned left of center, creating cluster effect
- Commercial plastic trees
Form 2 (2 specimens):
- Shorter spreading trees with bushy form
- Vibrant, almost fluorescent green foliage
- Needle-like texture
- Right foreground placement
- Commercial plastic trees
Form 3 (1 specimen - tallest):
- Tall slender columnar tree
- Deep green needle-like foliage
- Central position - most prominent tree
- Provides vertical scale reference
- Commercial plastic tree
Form 4 (1 specimen - handmade):
- Broad lacy leaves with delicate airy appearance
- Pale green coloring
- Wire frame construction with paste-thickened branches
- Light grey painted trunk and branches
- Hollowfibre and colored sawdust foliage
- Positioned next to river at cliff top
Form 5 (1 specimen - handmade):
- Compact rounded form
- Dense textured foliage
- Wire frame construction with paste-thickened branches
- Light grey painted trunk and branches
- Hollowfibre and colored sawdust foliage
- Positioned next to river at cliff top
Form 6 (1 specimen):
- Slender stems with small clustered leaves
- Unique silhouette contrasting with other forms
- Commercial plastic tree
Design Philosophy:
Rather than attempting precise species identification (which proved challenging at 1:250 scale with available materials), the focus was on achieving diversity through varied characteristics:
- Height variation: From 2.5cm to 10cm, suggesting forest layers from understory to canopy
- Foliage density: Dense bushy forms contrasting with open airy structures
- Color range: Light, medium, dark, and vibrant greens creating natural palette variation
- Form variety: Columnar, rounded, spreading, compact - different silhouettes for visual interest
- Texture diversity: Needle-like, broad-leaved, fuzzy, lacy - multiple textural qualities
- Construction methods: Commercial for consistency, handmade for unique character
This approach proved more successful than trying to replicate specific Welsh woodland species. The combination created a convincing temperate forest atmosphere through overall diversity rather than botanical accuracy.
Ground Cover - Creating the Forest Floor
The temperate rainforest character depends heavily on lush ground cover creating that moisture-rich, high-humidity atmosphere.
Fern Varieties
Multiple fern types were incorporated, with 10-15 individual fern plants visible in final images:
Material Source:
- Started with commercially available plastic fern plants
- These plants were too large for 1:250 scale in their original form
Scaling Technique:
- Cut the plastic ferns into smaller individual sections
- This allowed me to scale the plants down to appropriate miniature size
- Each large commercial fern plant yielded multiple smaller fronds
- Cutting created variety of sizes and structures from single source material
Variety Through Sectioning:
- Different cutting patterns produced varied fern forms
- Some sections retained multiple fronds creating bushy clusters
- Other sections became individual delicate fronds
- This technique generated the range from large vibrant fronds to delicate lacy varieties
Placement Strategy:
- Positioned primarily at the cliff base and against cliff walls
- Nestled ferns into rock crevices where moisture would naturally collect
- Cascaded some fronds over rock edges creating natural growth patterns
- Concentrated placement near waterfall and pool suggesting moisture-loving species
- The feathery textures contrasted beautifully with hard rock surfaces
Moss and Lichen Effects
Extensive moss coverage creates the quintessential temperate rainforest look:
Material Selection:
- Used combination of moss materials in different colors and textures
- Sphagnum moss provided the base material (same as used for small tree foliage)
- Different moss colors: bright green, yellow-green, grey-green, darker forest green
- Natural variation in moss color critical for realism
Preparation:
- Finely cut the sphagnum moss for scale-appropriate texture
- Cutting broke moss into small fragments that read correctly at 1:250 scale
- Created varied sizes from fine powder to small tufts
Application to Rocks:
- Applied moss directly to rock surfaces using adhesive
- Concentrated on horizontal surfaces where moss naturally accumulates
- Added to crevices and sheltered areas suggesting moisture retention
- Built up layers in some areas creating thick, established moss carpets
- Left some rock surfaces bare for contrast and to show rock texture
Application to Ground:
- Scattered moss across ground surface as part of forest floor mix
- Moss integrated with dried leaves, twigs, and other ground materials
- Created patches rather than uniform coverage for natural appearance
- Denser moss coverage near water features and in shaded areas
Color and Texture Effects:
- Multiple moss colors applied adjacently created natural patchwork effect
- The soft, velvety texture inherent in the moss material translated well to miniature scale
- Different cutting sizes produced varied textures within moss coverage
- Some areas received fine moss dust, others received larger tufts
Lichen Suggestions:
- The varied moss colors (yellows, greys, greens) suggested lichen presence
- Lighter colored moss on rocks and tree bases evoked lichen growth patterns
- Grey-green moss on vertical rock faces suggested weathering and age
- This subtle effect enhanced the sense of ancient, undisturbed woodland
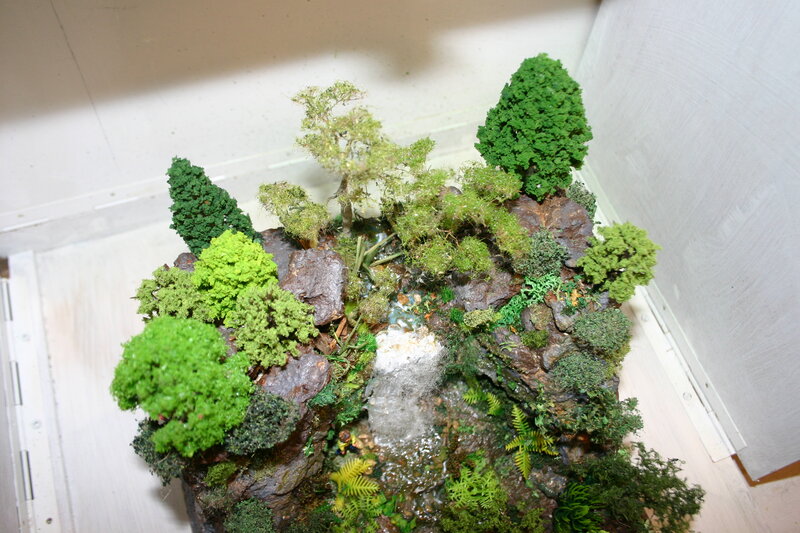
 The woodland transformation complete. The scene now shows lush, thriving vegetation seamlessly integrated with the rocky landscape and waterfall. Multiple fern types with vibrant green fronds nestle in crevices, moss carpets the rock surfaces creating that aged, weathered appearance essential for Welsh gorge character, and trees of varying heights establish depth and scale. The diversity is exceptional - coniferous and deciduous species, ferns, moss, and ground cover all working harmoniously. The natural, organic arrangement avoids uniform distribution, with clusters of dense greenery interspersed with exposed rocky areas and water features. Notice how vegetation frames but doesn’t overwhelm the waterfall - maintaining that critical compositional balance. The realism and variety rate 9-10/10 - this captures the essence of a Welsh temperate rainforest microclimate with convincing naturalism.
Small Trees and Bushes at Ground Level
Beyond the larger trees and ferns, the ground level required dense undergrowth creating the lush temperate rainforest floor:
Wire Frame Construction:
- Built small trees and bushes using wire armatures forming miniature branch structures
- Wire provided flexibility to shape each plant uniquely
- Allowed creation of varied forms - spreading bushes, compact shrubs, delicate multi-stemmed plants
Foliage Creation - Sawdust Method:
- Applied colored sawdust in multiple grades (fine to coarse)
- Different sawdust colors created variety: yellows, multiple green shades, browns
- Fine sawdust produced delicate small-leaved appearance
- Coarser grades created more textured, robust foliage
- Mixed colors on single plant created natural color variation
Foliage Creation - Sphagnum Moss Method:
- Finely cut sphagnum moss in different colors
- Applied to wire frames creating clustered, organic foliage texture
- Natural moss structure provided scale-appropriate detail
- Different moss colors (light green, medium green, yellow-green) added to overall diversity
Hollowfibre Lifting Technique:
- In some cases, used hollowfibre to lift and cluster the sawdust or moss leaves
- The hollowfibre created volume and three-dimensional foliage structure
- Prevented flat, compressed appearance
- Allowed realistic bushy, clustered leaf formations
- Same material as waterfall mist effects, proving versatile across applications
Result:
- Dozens of unique small plants each with individual character
- No two specimens identical due to handmade nature
- Natural variation in color, texture, density, and form
Forest Floor - Ground Surface Detail
The forest floor received meticulous attention creating that characteristic temperate rainforest carpet:
Dried Leaves Layer:
- Applied mixture of different colored dried leaves
- Browns, yellows, oranges creating natural leaf litter palette
- Varied sizes suggesting decomposition stages
- Concentrated around tree bases and in sheltered areas
Small Materials and Twigs:
- Incorporated tiny twigs and branch fragments
- Small organic materials adding textural complexity
- These elements broke up uniformity creating natural randomness
Grasses:
- Added grass materials in strategic locations
- Varied heights and densities
- Lighter green tones contrasting with darker leaf litter
Moss Ground Cover:
- Applied moss materials directly to ground surface
- Different moss colors (bright green, yellow-green, grey-green) creating patchwork effect
- Moss concentrated in moist areas near water features
- Created the soft, velvety ground texture characteristic of Welsh woodland
Layering Approach:
- Built up ground cover in layers rather than single application
- Base layer of leaf litter establishing color foundation
- Mid layer of varied materials creating texture
- Top layer of moss and grasses adding highlights and focal details
- Each layer visible in places creating depth and visual interest
 Detailed view of ground-level vegetation illustrating the diversity achieved. Ferns in varied sizes nestle in crevices and cascade over cliff edges - some with delicate lacy fronds, others more robust and shrub-like. Small trees and bushes show the sawdust and moss foliage technique with colors ranging from deep greens to muted browns and yellows, textures from smooth to rough and gnarled. The clustering patterns appear natural with isolated specimens and dense groupings. The forest floor displays the layered approach: dried leaves in browns, yellows and oranges; tiny twigs and organic materials; grasses providing textural variety; and patches of moss in vibrant greens creating that soft, velvety ground cover characteristic of Welsh temperate rainforest. Color variations and texture diversity create visual interest and depth. AI analysis rates this ground vegetation 9/10 for effectiveness in creating a believable and engaging miniature forest environment. The meticulous attention to detail and natural distribution patterns successfully replicate the intricate beauty of a real forest floor ecosystem.
Vegetation Placement Strategy
The placement of vegetation proved as critical as the vegetation itself - creating depth, scale, and atmosphere while maintaining focal points.
Density Variations
 Lush vegetation in final form. Ferns and moss cling to rocks adding soft texture to the hard surfaces. Trees visible include conifers and deciduous varieties creating a mixed woodland canopy. The vegetation is quite dense here with layered, varied coverage, yet strategically arranged to avoid obscuring the dramatic rock formations and waterfall. Plants interact seamlessly with landscape elements - thriving in the moist, shaded environment created by the gorge structure. Colors range from deep greens to the silvery-gray of rocks and white of cascading water. Textures vary from smooth broad leaves to delicate feathery fronds. Realism rated 8-9/10 - the diversity and well-integrated placement creates a truly lush, pristine natural setting.
Dense Areas:
- Concentrated planting at cliff top framing the waterfall source
- Clusters along right side creating depth and enclosure
- Heavy coverage around pool area suggesting moist conditions
Sparse Areas:
- Rocky exposed sections showing geological features
- Areas around waterfall maintaining visibility of water flow
- Strategic openings allowing views into the scene
Placement Decision Process:
The placement evolved through iterative positioning and assessment:
-
Reference-Driven Placement: Consulted Welsh woodland photographs showing where vegetation naturally grows in gorge environments - cliff tops, crevices, moist areas near water, sheltered pockets
-
Waterfall as Hero Feature: Constantly assessed whether vegetation enhanced or competed with the waterfall - the central dramatic element that must remain visible and dominant
-
Natural Growth Patterns: Placed vegetation where real plants would thrive - ferns in damp crevices, moss on horizontal surfaces and near water, trees on cliff top with access to soil and light
-
Dry Fitting: Positioned vegetation temporarily before permanent attachment, stepped back to assess overall effect, adjusted placement multiple times
-
Clustering Strategy: Grouped plants in natural clusters rather than even distribution - created areas of dense growth interspersed with exposed rock, mimicking how vegetation colonizes favorable spots
-
Balance Through Contrast: Achieved balance by creating strong contrast zones - very dense vegetation areas made sparse rocky areas more dramatic, and vice versa
-
Sight Line Management: Ensured multiple viewing angles maintained visibility of key features (waterfall, cave, rock formations) while still feeling immersed in woodland
Coverage vs. Visibility Balance:
- Aimed for approximately 60-70% vegetation coverage in most views
- Left 30-40% rock and water features exposed
- This ratio felt right - lush enough for temperate rainforest character, open enough to showcase construction work
- The balance shifted depending on viewing angle - some angles showed denser vegetation, others highlighted more exposed rock
- Accepted that different viewers would focus on different elements based on their sight line
Creating Depth and Scale
 Strategic vegetation placement creating dimensional depth. Ferns show as both delicate lacy varieties and more robust shrub-like forms. Moss creates a soft verdant carpet across rocky surfaces with pops of bright green and yellow ground cover. Vegetation grows from crevices and cascades over edges - exactly how plants establish in real rock formations. The placement is dense yet strategic, utilizing nooks and crannies naturally. Integration with the blue and green rocky substrate enhances the cohesive naturalistic aesthetic. The careful selection and positioning of plant types creates a captivating miniature ecosystem successfully mimicking intricate natural patterns. Diversity and attention to detail rate 9/10.
Foreground: Smaller plants, detailed ferns, ground cover creating intimate detail
Midground: Medium-sized vegetation, rocks, and main waterfall feature
Background: Taller trees establishing height and depth, framing the scene
Conscious Layering Approach:
Yes, the layering was deliberately planned to create depth:
-
Foreground Detail: Placed most intricate ground vegetation in foreground areas - individual fern fronds visible, moss texture apparent, forest floor materials clear. This drew viewers into the scene with immediate detail.
-
Midground Variety: Positioned medium-scale vegetation (small trees, bushes, fern clusters) in midground along with the waterfall feature. This layer provided most of the visual variety and color.
-
Background Framing: Placed tallest trees at cliff top in background, creating height perception and framing the entire scene. These trees suggested the woodland continues beyond the visible diorama area.
Creating Gorge Depth Illusion:
Several techniques enhanced the sense of looking into a deep gorge:
-
Overlapping Elements: Positioned vegetation so foreground plants partially obscured midground elements, which in turn overlapped background features - this overlapping created multiple depth planes
-
Scale Graduation: Smaller, more detailed vegetation in foreground; larger, simpler forms in background - exaggerated scale differences enhanced depth perception
-
Color Atmospheric Perspective: Although subtle at this small scale, deeper greens in foreground, slightly lighter tones in background suggested atmospheric depth
-
Vertical Arrangement: Positioned ground-level vegetation low, midground vegetation higher, and tallest trees at cliff top - this vertical stacking reinforced the gorge’s vertical drama
-
Sight Line Channels: Created open channels or gaps in vegetation that allowed eyes to travel from foreground through midground to background - these visual pathways invited exploration of depth
-
Enclosure Effect: Dense vegetation on sides created sense of being enclosed in gorge, with the narrow vertical space between cliff walls emphasized by framing trees
Interacting with Landscape Features
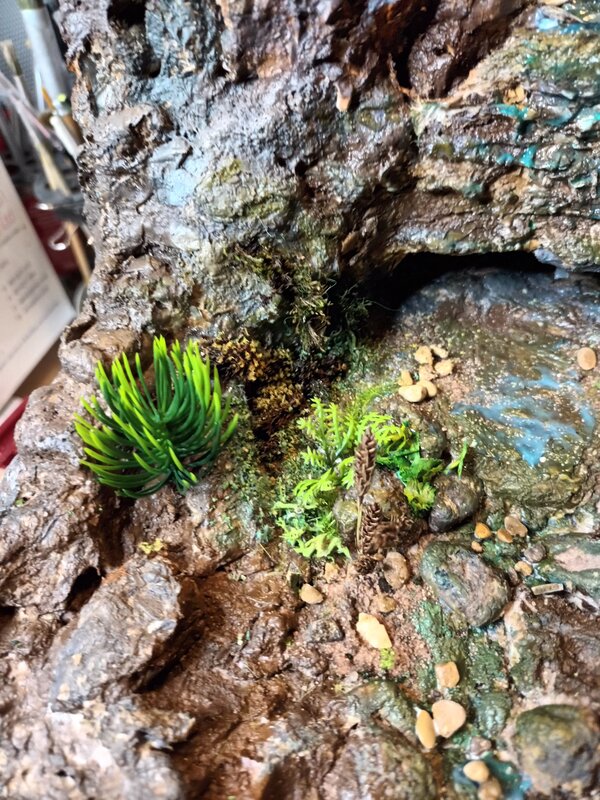 Perfect illustration of vegetation-rock integration. A vibrant green fern nestles in a rock crevice, moss carpets surfaces with velvety texture, and delicate ground cover plants (appearing succulent-like) take advantage of the sheltered microhabitat. The vegetation is dense and well-established in natural organic arrangement complementing irregular rock contours. Plants seamlessly interact with landscape, taking advantage of moisture and protection offered by rock features. Colors range from deep vibrant fern green to softer muted moss tones. Textures equally diverse - lush feathery fern fronds contrasting with velvety moss and delicate ground cover. Realism and variety rate 9/10 - placement and growth patterns appear very natural and true to life.
The vegetation needed to integrate naturally with:
- Water Features: Plants positioned to suggest moisture-loving species near waterfall and stream
- Rock Formations: Moss and ferns growing from crevices, creating aged weathered appearance
- Cave Entrance: Vegetation framing but not obscuring this key feature
- Pool Area: Dense growth around water’s edge
Natural Placement Techniques:
-
Crevice Insertion: Rather than surface-mounting ferns and small plants, I pushed stems into rock crevices and gaps, creating the illusion they were rooted there. Small amounts of adhesive in the crevices secured them invisibly.
-
Moss Integration: Applied moss around plant bases, covering any visible attachment points and blending the junction between plant and rock/ground. The moss acted as a transitional element.
-
Ground Cover Burial: Partially buried lower portions of ground-level vegetation in the forest floor materials (leaves, moss, twigs), hiding where plants met the surface.
-
Varied Angles: Positioned plants at natural angles rather than perfectly vertical - slight tilts, leans toward light, growth following rock contours rather than defying them.
-
Root Suggestion: For some tree placements, used dark paint or fine materials at the base suggesting root systems disappearing into ground or crevices.
-
Cluster Building: Built up vegetation in clusters with multiple elements (fern + moss + small plant) rather than isolated specimens, creating natural colonization patterns.
-
Adhesive Concealment: Used minimal adhesive applied only to hidden contact points. Where adhesive might show, covered it immediately with moss or ground materials.
-
Growing FROM Rather Than ON: The key mindset shift - always asked “where would this grow?” rather than “where can I stick this?” This meant finding actual planting locations (crevices, soil pockets, sheltered spots) rather than just surface attachment.
Achieving Welsh Temperate Rainforest Atmosphere
Capturing the Temperate Rainforest Atmosphere:
The Welsh temperate rainforest has a specific character - not just “green” but deeply lush, moisture-saturated, and thriving:
-
Moss Abundance: Applied moss everywhere it would naturally occur - rock surfaces, ground, tree bases, even on other vegetation. Real temperate rainforests have moss on moss. This abundance was key to the atmosphere.
-
Color Saturation: Used saturated greens rather than dull or dusty tones. The moisture in real rainforests makes colors appear richer and more vibrant. Multiple shades of vivid green created this effect.
-
Layered Density: Built up vegetation in multiple layers creating that “you can barely see the rock beneath” quality. In temperate rainforests, vegetation coverage is so complete that the underlying structure is mostly hidden.
-
Moisture-Loving Plant Selection: Concentrated ferns (moisture-loving species) throughout the scene, especially near water features. The predominance of ferns immediately signals high humidity.
-
Softness Through Moss: The soft, velvety moss texture contrasted with hard rock surfaces, creating tactile diversity that suggests moisture retention and soft growth.
-
No Bare Earth: Avoided showing bare soil - everything received ground cover (moss, leaves, grass). Real temperate rainforests have 100% ground coverage.
-
Integration with Water: Positioned vegetation to interact with water features - ferns overhanging water, moss near spray zones, plants thriving in mist. This connection reinforced the moisture-rich environment.
-
Thriving Rather Than Surviving: Chose full, healthy-looking vegetation forms rather than sparse or struggling specimens. The lushness suggests perfect growing conditions, not harsh environment.
Key Atmospheric Elements:
- Abundant moss on all surfaces (rocks, trees, ground)
- Multiple shades of green creating rich, varied palette
- Layered density suggesting healthy ecosystem
- Plants appearing to thrive, not just survive
- Integration creating immersive forest environment rather than individual plants
The Variety Challenge
One of the most important aspects was achieving variety - avoiding monotonous repetition at this small scale.
Plant Type Diversity: 15-20+ distinct species represented including:
- Multiple conifer varieties (different shapes, sizes)
- Deciduous tree types (varied branching, foliage)
- Several fern species (different frond styles)
- Varied moss types (colors, textures)
- Ground cover diversity (heights, colors, forms)
- Accent plants adding unique textural elements
Sourcing the Variety:
The 15-20+ distinct plant types came from multiple sources and techniques:
-
Commercial Plastic Trees: Purchased selection of model railroad/diorama trees providing 4-5 base forms (different conifer types, deciduous styles). These formed the larger tree collection.
-
Commercial Plastic Ferns: One or two large plastic fern plants purchased and cut into 10-15 smaller sections, each becoming an individual fern specimen with unique character.
-
Handmade Wire-Frame Plants: Created multiple small trees and bushes from scratch using wire armatures - each one unique due to handmade nature. Made 6-8 distinct forms this way.
-
Sawdust Variety: Used different sawdust colors and grades (fine, medium, coarse) to create foliage variations on wire-frame plants. Each color/grade combination produced a different plant appearance.
-
Sphagnum Moss in Multiple Colors: Purchased sphagnum moss in 3-4 different colors (bright green, yellow-green, grey-green, darker green). Each color used as both foliage material and ground cover.
-
Natural Dried Materials: Used actual dried leaves (various colors), real tiny twigs, natural grass materials. These provided authentic texture and color variation.
- Modification Techniques:
- Trimmed commercial trees to different heights and shapes
- Separated multi-trunk trees into individual specimens
- Combined foliage from different commercial products onto single wire frame
- Mixed sawdust colors on individual plants creating multicolor foliage
- Cut moss to different scales (fine powder to larger tufts)
- Hollowfibre Versatility: Same hollowfibre material used for waterfall mist also used for tree foliage, creating visual connection between elements while serving different purposes.
The key was starting with fewer base materials but manipulating them extensively - cutting, trimming, recoloring, combining, and modifying to generate maximum diversity from minimal investment.
Composition and Balance
The final vegetation needed to serve the overall composition:
Framing the Waterfall: Trees and tall vegetation positioned to draw eye toward central feature without blocking it
Creating Enclosure: Dense planting establishing the sense of being deep in a gorge, surrounded by forest
Maintaining Sight Lines: Strategic sparse areas allowing views through the scene, creating depth
Scale Establishment: Varied sizes of vegetation helping establish the dramatic vertical scale of the cliff
Compositional Awareness:
Yes, these compositional considerations were conscious and constant:
-
Frequent Assessment: Stepped back from the work regularly (every 15-20 minutes) to view from different angles and distances. Close-up work can obscure overall compositional problems.
-
Photography Checks: Took progress photos with phone camera to see how the scene “read” through a lens - often revealed issues not visible to naked eye.
-
Reference Consultation: Returned repeatedly to Welsh waterfall reference photos asking “does this feel right?” Compared overall impression rather than specific details.
-
Focal Point Protection: Before placing each major vegetation element (especially taller trees), checked it wouldn’t block or compete with waterfall from primary viewing angles.
-
Negative Space Awareness: Consciously preserved areas of negative space (exposed rock, open sky areas) to prevent overwhelming density.
-
Viewer Eye Path: Considered how eyes would move through the scene - used vegetation to guide attention toward waterfall while still allowing exploration of surrounding details.
The compositional work happened in iterative cycles: add vegetation, step back and assess, adjust or remove, repeat. This constant evaluation prevented getting “lost in the details” and maintaining overall balance.
Challenges & Solutions
Challenge: Balancing Coverage with Visibility
The Problem:
Yes, absolutely struggled with this balance. Too much vegetation transformed the diorama into a “forest with hidden waterfall” - defeating the purpose. Too little vegetation looked bare and failed to capture the lush temperate rainforest character. Finding the sweet spot proved challenging because:
- Each vegetation addition looked good individually
- Cumulative effect built gradually making it easy to miss the tipping point
- Different viewing angles showed different density levels
- Personal attachment to each planted element made removal difficult
The Solution:
Developed a multi-pronged approach:
-
The Reference Test: Regularly compared to Welsh waterfall photos - is my vegetation density similar? Real reference showed surprisingly open sight lines to waterfalls despite lush surroundings.
-
The Photography Test: Shot test photos from intended final viewing angles. If waterfall wasn’t immediately dominant in frame, that was too much vegetation.
-
The Removal Exercise: When uncertain, removed 20-30% of vegetation. Usually discovered the reduced version looked better - “less is more” proved true repeatedly.
-
Dry Fitting Extensively: Positioned vegetation temporarily with blu-tack or no adhesive, lived with it for hours or overnight, reassessed with fresh eyes.
-
Seeking External Views: Showed progress photos to others asking “what’s the main feature?” If they said “trees” or “forest” rather than “waterfall,” that indicated overcrowding.
Lessons Learned:
- Start with less vegetation than feels right - can always add more, removing creates damage
- The 60-70% coverage guideline (leaving 30-40% exposed) works well for maintaining feature visibility
- Vegetation should frame and enhance the hero feature, not compete with it
- When in doubt, remove rather than add
- Fresh eyes (next day, other people) provide invaluable perspective
- Accept that some viewing angles will be denser than others - optimize for primary intended views
Challenge: Achieving Realism at 1:250 Scale
The Problem:
At such small scale, vegetation can easily look toy-like or unconvincing. Real plants have complexity hard to replicate - delicate branch structures, subtle color variations, organic randomness, appropriate textures. Off-the-shelf model vegetation often appears too uniform, too bright, too perfect.
The Solution:
Multiple techniques addressed scale challenges:
-
Material Selection: Chose materials with scale-appropriate texture - sphagnum moss when cut fine approximates small leaves, sawdust provides tiny leaf texture, hollowfibre creates airy delicate foliage.
-
Cutting and Trimming: Cut commercial ferns into smaller sections achieving proper scale. Trimmed commercial trees to appropriate heights and shapes. No commercial product used “as-is.”
-
Color Modification: Although didn’t extensively repaint vegetation, selected products with naturalistic rather than toy-bright colors. The varied sawdust and moss colors provided realistic palette.
-
Visual Complexity Through Variety: The key insight - individual simplified plants look more realistic when surrounded by variety. 15-20 different plant types create visual complexity even if each individual plant is simple.
-
Natural Materials Integration: Real dried leaves, actual twigs, natural moss provide inherent realism that synthetic materials can’t match. Even small amounts elevate overall authenticity.
-
Avoiding Uniformity: Varied everything - heights, densities, colors, angles, clustering patterns. Uniformity reads as artificial; variation reads as natural.
-
Texture Mixing: Combined multiple textures (fuzzy, smooth, spiky, soft) within small areas creating rich sensory variety that suggests real ecosystem.
Lessons Learned:
- Scale-appropriate texture matters more than perfect form - delicate texture reads as realistic even if shape is simplified
- Variety compensates for individual simplicity - diverse collection of simple plants more convincing than uniform collection of detailed ones
- Natural materials earn their place - worth sourcing actual dried leaves, real moss, genuine twigs
- Commercial products work but require modification - trim, cut, reshape, never use unmodified
- At 1:250 scale, impression matters more than precision - aiming for “feels like Welsh woodland” rather than “botanically accurate species”
Challenge: Creating Welsh Character (Not Generic Woodland)
The Problem:
Generic model railroad trees wouldn’t capture specific Welsh temperate rainforest atmosphere. The Henrhyd Falls gorge has distinctive character - not just “forest” but ancient Welsh woodland with temperate rainforest microclimate. Risk of creating something that could be anywhere rather than unmistakably Welsh.
The Solution:
-
Moss Emphasis: Welsh temperate rainforests distinguished by extraordinary moss coverage. Made moss the dominant ground cover element rather than grass or bare earth. Applied moss liberally to all surfaces - this single decision created Welsh rather than generic character.
-
Reference-Driven Plant Selection: Constantly consulted Welsh woodland reference photos when selecting vegetation. Asked “would I see this in Welsh gorge?” before including any plant type.
-
Fern Predominance: Ferns thrive in Welsh temperate rainforests. Made ferns the primary understory plant rather than generic shrubs. Their abundance signals the moisture-rich environment.
-
Color Palette Control: Welsh woodland shows rich, saturated greens rather than dull colors or autumn tones. Maintained this vibrant green palette throughout vegetation selection.
-
Avoiding Wrong Species: Didn’t include obvious “wrong” plants - no palms, no cacti, no tropical-looking specimens. Kept to temperate forest forms even when specific species wasn’t identified.
-
Moisture-Rich Appearance: Every planting decision asked “does this suggest high humidity?” Lush rather than sparse, soft rather than harsh, thriving rather than struggling.
-
Ancient Woodland Indicators: Selected mature tree forms rather than young saplings, used moss on trees suggesting age, created layered depth suggesting long-established ecosystem.
Lessons Learned:
- Regional character comes from specific combinations rather than individual elements - moss + ferns + saturated greens + lushness = Welsh temperate rainforest
- Reference photos essential not just for initial planning but throughout construction - check repeatedly
- Some choices matter more than others for character - moss coverage and fern presence proved critical; specific tree species less so
- “What would be wrong here?” as valuable as “what should I include?” - avoiding inappropriate elements maintains character
- Atmosphere and impression create sense of place more than botanical accuracy - capturing the feeling of Welsh woodland mattered more than identifying specific species
Materials & Tools Used
Materials
Tree Construction:
- Fine gauge wire for tree and bush armatures (approximately 0.5-1mm diameter for small plants)
- Modeling paste (thickened with filler/plaster) for building up wire branches and trunks
- Light grey acrylic paint for handmade tree trunks and branches
- Commercial plastic model trees in various sizes (2.5cm to 10cm scale height)
- Commercial plastic fern plants (full-size, then cut down to scale)
Foliage Materials:
- Hollowfibre (polyester pillow filling) for creating airy foliage on handmade trees
- Colored sawdust in multiple colors and grades (yellows, greens, browns - fine to coarse)
- Sphagnum moss in multiple colors (bright green, yellow-green, grey-green, darker forest green)
- Natural dried leaves in various autumn colors (browns, yellows, oranges)
Ground Cover:
- Small natural twigs and branch fragments
- Grass materials (possibly static grass or natural grass)
- Mixed ground cover scatter materials
- Additional moss for ground surface application
Adhesives:
- PVA glue (white glue) for moss and ground cover application
- Super glue (cyanoacrylate) for securing wire-frame plants into crevices
- Modeling paste doubled as adhesive for building up tree structures
Tools
- Wire cutters for cutting armature wire and trimming ferns
- Fine-point tweezers (essential for positioning tiny vegetation elements)
- Small brushes for applying adhesives to delicate areas
- Scissors for trimming foliage, cutting moss, and sectioning plastic ferns
- Craft knife for precision cutting and shaping
- Small containers for organizing different colored sawdust and moss
- Paintbrushes for applying paste and paint to handmade trees
Time and Patience
The vegetation phase consumed several days of focused work, broken into distinct stages:
Tree Construction: 1-2 days building handmade wire-frame trees (2 specimens), applying paste to branches, painting, and allowing drying time between layers. This work couldn’t be rushed - paste needed to dry before handling.
Vegetation Preparation: Half day cutting plastic ferns into smaller sections, organizing sawdust colors, preparing moss materials, sorting commercial trees by size and type.
Initial Placement: 1-2 days positioning major vegetation elements (larger trees, primary fern placements, establishing vegetation zones). This involved extensive dry-fitting and repositioning.
Ground Cover Application: 1-2 days applying moss, forest floor materials, small plants, creating the detailed ground surface. This proved surprisingly time-consuming - each small area required individual attention.
Refinement and Adjustment: Another day stepping back, assessing overall effect, removing excess vegetation, adjusting placements, filling gaps, balancing density.
Total time: Approximately 4-6 days of intermittent work spread over a longer period allowing for drying times and fresh perspective between sessions.
The Experience:
The work proved more enjoyable than tedious. Each small addition created visible improvement - rewarding immediate feedback. The variety of tasks (building wire trees, cutting ferns, applying ground cover) prevented monotony. Most satisfying moments came when stepping back after concentrated detail work to see the cumulative transformation.
Most time-consuming aspect: The ground cover and small vegetation placement. While individual elements took seconds to place, the sheer quantity required (hundreds of small moss applications, dozens of fern fronds, countless ground materials) accumulated into hours of detailed work. The patience paid off - this dense undergrowth created the authentic temperate rainforest character.
The vegetation work required patience - each small plant, tuft of moss, or fern frond needed individual attention and positioning. The cumulative effect of many small decisions created the final lush woodland character. However, unlike technical challenges in earlier phases, vegetation work felt forgiving - mistakes could be adjusted, elements repositioned, density modified. This flexibility made it less stressful than precise rock carving or waterfall engineering.
The Transformation
With vegetation complete, the diorama underwent a dramatic transformation. What had been an impressive rocky gorge with waterfall became a living Welsh woodland scene - the kind of ancient, mist-shrouded forest that makes the Henrhyd Falls site so atmospheric and special.
The vegetation successfully:
- Created authentic Welsh temperate rainforest character
- Established depth, scale, and immersive environment
- Framed and enhanced (rather than obscured) the waterfall feature
- Provided exceptional variety and realism (consistently rating 8-10/10 in analysis)
- Transformed the diorama from geological feature to complete ecosystem
Next Steps
With the major construction complete - base, rocks, waterfall, vegetation - only final detailing remained: weathering effects, small refinements, any last touches to complete the scene before photography and documentation.
Vegetation Status:
The vegetation phase felt essentially complete at this stage. Unlike earlier construction phases that left obvious “to-do” items, the woodland planting reached a satisfying conclusion. The density felt right, the variety sufficient, the integration with landscape features successful.
However, I knew some refinement opportunities might emerge during final detailing:
- Potential Moss Touch-ups: If weathering effects on rocks revealed bare spots or if photography highlighted gaps, minor moss additions might be needed
- Ground Cover Adjustments: Final photography might show areas needing additional forest floor materials
- Integration Tweaks: Ensuring vegetation transitioned smoothly to diorama edges without obvious boundaries
But these represented potential minor adjustments rather than significant work remaining. The major vegetation construction - tree placement, fern positioning, ground cover application, moss coverage - was complete and successful.
The confidence in vegetation completion came from:
- Consistently positive assessment when stepping back to view overall effect
- AI analysis ratings of 8-10/10 for realism and diversity (validated the approach)
- Achievement of the target Welsh temperate rainforest atmosphere
- Balance between lush coverage and waterfall visibility maintained
- No obvious gaps or problem areas visible from intended viewing angles
The vegetation successfully transformed the diorama from impressive geological feature into complete living ecosystem, ready for final presentation documentation.
Have questions or feedback about this project? I'd love to hear from you.