Henrhyd Falls - Build Log #004: Waterfall Construction
Creating the Heart of the Diorama
Timeline: 16 November 2025
Focus: River, pond, waterfall, and water effects - the defining feature of Henrhyd Falls
With the cliff structure largely complete, the work on what would be the most challenging and critical aspect of this diorama could commence: creating realistic water effects for the river, pond, and waterfall. This was one of the key objectives set for the entire model - capturing the dramatic cascade of Wales’ tallest southern waterfall in miniature.
The waterfall would be the centerpiece, the element that would either make or break the entire diorama. Everything built so far - the base structure, the vertical cliff face, the cave entrance, the pool area - was in service of supporting this one dramatic feature.
Water Effect Materials
To help with the water effects, a range of colored water effect gels was purchased from a hobby shop. These came in blue, green, and white - essential for creating realistic water appearance with depth, movement, and highlights. The gels would serve multiple purposes: the river bed, the pond surface, wet rock effects, and most critically, the waterfall cascade itself.
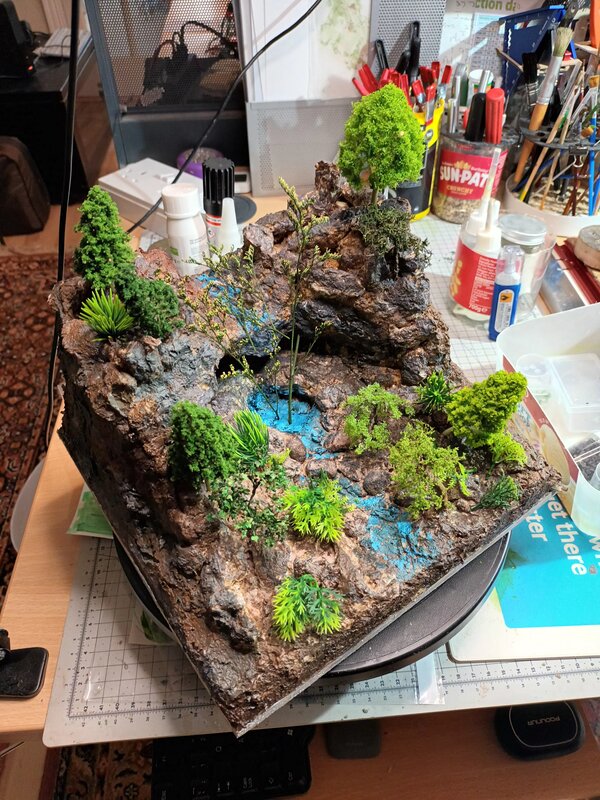 The cliff face complete and ready for water work. The vertical channel carved into the rock awaits its cascading water feature. The layered rock formations provide the perfect backdrop, and the cave entrance formation at mid-height is clearly visible. The sculpted rocks and carefully textured surfaces would soon interact with the water effects - the textured and irregular surfaces are ideal for mimicking water flow over rocks. At this stage, you can see the flow of the composition from cliff top to pool bottom, rating around 7-8/10 for representing the intended waterfall structure.
Creating the River and Pond
The process began with preparing the surfaces where water would appear:
The Riverbed Foundation
Small stones using horticultural grit were carefully positioned in the river bed at the bottom of the falls. These would show through the translucent gel, creating the authentic look of a rocky Welsh stream bed. The stones were placed with attention to how they would appear once covered - creating natural patterns of flow and turbulence.
Applying the Water Gel
The water effect gel was then applied in the pond area at the base of the falls, using a mixture of blue, green, and white. The colors were blended to create depth - darker blues and greens in deeper areas, lighter tones and whites where light would catch the surface or where water would be shallow and reflective.
The same technique was applied down the river channel, creating the appearance of flowing water continuing beyond the waterfall pool. At the top of the cliff, the feeding river was created similarly, showing the water source before it cascaded over the edge.
 The pool area with water effect gel creating the appearance of the plunge pool. Small stones visible through the translucent gel add authenticity to the rocky riverbed.
Wet Rock Effects
The gloss effect on the rocks and cliff edges was achieved by thinly painting some of the water effect mixture directly onto the rock surfaces. This created the appearance of wet, spray-covered rocks near the falls - exactly the effect seen at real waterfalls where constant moisture keeps surfaces glistening. This detail would prove essential for realism, as the rocks closest to falling water are always darker and glossier than dry rocks further away.
 The river channel at the top of the cliff, where water flows before making its dramatic 10cm plunge. The water gel creates the illusion of flowing water approaching the precipice.
The Waterfall Cascade - The Critical Challenge
Creating the actual waterfall - the vertical fall of water over the cliff - was the most technically demanding part of the entire build. This required a different approach than the static water in the pond and river.
The Technique
The waterfall was created by running streaks of white water effect gel onto a sheet of plastic. While the gel was still workable, a sharp instrument was used to run through it vertically, creating the striated appearance of running water - mimicking how a real waterfall shows individual streams and rivulets as water cascades over rock faces.
This technique created texture and dimension, with raised lines representing the flow paths water takes as gravity pulls it downward. The white gel provided the highlight effect - the way falling water catches light and appears almost luminous against darker rock.
Shaping and Installation
After drying on the plastic sheet, the hardened gel waterfall was carefully lifted off. At this point, it was a flexible but solid piece that could be shaped to fit the vertical space on the cliff face. The piece was then positioned and attached, filling the channel between the cliff top and the pool below.
The installation required careful fitting - the waterfall piece needed to contact the rock face naturally, with some sections appearing to cascade over protruding rocks while other sections dropped freely through space, just as real waterfalls do when water leaves the rock face and falls through air.
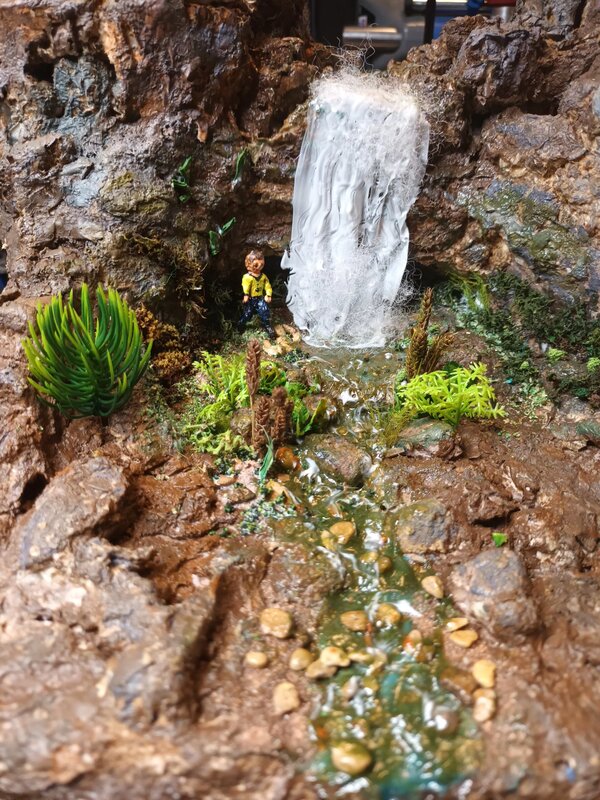
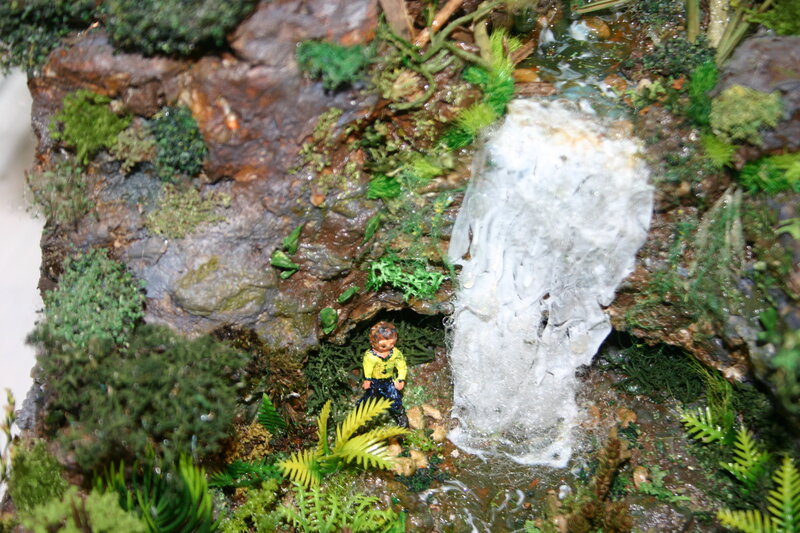
 The waterfall feature created from flexible translucent material. The textured, web-like quality effectively mimics cascading water flow. This technique proved highly effective - the transparent material creates a convincing illusion of water spilling over rocks and vegetation, rating 8/10 for water flow representation. The width of the waterfall is well-captured, spanning across the varied terrain naturally (9/10 for width representation). The interplay between the synthetic material and surrounding environment creates an immersive miniature landscape.
 The white water effect material at the cliff top clearly defines the source of the falls. The cascading design creates a smooth, continuous flow effect (7/10 for flow effectiveness). The water appears to spread naturally across the rocky terrain (7/10 for width). The cohesive integration of the waterfall with the moss-covered landscape creates a naturalistic representation of this miniature cascade (8/10 overall quality).
Creating the Mist Effect
No waterfall is complete without the atmospheric spray that surrounds the falling water. At Henrhyd Falls, the mist created by 27 meters of falling water is one of the site’s defining characteristics - it creates the humid microclimate that supports the temperate rainforest vegetation.
Hollowfibre Technique
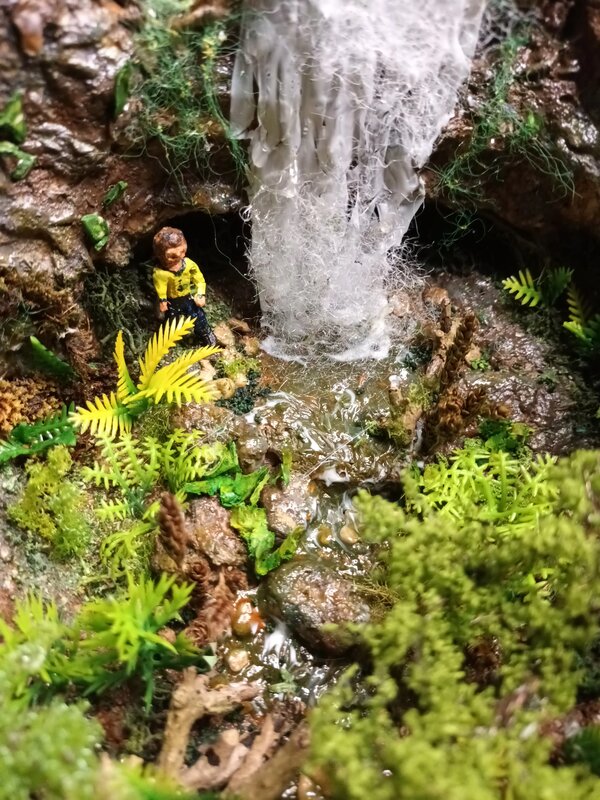
The mist effect was created using hollowfibre - the same material used as pillow filling. This synthetic material could be carefully pulled apart and positioned to create wispy, translucent clouds that suggested water vapor and spray without obscuring the waterfall itself.
Small amounts were positioned at the base where water hits the pool (where the most dramatic spray would occur) and along the sides of the falling water where spray would naturally drift. The key was subtlety - too much would hide the waterfall, too little would miss the atmospheric effect entirely.
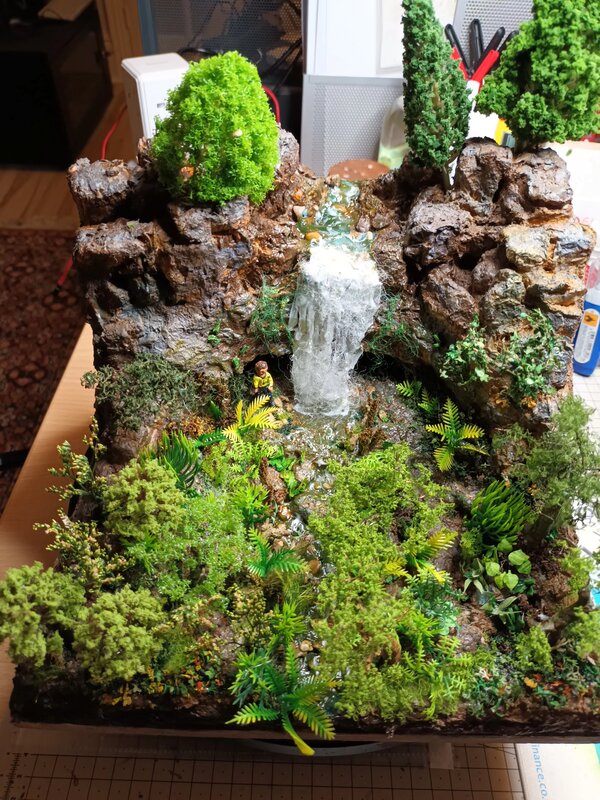
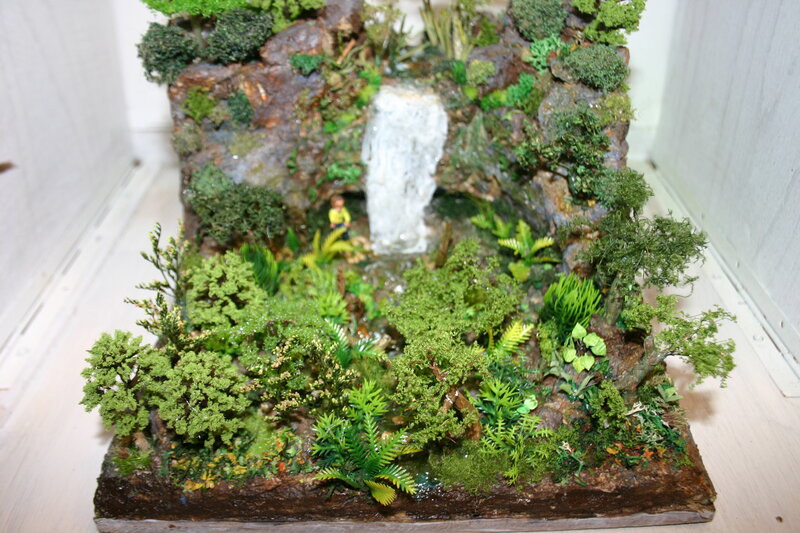
 The completed waterfall feature integrated into the rocky landscape. The combination of sculpted materials and water effects creates the impression of rushing water cascading down (7/10 for flow effectiveness). Natural elements like rocks and moss blend the artificial waterfall into the environment. The water spreads across the rocky surface naturally, though the overall width is somewhat constrained by the 25cm base (7/10 for width). The attention to detail in sculpted water flow and landscape integration rates 8/10 for overall quality.
Critical Assessment - Learning from First Attempts
Looking back at this first attempt to work with water effect gels, the results were marginally effective in creating an authentic waterfall appearance. Several factors contributed to less-than-ideal outcomes:
The Challenges
Limited Visibility: Once plants were added in the next phase, most of the river was obscured, with very little water visible in the final product. The careful work on the river channel became largely hidden by vegetation.
Pool Size: The pond at the base of the falls was too small. For a 27-meter waterfall, the plunge pool would be more substantial in reality, and the miniature version didn’t quite capture the scale of water impact.
Waterfall Solidity: The white gel streaks on the falls, while creating texture, appeared too solid. Real falling water has translucency, movement, and variation that the technique didn’t fully capture. The vertical runs were perhaps too uniform, too consistently textured.
The Reality of Learning Curves
Watching YouTube videos of masterful model makers creating perfect water effects made the technique look straightforward. But those modelers had clearly done this many times, accumulating practice and experience. This was a first attempt, and it showed.
The waterfall worked - it read as a waterfall - but it didn’t achieve the level of realism initially envisioned. For a first attempt at this scale and technique, it was acceptable. For what the diorama ultimately deserved, there was room for significant improvement.
Lessons for Future Builds
Practice Material Techniques: Water effects require experimentation before final application. Test pieces and technique trials are essential.
Consider Transparency: Future waterfall attempts might benefit from multiple layers of different translucencies - building up the effect rather than relying on a single application.
Scale Appropriate Features: The pool should have been larger, the river more prominent. Don’t underestimate how much vegetation will obscure water features.
Reference Real Water Behavior: More time studying how falling water actually looks - the mix of solid streams, fine spray, air gaps, and irregular flow patterns.
Materials & Tools Used
Materials
- Water effect gel (blue, green, white colors)
- Horticultural grit (small stones for riverbed)
- Plastic sheet (for creating waterfall on flat surface)
- Hollowfibre/pillow filling (for mist effects)
- Gloss medium (for wet rock surfaces)
Tools
- Mixing surface for blending gel colors
- Sharp sculpting tools (for creating waterfall texture streaks)
- Fine brushes (for applying gel to specific areas)
- Tweezers (for positioning small stones and hollowfibre)
Techniques Learned
Water Effect Gel Application
- Blending multiple colors for depth and realism
- Creating transparent layers showing subsurface details
- Thin application on rocks for wet appearance
- Building up texture on vertical surfaces
Waterfall Construction
- Creating textured cascade on flat surface before installation
- Using sharp tools to create flow lines while material is workable
- Shaping flexible dried material to fit three-dimensional space
- Balancing opacity for visibility while maintaining water appearance
Atmospheric Effects
- Using synthetic fiber materials for mist and spray
- Positioning subtle elements without overwhelming main feature
- Creating suggestion of moisture and atmosphere at appropriate scale
Technical Achievement vs. Artistic Vision
The water effects phase represented both achievement and compromise:
What Worked:
- Basic water appearance in pond and river
- Wet rock effects adding realism to cliff surfaces
- Waterfall reading clearly as falling water from viewing distance
- Integration with rock structure maintained compositional flow
What Could Improve:
- Greater translucency in waterfall for more realistic water appearance
- Larger pool proportional to waterfall height
- More varied texture in cascade (less uniform striation)
- Better balance between water visibility and vegetation coverage
This honest assessment would inform not just future waterfall builds, but the broader approach to challenging new techniques: expect first attempts to be learning experiences, allocate time for testing, and recognize that mastery requires repeated practice.
Next Steps
With water effects complete (even if not perfect), the diorama now had its defining feature in place. The next phase would add the lush Welsh woodland character - trees, ground cover, moss, and ferns that would transform the rocky gorge into the temperate rainforest environment of Henrhyd Falls.
The challenge ahead: ensuring vegetation enhanced rather than obscured the waterfall that had taken so much effort to create.
Have questions or feedback about this project? I'd love to hear from you.