VW Golf Estate - Discovering Air-Dry Clay
Build Log 003: Building the VW Golf R Estate
Date: January 16 - February 10, 2025
Phase: Car Construction
Time Spent: ~22 hours
Status: Completed (after multiple rework cycles)
The Temptation
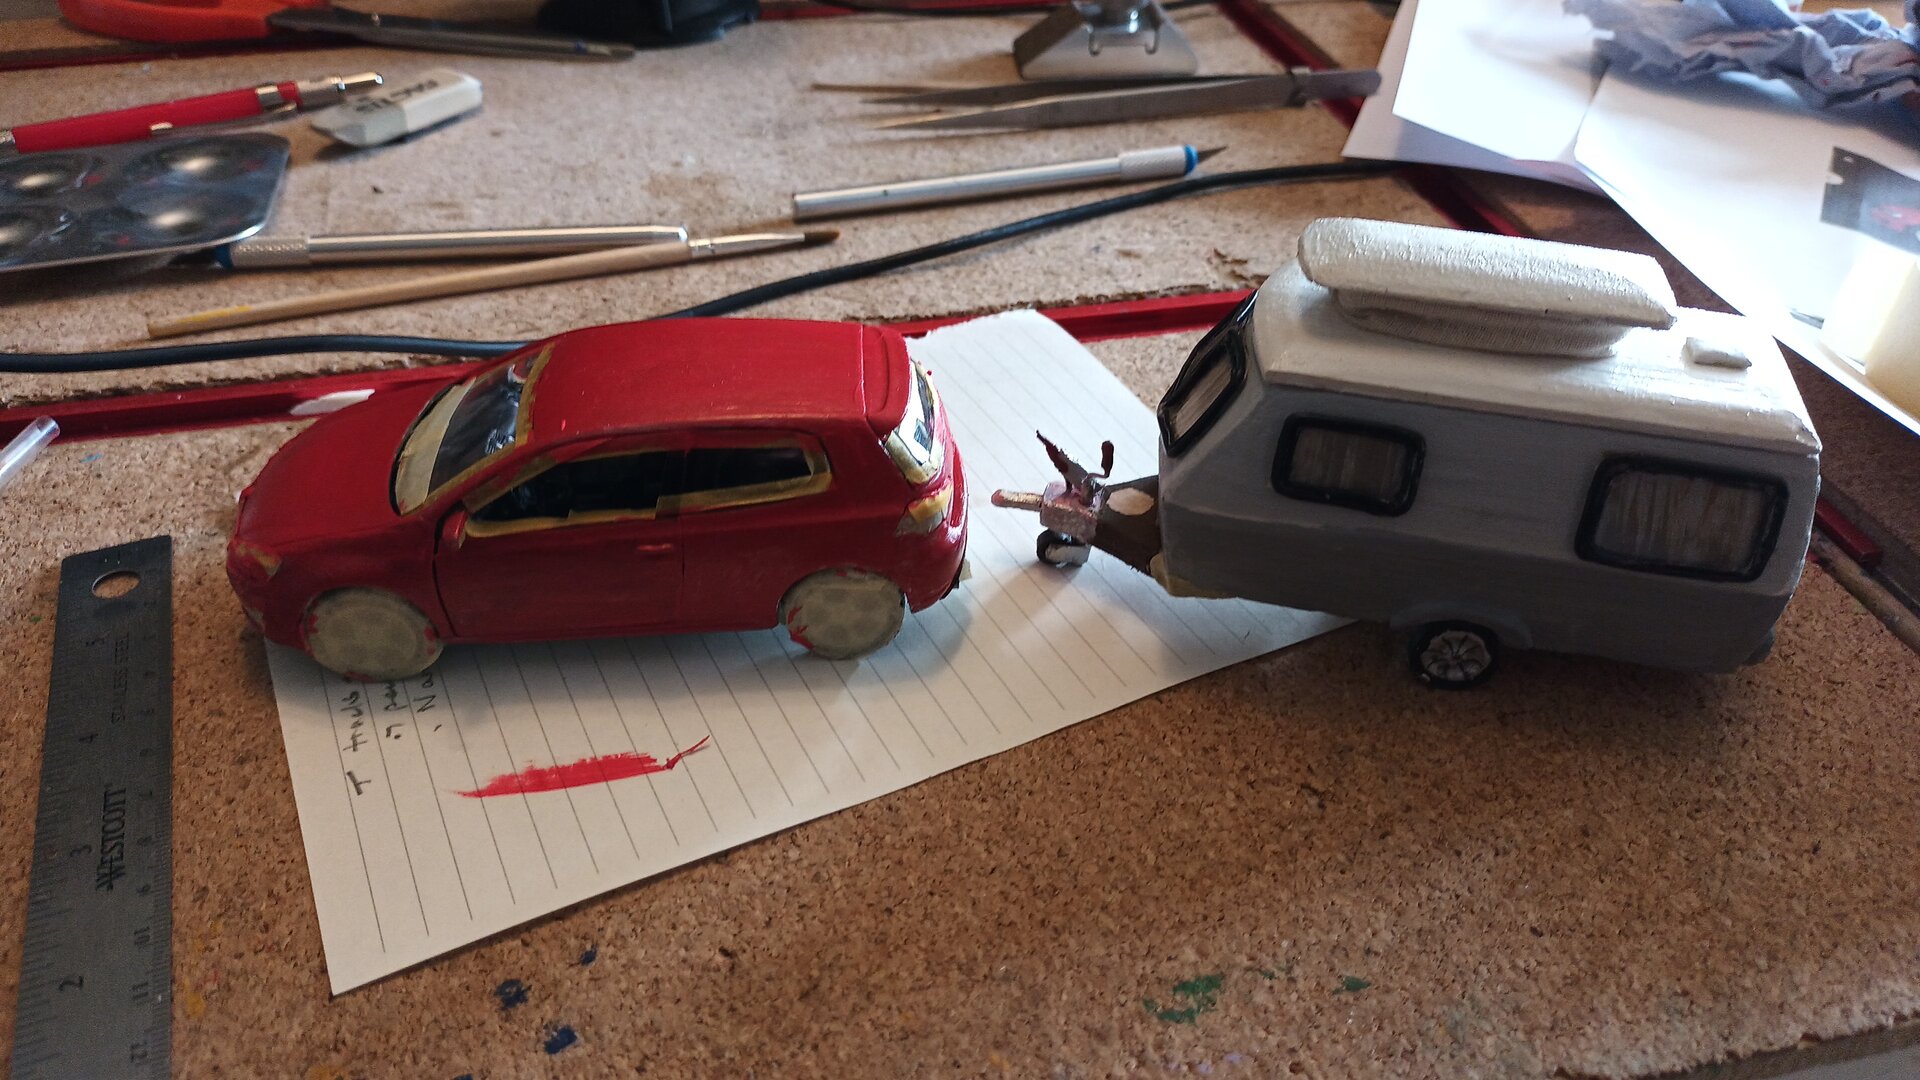
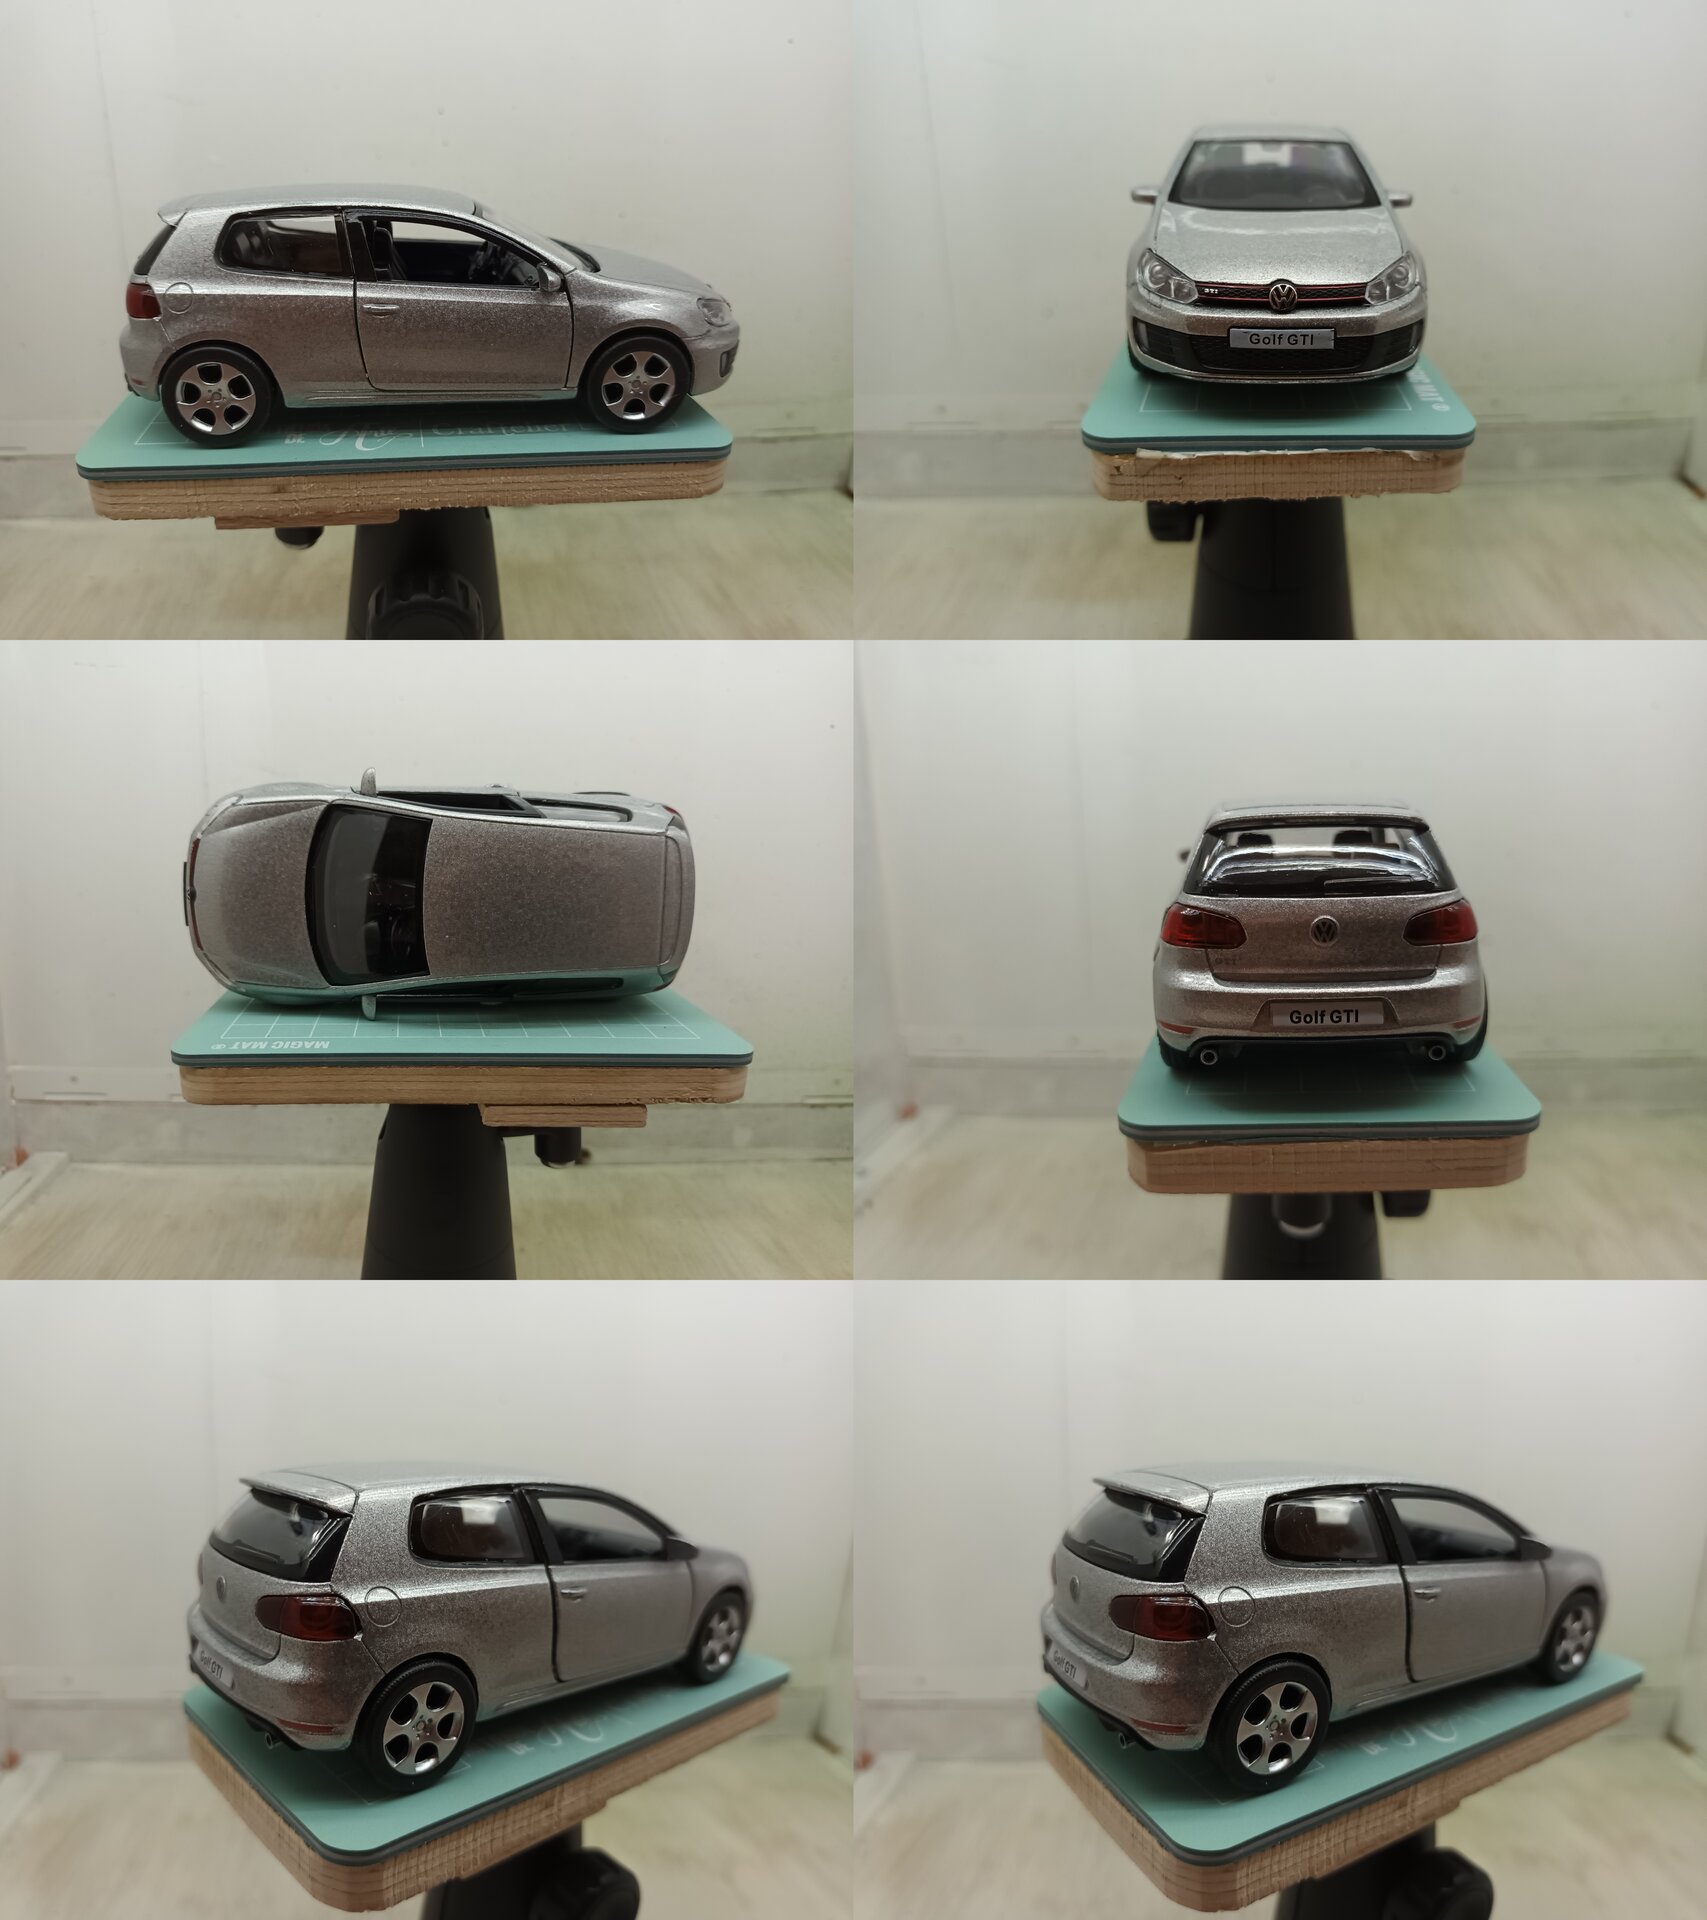
With the caravan successfully completed, I faced a decision point. I had purchased a red VW Golf model during the research phase, thinking it might serve as a reference or possibly even a shortcut.
Looking at it next to the completed caravan, the temptation was strong: “Why not just use this?”
Two problems:
- Wrong scale - The model was 1:43, close but noticeably different from my 1:42 caravan
- Wrong body style - It was a sedan, not the estate (wagon) that my son actually owns
The commission required accuracy. The easy way out wasn’t an option. I needed to build another vehicle from scratch.
But this time, I had the confidence from successfully building the caravan. If I could make a curved caravan, I could make a car… right?
Research Phase - Finding the Target

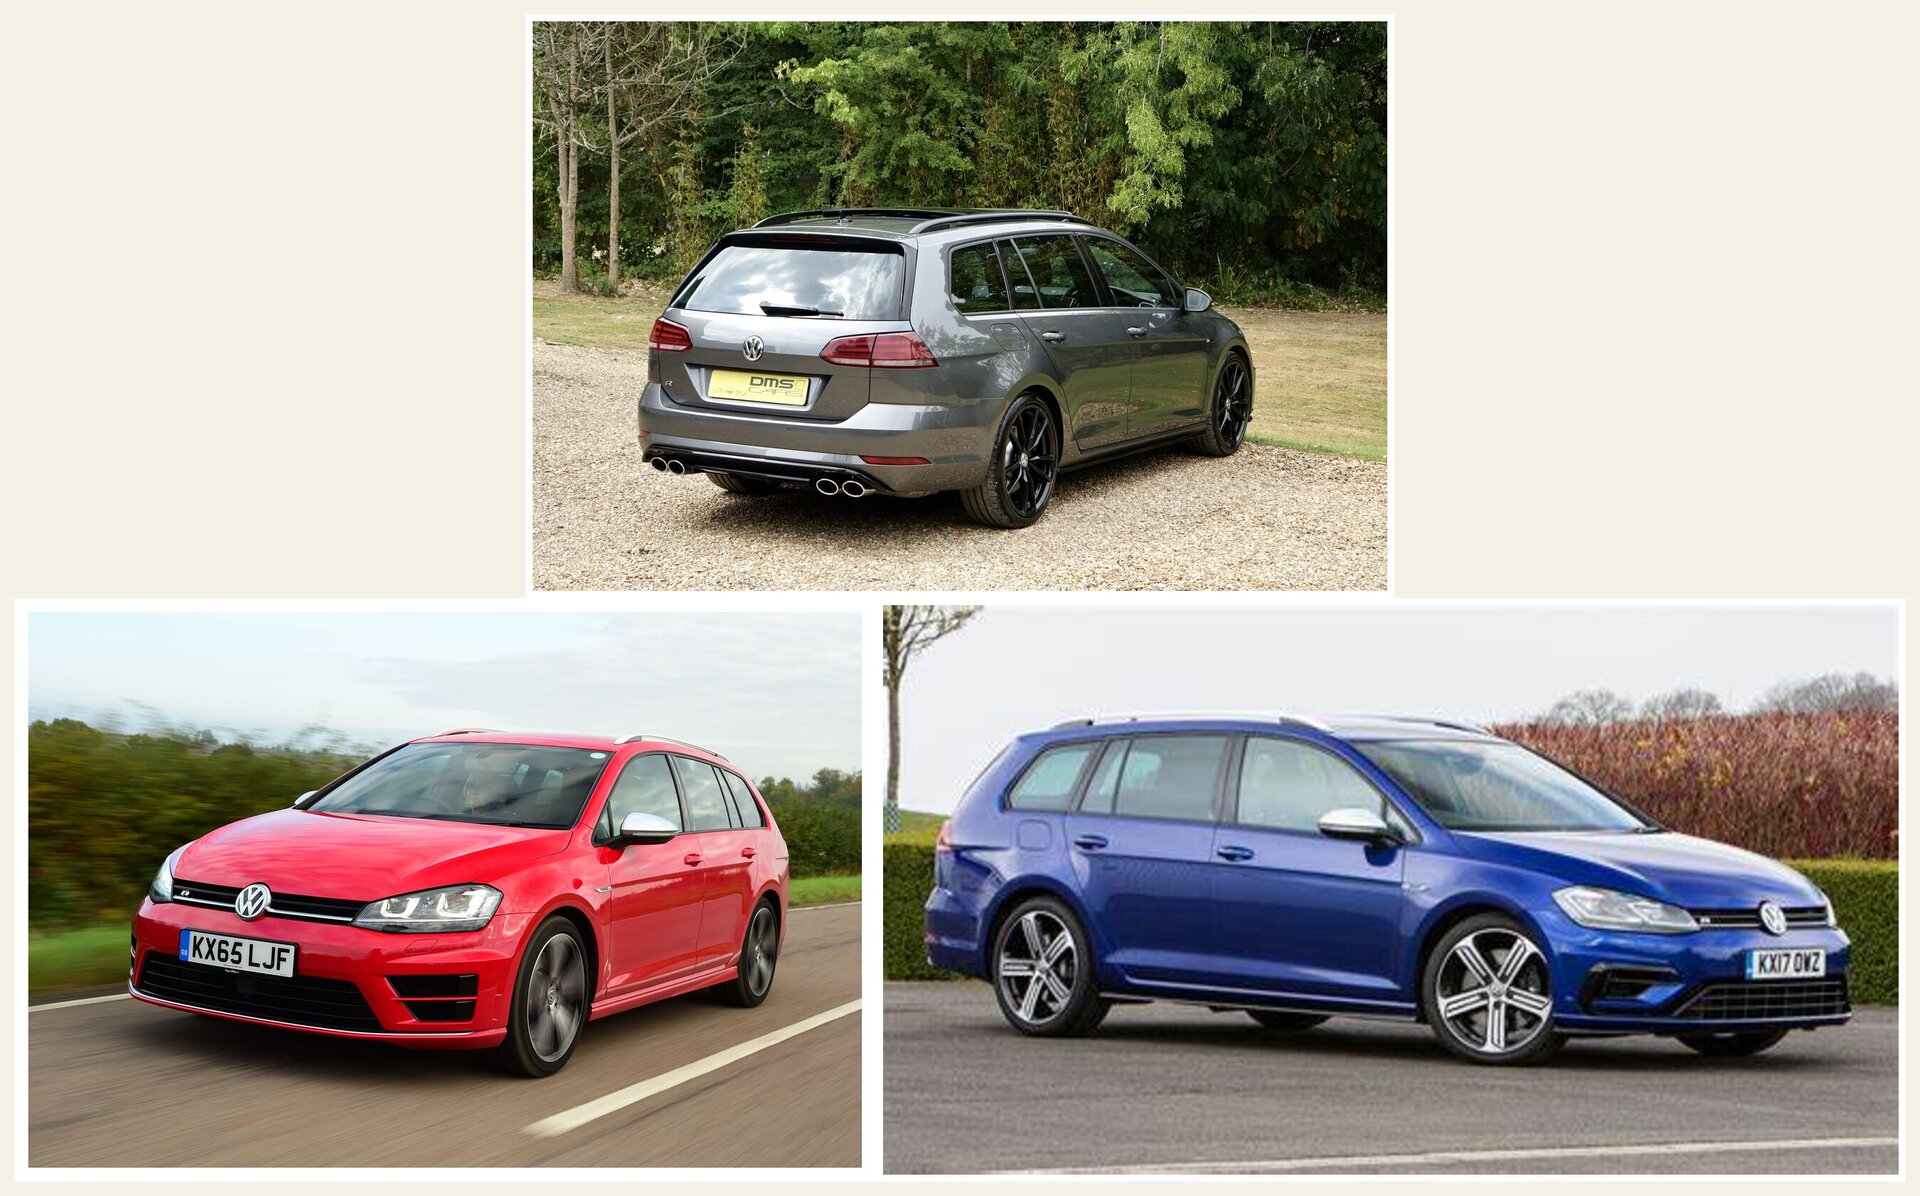
I found perfect reference photos of the VW Golf R Estate in red - exactly the car I needed to build. The challenge: even after extensive searching, I couldn’t find any model kit at 1:42 scale of an estate version.
Strategy: Use the sedan model I’d purchased as a sizing and shaping reference, then modify proportions for the estate body style using photo references.
Key Differences Between Sedan and Estate:
- Longer roofline extending to rear
- Vertical rear hatch instead of sloping trunk
- Extended rear overhang
- Different rear window angle
- Modified D-pillar design
Scale Calculations and Measurements

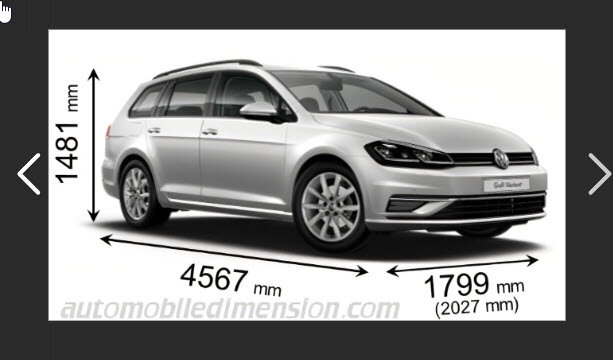
Using the purchased sedan model and photo references, I calculated dimensions:
At 1:42 Scale:
- Overall length: ~90mm (estate is longer than sedan)
- Width: ~40mm
- Height: ~35mm
- Wheelbase: ~60mm
- Extended rear section: +15mm over sedan
These calculations were critical - get the proportions wrong and it won’t read as the correct vehicle type.
The Paper Prototype - Heart-Sinking Moment

Following my usual process, I created a paper prototype to establish the footprint and visualize the estate body extending beyond the sedan.
The moment of doubt: Comparing my rough paper cutout to the beautifully finished red model, my heart sank into my shoes. The reference model looked so polished and smooth. My paper template looked… like paper.
How was I going to achieve that level of finish working from scratch?
I placed the sedan model next to the caravan again. It looked good together. Really good. The scale mismatch wasn’t that obvious. Maybe I could justify it…
No. This was commissioned work. It needed to be right. Their actual car. The estate.
Time to try something new.
Discovering Air-Dry Clay
After struggling with Milliput epoxy putty’s limited working time on the caravan, I’d been researching alternatives. That’s when I discovered air-dry clay.
Why Air-Dry Clay for Vehicles:
- Extended working time - hours instead of minutes
- Easier to smooth while still workable
- Can be carved when leather-hard (partially dried)
- Water-soluble when wet for blending
- Sands well when fully dry
- Lightweight compared to epoxy putty
- Forgiving - can rewet and rework if needed
The epoxy putty was too unforgiving for the extended shaping time automotive curves require. Air-dry clay seemed perfect for this challenge.
The gamble: I’d never worked with air-dry clay before. But the caravan experience taught me that sometimes you have to try new materials and techniques.
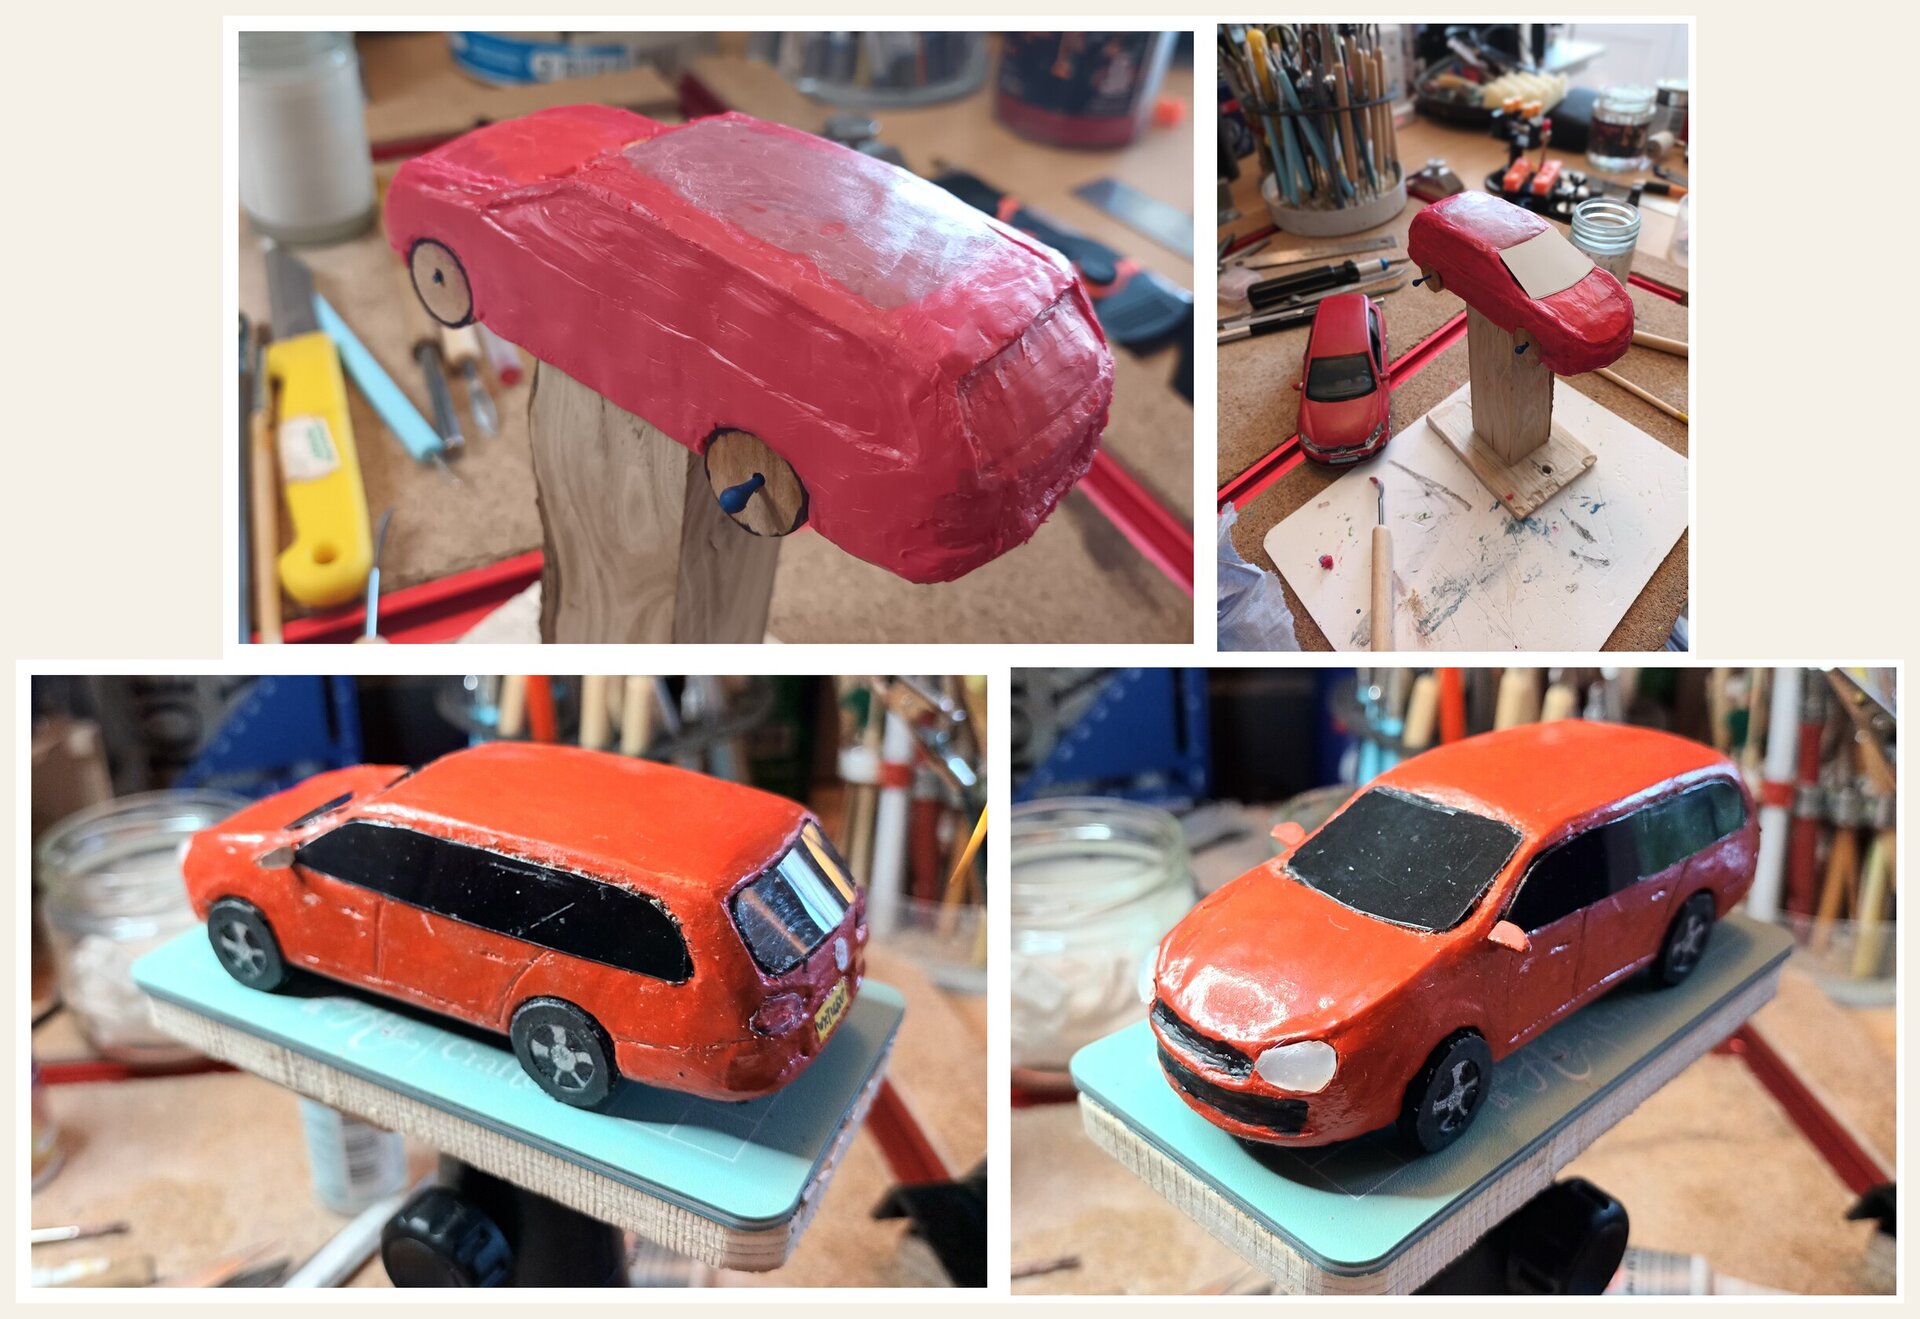
Phase 1: Internal Structure and Clay Application

Construction Approach:
- Internal Armature:
- Balsa wood core for overall shape
- Wire reinforcement for strength
- Lightweight filler (crumpled foil) to save clay
- Extended rear section structure for estate body
- Clay Application:
- Applied in sections (easier to control)
- Built up gradually (thin layers)
- Kept spray bottle handy (mist to keep workable)
- Extended rear roofline for estate profile
- Formed basic body panels
- Initial Shaping:
- Used water and fingers for rough shaping
- Referenced photos constantly
- Checked proportions against paper template
- Allowed to firm up before detail work
First impressions of air-dry clay: This was SO much easier to work with than epoxy putty! The extended working time meant I could step back, assess, and adjust without panic. I could smooth and blend without fighting hardening material.
Phase 2: Detailed Shaping and Refinement
Working with Leather-Hard Clay:
Once the clay firmed up but before fully drying, it reached a “leather-hard” stage - perfect for carving and detailing:
- Carving body lines with craft knife
- Smoothing surfaces with damp sponge
- Creating panel gaps between doors, hood, trunk
- Refining curves of wheel arches
- Shaping windows recesses
- Adding character lines (body creases)
The estate roofline challenge:
Getting the extended roofline to look right was critical. Estate cars have a distinct profile - the roof extends almost horizontally to the rear, then drops vertically at the hatch. Too much slope and it looks like a hatchback. Not enough slope and it looks awkward.
I rebuilt this section twice before getting it right.
Phase 3: Windows and Glass
Window Construction:
- Window Openings:
- Carved while clay was leather-hard
- Front, rear, and side windows
- Proper angles and proportions
- Edges refined with files when fully dry
- Glazing:
- Clear plastic from packaging material
- Cut slightly oversize for each window
- Painted black on back surface (tinted glass effect)
- Glued from inside
- Window Frames:
- Fine black lines painted around edges
- Chrome trim painted where appropriate
- Windshield wipers suggested with fine wire
The glass effect: Painting black on the back of clear plastic creates a convincing tinted window effect while maintaining transparency for depth.
Phase 4: Details - Lights, Trim, and Personal Touches
Headlights and Taillights:
- Formed from hot glue - builds up in convincing lens shapes
- Clear for headlights - painted silver behind for reflection
- Red for rear lights - gloss coat for lens effect
- Amber for indicators - proper positioning
Grille and Bumpers:
- Front grille - carved detail, painted black
- Bumpers - integrated into body, painted to match or contrast
- Air intakes - suggested with black paint in recesses
The Personal Touch - Number Plate:
Made from yellow paper (UK rear plate) with the actual license plate number of my son’s real car. This small detail transforms it from “a red Golf” to “their red Golf.”
Little touches like this matter in commissioned work.
Phase 5: Wheels and Stance
Wheels:
- Repurposed from parts with some modification
- Painted to match VW alloy wheel style
- Silver/grey with darker recesses
- Proper sizing for 1:42 scale
Stance (how the car sits):
Getting the stance right matters more than people realize:
- Ride height - not too high (SUV) or too low (modified)
- Wheel positioning - proper clearance in arches
- Level - front and rear at correct heights
- Slight forward tilt - mimics real car weight distribution
The car needs to “sit” convincingly on its wheels.
The Rework Cycles
The process did not go without disasters and reworks. This is where my “good enough” attitude was tested again and again.
Problems encountered:
- Roof Line Too Steep (First Attempt):
- Looked like hatchback, not estate
- Removed clay, reshaped, reapplied
- ~3 hours lost, but necessary
- Window Angles Wrong (Second Attempt):
- Rear windows didn’t match reference photos
- Carved out, refilled, re-carved
- ~2 hours rework
- Paint Surface Too Rough (First Paint Attempt):
- Clay texture showing through paint
- Sanded back, re-smoothed, reprimed
- ~4 hours additional work
- Body Not Smooth Enough (Multiple Times):
- Kept finding bumps and irregularities
- More sanding, more primer, more inspection
- Lost count of iterations
Total rework time: Approximately 12-15 hours across the entire build
Emotional toll: Significant. With the caravan, I proved I could build a vehicle. Why was the car proving so difficult? Doubts crept in. Frustration mounted.
The reality: Cars are HARD to model. Automotive designers spend years perfecting curves that look simple. Replicating those curves in miniature with hand tools is genuinely challenging.
Acceptance: In commissioned work, “good enough” isn’t good enough. Each rework cycle got me closer to the quality the project deserved.
Phase 6: Final Paint and Finish
Paint Process:
- Surface Preparation:
- Sanded with 240, 400, 600, 800 grit progression
- Filled tiny imperfections with diluted PVA
- More sanding
- Primer coat
- Inspect, sand any issues
- Final primer coat
- Color Coats:
- Red automotive color (custom mixed)
- Multiple thin coats (5-6 coats total)
- Drying time between each coat
- Light sanding between coats (800 grit, very gentle)
- Clear Coat:
- Gloss clear coat for shine
- 2-3 thin coats
- Allowed full cure (48 hours)
- Final Details:
- Number plates added after clear coat
- Light weathering (very subtle)
- Chrome details painted
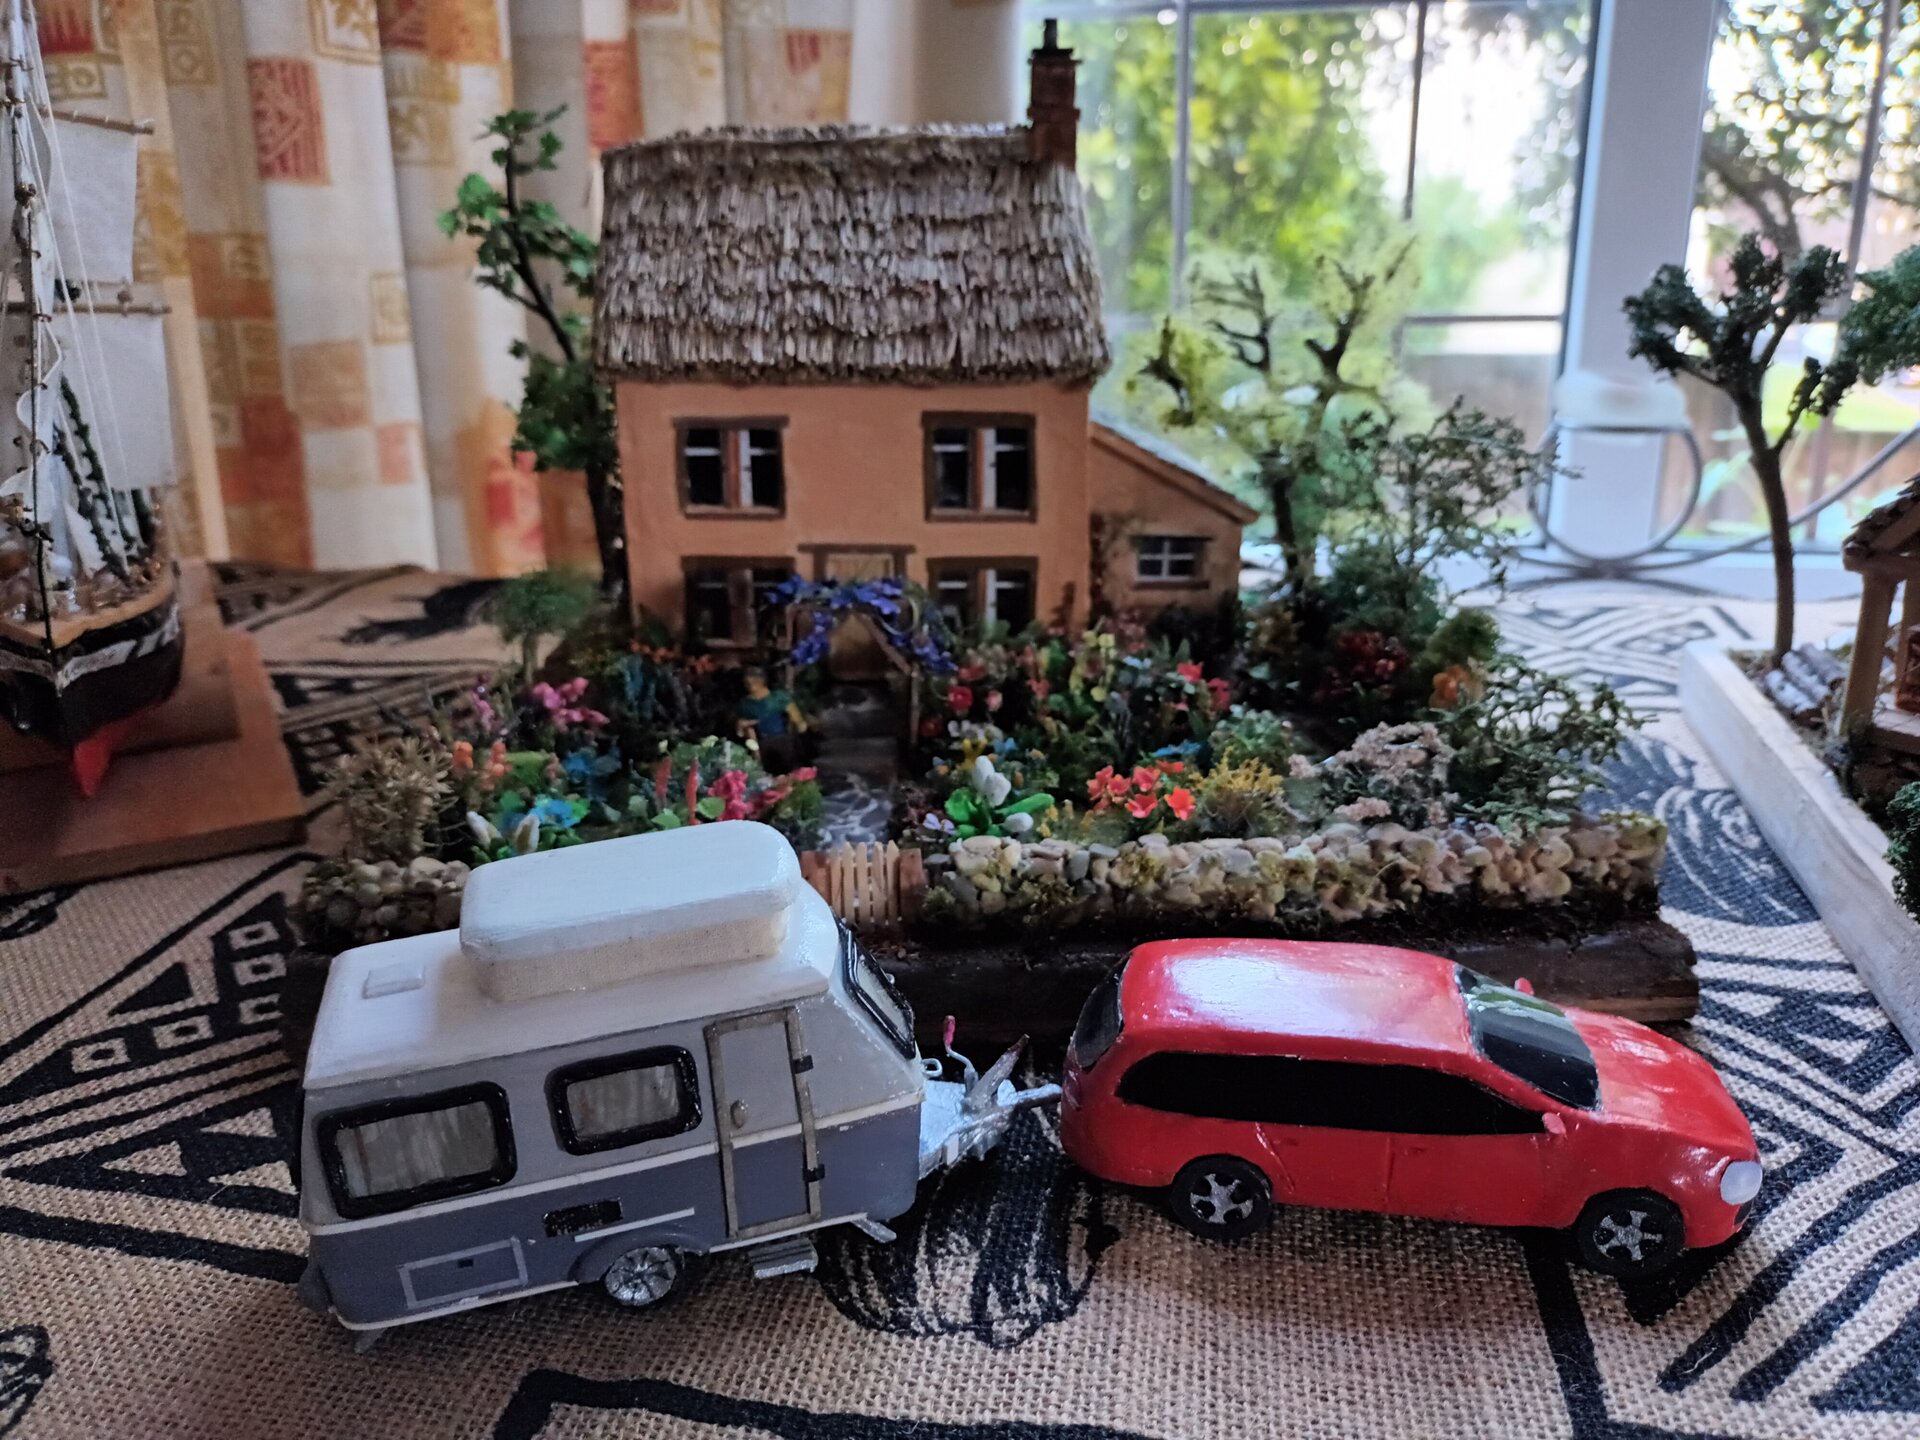
The finish: Not showroom perfect, but significantly better than my initial attempts. The automotive curves read correctly, the red paint had depth, and most importantly - it looked like a VW Golf R Estate.
Skills Developed
New Skills:
- Working with air-dry clay for miniature vehicles
- Understanding automotive body panel relationships
- Creating convincing automotive glass effects
- Hot glue technique for lights
- Achieving automotive paint finishes by hand
Improved Skills:
- Patience with rework (dramatically improved)
- Surface preparation for painting
- Reference photo interpretation
- Proportion checking and adjustment
- Accepting imperfection while striving for excellence
Important Lesson: Air-dry clay is now my preferred material for vehicle bodies. The extended working time makes the frustration level so much lower than epoxy putty. I’ll use it for future vehicle projects.
Comparison: Caravan vs. Car
Caravan was harder for:
- Compound curves (the Eriba “egg” shape)
- Window construction (curved frames)
- Getting proportions from limited references
Car was harder for:
- Automotive surface expectations (we all know what cars look like)
- Multiple rework cycles (kept seeing imperfections)
- Estate body modification from sedan reference
- Paint finish standards (cars have smooth, glossy paint)
Both taught valuable lessons. Both required accepting major rework. Both pushed my skills forward.
Materials Used
Structural:
- Air-dry clay (500g consumed)
- Balsa wood (internal structure)
- Wire (reinforcement)
- Aluminum foil (lightweight filler)
Details:
- Clear plastic sheet (windows)
- Hot glue (lights)
- Yellow paper (number plate)
- Repurposed wheels (modified)
Paint:
- Primer (grey, spray)
- Red automotive color (custom mixed)
- Black (windows, details)
- Silver/chrome (trim, wheels)
- Clear gloss coat (protection and shine)
Time Investment:
~22 hours total (including 12-15 hours of various rework cycles)
The Moment of Truth
Placing the completed car next to the caravan for the first time was validating. They belonged together. The scale matched. The quality matched. The commission was taking shape.
Client reaction: “That’s our car! You even got the number plate right!”
All the rework, all the frustration, all the doubts - worth it for that recognition.
Reflections
What I Learned:
- Air-dry clay is excellent for vehicle modeling
- Multiple rework cycles are normal, not failure
- Reference photos are critical for automotive work
- Small personal details (number plate) enhance commissioned pieces
- My standards increased through this project
What I’d Do Differently:
- Accept earlier that rework is part of the process
- Take more progress photos (forgot in the intensity of building)
- Practice paint technique more before final piece
- Build more time into the schedule
Key Insight: The difference between personal and commissioned work became clear through this build. For personal projects, I might have accepted “pretty good” earlier. Commission work requires “as good as I can make it.”
Next Steps
With both vehicles successfully completed, I could turn attention to the next challenge: creating recognizable figures of real people - including Tilly the dog.
This would prove to be an entirely different kind of challenge…
Coming in Build Log 004: Figures and Tilly - Wire armatures, air-dry clay struggles, and discovering that carving works better for dogs.
Materials Cost This Phase: ~£18
Time Spent: 22 hours
Rework Cycles: Multiple (lost count, approximately 4-5 major)
Patience Tested: Severely
Air-Dry Clay Verdict: Excellent for vehicles, will use again
Client Reaction: “That’s our car!”
Previous: 002 - Caravan Construction
Next: 004 - Figures and Tilly
Have questions or feedback about this project? I'd love to hear from you.