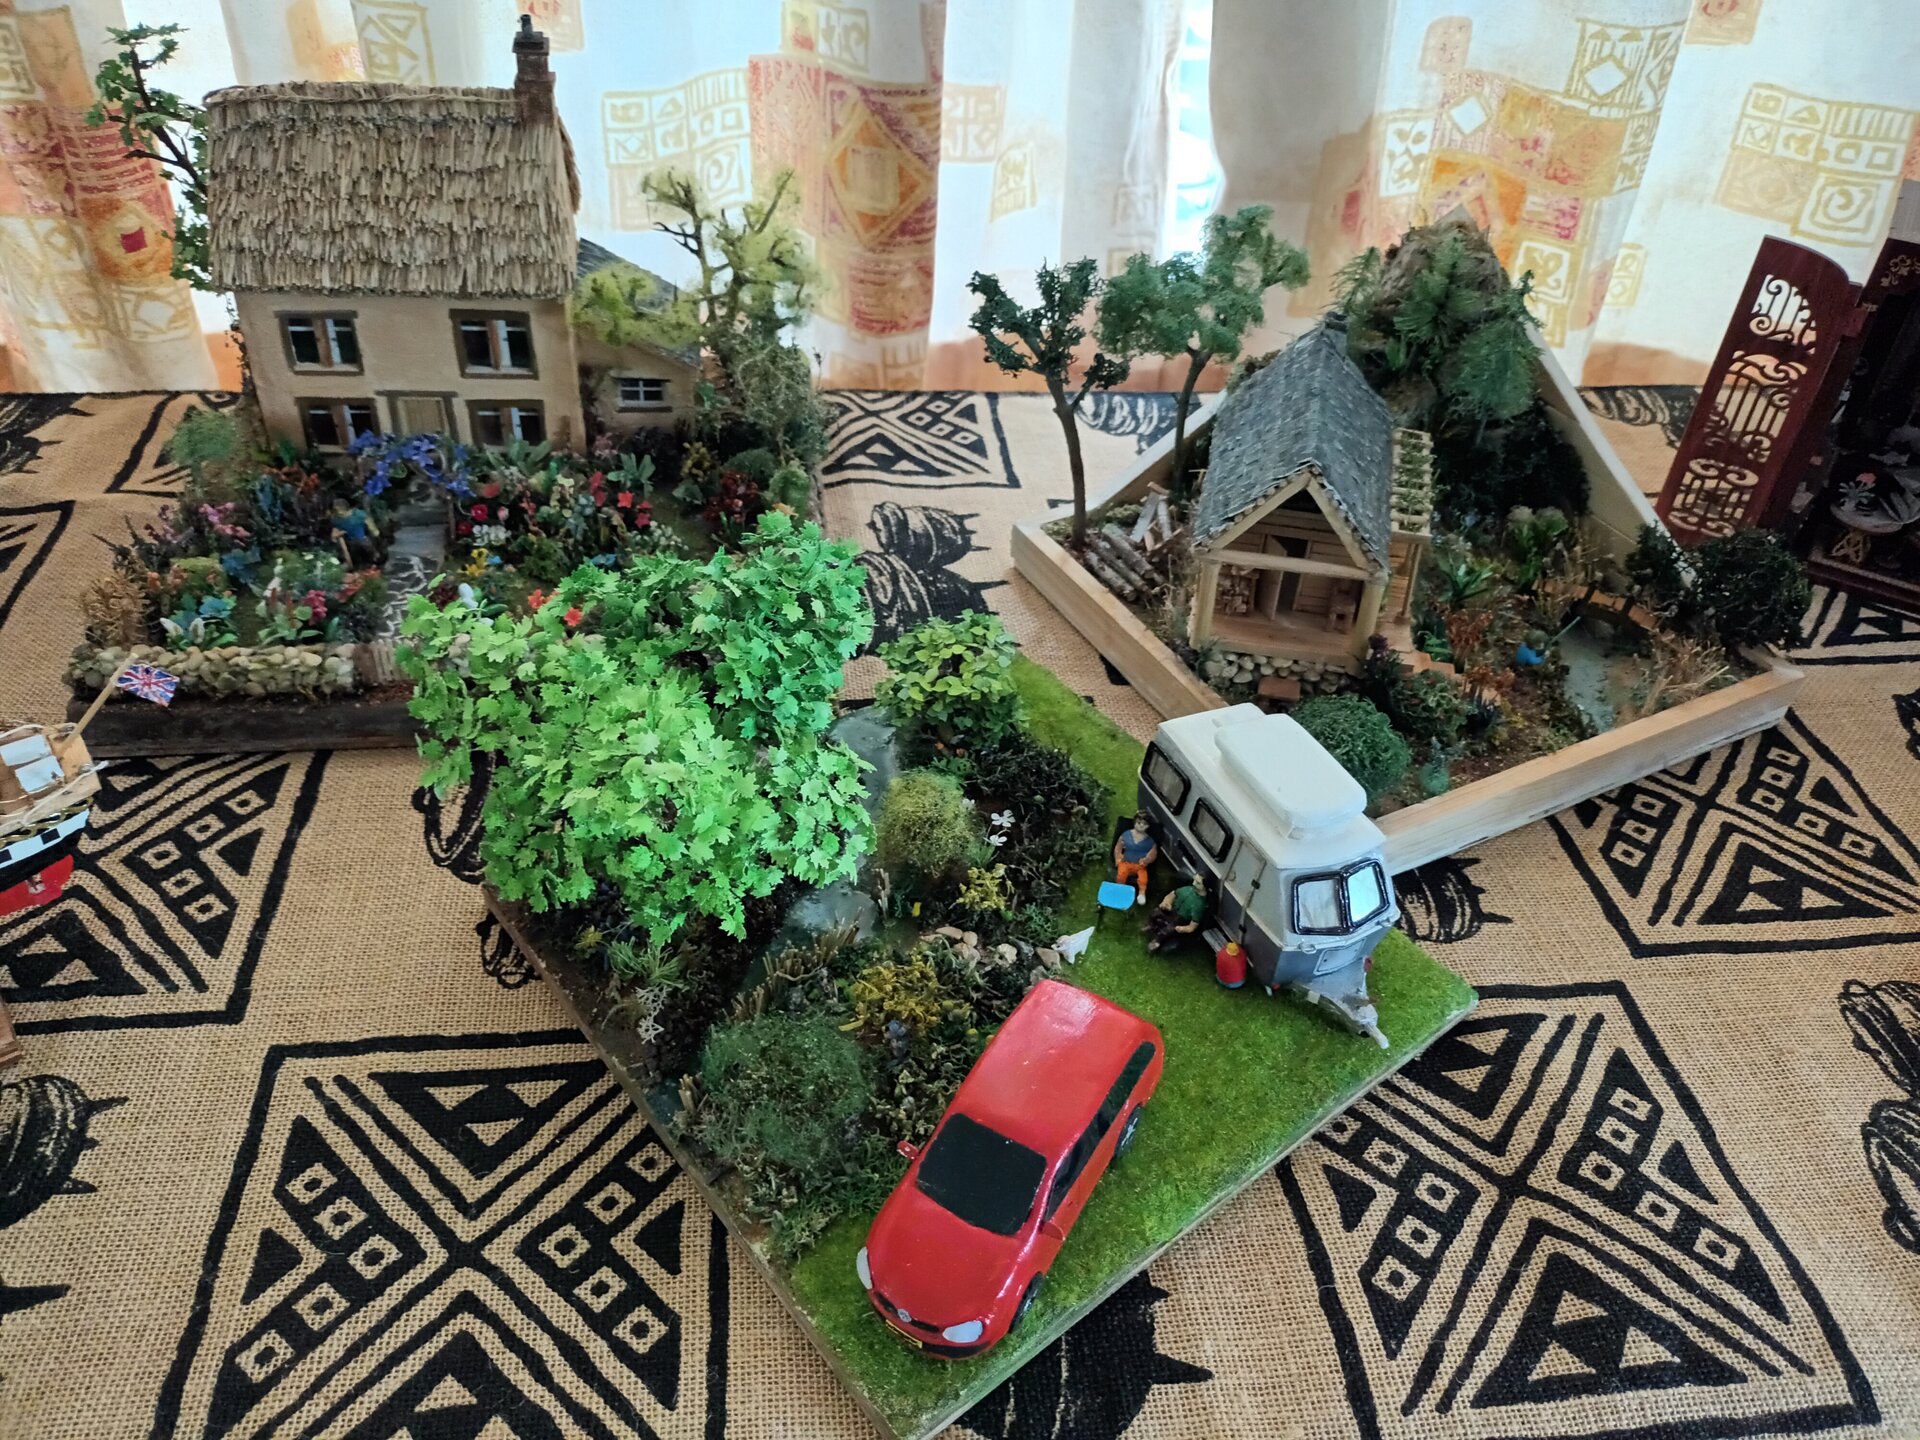
Final Assembly and Delivery - The Complete Scene
Build Log 007: Final Assembly, Finishing, and Delivery
Date: April 20 - May 10, 2025
Phase: Final Integration and Delivery
Time Spent: ~12 hours
Status: Completed and Delivered
The Final Countdown
After months of construction, all the individual elements were complete:
- ✅ Eriba Triton caravan
- ✅ VW Golf R Estate
- ✅ Two human figures
- ✅ Tilly the dog
- ✅ Trees and vegetation
- ✅ Rocky riverbank
- ✅ Static grass coverage
- ✅ Resin water river
Now came the nerve-wracking task: permanently assembling everything together.
The anxiety: Up until this point, components were moveable. I could adjust, reposition, rework. Once glued down, everything became permanent. No more chances to fix mistakes.
The necessity: For delivery, the diorama needed to be stable, transportable, and durable. Components needed secure mounting.
Pre-Assembly Planning
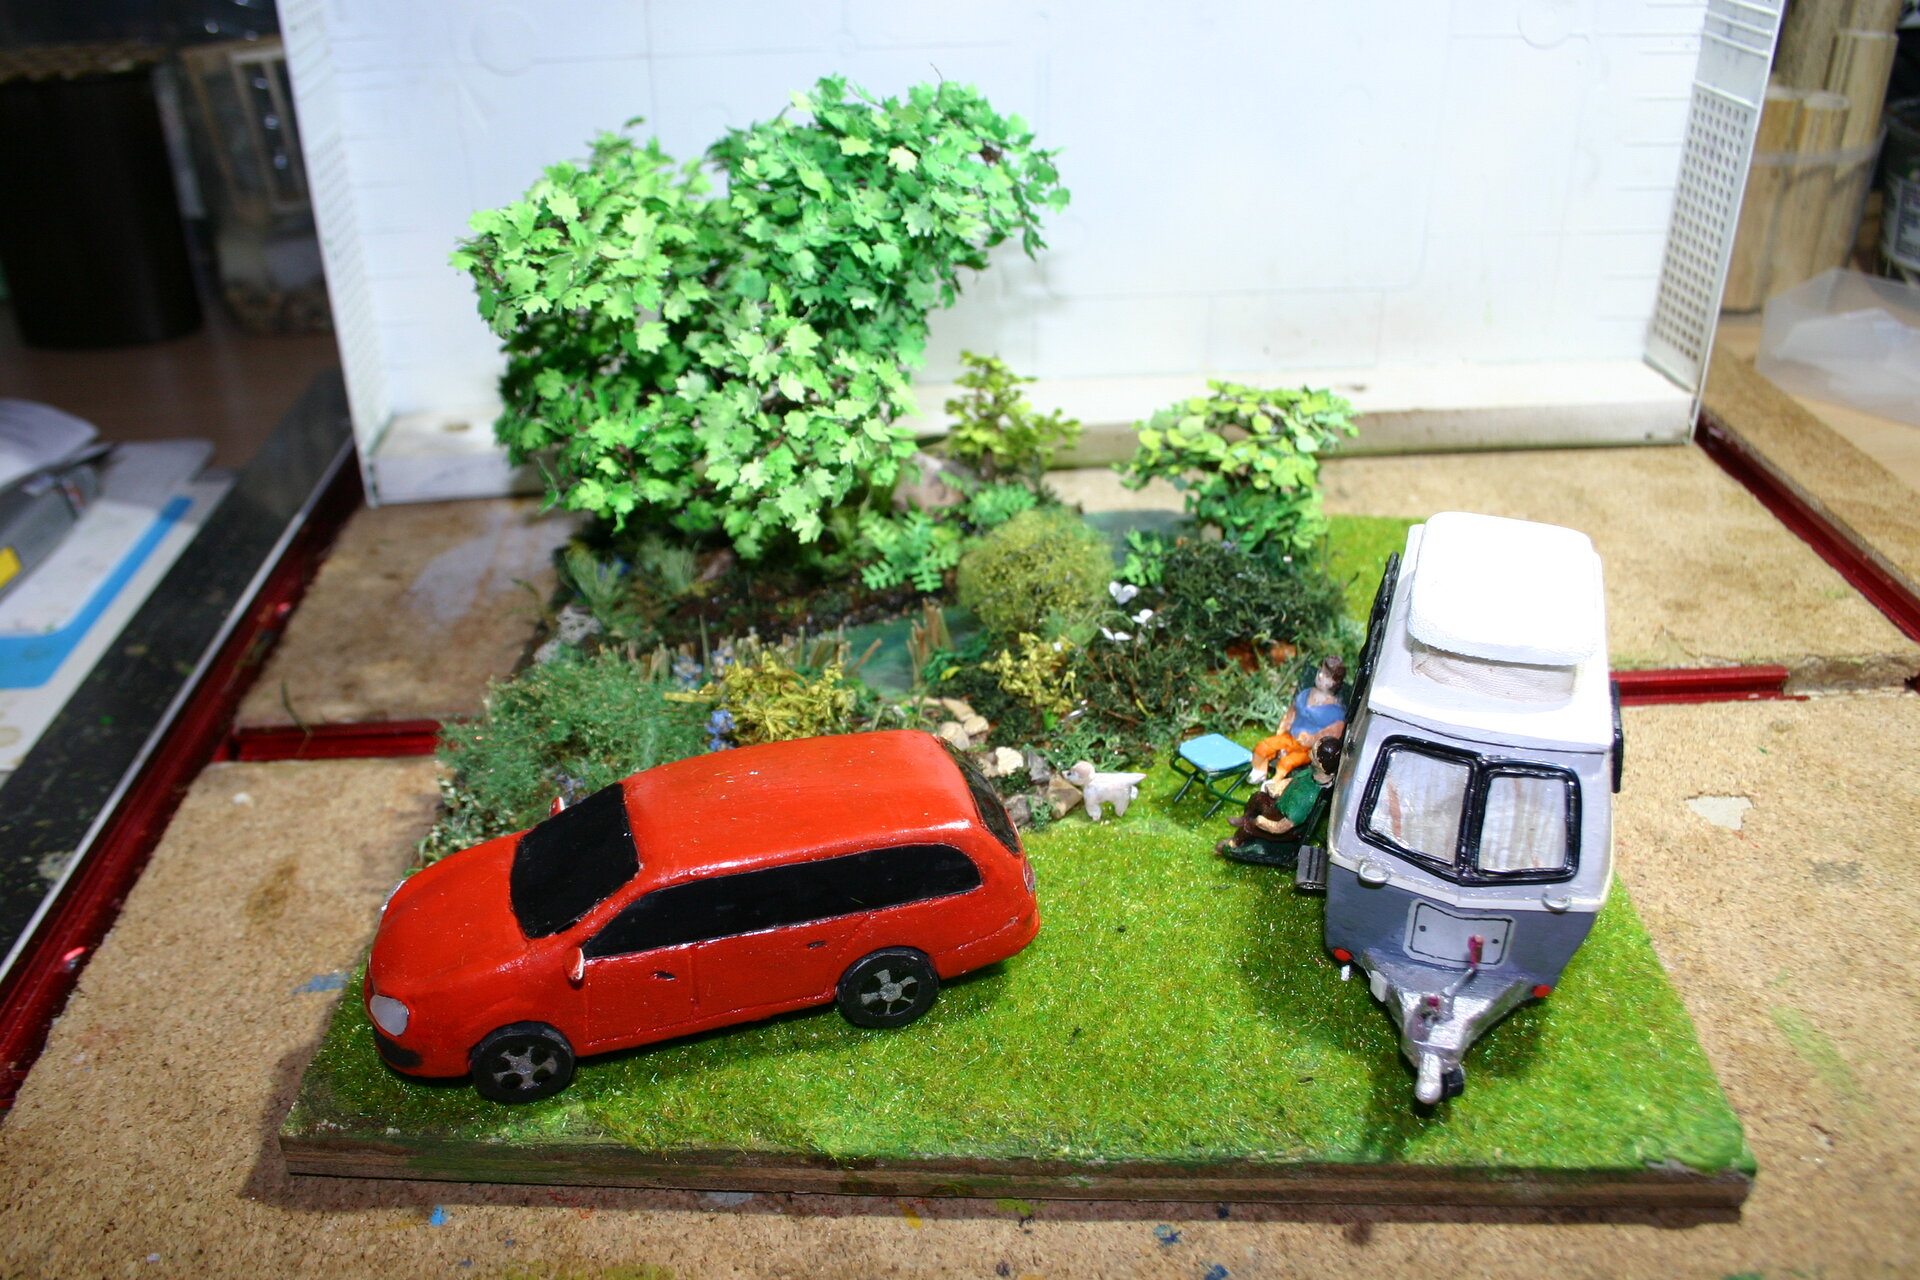
Composition Considerations:
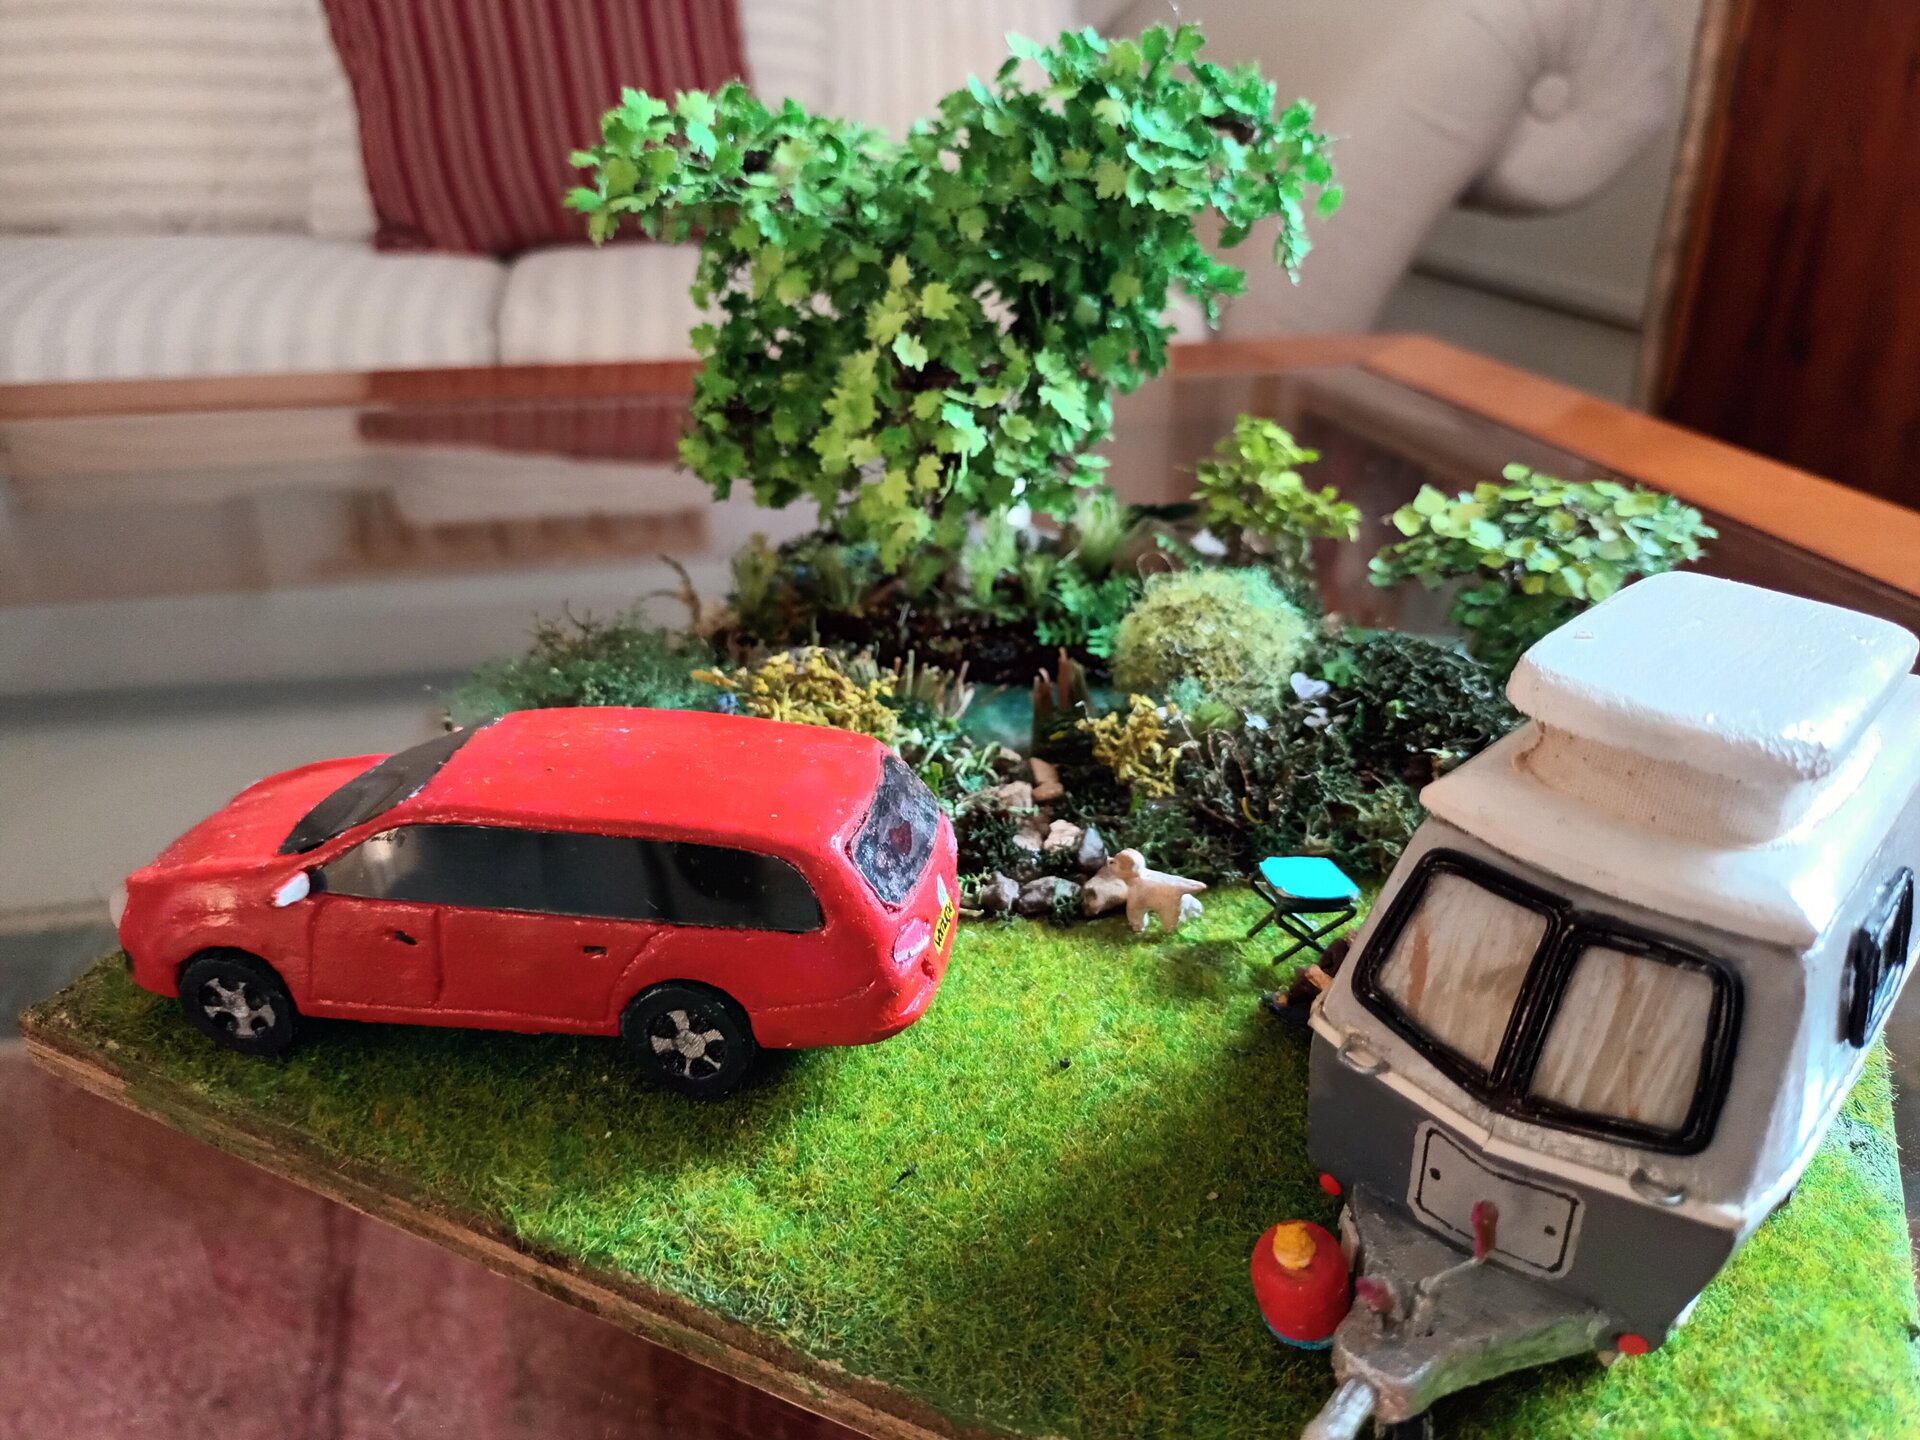
- Caravan Positioning:
- Slightly off-center (more dynamic)
- Angled ~15° (shows side and front)
- Door visible toward viewer
- Relationship to car and figures clear
- Car Placement:
- Behind caravan (towing position)
- Visible from front/side (shows it’s an estate)
- Hitch connection implied
- License plate visible
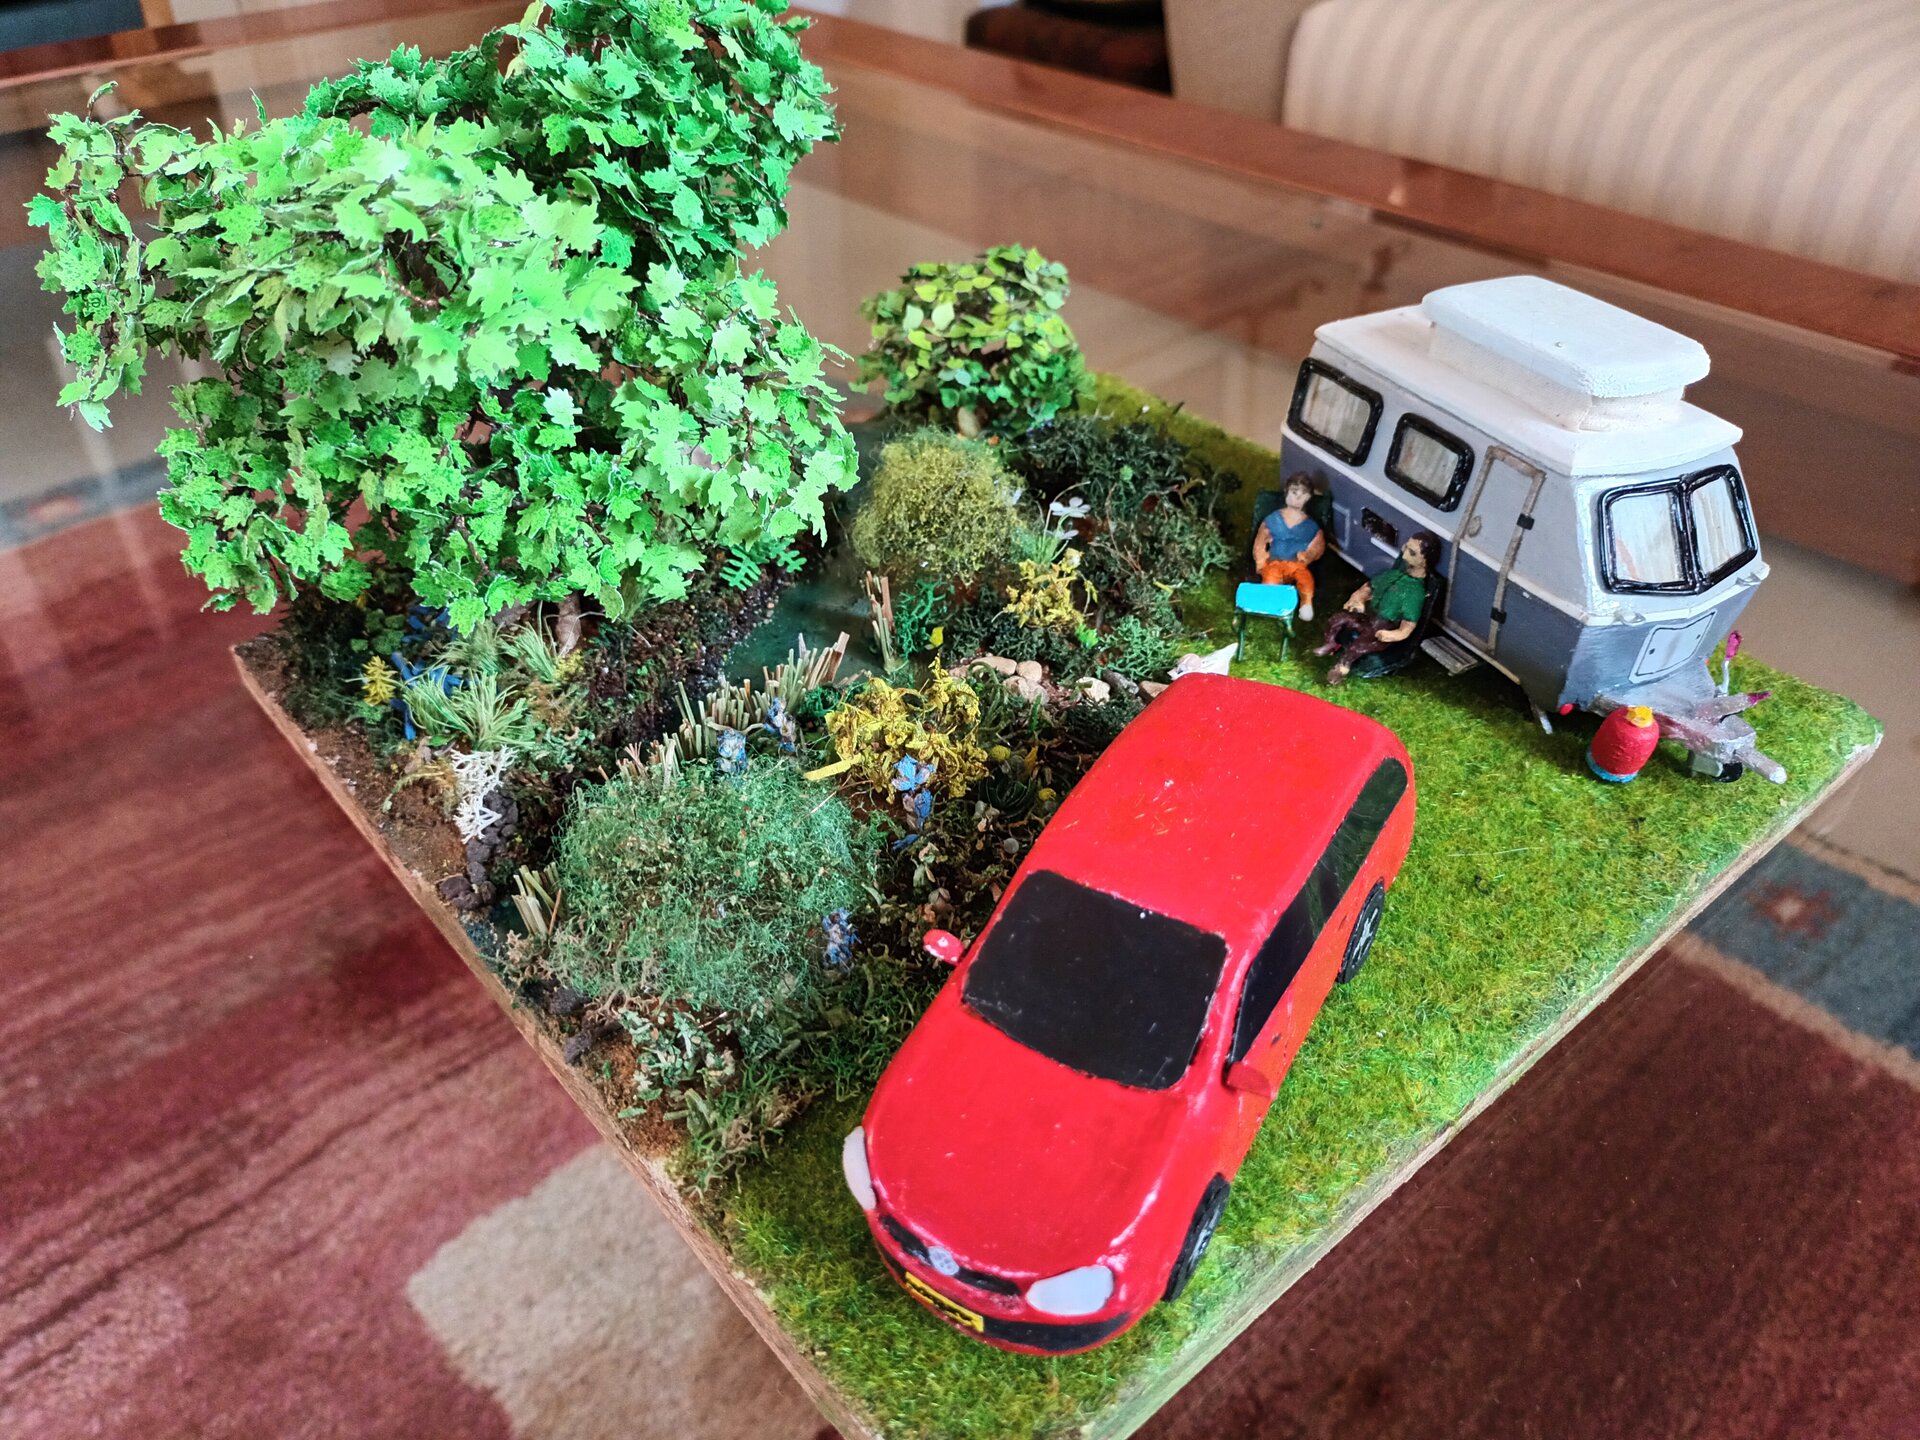
- Figure Positions:
- Male figure: Near car (owner checking vehicle)
- Female figure: Near caravan (setup/pack activity)
- Both at natural heights (standing on grass)
- Positioned so they “read” together
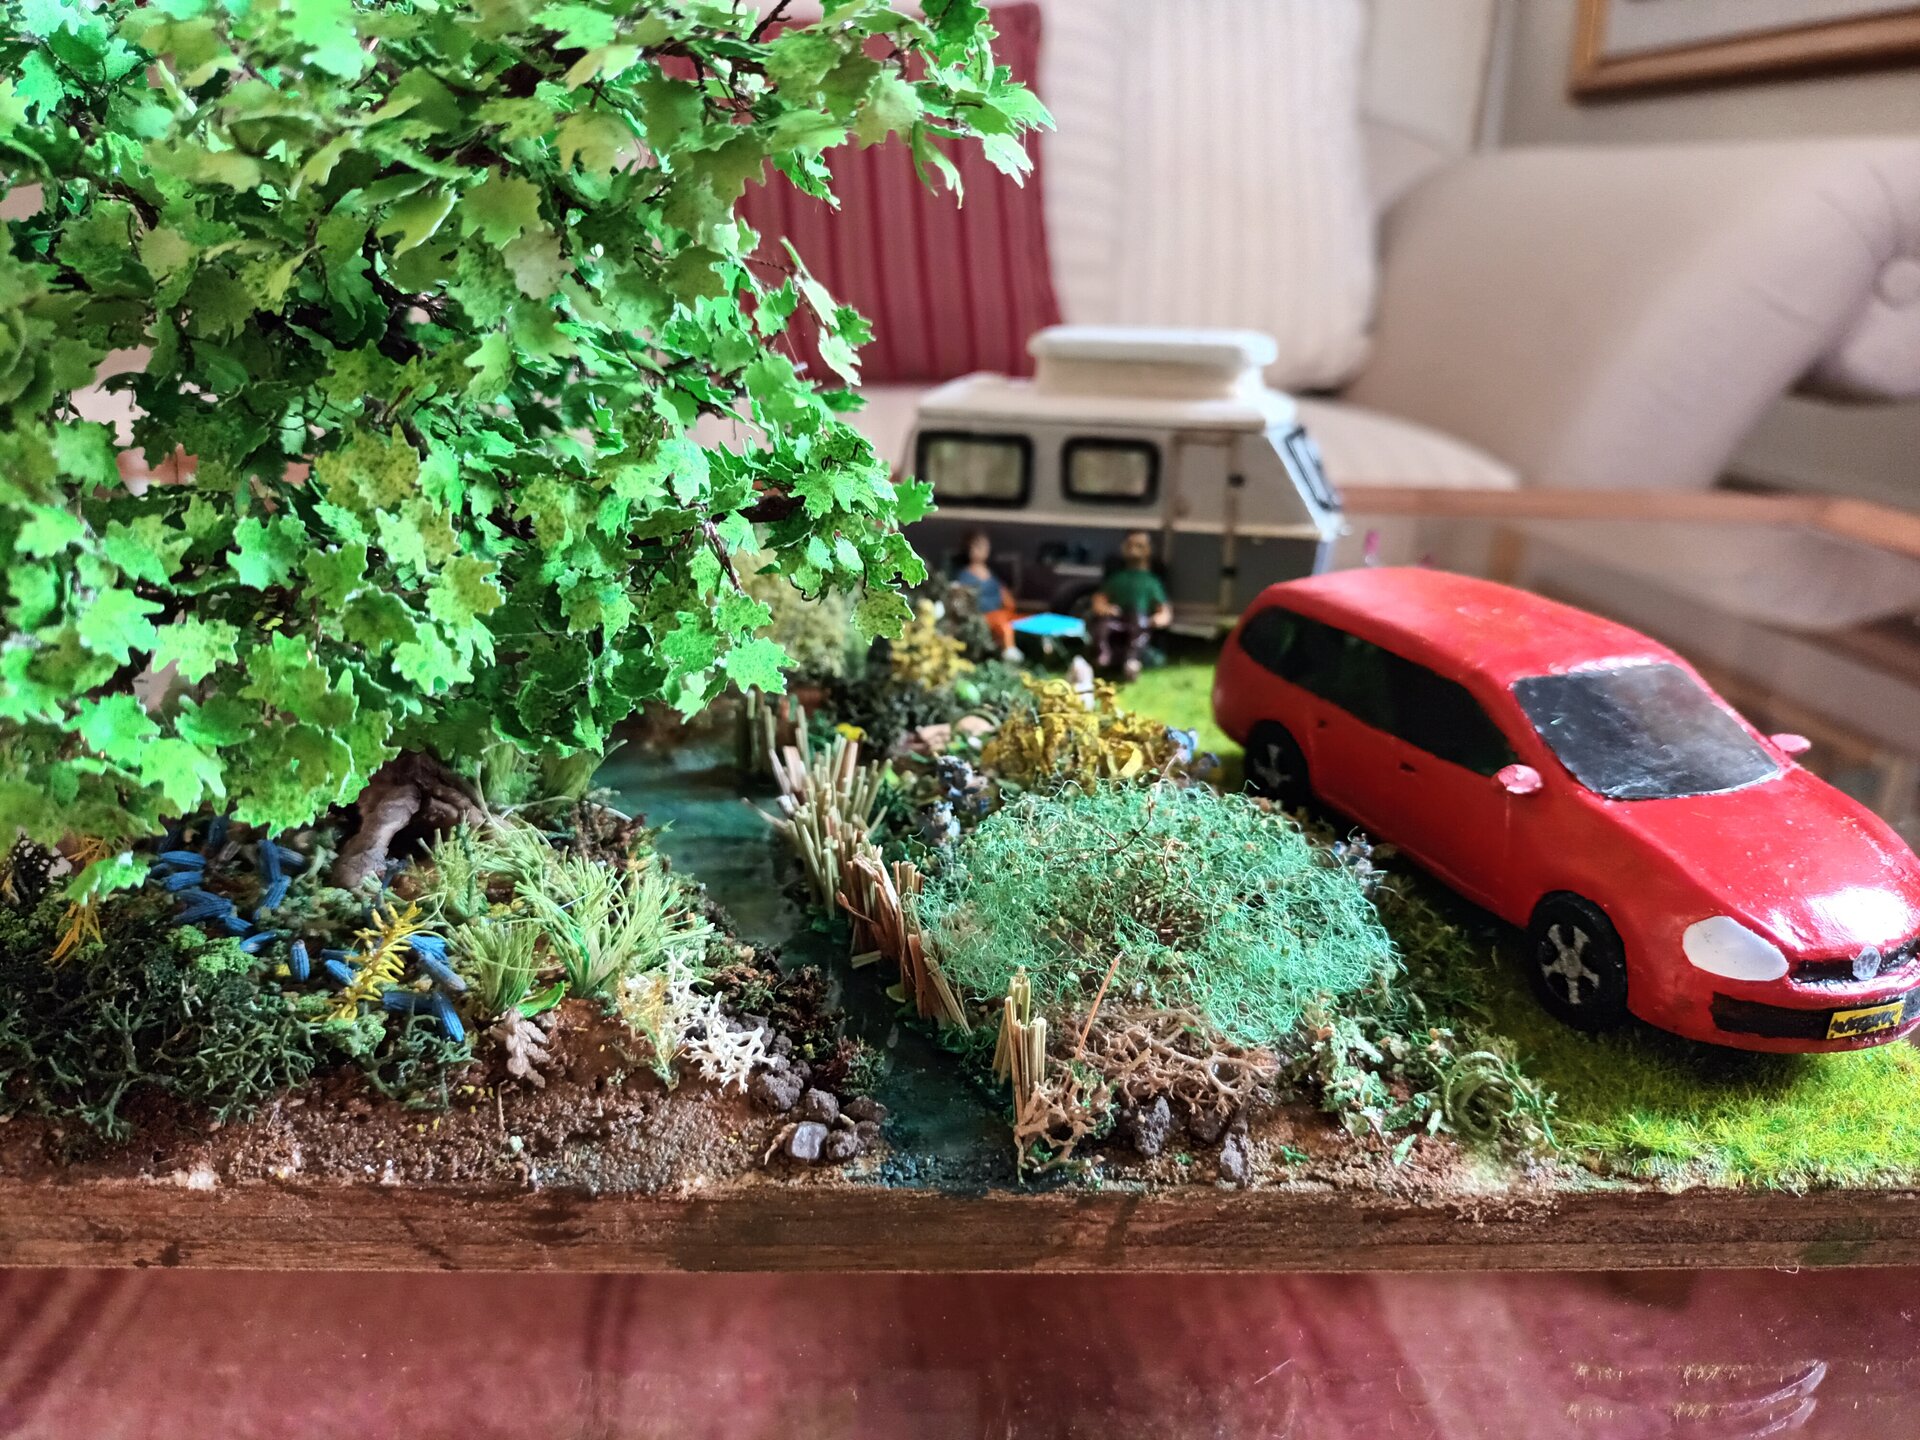
- Tilly Placement:
- Exploring away from figures (dog behavior)
- Near water (dogs love water)
- Visible and clear focal point herself
- Adds life and story
- Sight Lines:
- No element completely hidden behind another
- Viewer can see all key details
- Depth and overlapping (but not obscuring)
- Works from multiple viewing angles
Testing: Spent several hours just moving components around, stepping back, viewing from different angles, taking photos, adjusting.
Strategy: Once satisfied, marked positions with pencil on base before removing components for gluing.
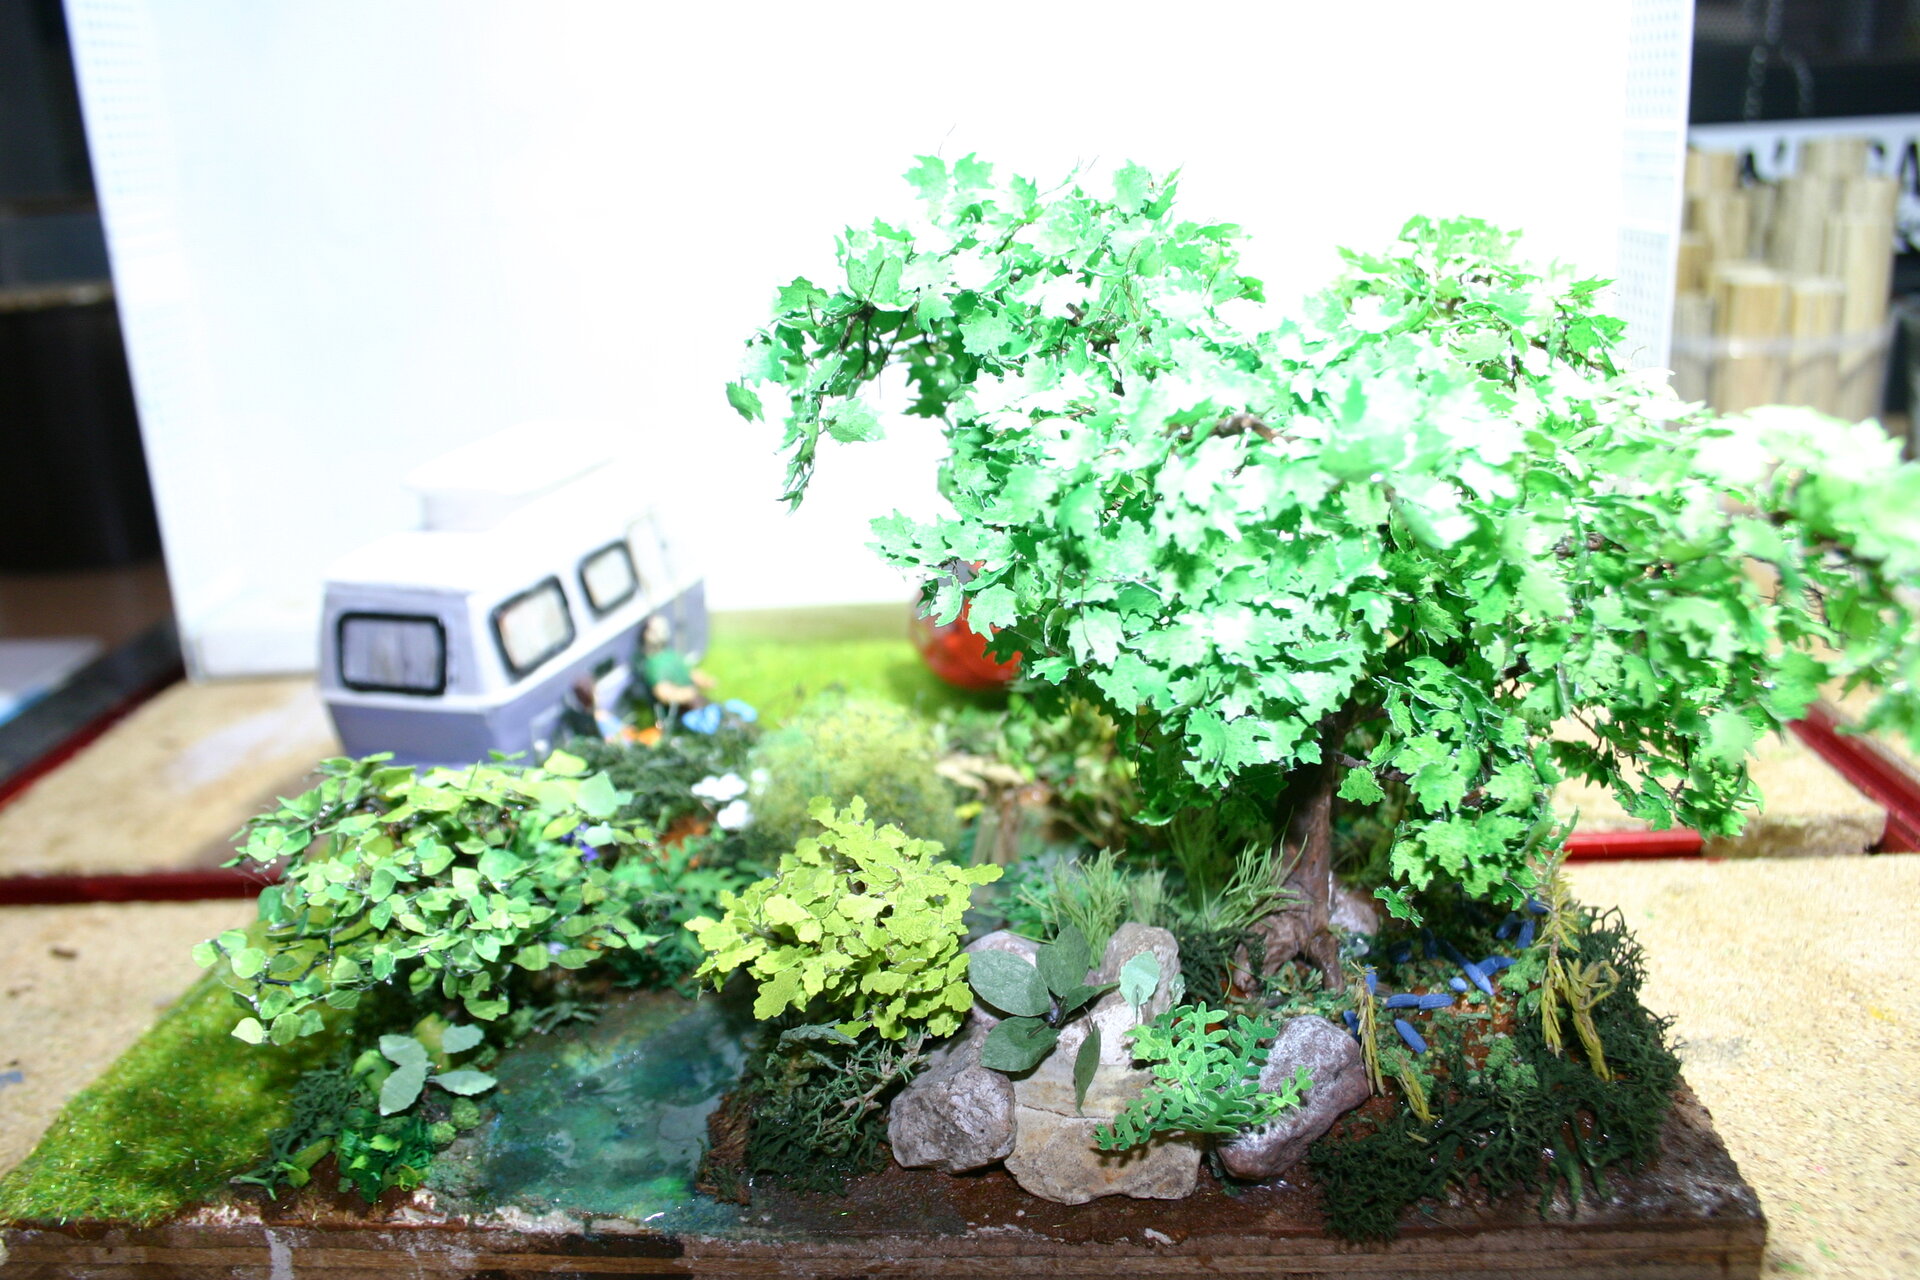
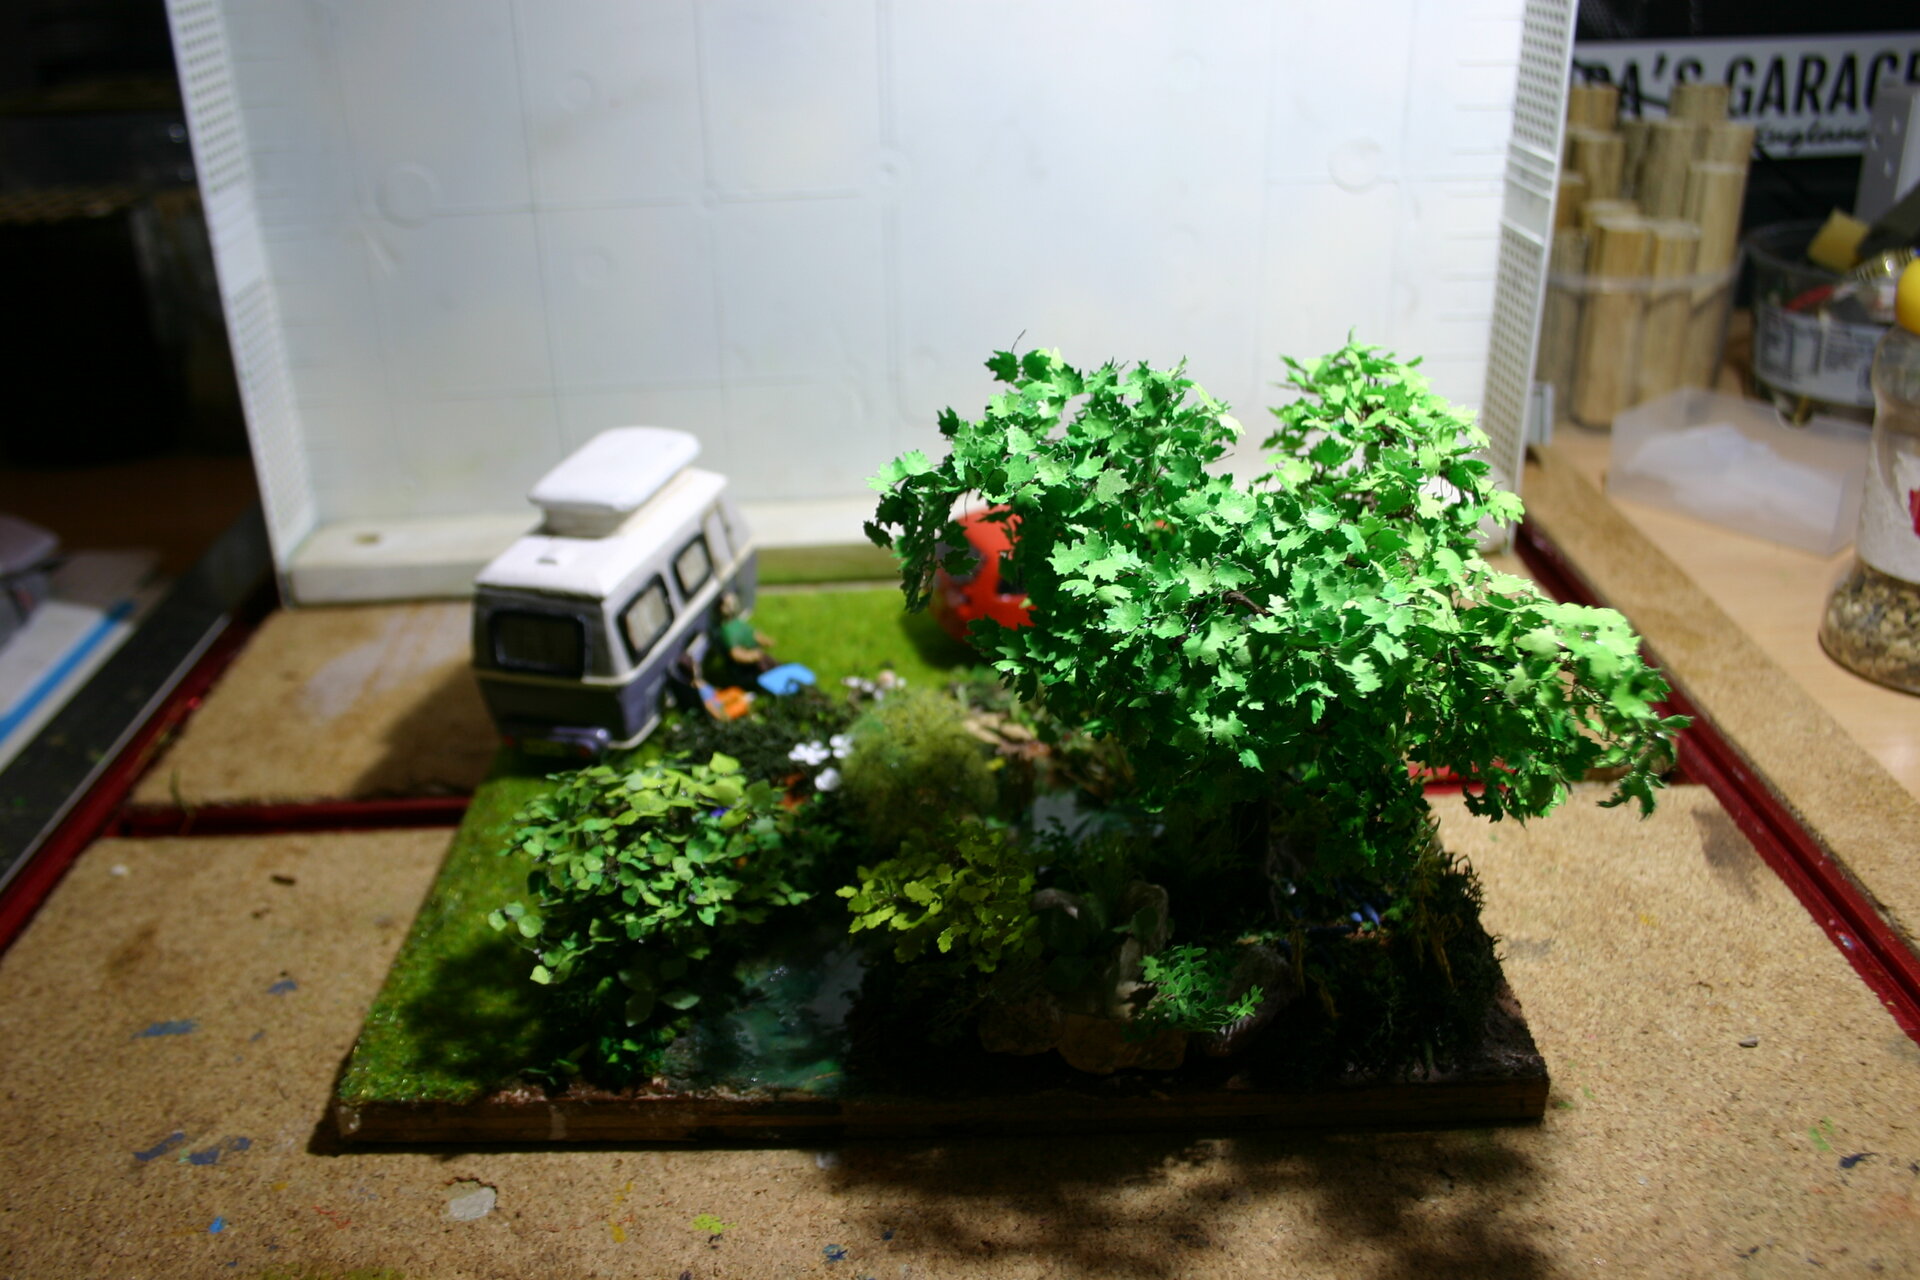
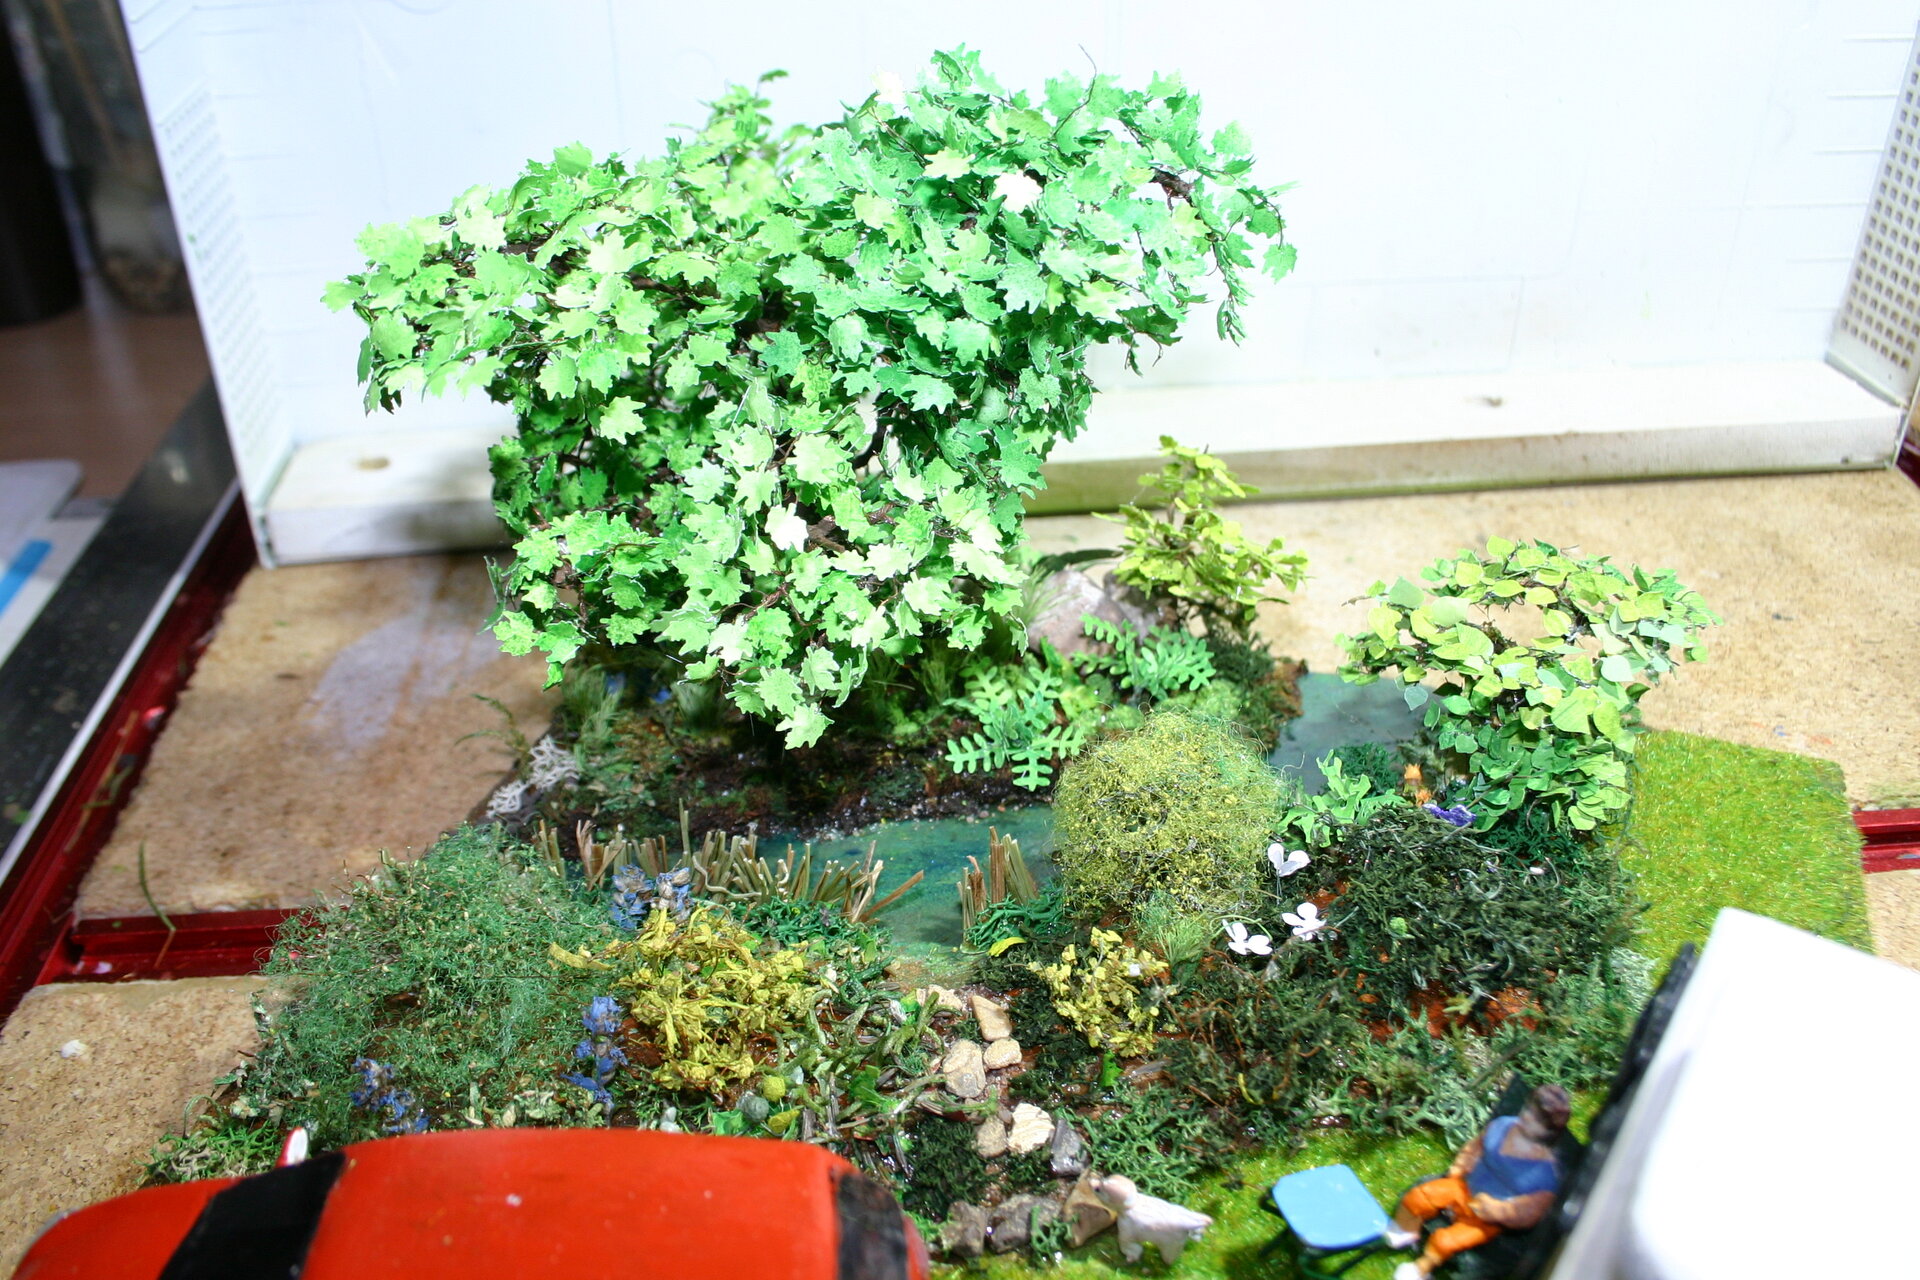
Mounting the Trees
Trees went down first - they establish the scene edges and frame.
Tree Mounting Process:
- Pilot Holes:
- Drilled small holes in base where tree trunks would go
- Depth: ~10mm (secure mounting)
- Diameter: Slightly smaller than trunk wire
- Trunk Preparation:
- Trimmed tree base to clean wire
- Bent slightly if needed (natural lean)
- Test fit in holes
- Adhesive:
- Epoxy glue in holes (strongest bond)
- Inserted tree trunks
- Held vertical while checking from multiple angles
- Left to cure (24 hours)
- Base Blending:
- Once cured, built up ground texture around base
- PVA and scatter material
- Moss and small plants at tree bases
- Static grass integration
- Natural transition (trees grow from ground, not sit on it)
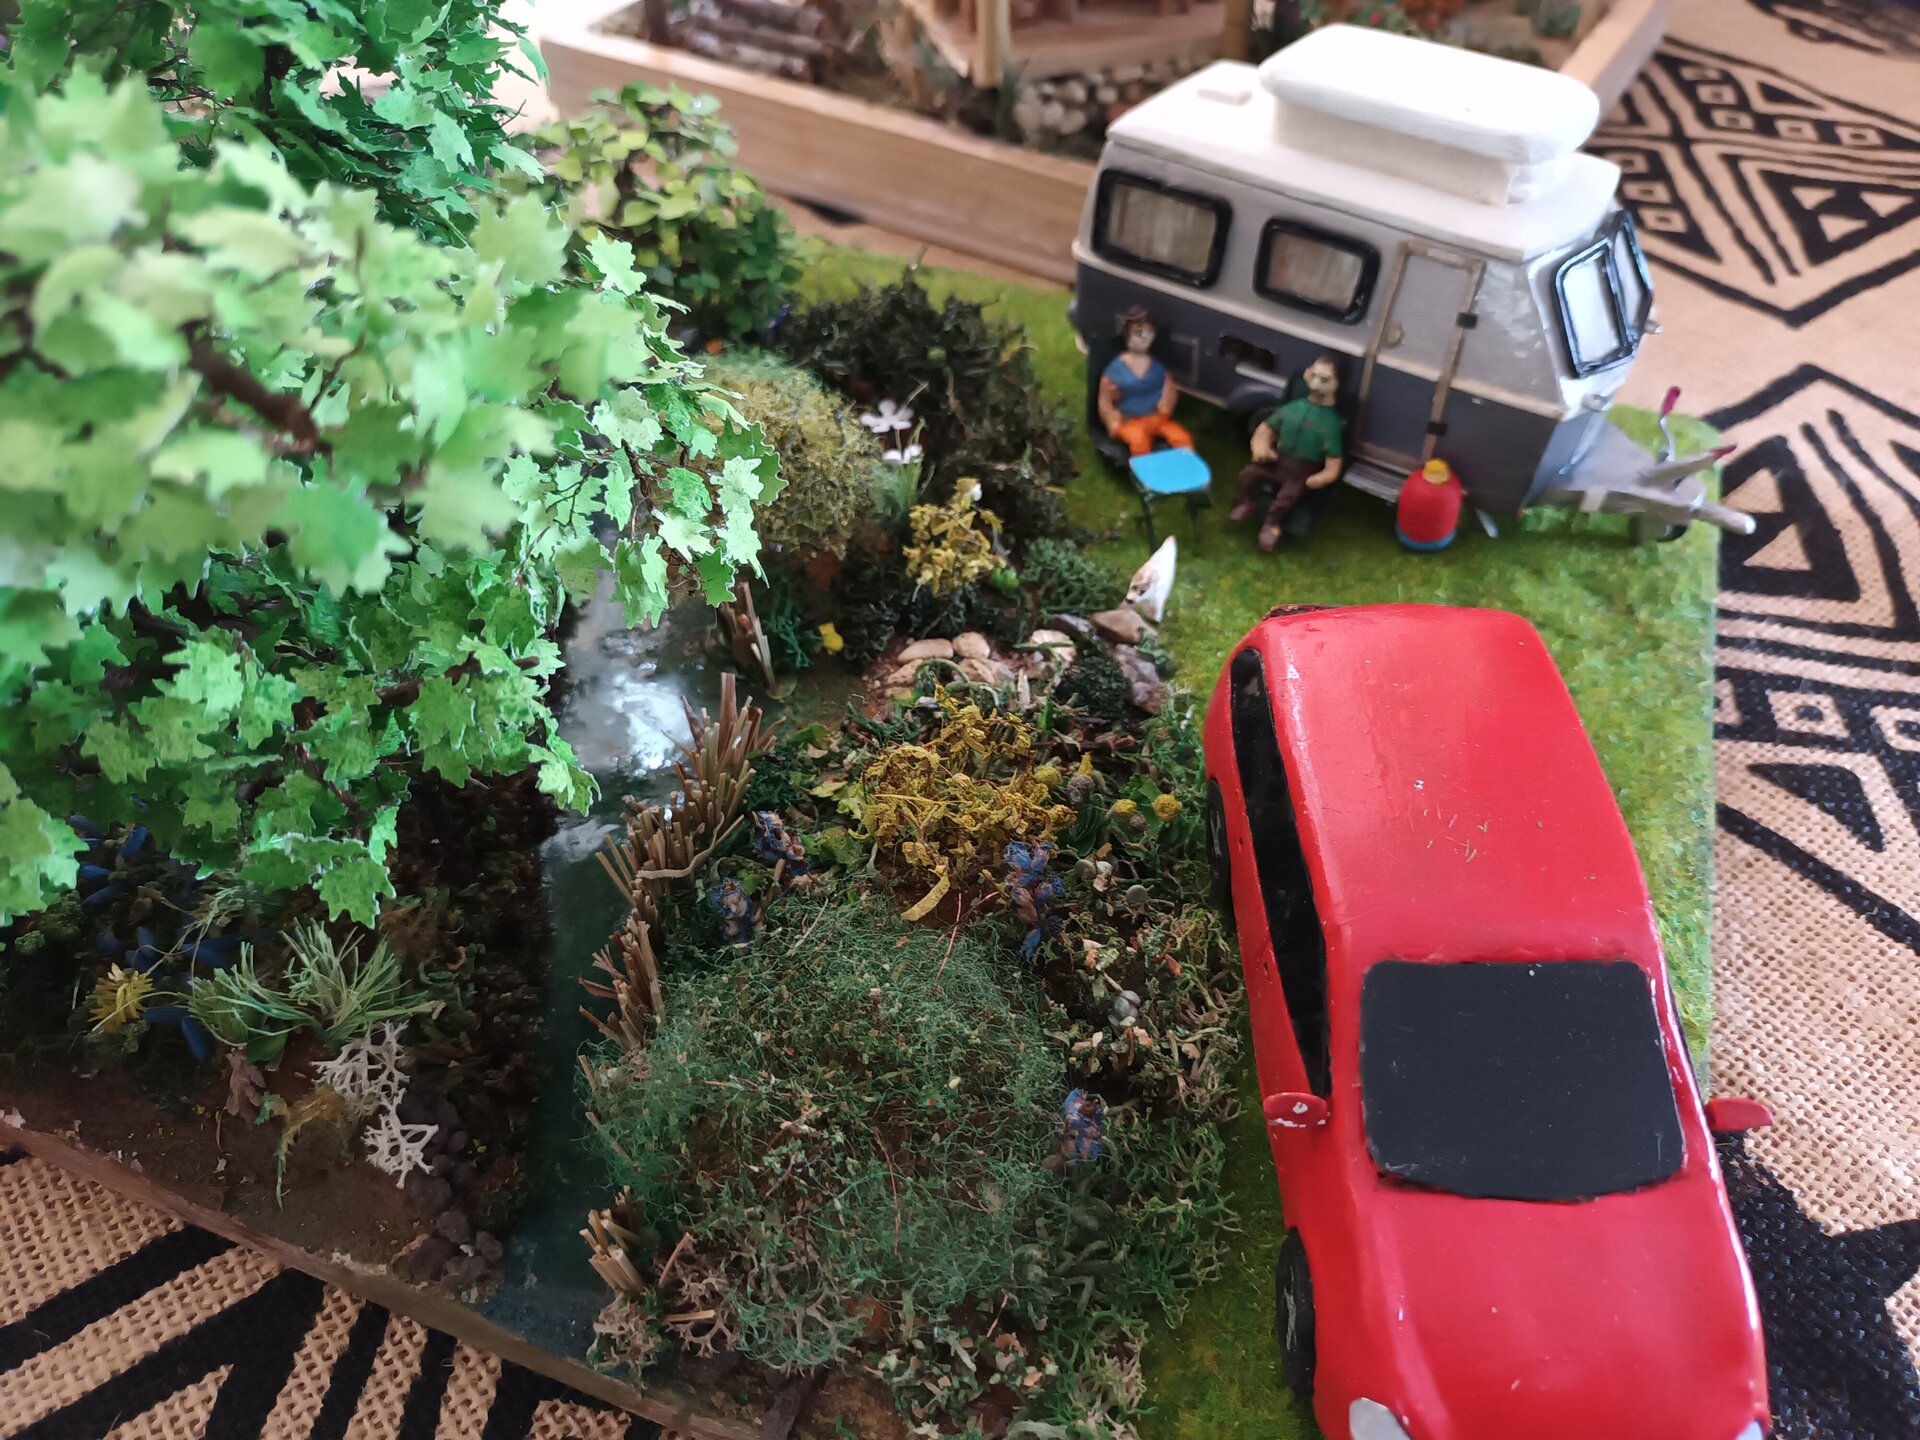
Result: Six trees securely mounted, framing the scene, creating depth.
Vehicle Integration
Caravan Mounting:
- Base Contact:
- Caravan has wheels and stabilizing legs
- All contact points marked on base
- Small indents made for wheels (sitting IN grass, not on top)
- Adhesive Strategy:
- Superglue on wheel contact points (instant, strong)
- PVA around edges (cleanup friendly)
- Wheels slightly sunk into grass (realistic weight)
- Level Check:
- Spirit level confirmed caravan sits straight
- Slight nose-up angle (realistic when hitched)
- Door clearance (opens visually, even though fixed)
- Integration:
- Built up grass around wheels
- Shadows painted under caravan (depth)
- Connection to ground looks natural
Car Mounting:
- Tire Tracks:
- Visible path where car drove onto grass
- Compressed grass (darker, flatter)
- Slight dirt/mud visible in tracks
- Adds realism and story
- Wheel Position:
- Each wheel slightly sunk into grass
- Tire tread impression suggested
- Weight distributed realistically
- Adhesive:
- Epoxy under each wheel (stronger than superglue for potential bumps)
- Clamped gently while curing
- Double-checked level from all angles
- Hitch Connection:
- Fine wire connecting car to caravan
- Painted to match (subtle)
- Shows relationship between vehicles
Result: Both vehicles sit convincingly on the ground, looking like they have weight and belong in the scene.
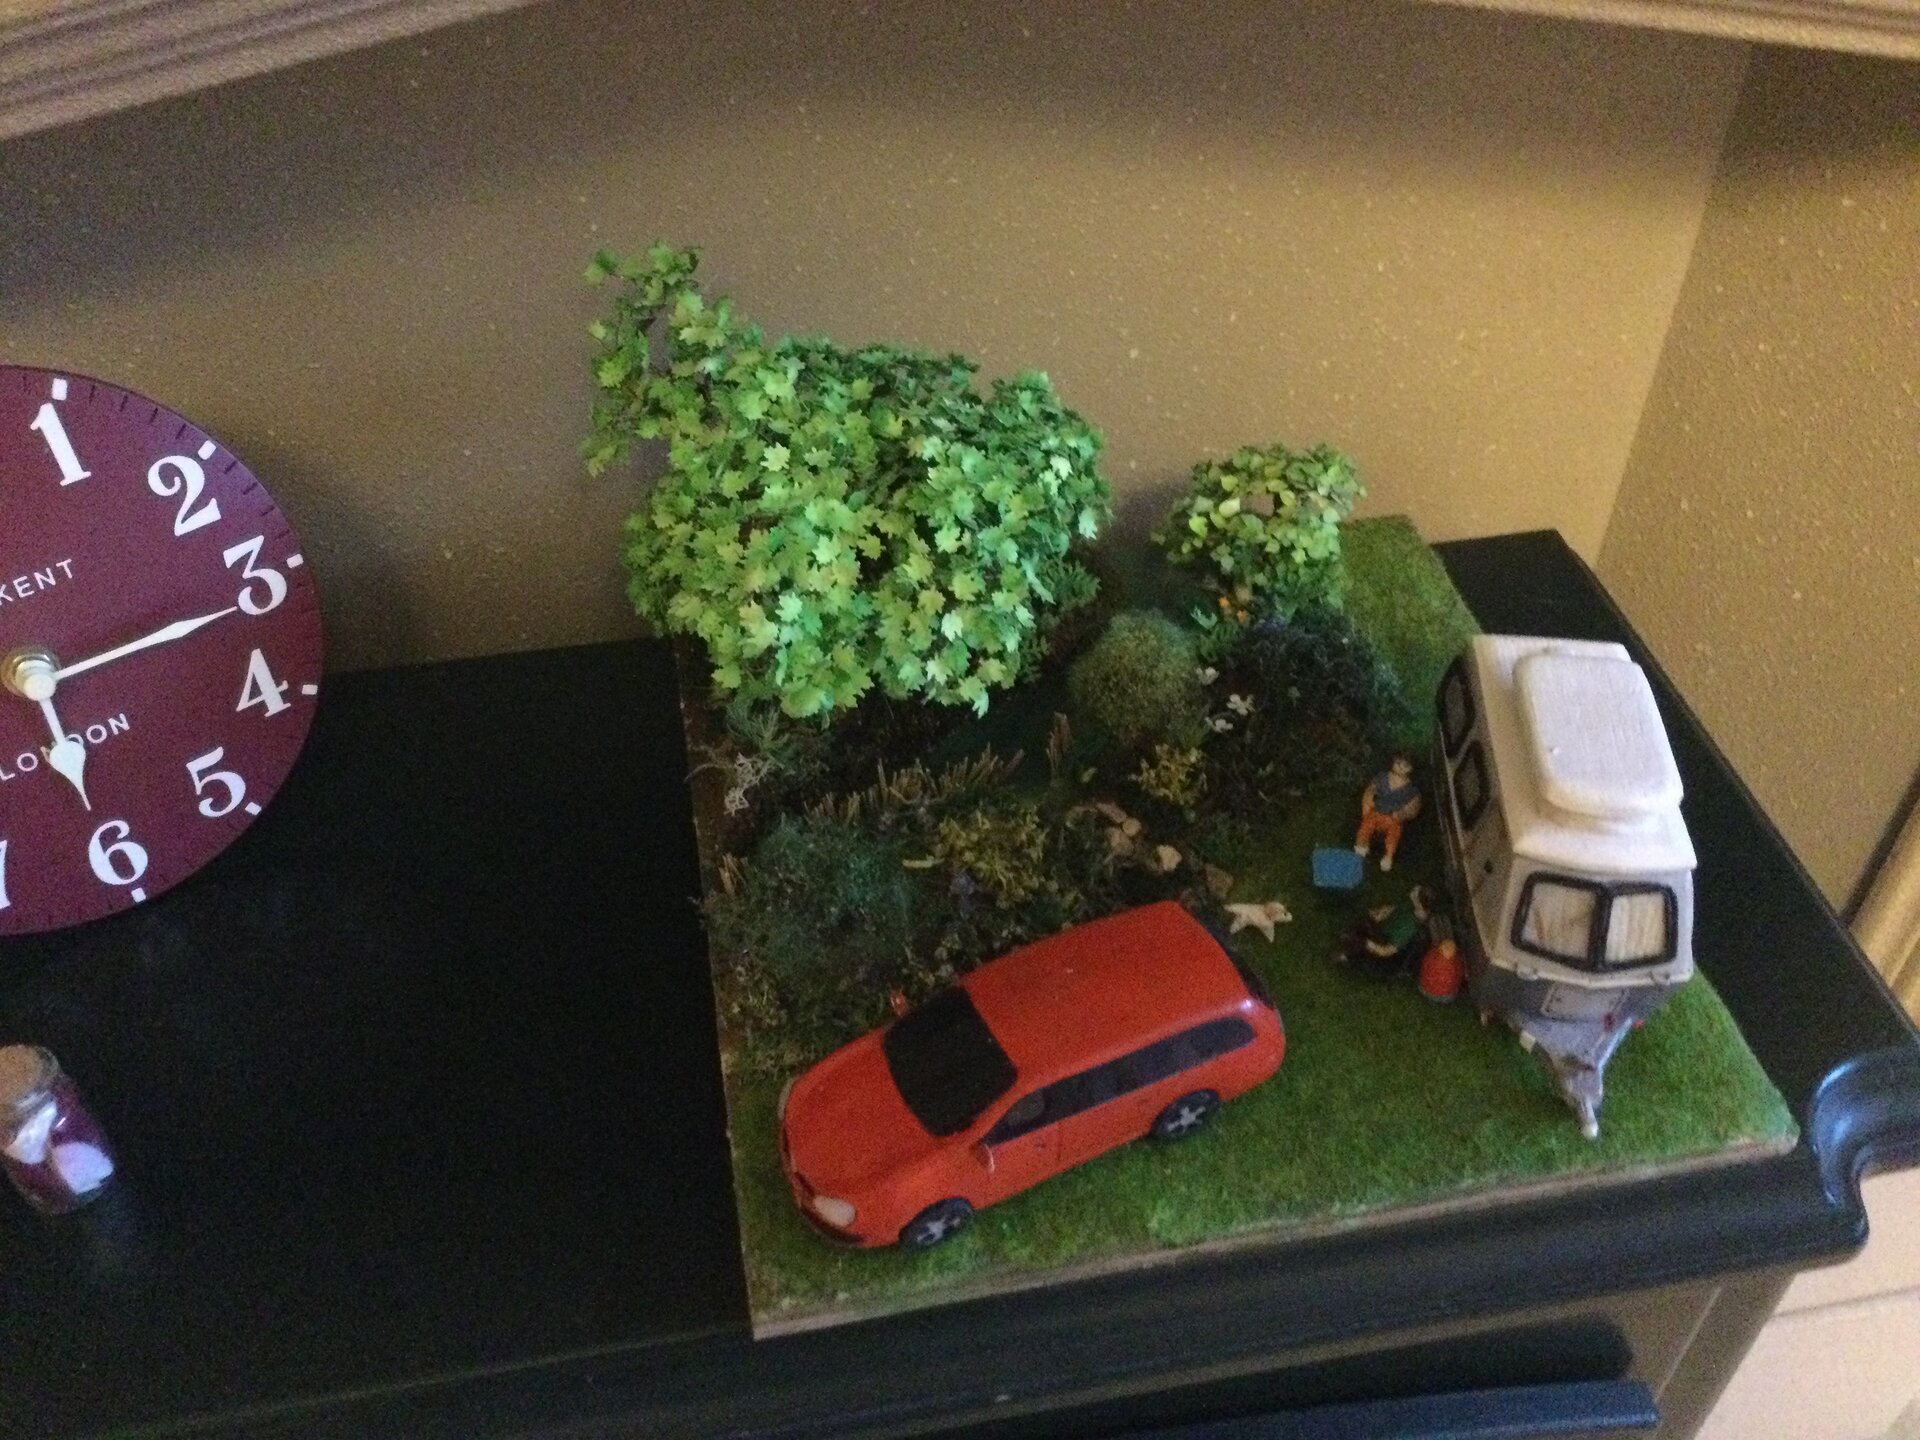
Figure Placement

Human Figures:
- Foot Position:
- Figures carved with flat feet
- Standing naturally on grass
- Slight depressions suggested where feet compress grass
- Stable stance
- Relationship to Elements:
- Male figure near car (checking, loading, owner role)
- Female figure near caravan (setup, domestic role)
- Both facing slightly toward each other (connection)
- Natural positions (not posed, just being)
- Mounting:
- Small pins in feet (drilled, epoxy glued)
- Holes in base for pins
- Secure mounting
- Can’t be knocked over easily
- Shadows:
- Painted shadows at feet (grounds figures)
- Direction matches trees and vehicles
- Subtle but effective depth cue
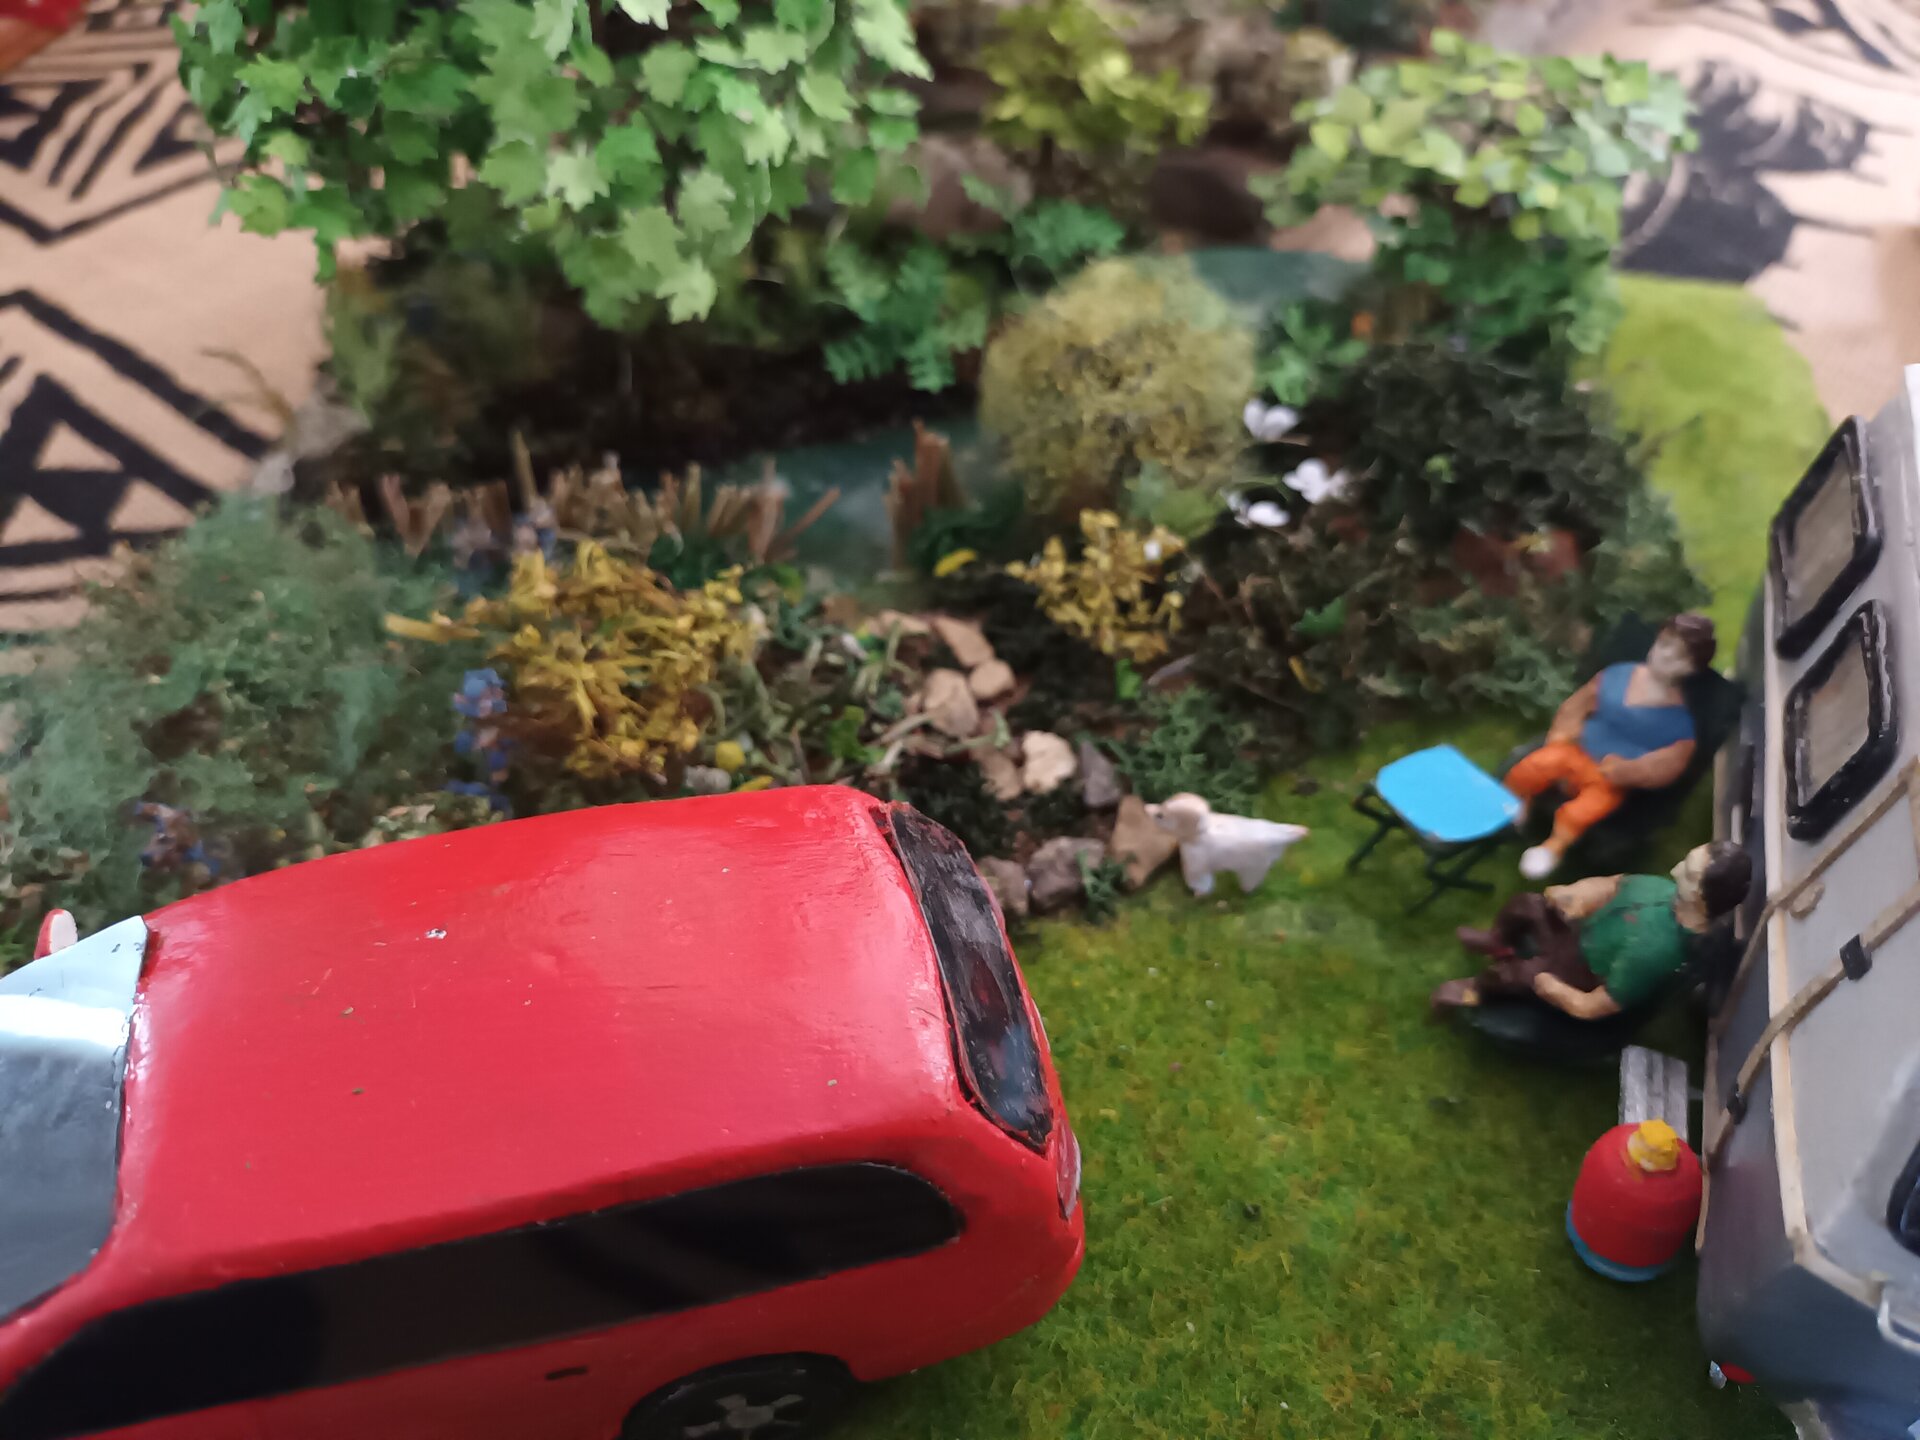
Tilly the Dog:
- Position:
- Investigating near riverbank
- Head toward water (dog curiosity)
- Distance from owners (dogs explore)
- Clear sightline (she’s small, needs visibility)
- Mounting:
- All four paws contact ground
- Pinned securely (smallest, most delicate component)
- Natural stance (alert, exploring)
- The Story Moment:
- Couple has stopped at riverside
- Car and caravan parked
- They’re doing setup/checking vehicle
- Tilly is investigating interesting smells near water
- Peaceful Welsh countryside moment
Result: The figures bring life to the scene. Without them, it’s a pretty diorama. With them, it’s a story.
Final Weathering and Details
Weathering the Vehicles:
- Dust and Dirt:
- Dry brush light brown/grey on lower vehicle panels
- Wheel arches (dirt spray from driving)
- Under caravan (road dirt)
- Not heavy, just suggestion
- Travel Wear:
- Slight scratches suggested on bumpers
- Windshield slight dust
- Tires dirty (realistic)
- License plate slightly worn
- Caravan Specific:
- Slight weathering on white panels
- Door handle area slightly darker (hand contact)
- Windows reflecting sky (pale blue tint)
Ground Details:
- Tire Tracks:
- Darkened grass in wheel path
- Slight mud/dirt visible
- Compressed vegetation
- Story element (they drove here)
- Foot Traffic:
- Path from car to caravan door
- Worn grass near door
- Realistic wear patterns
- Natural Debris:
- Few leaves scattered
- Small twigs near trees
- Pine needles under trees
- Natural, not pristine
Water and River Details:
- Riverbank Edges:
- Moss on wet rocks
- Darker stones at waterline (wet appearance)
- Slight green algae in water near rocks
- Natural shoreline
- Reflections Enhanced:
- Slight blue wash on river bed (sky reflection)
- Trees suggested in water surface reflection
- Very subtle, just hint
Tree Details:
- Bark Enhancement:
- Final dry brush on trunks (highlights)
- Moss on north side (green texture)
- Lichen suggested on some branches
- Natural color variation
- Foliage Final Touches:
- Few leaves loose (fallen)
- Leaf litter under trees
- Not autumn, but natural tree shed
Quality Control Check

Before declaring the piece complete, I conducted thorough quality inspection:
Structural Check:
- ✅ All components securely mounted
- ✅ No loose parts
- ✅ Base stable and level
- ✅ Can be carefully lifted and moved
- ✅ No adhesive visible where it shouldn’t be
- ✅ Trees secure (gentle wiggle test)
- ✅ Figures won’t fall off
Visual Check:
- ✅ No visible glue smears
- ✅ Paint coverage complete (no bare spots)
- ✅ Static grass coverage adequate
- ✅ Colors balanced throughout
- ✅ No dust or debris on resin water
- ✅ Details visible and clear
- ✅ Weathering appropriate (not overdone)
Story Check:
- ✅ Scene tells clear story
- ✅ Composition works from multiple angles
- ✅ Human figures recognizable
- ✅ Vehicles accurate to client’s actual car/caravan choice
- ✅ Tilly recognizable as their dog
- ✅ Welsh setting convincing
- ✅ Riverside atmosphere achieved
Technical Check:
- ✅ Scale consistent throughout (1:42)
- ✅ Proportions correct
- ✅ Perspective works
- ✅ No obvious errors or mistakes
- ✅ Finished to professional standard
Issues Found:
- One small area of grass needed additional application (fixed)
- Slight dust on water surface (carefully removed)
- One tree needed additional trunk base blending (improved)
- Minor paint touch-up on car bumper (corrected)
Final Verdict: Ready for delivery.
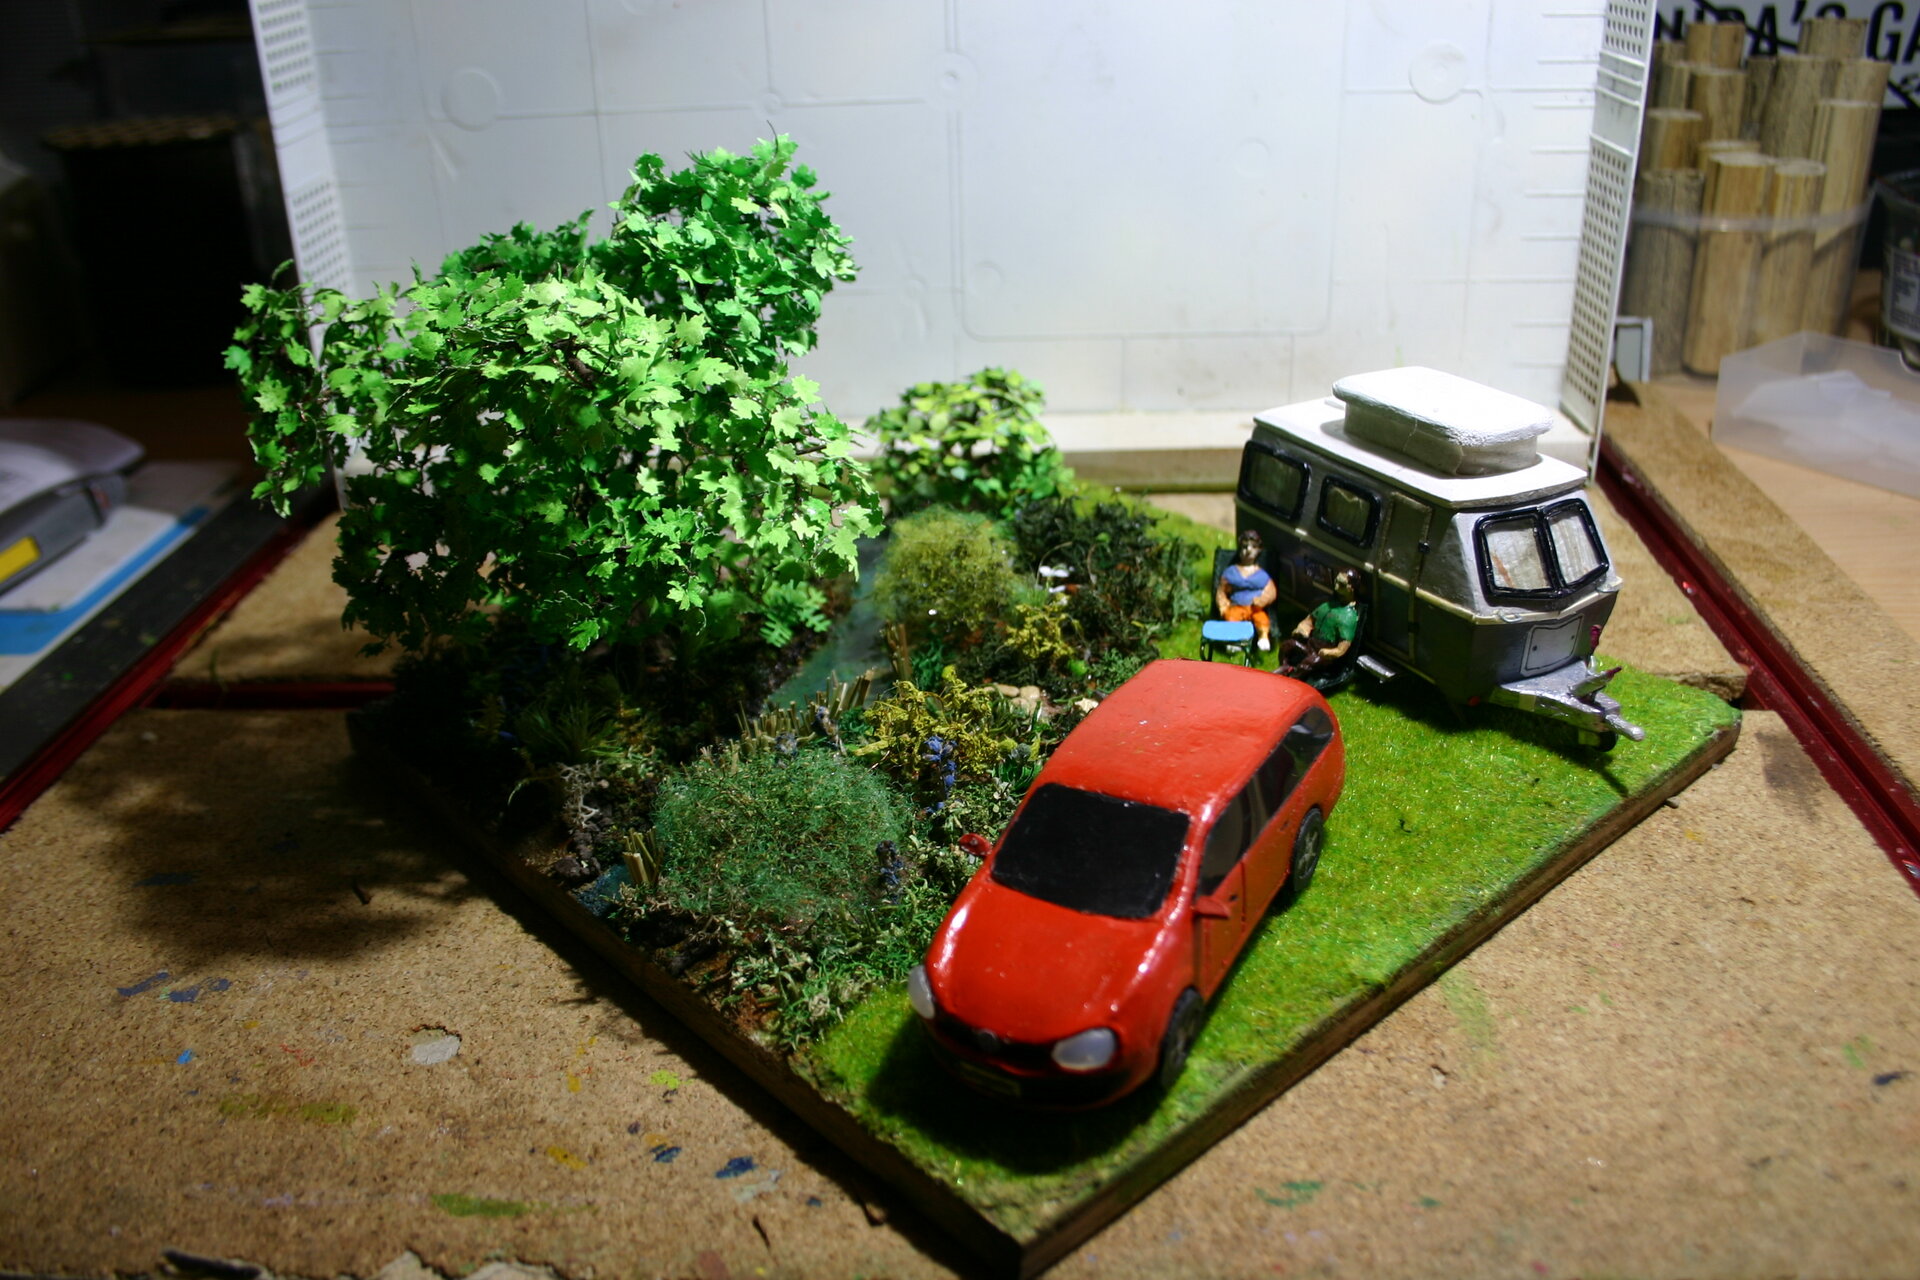
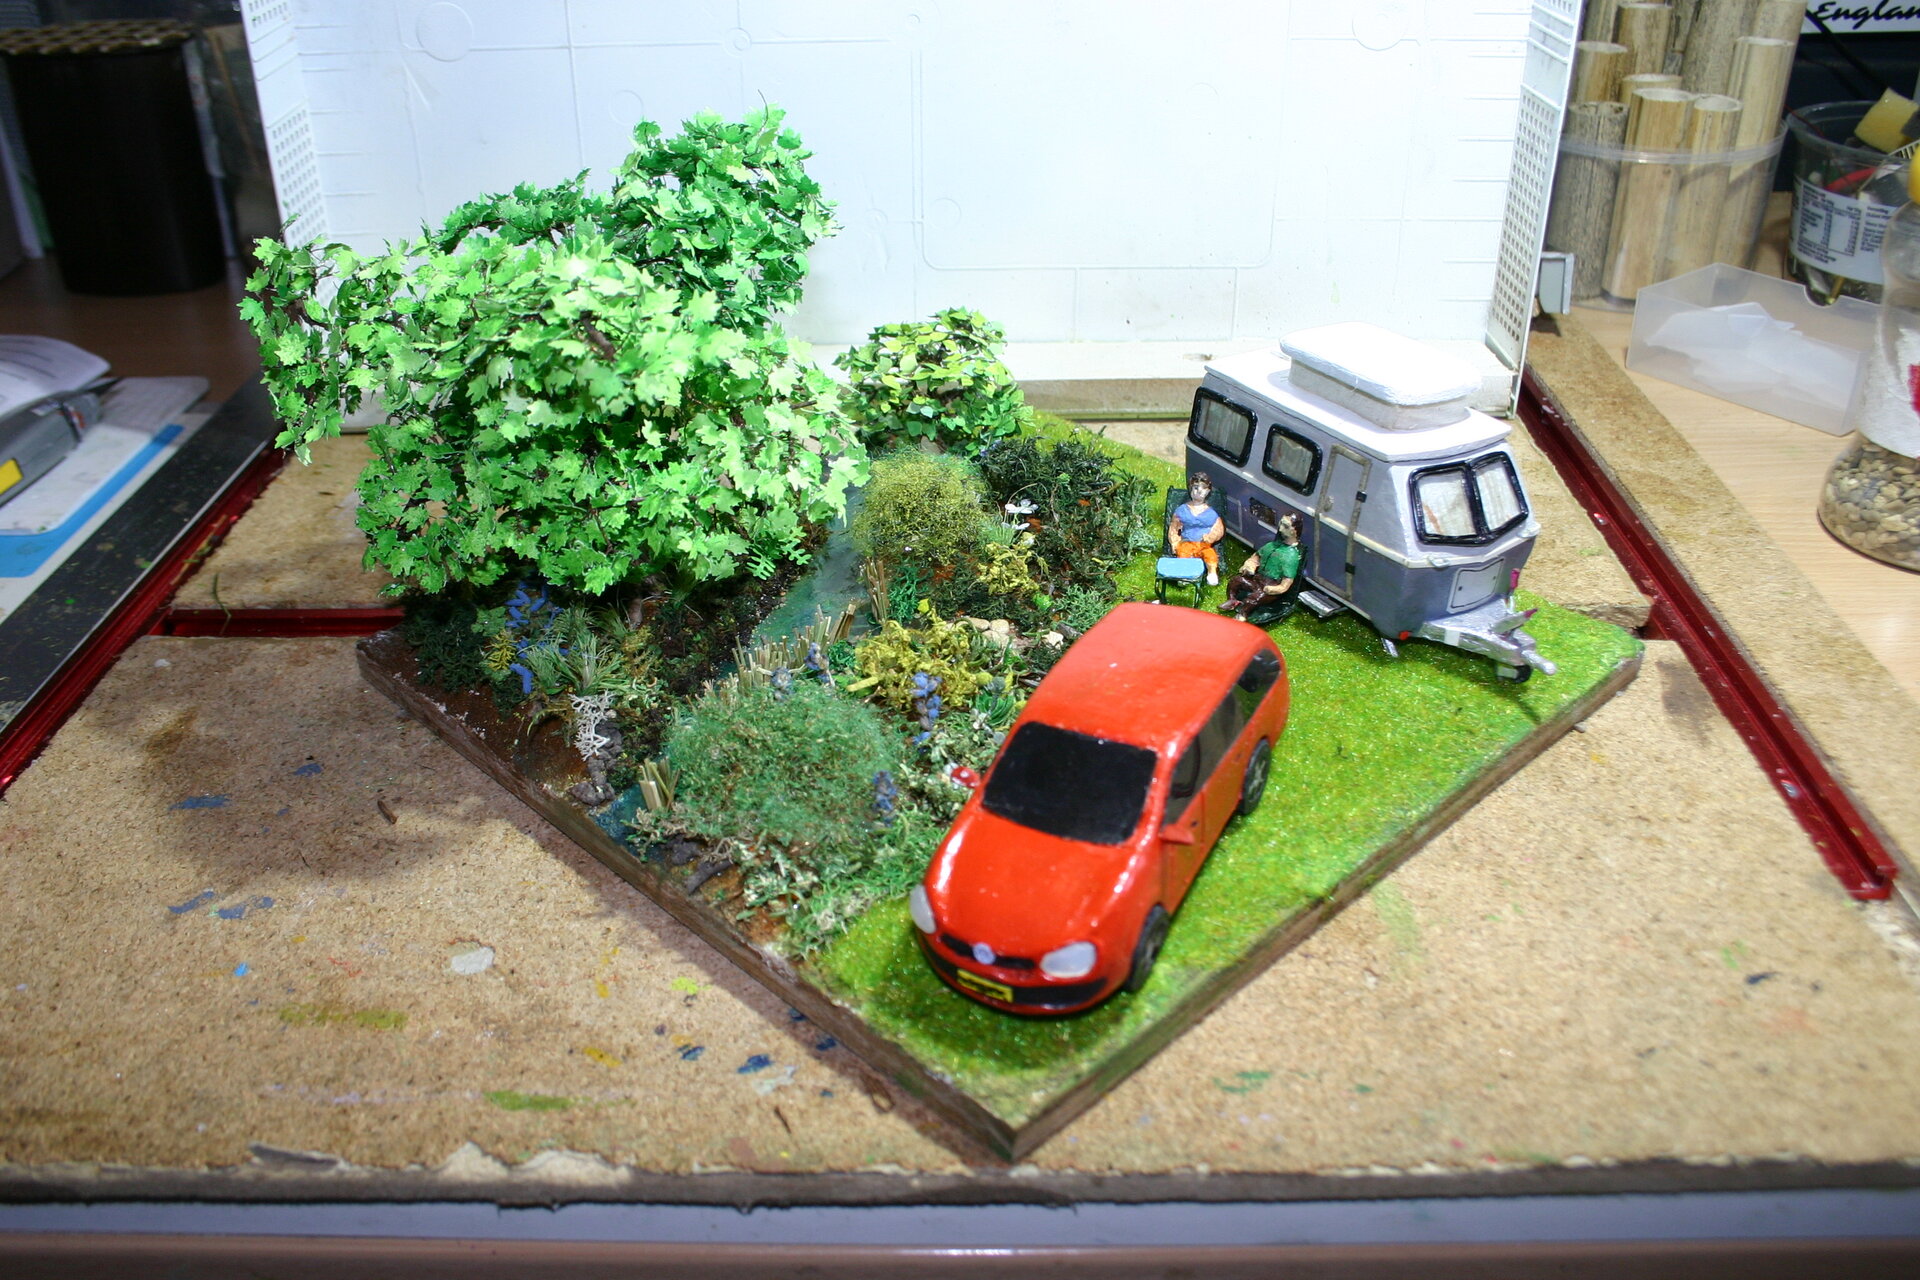
Photography Session
Before delivery, I conducted a comprehensive photography session:
Purpose:
- Document completed work
- Portfolio piece
- Client reference
- Insurance record
- Personal record
Setup:
- Natural lighting (cloudy day, diffused light)
- White background (isolates diorama)
- Multiple angles (360° coverage)
- Detail shots (figures, vehicles, water, grass)
- Scale reference shots (with ruler/common object)
Photos Captured:
- Wide shots (overall composition)
- Medium shots (sections and groupings)
- Close-ups (individual details)
- Different angles (front, sides, three-quarter views)
- Lighting variations (to show depth and texture)
Total Images: Approximately 50+ photos taken, 19 best selected for portfolio
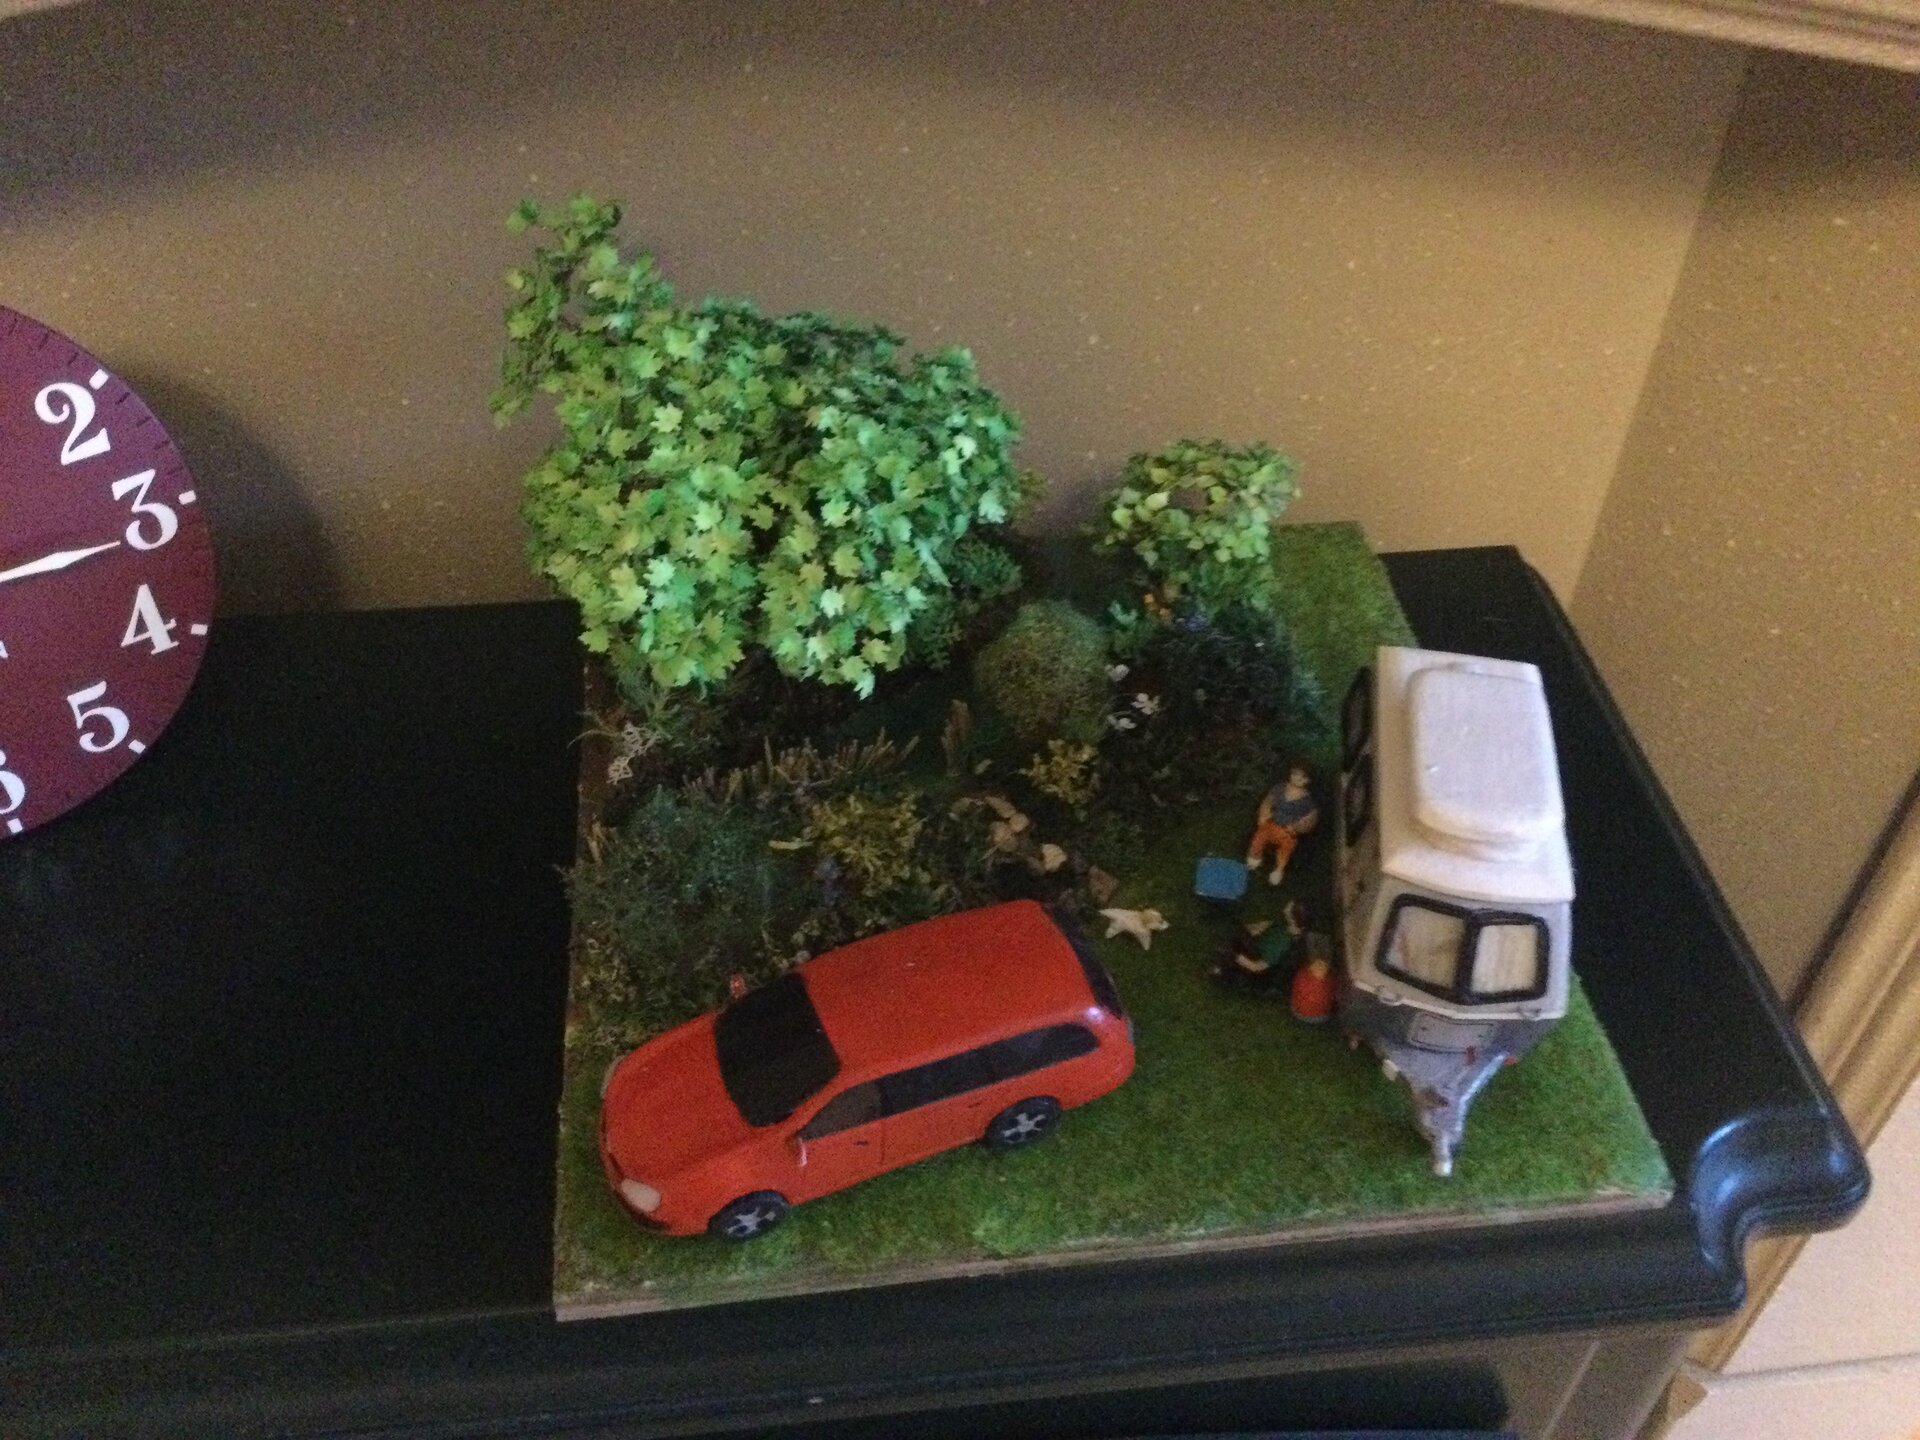
Protection and Display Base
Display Base Enhancement:
- Base Edge Treatment:
- Edges beveled slightly (refined appearance)
- Painted black (professional gallery base look)
- Multiple coats (smooth finish)
- Protects base edges from chips
- Base Underside:
- Felt pads applied (protects furniture)
- Label added (title, scale, artist, date, commission info)
- Professional presentation
- Information Plate:
- Small brass plate (front edge of base)
- Engraved: “Caravaning in Wales - 1:42 Scale - 2025”
- Professional touch
Protective Display Case:
Considerations:
- Protects from dust
- Prevents accidental damage
- Allows viewing
- Transportable
- Must be removable (access for photos/handling)
Solution:
- Clear acrylic case (custom-sized)
- Lifts off base (not permanently attached)
- Ventilation holes (prevents moisture buildup)
- Fits perfectly over diorama
- ~50mm clearance above tallest tree
Cost: £35 for custom case (worth it for protection)
The Delivery: May 10, 2025

Delivery Preparation:
- Packaging:
- Base wrapped in bubble wrap
- Case wrapped separately
- Sturdy box with padding
- Clear orientation marking (“THIS WAY UP”)
- Fragile labels
- Documentation Included:
- Build photos (progress documentation)
- Care instructions (cleaning, handling, display)
- Scale information
- Materials list
- Artist contact information
- Certificate of authenticity
The Handover:
Met my son and his partner at their home. Nervous excitement - seven months of work about to be judged.
Unpacking:
- Removed protective case first
- Their immediate reaction: silence (nerve-wracking)
- Then: “Oh my god, that’s incredible!”
Their Observations:
- “That’s definitely our car - you even got the number plate!”
- “The caravan looks just like the photos we showed you!”
- “Is that… is that supposed to be Tilly? That’s amazing! Look at her ears!”
- “I love the river - it actually looks wet!”
- “The grass looks so real - I can see where you’d pitch the tent!”
- “This is going in the living room. Everyone has to see this.”
Questions Asked:
- How long did it take? (80 hours over 7 months)
- What’s it made of? (Everything from scratch - explained materials)
- How did you make the water? (Explained resin technique)
- Can we touch it? (Yes, but carefully - showed how to lift protective case)
- Did you enjoy making it? (Mixed answer - stressful but rewarding)
Their Reaction to Tilly: “You made her perfect. The ears are exactly right. When we show people this, they’re going to recognize her immediately.”
Payment and Completion:
- Commission fee agreed upon (£250 - covering materials and time)
- Payment received
- Handshake and thanks
- Photos taken of them with the diorama
- Promised to share photos of it in their home
My Feelings:
- Relief (they loved it)
- Pride (it turned out well)
- Exhaustion (seven months of effort)
- Satisfaction (commissioned work completed successfully)
- Slight sadness (letting go of major project)
Project Statistics
Timeline:
- Start Date: December 10, 2024
- Completion Date: May 10, 2025
- Duration: 5 months (22 weeks)
- Active Build Time: ~80 hours
Components Built:
- 1 x Eriba Triton caravan (custom scratch-built)
- 1 x VW Golf R Estate (custom scratch-built)
- 2 x Human figures (wood carved)
- 1 x Dog figure (wood carved)
- 6 x Trees (wire and foam)
- 1 x River (resin)
- Multiple vegetation elements
- Rocky riverbank
- Welsh riverside landscape
Materials Cost:
- Structural materials: ~£45
- Paint and finishing: ~£30
- Static grass and vegetation: ~£35
- Resin and water effects: ~£25
- Trees and foliage: ~£20
- Display case: ~£35
- Miscellaneous (glue, tools, etc.): ~£30
- Total Materials: ~£220
Financial:
- Commission Fee: £250
- Materials Cost: £220
- Net Profit: £30
- Effective Hourly Rate: £0.38/hour
Reality Check: This was not done for profit. This was done for:
- Challenge
- Skill development
- Portfolio piece
- Favor for family
- Love of the craft
Skills Summary: What I Learned
New Skills Acquired:
- Epoxy resin water effects
- Static grass application
- DIY tool creation (static applicator)
- Air-dry clay vehicle construction
- Wood carving miniature figures
- Wire tree construction
- Commissioned work management
- Client expectation management
Skills Significantly Improved:
- Surface preparation and painting
- Weathering techniques
- Composition planning
- Problem-solving under constraints
- Material experimentation
- Patience with rework
- Quality standards
- Professional presentation
Skills That Surprised Me:
- Research (visiting campsites, studying plants)
- Photography (documenting work)
- Client communication
- Project management
- Custom tool development
Personal Growth:
- Learning when “good enough” isn’t good enough
- Accepting rework as part of process
- Pushing through frustration
- Delivering professional-quality commissioned work
- Meeting deadlines while maintaining standards
Reflections on Commissioned Work
What’s Different About Commissioned vs. Personal Projects:
Commissioned Work:
- ❌ Less creative freedom (must match brief)
- ✅ Higher standards required (someone paid for it)
- ❌ More pressure (can’t just abandon if difficult)
- ✅ Clear goals (specific requirements)
- ❌ Less fun when frustrated (can’t just put aside)
- ✅ Accountability (someone expects results)
- ✅ Professional development (portfolio piece)
- ✅ Financial compensation (small, but there)
Personal Projects:
- ✅ Total creative freedom
- ❌ Can abandon when difficult
- ✅ Fun-focused
- ❌ Easier to accept “good enough”
- ✅ No pressure
- ❌ No external accountability
- ❌ No portfolio pressure
What I Learned:
- I can deliver commissioned work to professional standards
- My skills are marketable (if I chose to pursue this)
- I enjoy the challenge of constraints
- Meeting client expectations is very satisfying
- Being accountable raises my own standards
Would I Do Commissioned Work Again?
Yes, but selectively:
- Projects that interest me technically
- Clients I trust and communicate well with
- Reasonable timelines
- Fair compensation for time and materials
- Subjects I’m passionate about
The Technical Challenges Conquered
Major Hurdles Overcome:
- Eriba Caravan Curves ✅
- Problem: Complex compound curves
- Solution: Balsa wood + epoxy putty + patience
- VW Golf Estate (Wrong Reference Model) ✅
- Problem: Only had sedan, needed estate
- Solution: Air-dry clay, photo references, multiple reworks
- Recognizable Figures at 1:42 ✅
- Problem: Too small for portrait detail
- Solution: Stylized wood carving, characteristic postures
- Tilly the Dog ✅
- Problem: Tiny scale, must be recognizable
- Solution: Wood carving (material breakthrough)
- Space Constraints ✅
- Problem: Entire scene in 350mm x 250mm
- Solution: Careful composition, suggestion over completion
- Realistic Water ✅
- Problem: Making water actually look wet
- Solution: Epoxy resin (nerve-wracking but successful)
- Natural Grass Coverage ✅
- Problem: Avoiding “astroturf” appearance
- Solution: Multiple colors/heights, campsite research
None of these were guaranteed to work. All required research, testing, and accepting failure as part of the learning process.
What I Would Do Differently
If I Were Starting This Project Again:
- More Time for Planning:
- Spent 8 hours planning
- Should have spent 15-20 hours
- Better planning = less rework
- Test Pieces for Every Technique:
- Did some testing
- Should have tested EVERYTHING
- Would have saved rework time
- Better Progress Photos:
- Got caught up in building, forgot to document
- Missing some key progress shots
- Would establish photo routine
- Earlier Client Check-ins:
- Showed progress a few times
- Should have shown more frequent updates
- Prevents surprises at delivery
- More Realistic Timeline:
- Estimated 3 months
- Took 5 months
- Should have built in buffer time
- Charge More:
- £250 for 80 hours = £3.12/hour
- Should have charged £400-500 minimum
- Undervalued time and skill
But Would I Change the Process?
- The struggles taught me
- The rework improved skills
- The challenges made me better
- The project achieved its goals
No regrets.
The Final Piece
What the Final Piece Represents:
- 80 hours of active work
- 7 months of calendar time
- Countless hours of research
- Multiple technique breakthroughs
- Many moments of doubt
- Several complete reworks
- Frustration, satisfaction, pride
- Learning, growing, improving
- A story told in miniature
- A family captured in a moment
- A Welsh riverside preserved
- A commission successfully completed
Client Satisfaction: ✅
Technical Goals: ✅
Artistic Goals: ✅
Learning Objectives: ✅
Portfolio Piece: ✅
Project Status: COMPLETE
Final Thoughts
This project pushed me further than any previous model building work. It demanded new skills, tested my patience, and required professional-level results.
What Made It Worthwhile:
- Seeing the clients’ faces when they recognized their car, their dog, themselves
- Knowing it will be displayed and enjoyed for years
- Having a portfolio piece that demonstrates serious skills
- Proving to myself I can complete commissioned work
- The growth as a builder and artist
The Biggest Lesson:
Commissioned work isn’t just about building skill. It’s about:
- Communication
- Meeting expectations
- Professional standards
- Accountability
- Delivering on promises
- Client satisfaction
- Personal integrity
I started this project as a favor for my son. I finished it as a professional commission that I’m genuinely proud of.
The Questions I Can Now Answer:
- Can I build vehicles from scratch? Yes.
- Can I work with multiple materials and techniques? Yes.
- Can I deliver commissioned work? Yes.
- Can I meet client expectations? Yes.
- Would I do it again? Yes, selectively.
The Question I Couldn’t Answer Before:
Am I good enough to charge for my work?
The Answer:
Not yet at full professional rates, but yes - I can deliver commissioned work that clients value and love. This project proved that.
What’s Next?
Immediate Plans:
- Rest (seriously, I need a break from detailed work)
- Document lessons learned more formally
- Update portfolio with this project
- Consider next commission (if right project presents itself)
Future Goals:
- Improve figure sculpting (still weakest skill)
- Master automotive paint finishes
- Explore other scales
- Try different types of commissions
- Potentially teach workshops (passing on skills)
This Project Opened Doors:
Word of mouth has already generated interest from friends and family. “Could you make…?” questions are appearing.
I now know the answer: “Maybe. Let’s talk about what you’re envisioning.”
Project Complete: May 10, 2025
Total Time: 80 hours over 7 months
Total Cost: £220 in materials
Commission Fee: £250
Client Satisfaction: 100%
Personal Satisfaction: 95% (always room for improvement)
Would Do Again: Yes
Previous: 006 - Grass and River Effects
Build Logs Complete
Gallery: The Complete Journey
Thank you for following this build journey.
- Models4Comfort, May 2025
Have questions or feedback about this project? I'd love to hear from you.