Planning & Commission Brief
Build Log 001: Planning Phase and Commission Brief
Date: December 15, 2024
Phase: Project Planning and Research
Time Spent: ~8 hours
Status: Planning Complete
The Commission
It started casually over a relaxing evening with my son and his family in November 2024. Fresh from completing the English Country Garden, I was feeling confident - perhaps overconfident.
“So do you have anything that I can build for you?” I asked jokingly.
“Yes!” came the immediate response. “Can you build our new caravan and car on a campsite next to a river?”
And just like that, I had a commission.
Client Requirements:
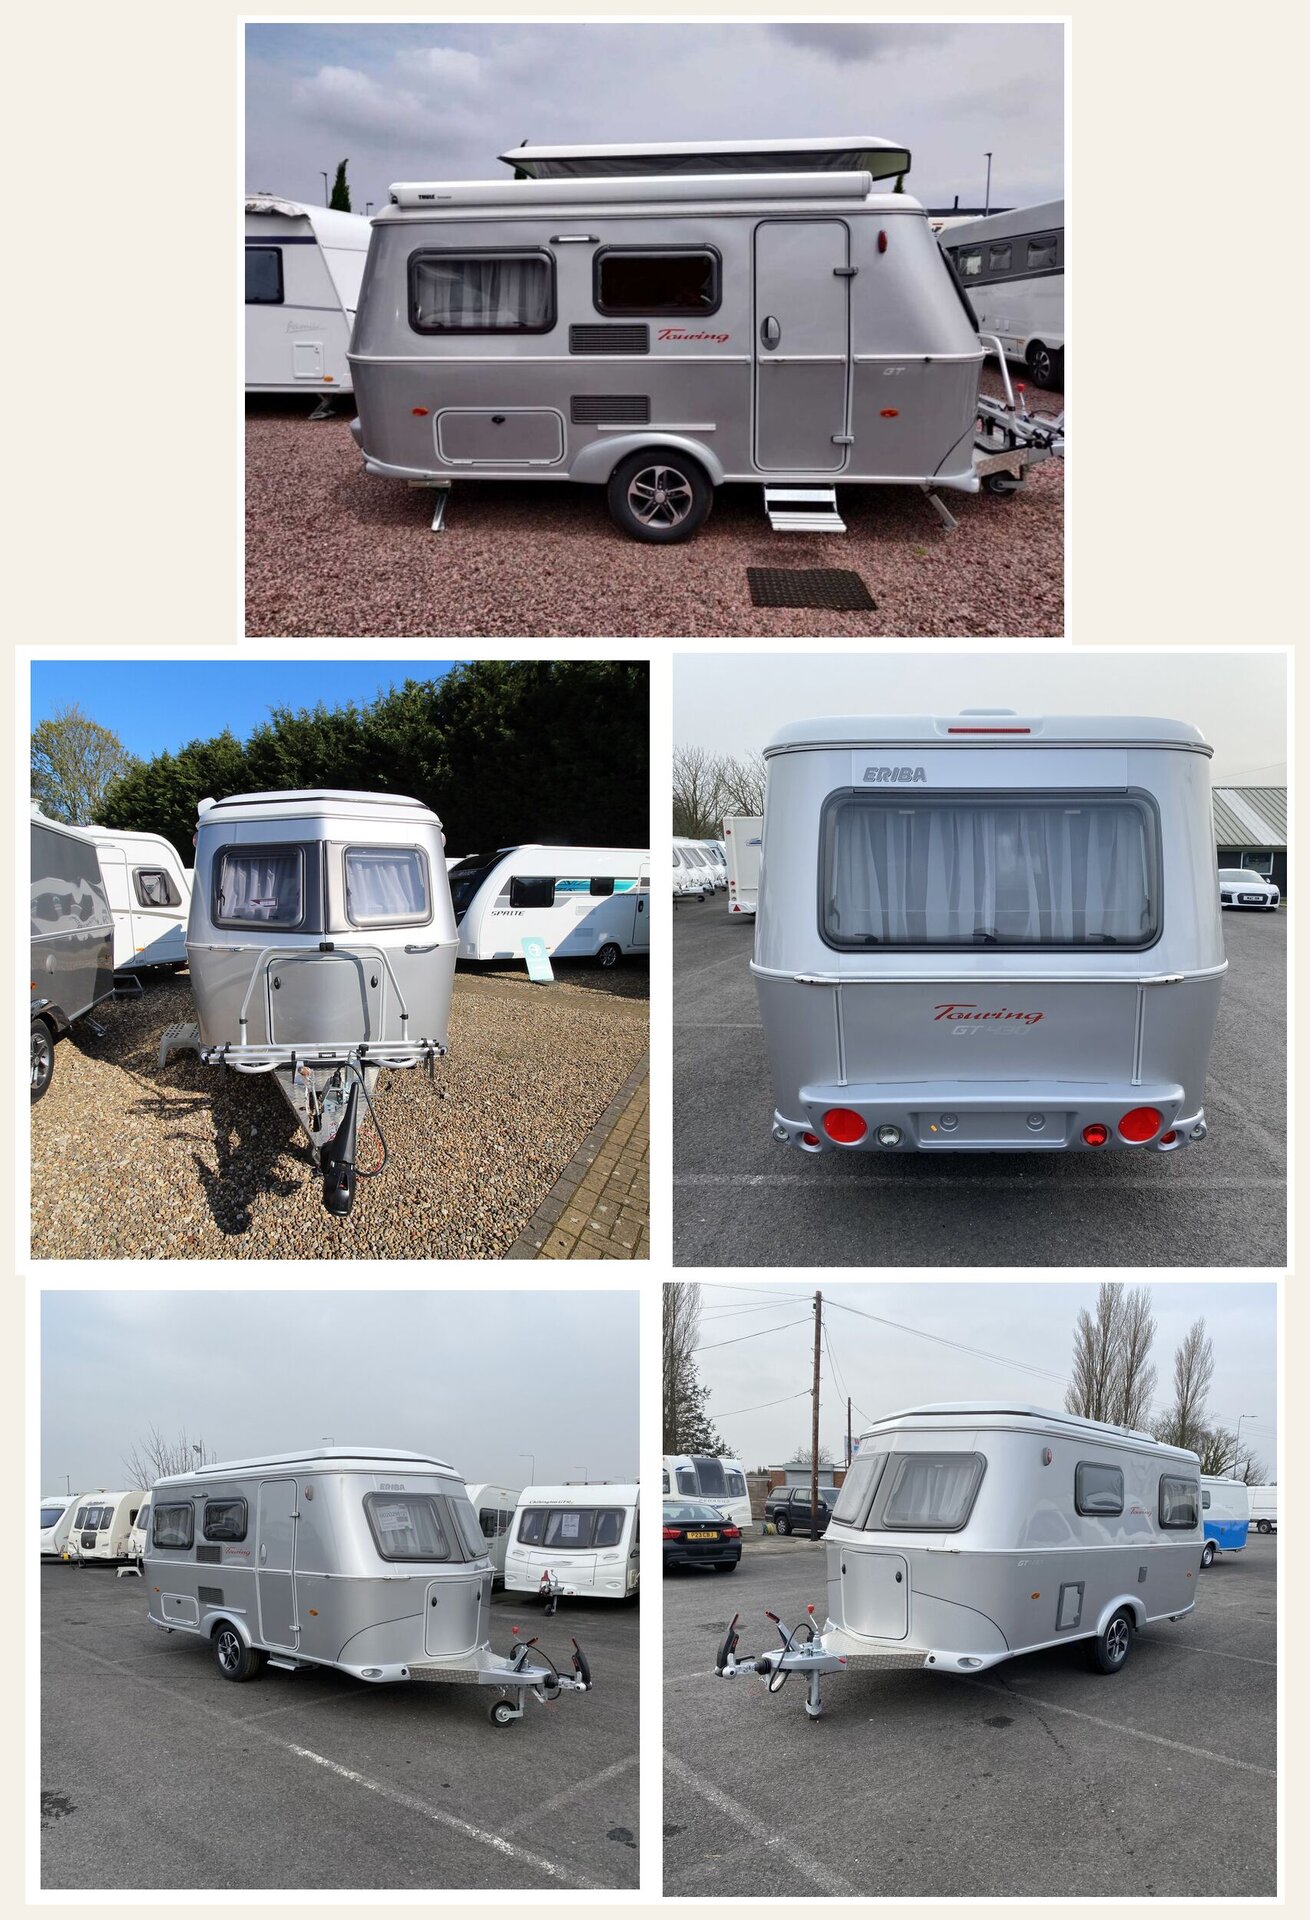
- Eriba Triton caravan (their actual model)
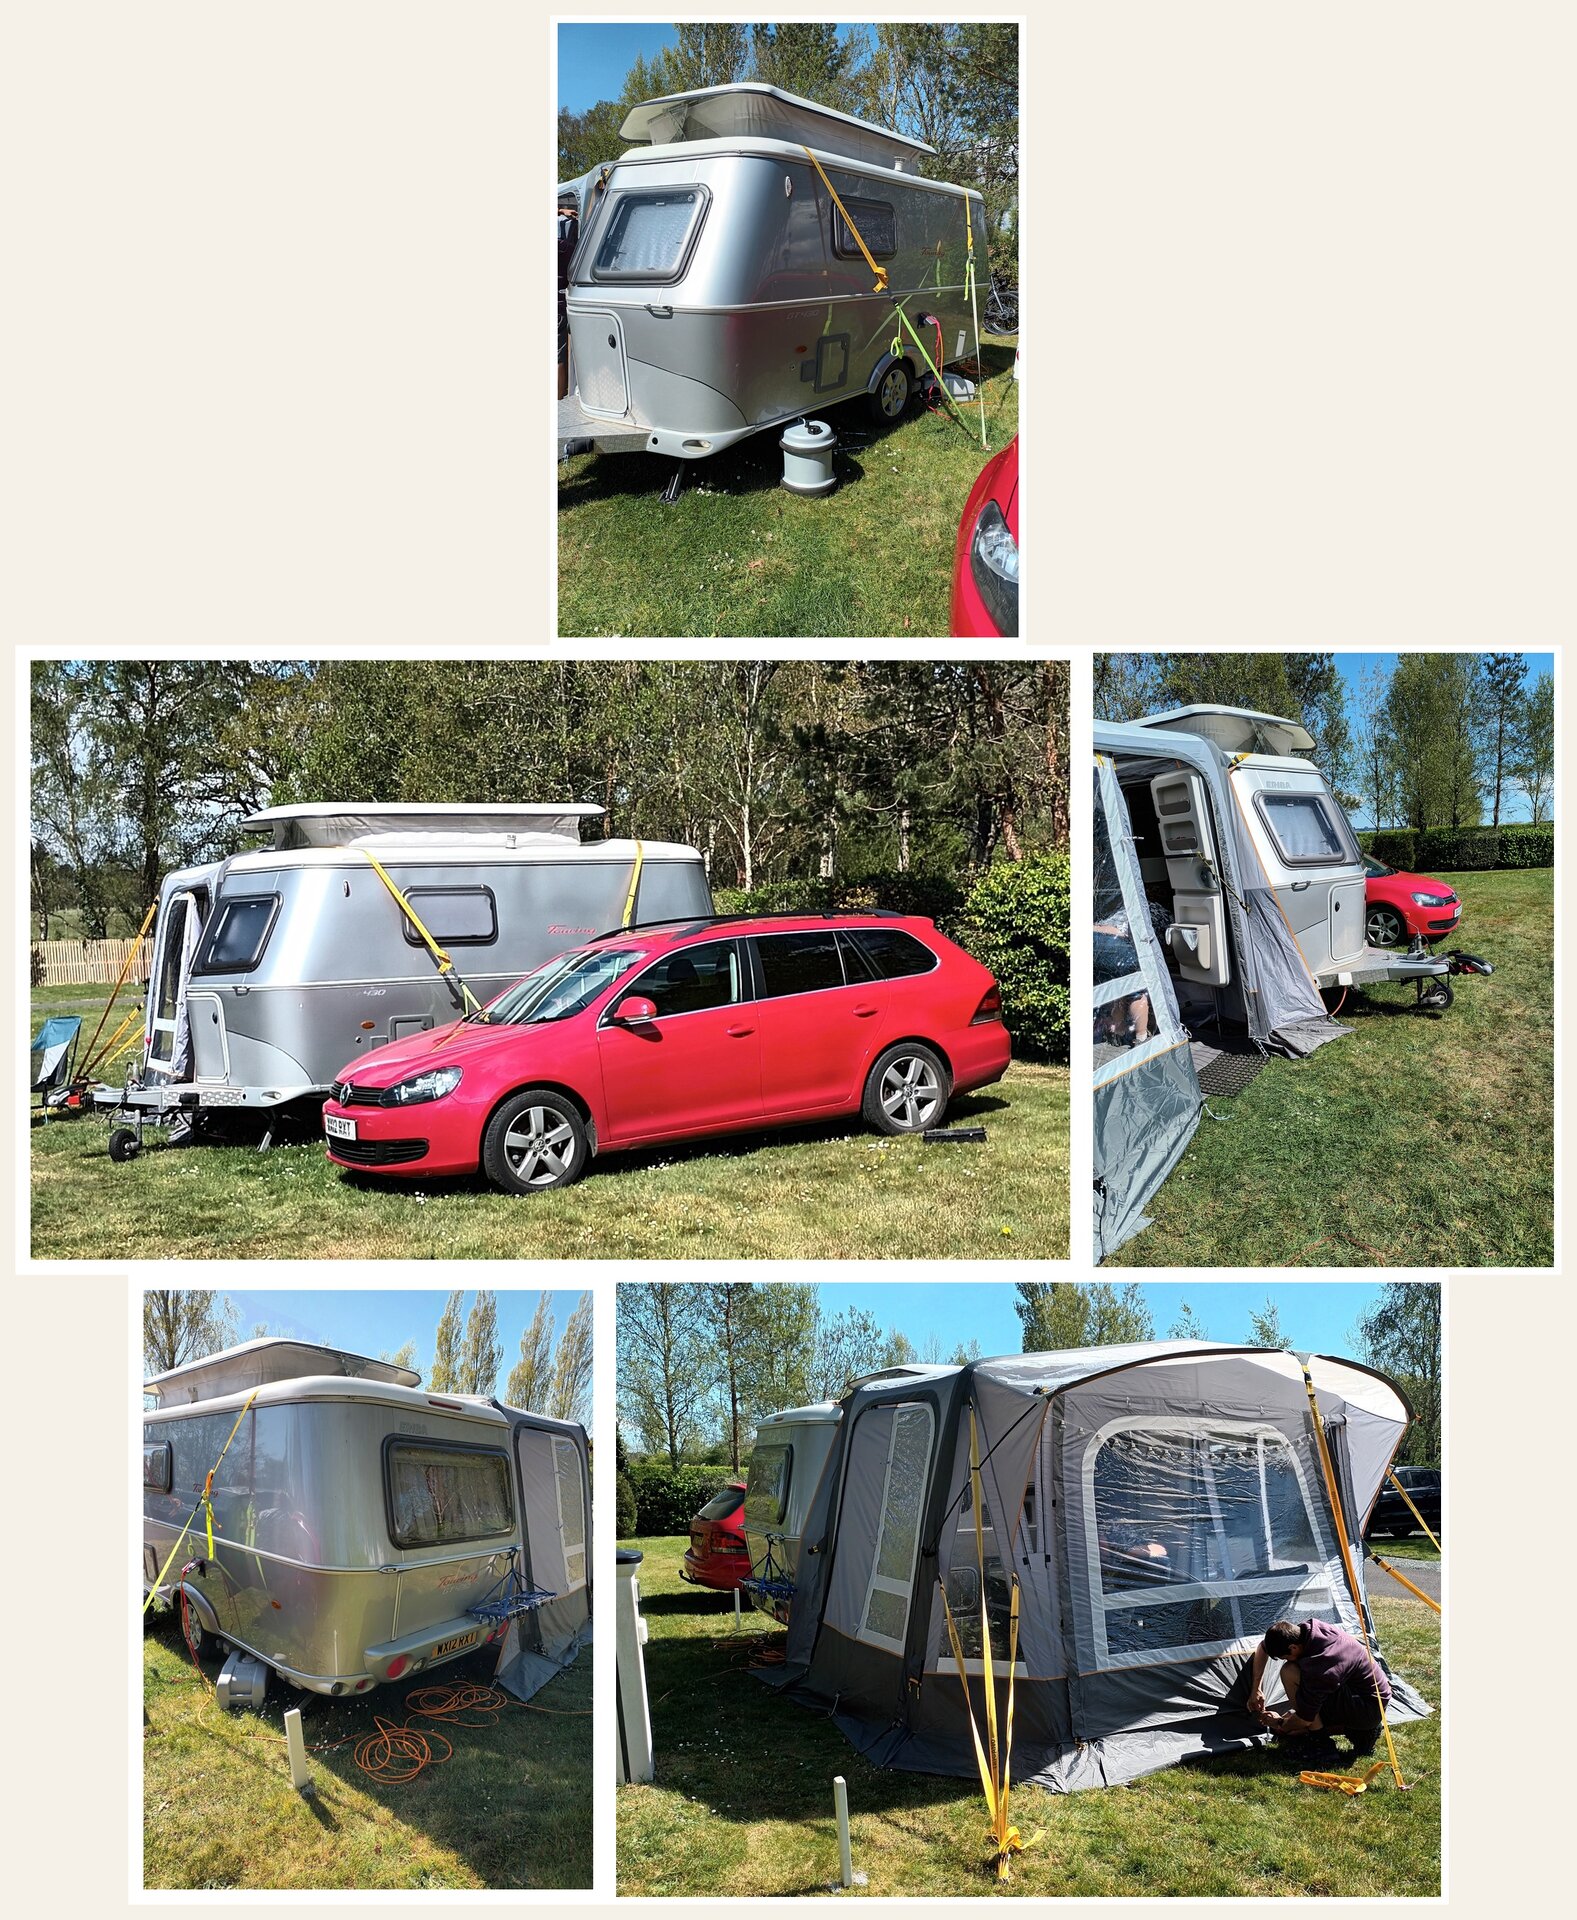
- VW Golf R Estate in red (their actual car)
- Two figures (my son and daughter-in-law)
- Tilly (their beloved dog)
- Campsite setting near a river
- Welsh countryside scenery
- Must fit on 25cm × 25cm base (shelf space constraint)
Reality Check: What I’d Never Done Before
As the excitement settled, reality set in. This commission required skills I didn’t have:
Vehicle Modeling: Zero experience
- Never built a miniature car or caravan
- No idea how to achieve smooth automotive curves
- Uncertain about materials and techniques
Portrait Figures: Previous failures
- My figure work was poor and not recognizable
- Never successfully sculpted specific people
- Concerned about client disappointment
Animals: Complete unknown
- Never attempted a miniature dog
- No reference for techniques
- Tilly needed to be recognizable
Water Effects: Previous attempt unsatisfactory
- Log Cabin river was disappointing
- Needed to research better techniques
- Resin work was new territory
Despite these challenges, I accepted the commission. The only way to improve is to push beyond comfort zones.
Scale Determination
With a fixed 25cm × 25cm base (dictated by available shelf space), I needed to work backwards from the caravan dimensions to determine the scale.
Research Phase
I collected extensive reference material:
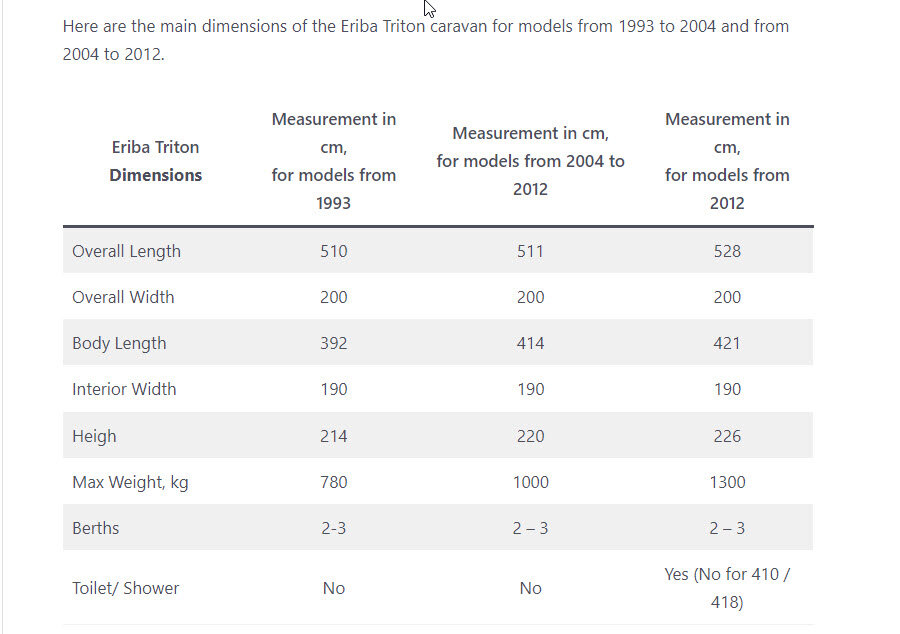
- Manufacturer Specs: Official Eriba Triton dimensions
- Online Photos: Multiple angles and detail shots
- Other Models: Found one example of someone’s scratch-built Eriba
- Site Visit: Photographed the actual caravan and car on location
Scale Calculations
Working from the Eriba Triton’s actual dimensions, everything calculated to 1:42 scale.
Caravan Dimensions (mm):
| Element | Model | Actual | Ratio |
|---|---|---|---|
| Body Length | 100mm | 4210mm | 1:42.1 |
| Overall Length | 125mm | 5280mm | 1:42.2 |
| Width | 48mm | 2000mm | 1:41.7 |
| Height | 54mm | 2260mm | 1:41.9 |
The slight variations average out to 1:42 - close enough for visual accuracy.
Related Elements at 1:42:
| Item | Model Size | Real Size | Notes |
|---|---|---|---|
| Base | 250mm | 10.5m | Entire scene footprint |
| Man | 48mm | 2.0m | 6’6” figure |
| Woman | 40mm | 1.7m | 5’7” figure |
| Dog (Tilly) | 12mm | 500mm | Medium-sized dog |
| Car | 90mm | 3.8m | VW Golf Estate |
| Large Tree | 143mm | 6.0m | Background tree |
| River Width | 71mm | 3.0m | Backdrop river |
| Large Plant | 48mm | 2.0m | Tall shrub |
| Flower Head | 1mm | 40mm | Individual bloom |
This mathematical foundation gave me confidence - if I got the proportions right on paper, everything would look correct together.
Creating Working Plans
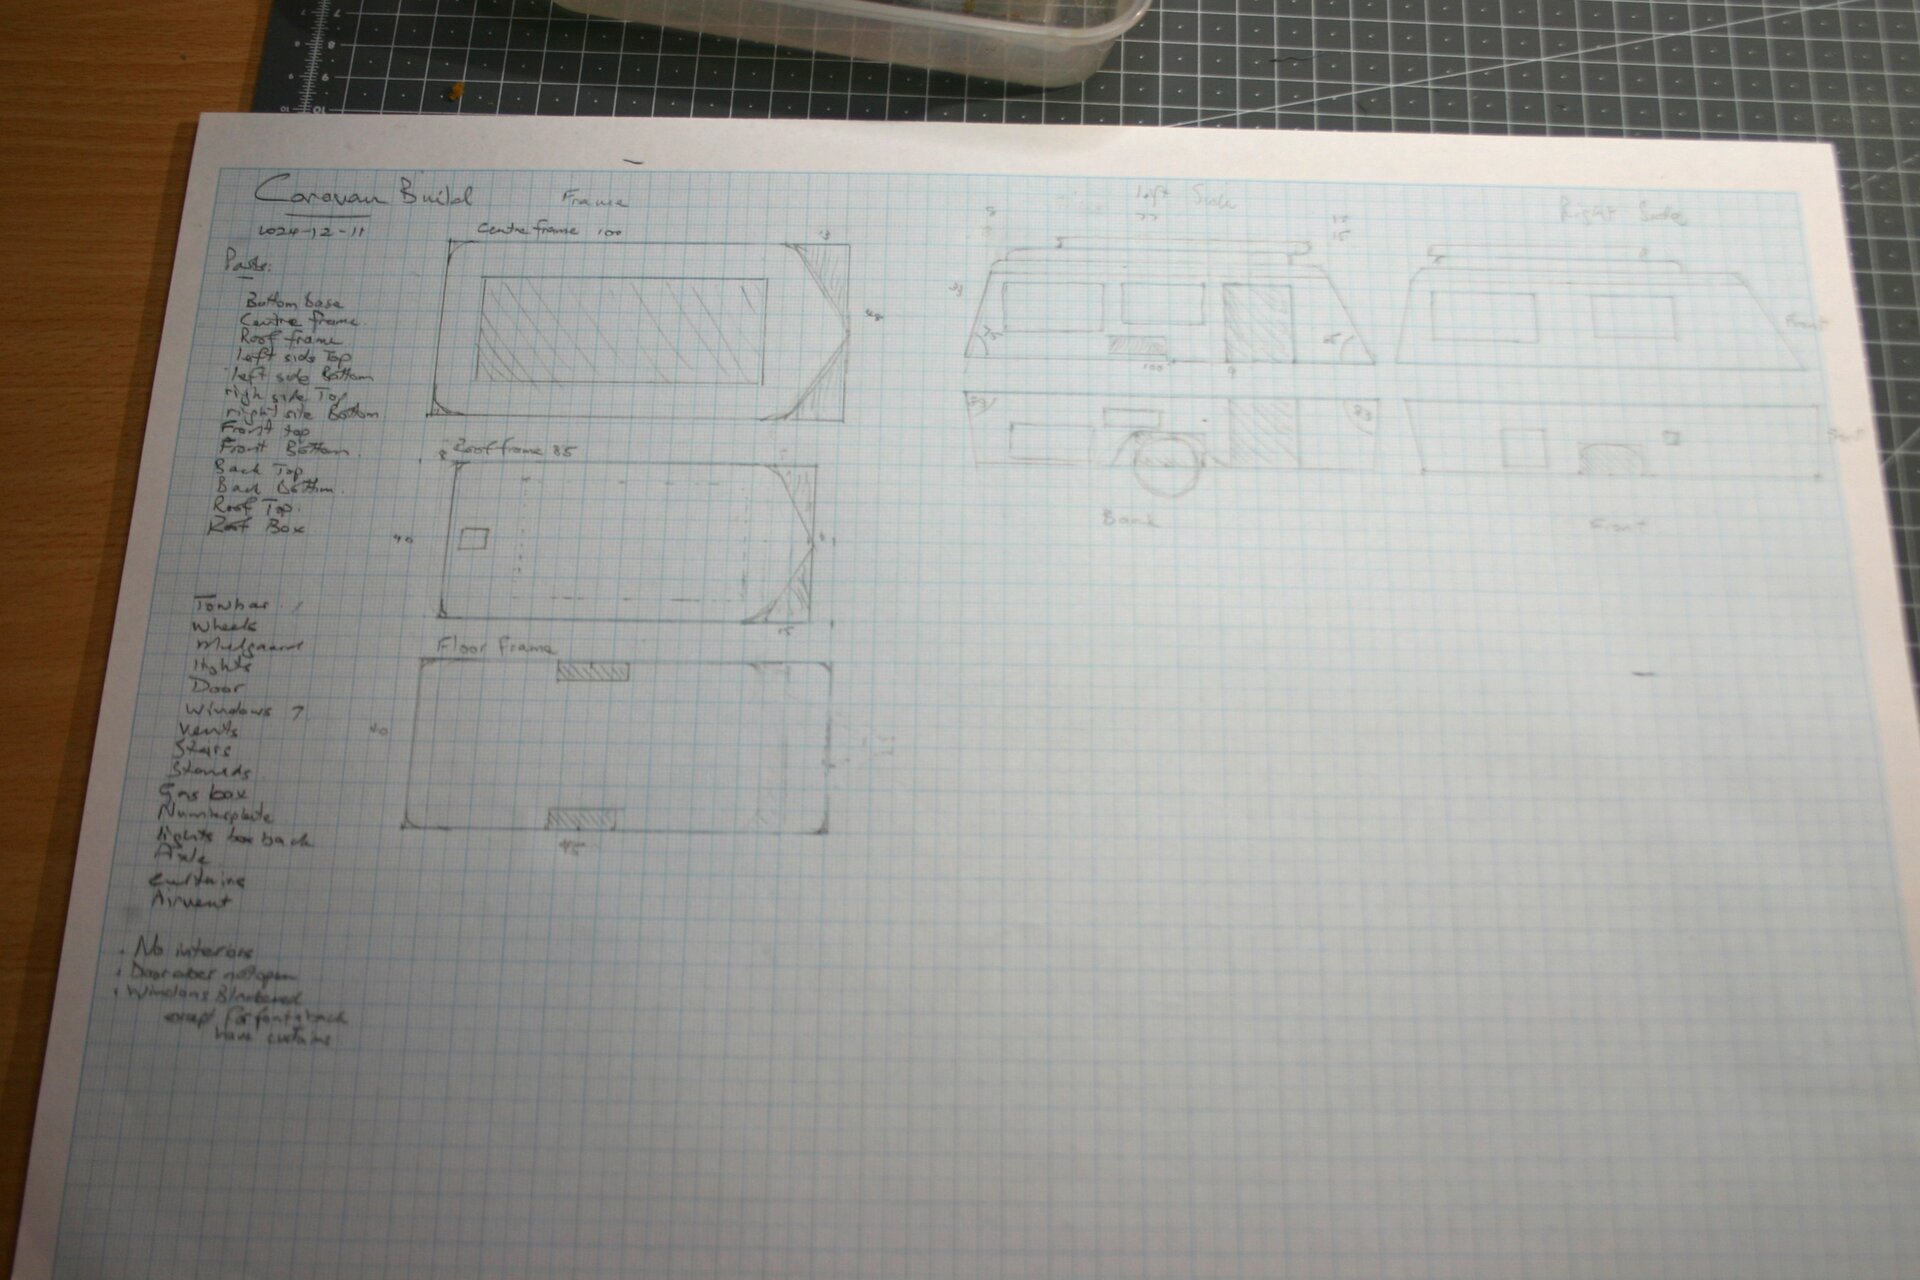
Without formal architectural drawing skills, I work “to the eye” - measuring and fitting as I build. But for this commission, I needed more structure:
Planning Documents Created:
- Scale conversion table for all elements
- Cutting sheet for caravan body layers
- Reference photo collection organized by component
- Materials list for each build phase
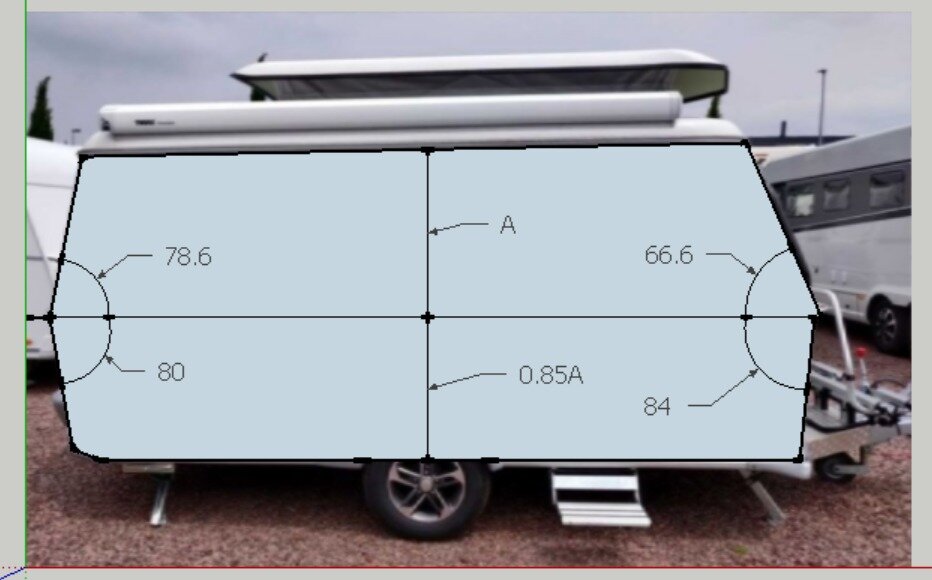
- Angle calculations from side-view photos
The cutting sheet became my blueprint. Even though I knew I’d adjust during construction, having these dimensions calculated in advance prevented major errors.
Research - The Eriba Challenge
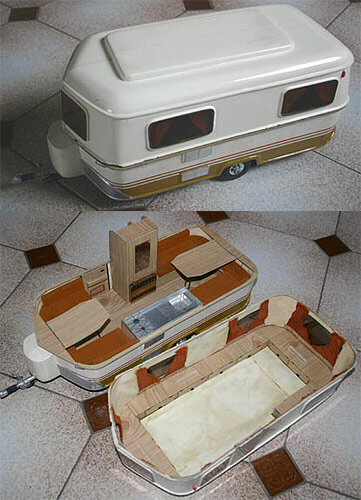
Research Findings:
- No kits available at any scale for Eriba caravans
- No building plans for model makers
- Very few examples of scratch-built Eribas
- One successful build found online (pictured above)
The one example I found was crucial - it proved someone else had successfully scratch-built an Eriba. If they could do it, so could I.
Key Details to Capture:
- Distinctive curved body shape (Eriba’s signature “egg” profile)
- Large curved windows (particularly challenging front nose windows)
- Characteristic mudguards
- Jockey wheel and hitch
- Wheel design and proportions
- Rear bumper and lights
Research - The VW Golf Estate

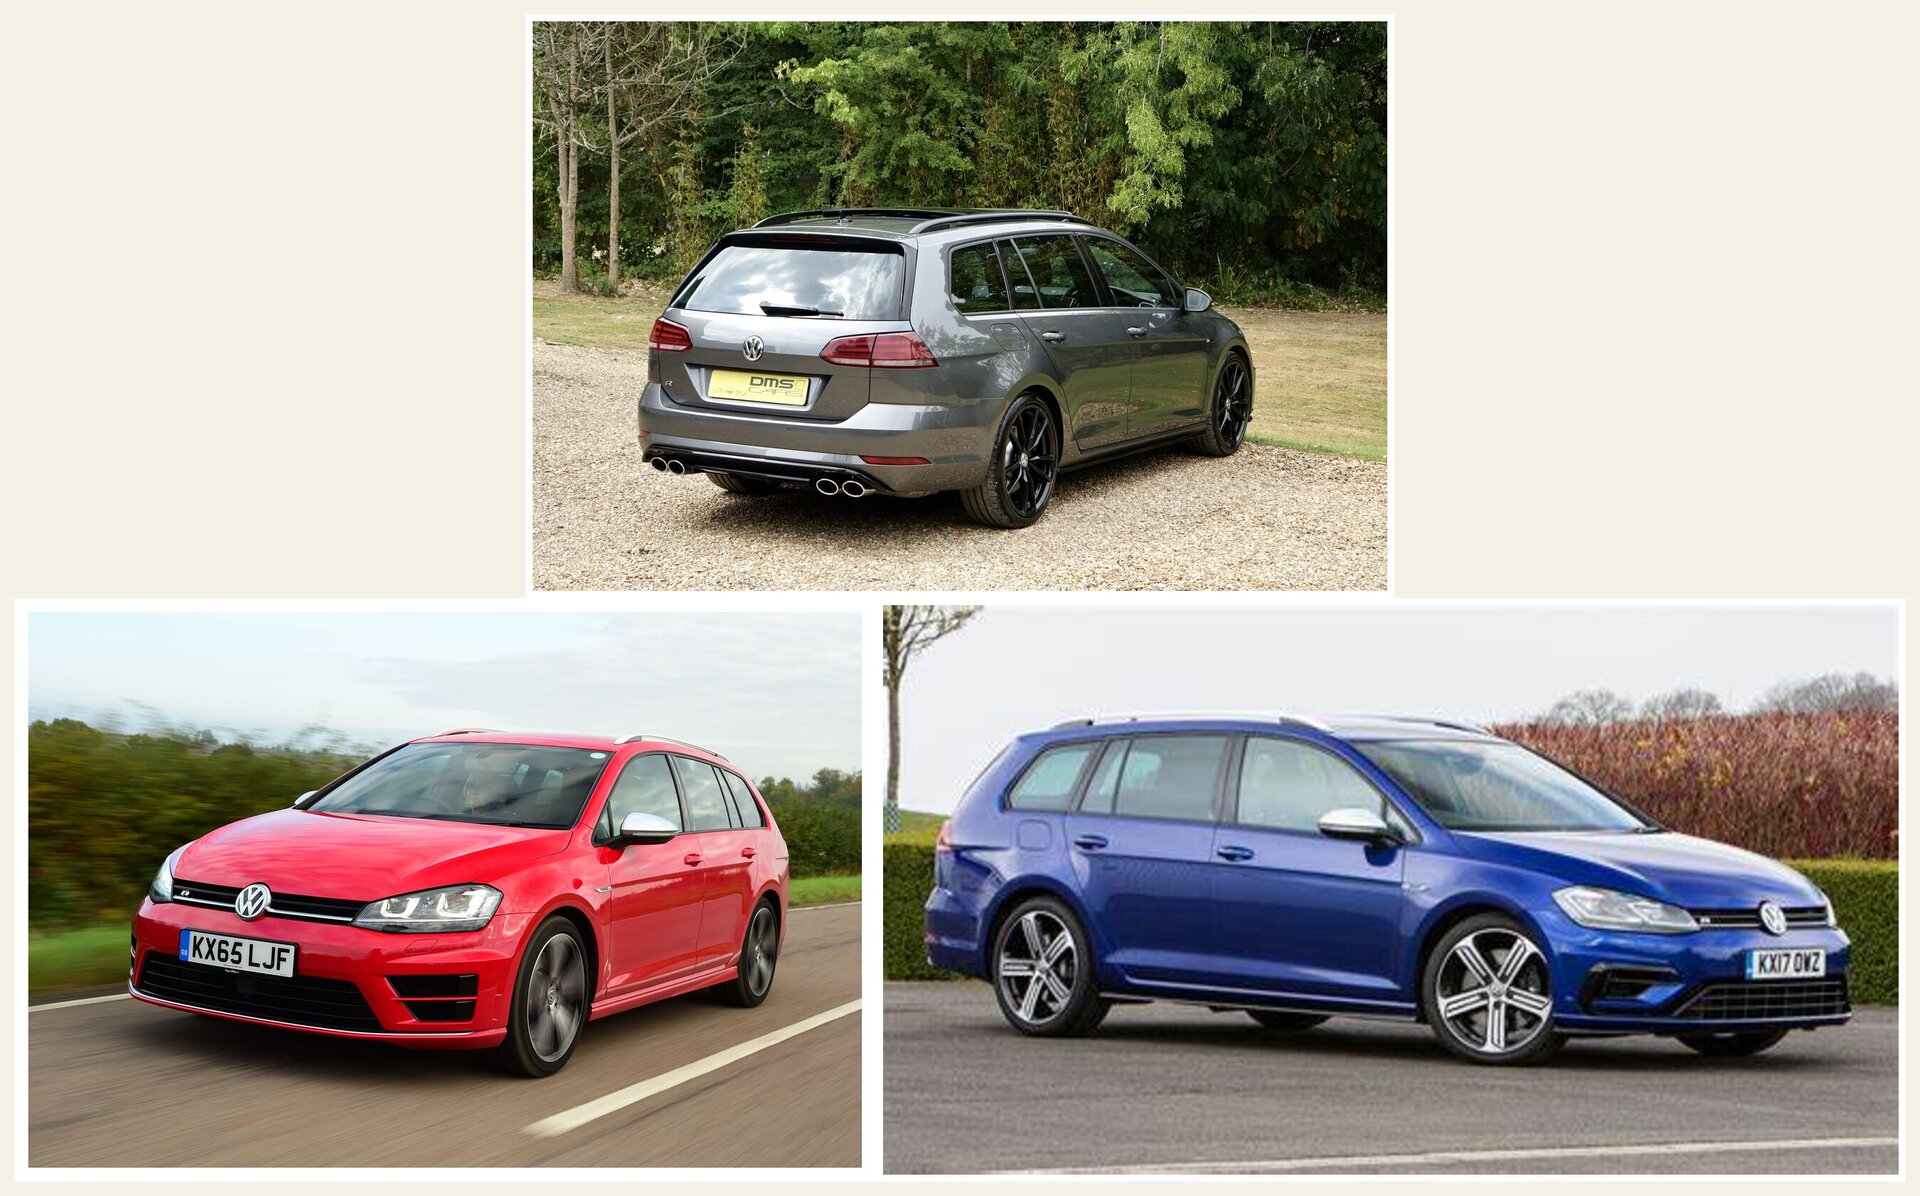
Car Challenge:
- No model kits at 1:42 scale for Golf Estate
- Purchased 1:43 VW Golf sedan as sizing reference
- Needed to modify proportions for estate body style
- Required understanding of automotive curves and details
Key Details to Capture:
- Estate roofline (longer than sedan)
- Rear hatch design
- Red paint finish
- Actual license plate number (for personal touch)
- Wheel design
- Light clusters
- Window proportions
Build Strategy Decision
With all research complete, I faced a critical decision: what to build first?
Decision: Build the caravan first.
Reasoning:
- Most technically challenging component
- If I couldn’t successfully build the caravan, there was no point continuing
- Would establish whether my techniques could achieve the required quality
- Learning curve on caravan would inform car build
- Failure early is better than failure late
This was a risk-management decision. Better to discover my limitations early than invest 50+ hours only to fail on the centerpiece component.
Materials Planning
Caravan Construction:
- Balsa wood (body layers and roof)
- Milliput two-part epoxy putty (body shaping)
- 1.5mm aluminum wire (window frames)
- 0.5mm aluminum wire (inner window detail)
- Transparent plastic (window panes)
- Tissue paper (curtains)
- Bamboo (wheel construction)
- Paper (tire treads)
- Hot glue (detail work)
Car Construction:
- Air-dry clay (body shaping) - new material to try
- Balsa wood (internal structure)
- Plastic sheet (windows)
- Hot glue (lights)
- Paint (automotive red finish)
Figures:
- Wire (armatures)
- Air-dry clay - easier to work than epoxy putty
- Wood (Tilly the dog)
- Paint (flesh tones and clothing)
Scenery:
- Static grass - new tool to try
- Wire (trees and plant armatures)
- Paper (leaves and petals)
- Sawdust (tree foliage)
- Clear casting resin (river) - improved technique needed
- Paint and natural materials
Mental Preparation
This commission represented several firsts:
- Working to someone else’s specifications
- Fixed deadline (general expectation, not hard date)
- Subjects that needed to be recognizable (their actual caravan and car)
- Space constraints not of my choosing
- Potential for client disappointment
Mindset Adjustments Needed:
- “Good enough” wouldn’t be good enough
- Multiple rework cycles must be accepted
- Research before action (less trial-and-error)
- Document process for problem-solving
- Manage expectations (figures might not be portrait-quality)
I discussed with my son that the figures would be stylized rather than exact portraits - managing this expectation early was important.
Timeline Estimate
Initial Planning: 7 months seemed reasonable
Breakdown:
- Caravan: 2-3 weeks
- Car: 2-3 weeks
- Figures: 1 week
- Scenery: 2 weeks
- Final assembly: 1 week
- Buffer for rework: 3-4 weeks
Reality: This was reasonably accurate - completed July 2025 (7 months)
Key Decisions Made
- Scale: 1:42 (driven by caravan dimensions and base constraint)
- Build Order: Caravan first (make-or-break component)
- Materials: Willing to try new materials (air-dry clay, static grass, resin)
- Simplifications: No awning, no extensive campsite, focus on core elements
- Quality Bar: Multiple rework cycles acceptable to achieve client satisfaction
Next Steps
With planning complete, the next phase: attempting the Eriba Triton caravan.
This was the moment of truth - could I actually build a recognizable miniature vehicle from scratch?
Coming in Build Log 002: Caravan Construction - Three layers of balsa, countless hours with epoxy putty, and the challenge of those curved Eriba windows.
Reflection
Planning a commissioned piece feels different from planning personal projects. There’s a weight of responsibility - capturing someone else’s memories, meeting their expectations, working within their constraints.
But there’s also motivation: the desire to deliver something that brings joy, captures a moment in time, preserves a memory.
The research phase revealed both challenges and possibilities. Every “this seems impossible” moment was balanced by “but someone else did it, so I can too.”
Time to stop planning and start building.
Materials Purchased This Phase:
- Milliput epoxy putty (2 packs)
- Air-dry clay (1kg)
- Clear casting resin kit
- Static grass applicator + grass fibers
- Aluminum wire (various gauges)
- Transparent plastic sheets
- Reference car model (1:43 VW Golf)
Time Spent: ~8 hours (research, calculations, planning)
Cost So Far: ~£45
Confidence Level: Cautiously optimistic
Next Build Log: 002 - Caravan Construction
Have questions or feedback about this project? I'd love to hear from you.