Log Cabin in the Woods
A Three-Month Journey into Scratch-Built Diorama Modeling
Chapter 1: The Spark of Inspiration
From Kit Builder to Scratch Builder
My journey into scratch building began with Cathy’s Flower House, a beautifully designed kit that introduced me to the art of making miniature plants. The kit came with everything flat-packed and indexed - all the plants, flowers, and garden equipment supplied with proper assembly guidance. I love plants, and this kit awakened something in me: the desire to create these miniature worlds myself, using materials from around my own house, tool room, and garden.
At this stage, I didn’t even know the terms “diorama” or “scratch build.” I simply wanted to experiment with this newfound skill. Only later, through internet research, did I discover there was an entire industry of skilled and experienced enthusiasts worldwide doing exactly what I wanted to do.
The Garden Connection
As a keen gardener, I maintain an active composting area, recycling the majority of garden material. Some thicker branches (1.5 inches and more) couldn’t go through the chipper, so I started experimenting with slicing them into 2mm × 50mm strips using my table saw. Looking at these strips, inspiration struck: I could build a cabin with them!
Internet searches revealed lovely log cabin images that captured my imagination - 42 research images organized by category became my reference library for this project.
Chapter 2: Planning and Prototyping
Working Without Architectural Drawings
I first had to figure out the scale and size. Since I cannot make architectural drawings, I work “accurate to the eye rather than mathematically precise” - sizing components by what looks right. This meant I had to size, measure, and fit each component during the actual building process.

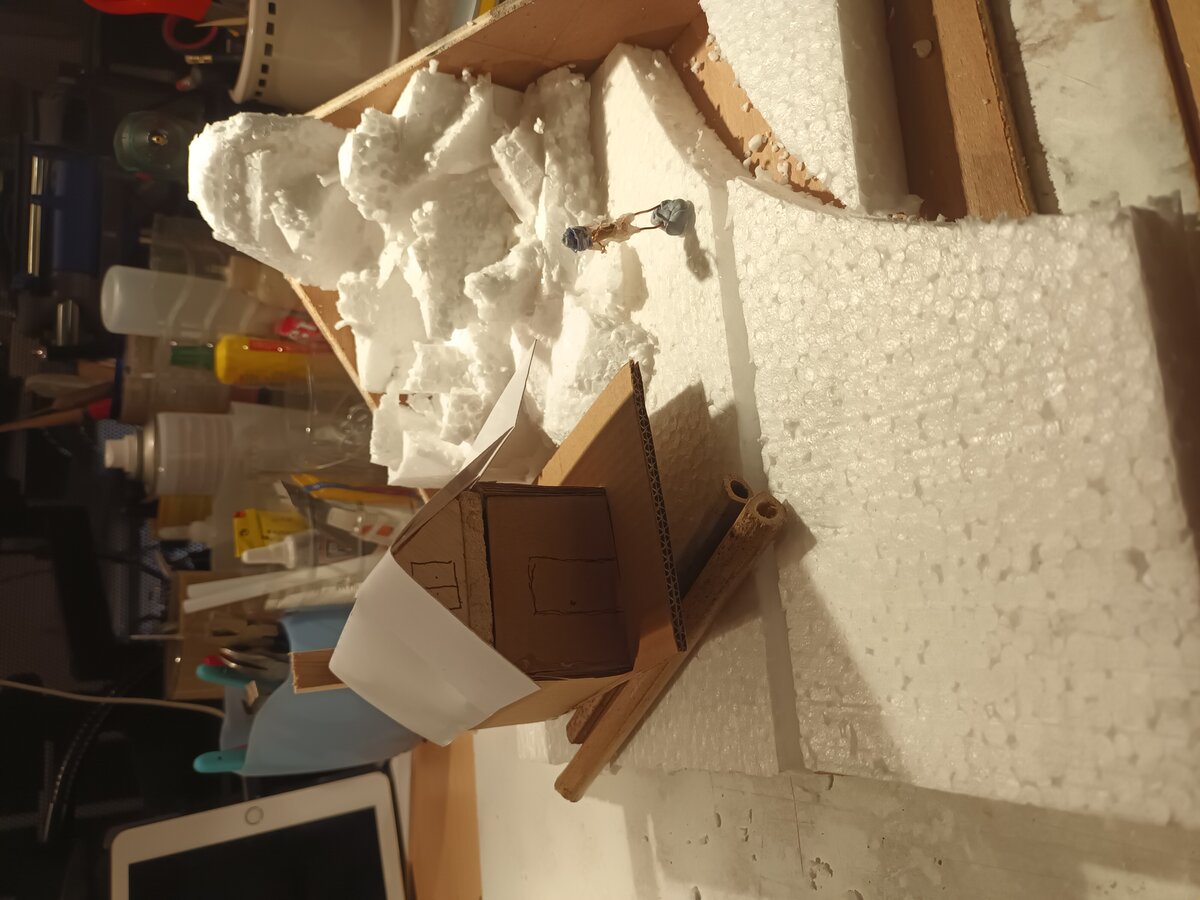
My approach: create a paper and cardboard prototype cabin to establish the footprint and visualize proportions. The cabin ended up at 13cm × 9cm.
The Landscape Vision
Key features I wanted:
- An authentic log cabin in the woods
- A flowing river
- Several larger trees
- A dramatic rocky backdrop
The challenge: fitting all this onto a 25cm × 25cm base due to space limitations.
Design Decision: I deliberately kept the rocky backdrop even though the scale isn’t strictly realistic compared to the cabin. My reasons:
- Creates perspective and depth
- Dramatic visual effect
- Allows showing different tree types growing on rocks
- Provides surfaces for moss and lichen details
- Artistic freedom for the composition I envisioned
Chapter 3: The Base - A Disaster That Taught Me Patience
Initial Construction
Setting the cabin against a rocky cliff backdrop, I glued pieces of 20mm styrofoam together to form the basic cliff shape. I quickly realized the structure needed support, so I added a thin plywood backing initially.
The cliff backing was fitted diagonally to the height of the rocks, which both sturdied the structure and created visual continuity for the eye to follow.
Materials:
- 20mm styrofoam (base and rocky backdrop)
- Flour, PVA glue, water, vinegar, cooking oil (paste mixture)
- Initially: thin plywood backing (later changed)
The Paste Mixture Disaster
I researched homemade paste recipes to cover the styrofoam. Most used similar ingredients: flour, PVA glue, water, with vinegar (to suppress mold) and cooking oil (to reduce stickiness).
I mixed my paste and covered the foam with layers, letting it dry. But I probably started adding landscaping structures too early. The paste continued cracking for some time and started to curl.
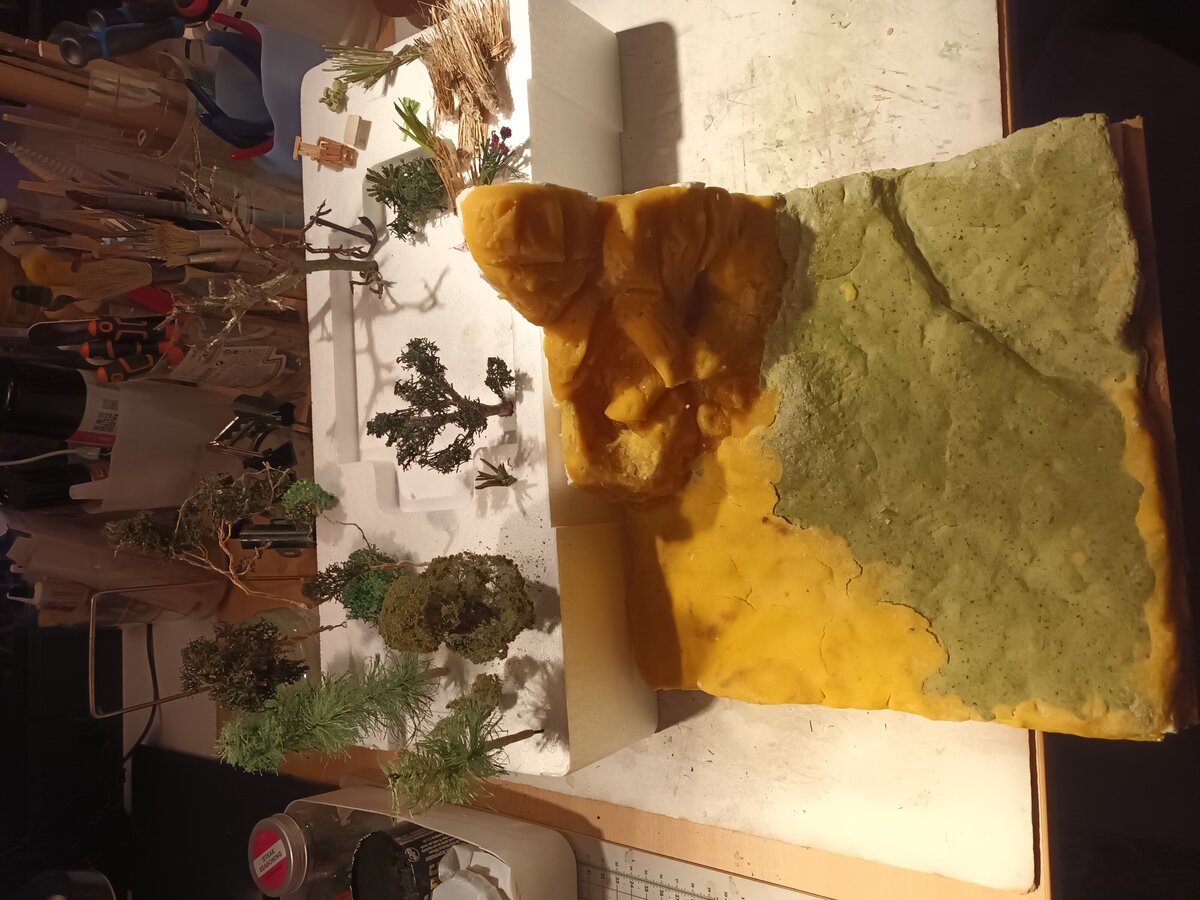
THE BIG PROBLEM: It cracked badly, most likely due to the paste composition.
My Solution: I kept filling in the cracks until it hardened - spending probably closer to 2 weeks total on this frustrating process.
Improving the Design
While dealing with the cracking, I made a significant change: replaced the plywood backdrop with proper wood strips glued together from dried garden tree branches.
Three reasons for this change:
- Consistency - using natural wood matched my overall material philosophy
- Improved stability - stronger structural support
- Better aesthetics - natural wood grain and texture
All wood material came from garden trees, properly dried and cut into strips of different thicknesses and widths with a table saw. The edges of the lower ground area were framed to hide the polystyrene base.
Lesson Learned: Next time I’d add more PVA and less water. I’ll explore other ingredients in future models - plaster, wood sawdust, or paper mache.
Chapter 4: Keeping Momentum - Parallel Plant Preparation
Turning Frustration into Productivity
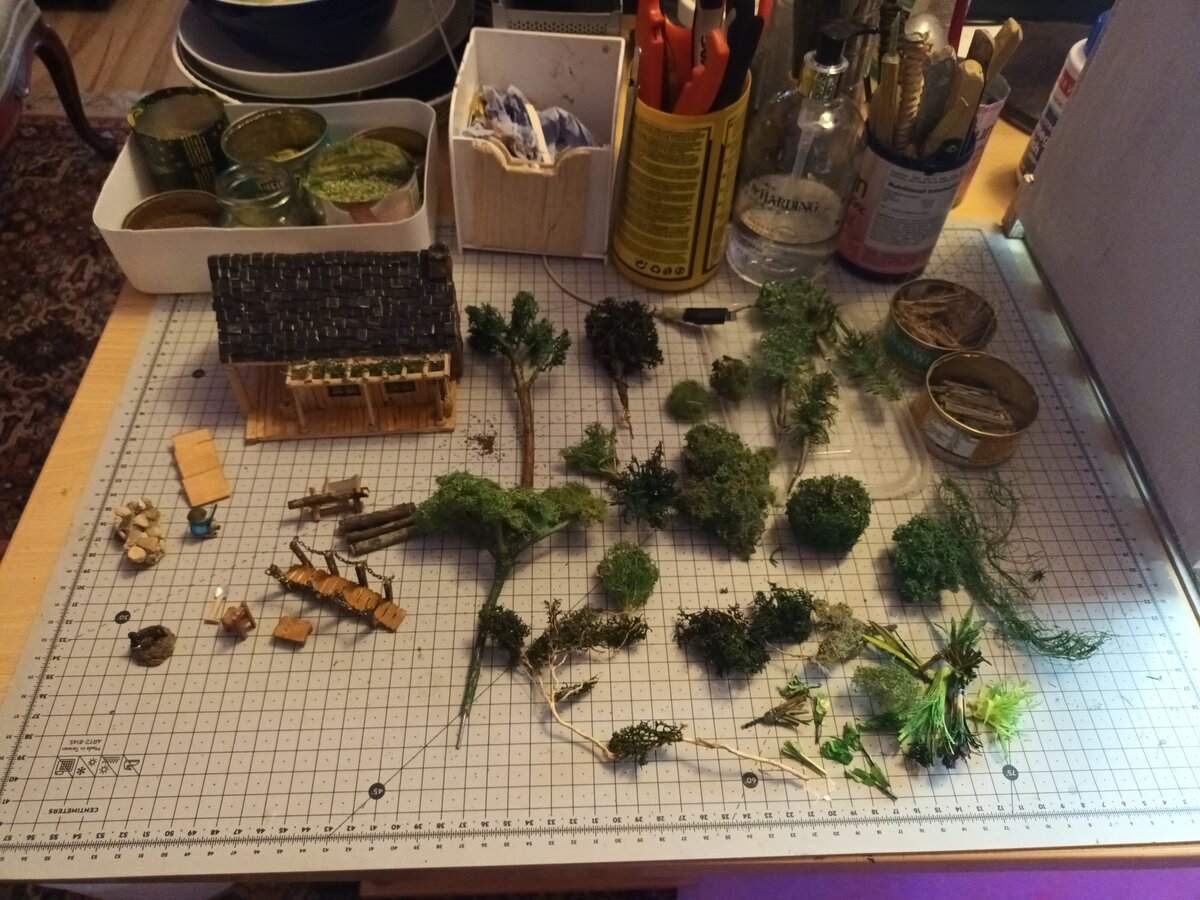
While waiting for the paste to dry and dealing with cracking issues, I kept momentum by collecting and preparing materials for plants and trees. This parallel work proved essential during the frustrating drying period.
The Material Hunt
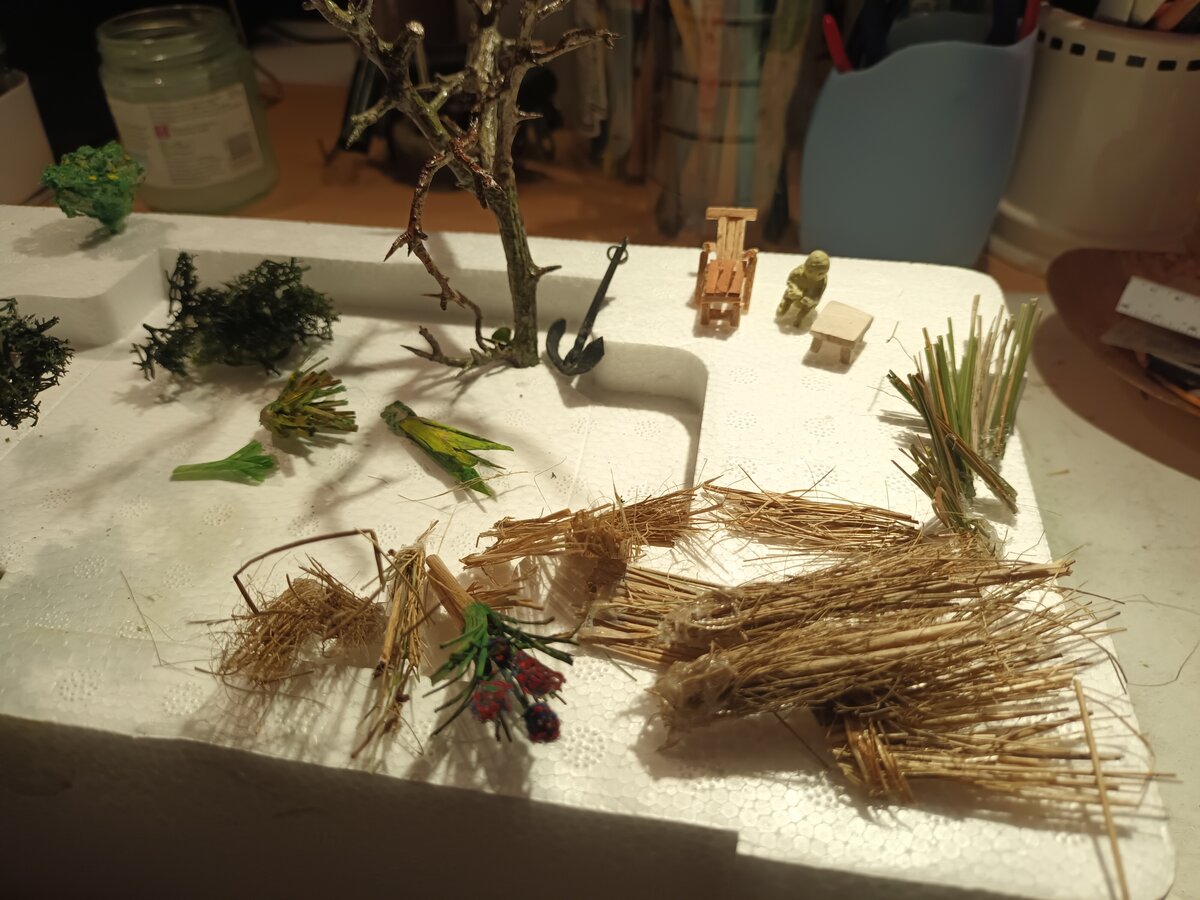
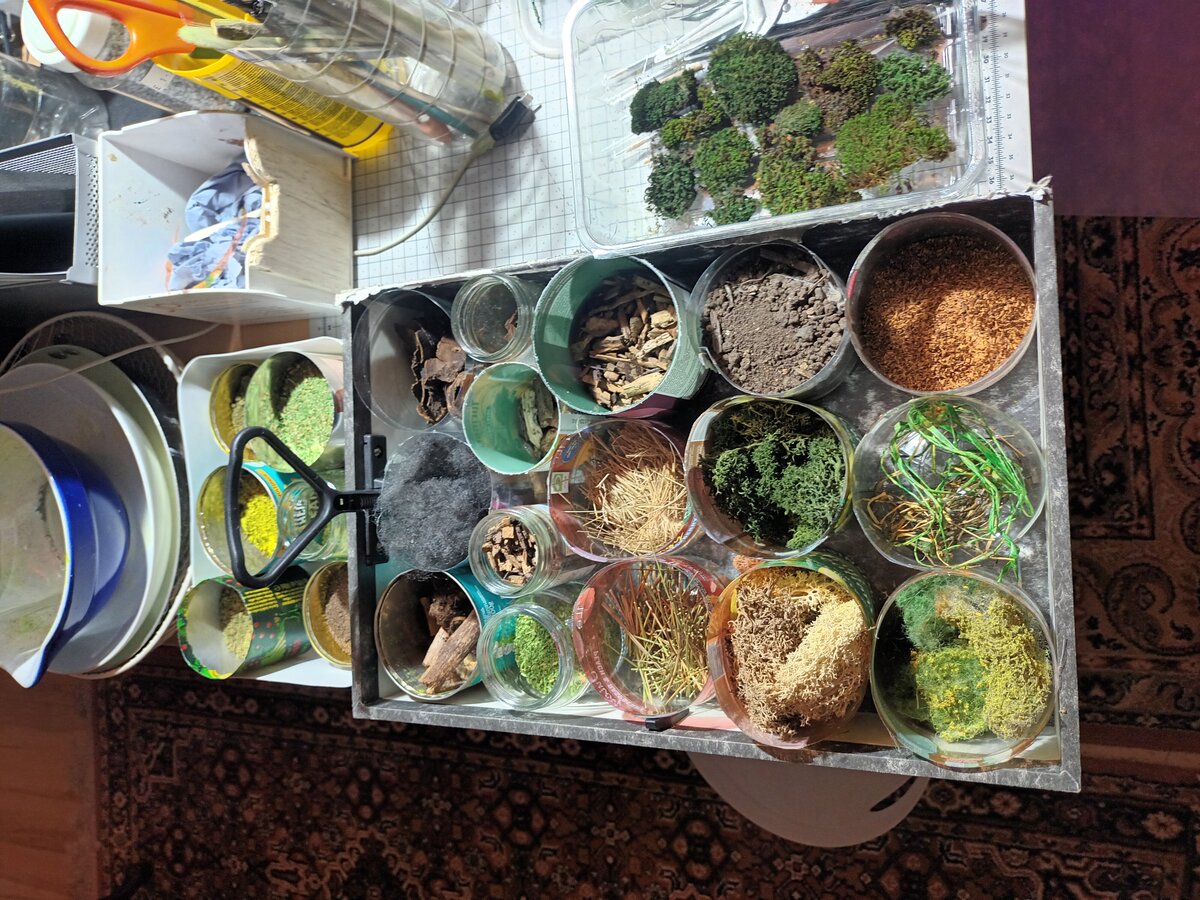
Materials collected:
- Twigs and dried plant roots (from woodland areas and garden prunings)
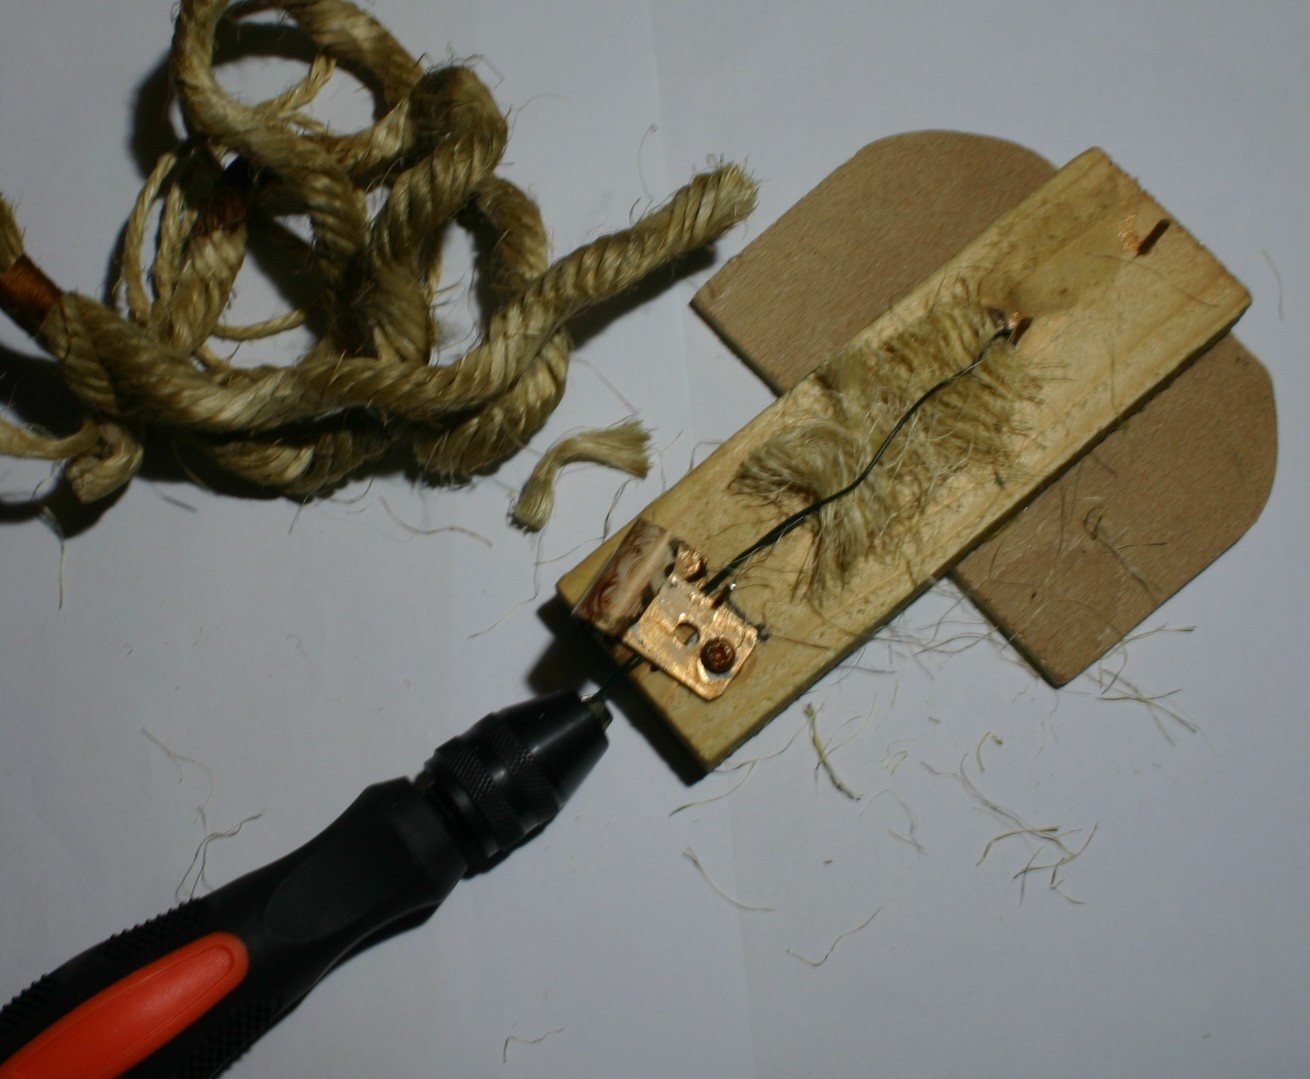
- Sisal untwined from rope (for pine needles)
- Dried moss
- Different types of grass
- Sawdust (for foliage texture)
- Sifted soil
- Small stones (horticultural grit)
- Pillow filling or hollowfibre (for shrubs and bushes)
Experimentation and Technique Development
Combined with internet research, I started experimenting:
- Coloring sawdust to cover twigs for trees and shrubs
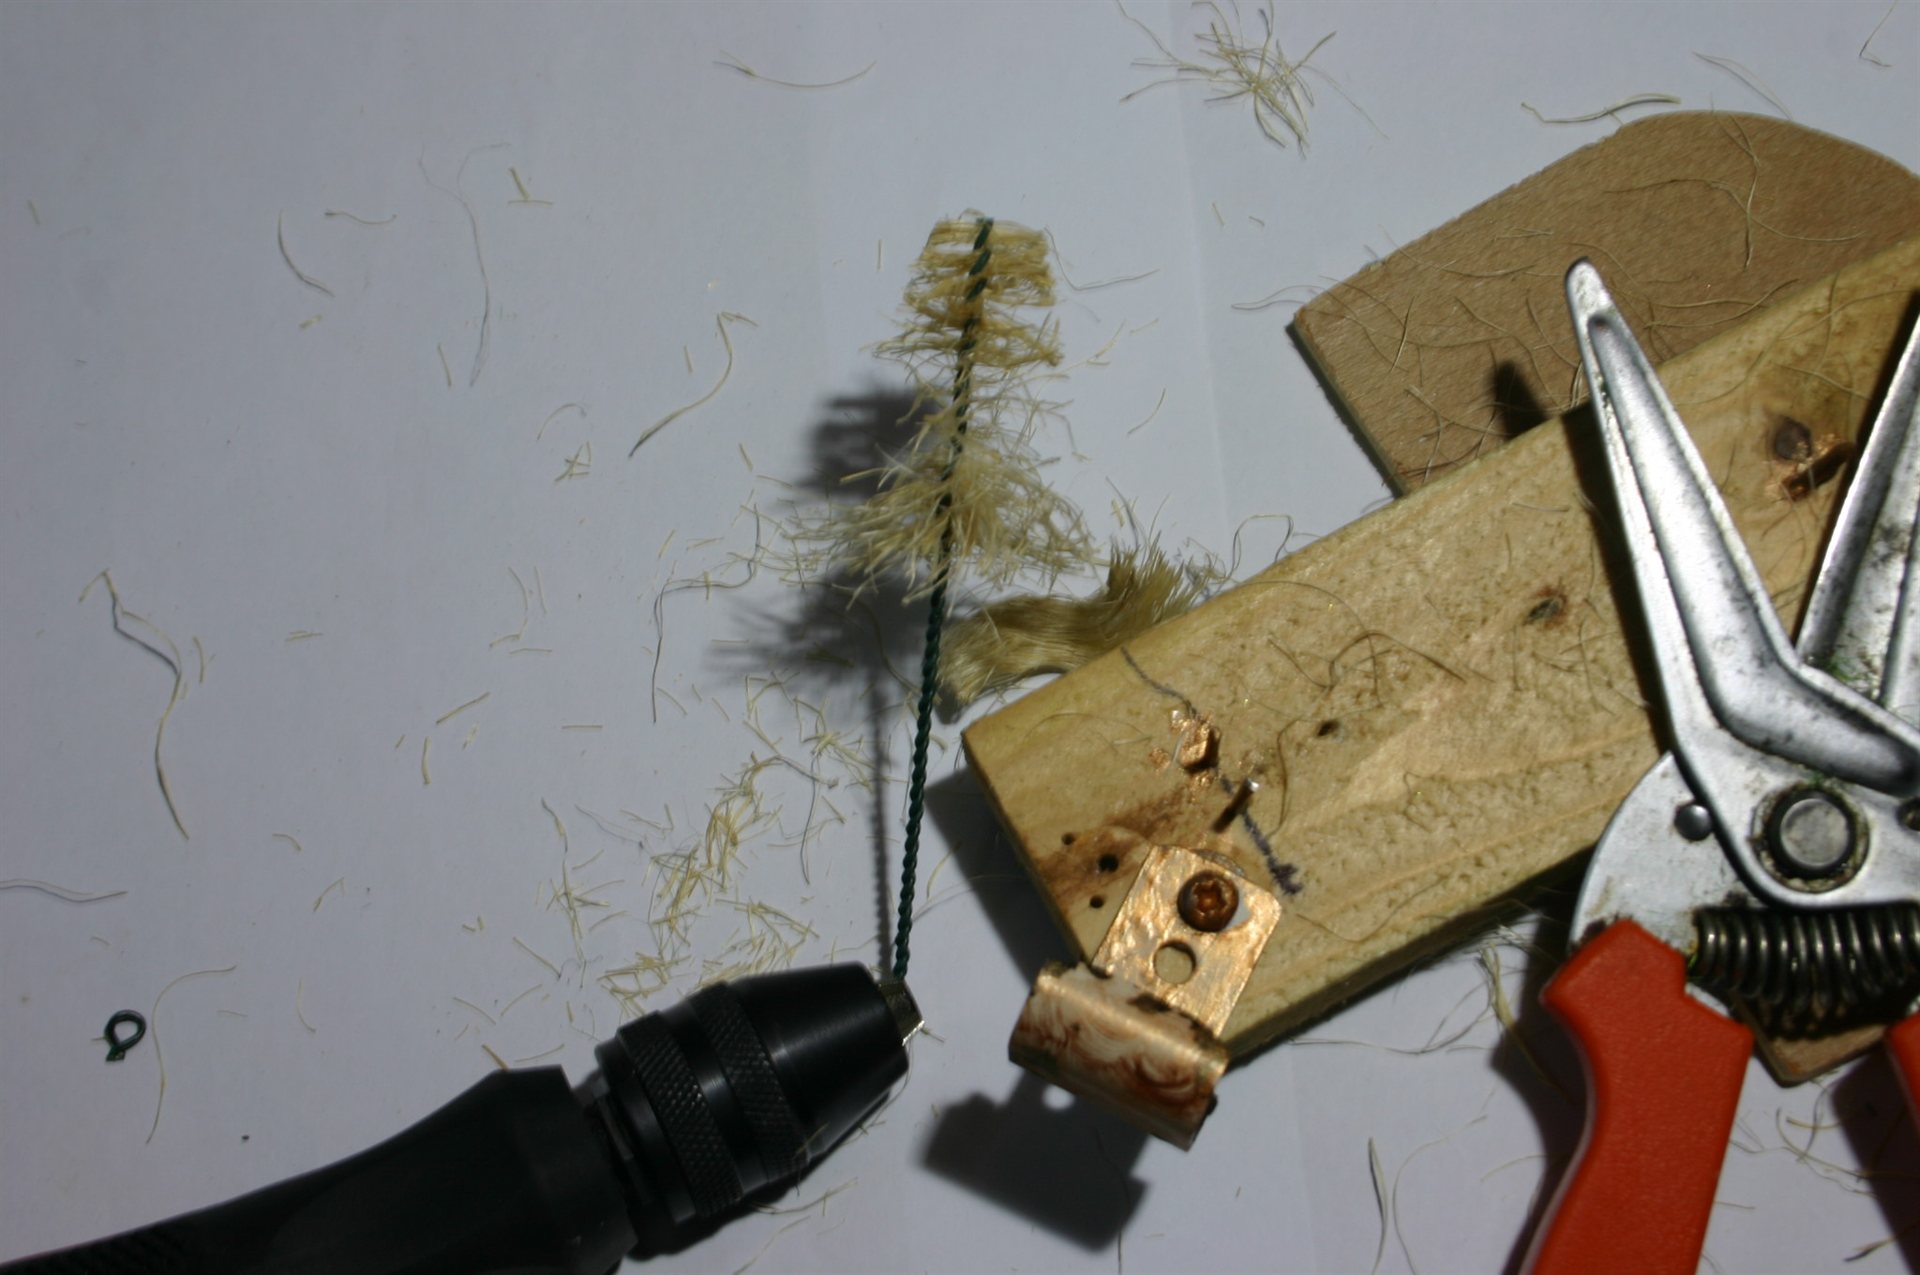
- Coloring sisal for pine trees
- Using a glue gun to set grasses into little bundles
- Attaching twigs to main branches using drill-and-pin technique with CA glue
- Using pillow filling for shrubs, gluing sawdust to it for texture
Custom Tool Creation
I made a tool for twisting wires and setting sisal into pine trees.
Selection and Rejection
This experimentation led to selecting trees and shrubs for the landscape. Many attempts were discarded before achieving the right look - a normal part of the creative process and discovery.
Time Investment: Approximately 25-30 hours
Chapter 5: Building the Cabin
Construction Philosophy
With a good selection of landscape material at hand, I decided to build the cabin itself. My approach remained consistent: measure, fit, and adjust during construction since I work without formal architectural drawings.
Materials
Structural:
- Wood strips reclaimed from garden tree branches, various thicknesses and widths (mainly Acer and Bay leaves)
- Square pieces for shaping logs for wall frames, doors, windows, and roof
- Planks for floor, steps, and walls
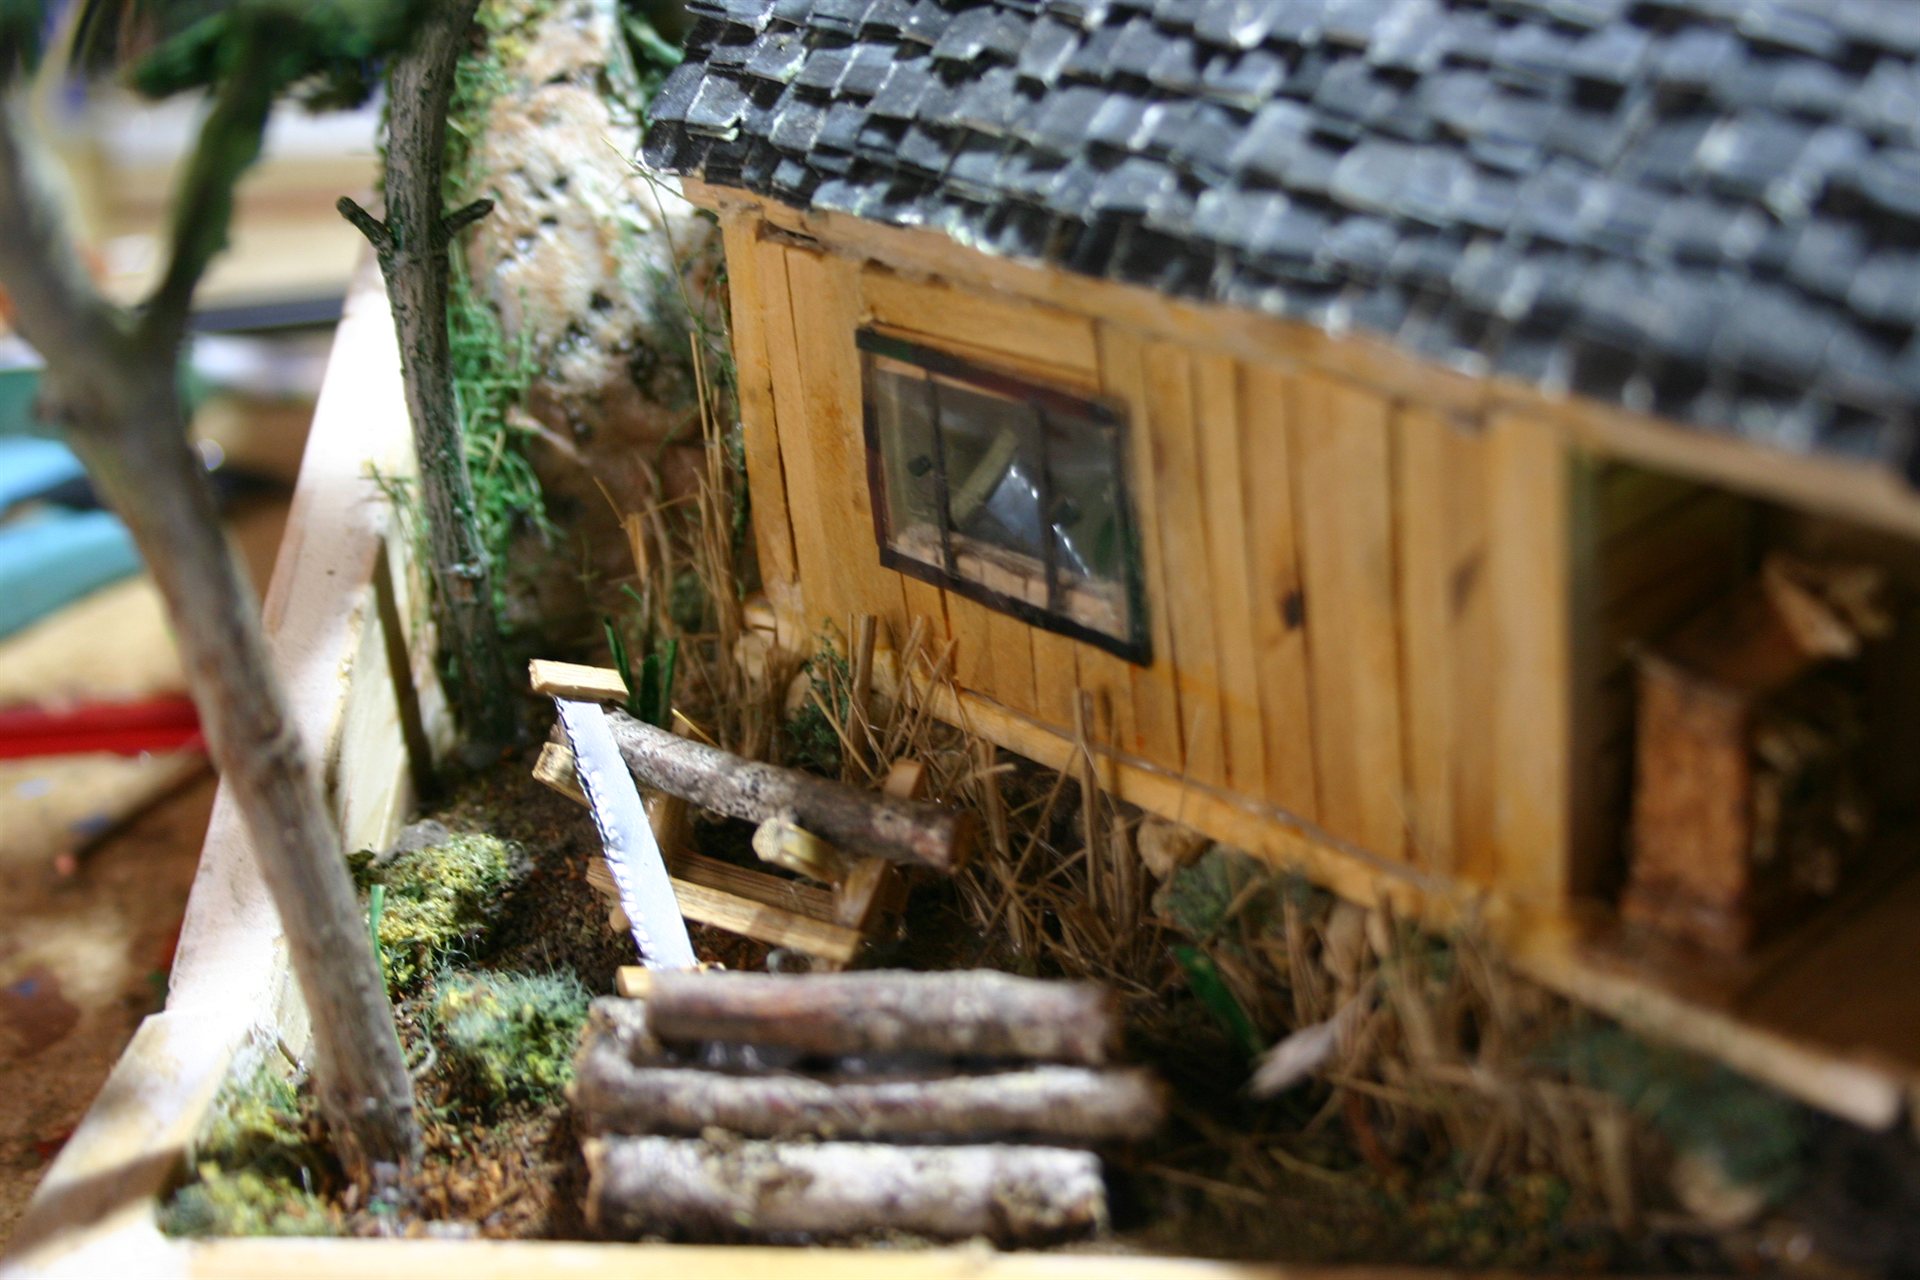
- Clear plastic for windows
- Dowels for roof structure
- Bamboo of different thicknesses for the patio
- Balsa wood for cabin base
- Epoxy putty for the chimney
- 3 sheets of 80gr paper glued together for roof tile thickness
Details:
- Epoxy putty for stone-textured chimney (I only discovered air dry clay later)
- Water-based acrylic paint (various reddish shades for bricks, black and white for weathering)
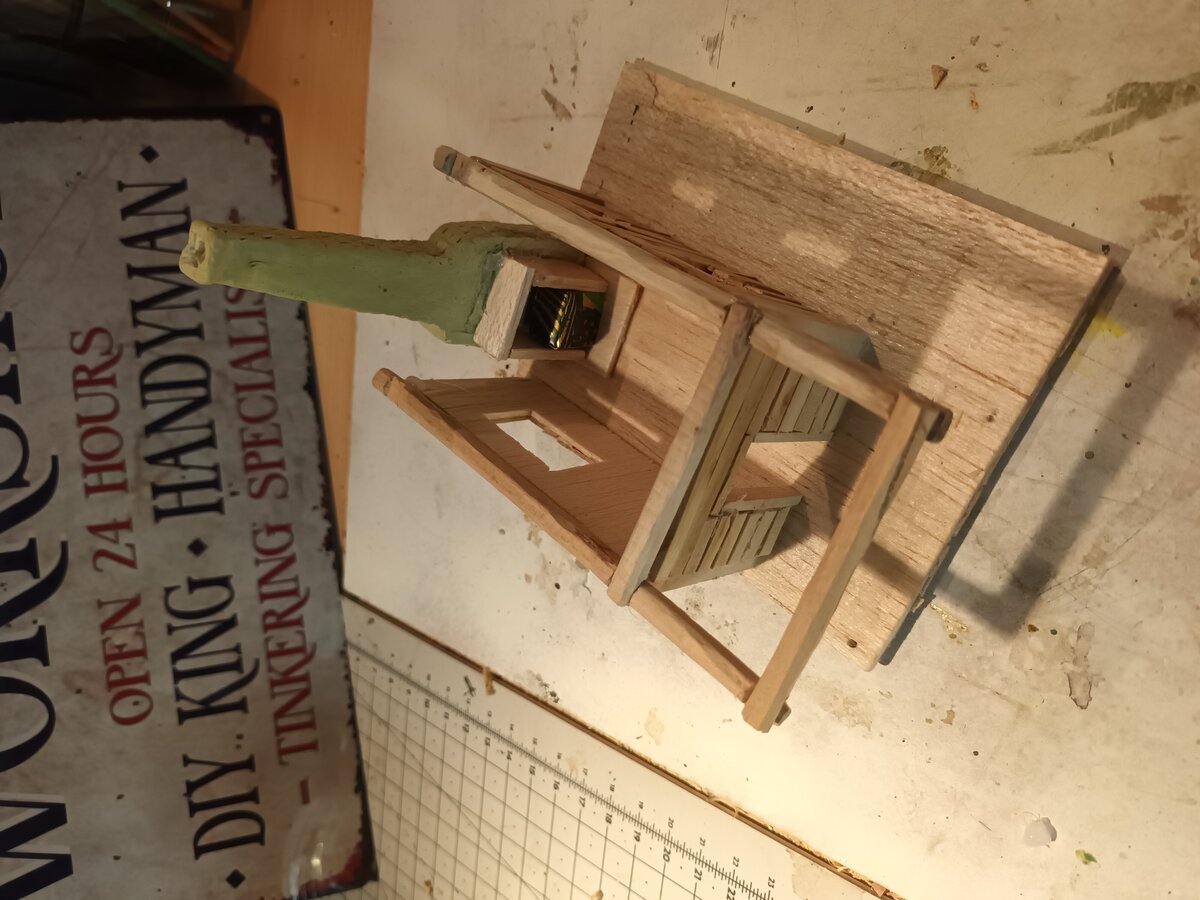
Wall Construction Method
Each wall was separately framed, then fitted with wood strips. Windows and doors were framed individually. This approach made assembly easier and ensured everything was square before joining walls together.

This was particularly important for positioning doors and windows correctly, and for fitting the chimney - all requiring careful measurement and fitting during the building process.
Log Work
Each log was individually cut to size and fitted. The logs were stained to add color variation and natural wood tones. I did NOT do any bark texturing - the natural texture of the wood strips provided the character.
Wall assembly details:
- Corner notching carefully cut for authentic interlocking
- Each log cut with slight length variations for realism
- Painted with watered-down acrylic with various wood tones for natural variation
- Fitted and glued with corner notches aligned
- Stone foundation wall to level cabin (using horticultural grit for stones)
- Weathered foundation with plants growing in wall crevices
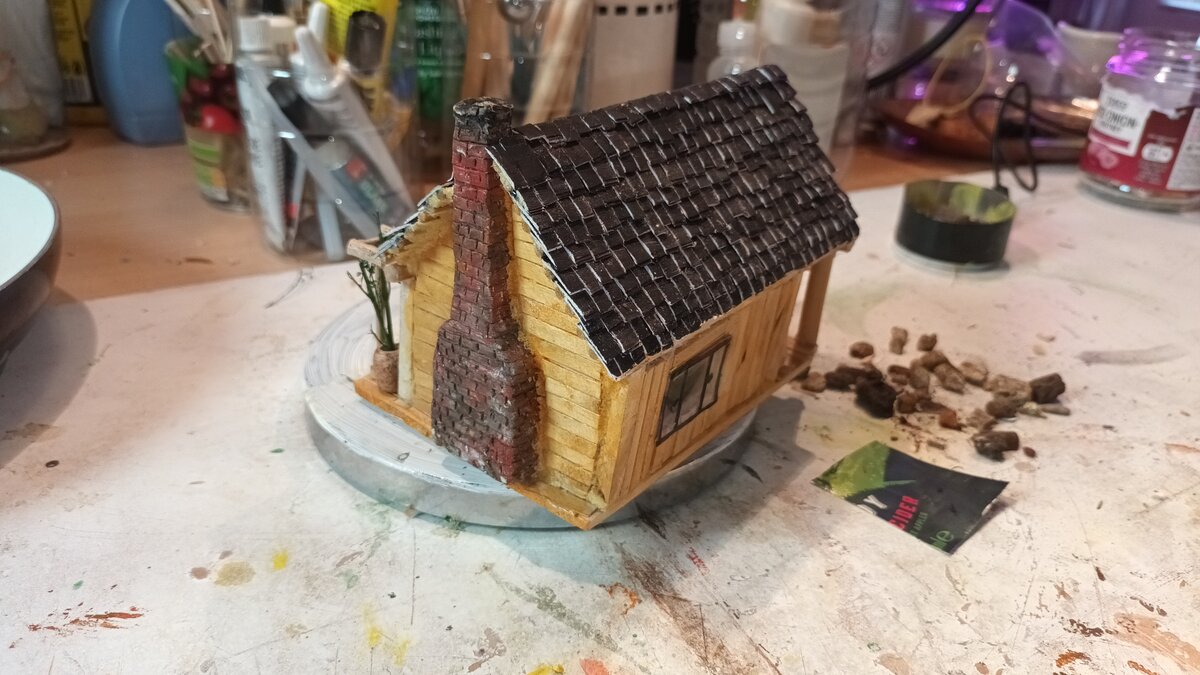
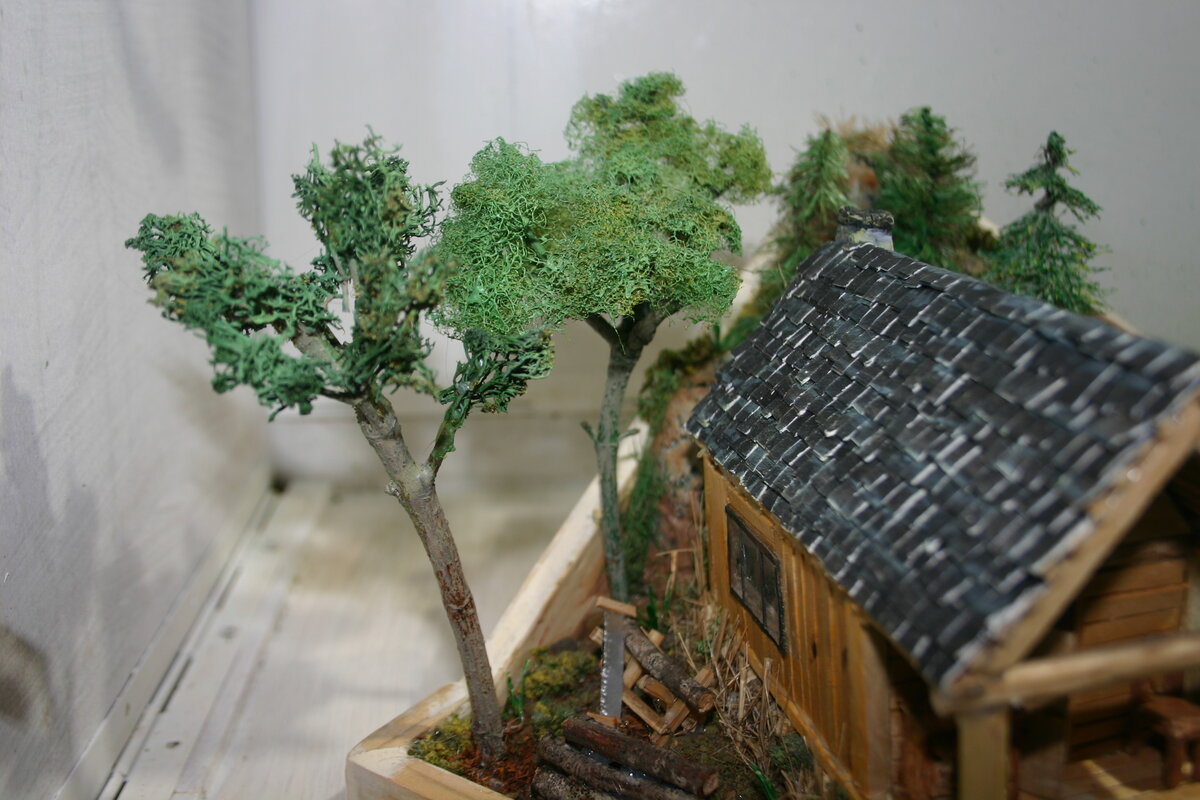
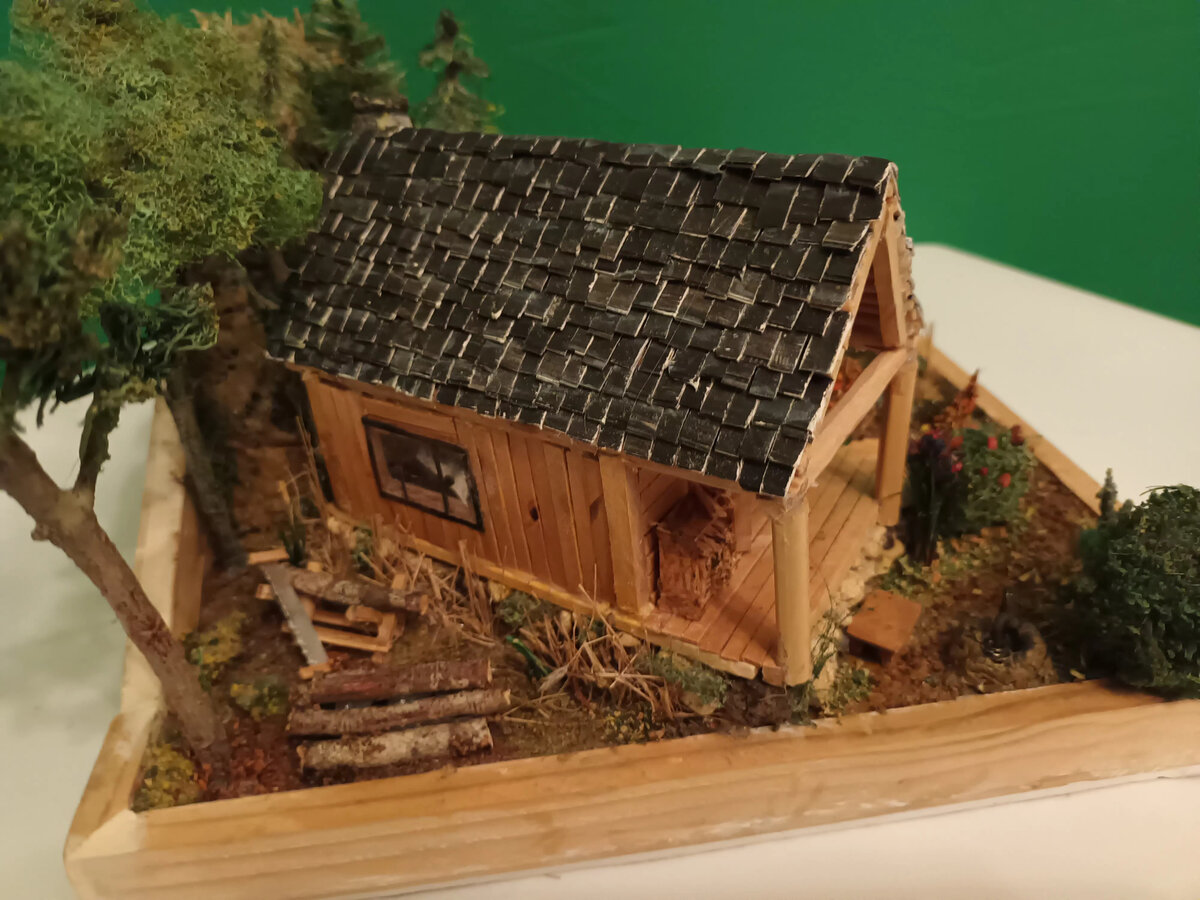
Roof Construction
- Ridge beam running the cabin length
- Individual rafters evenly spaced
- Cross bracing for stability
- Roof boards laid perpendicular to rafters
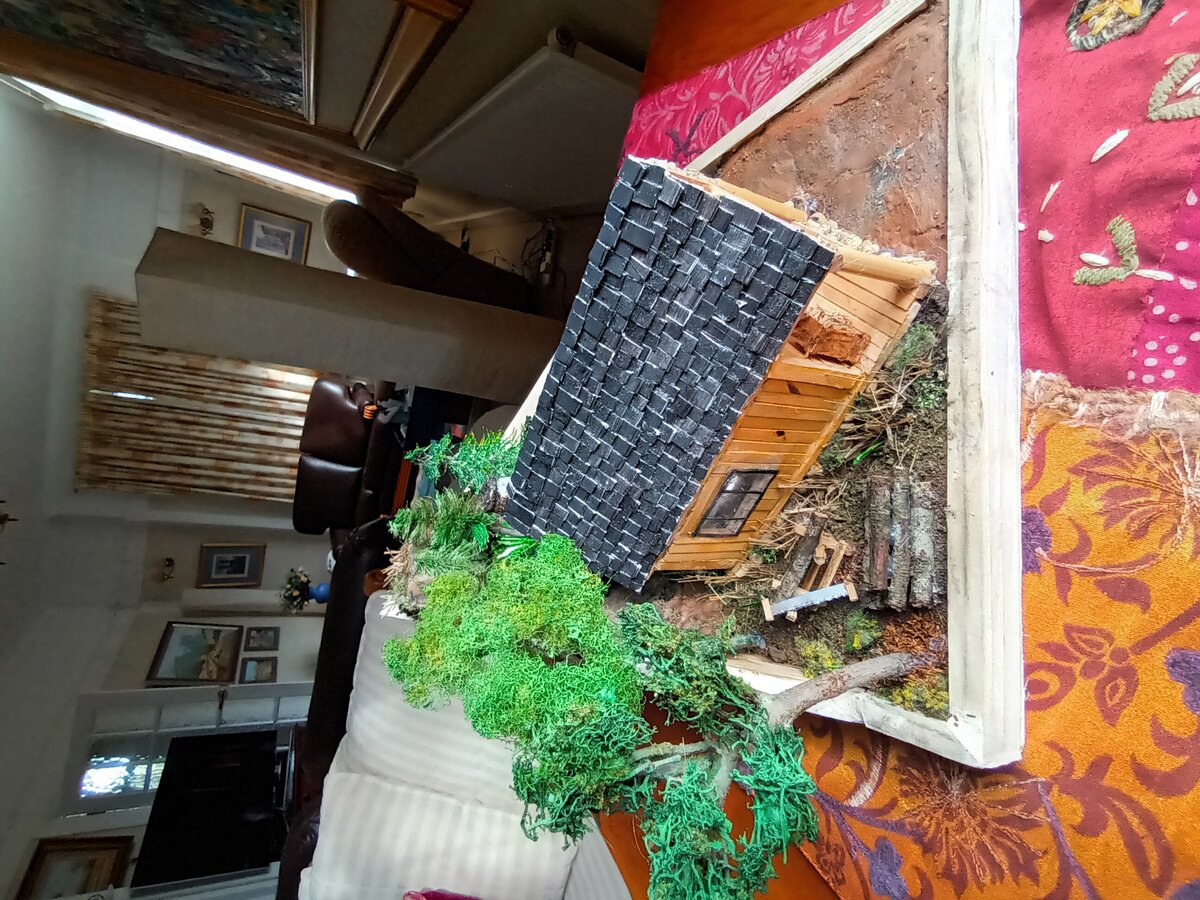
- Individual shingles made from 3 sheets of paper glued together with PVA to get the right thickness, painted dark grey to black, weathered, then cut into single tiles and applied row by row (time-intensive but worthwhile)
Details That Bring Life
Chimney: The core made from scrap wood, then covered with milliput standard epoxy putty with mortar lines scratched in. Bricks painted in different shades of acrylic reddish and weathered with black and white.
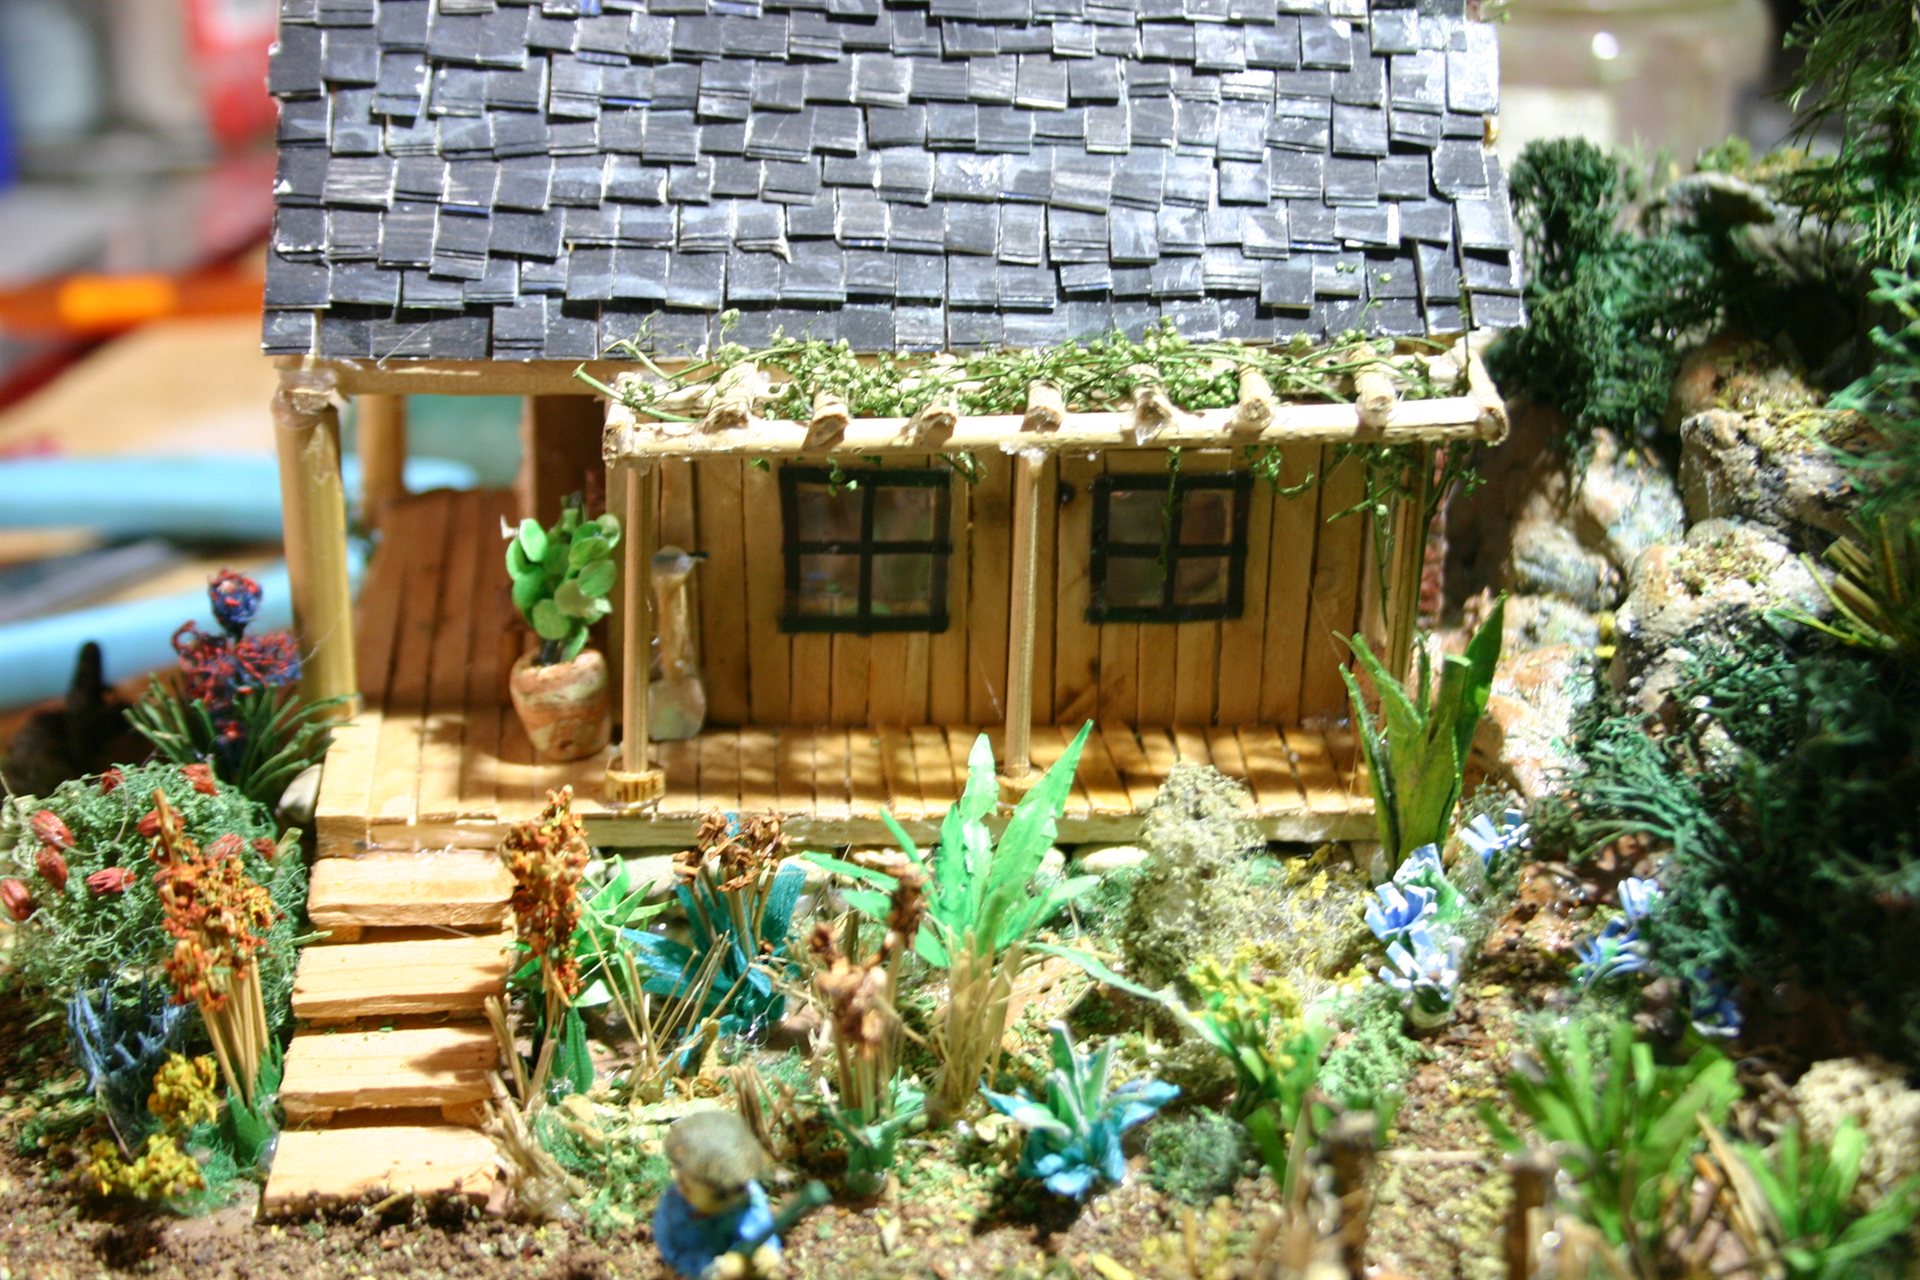
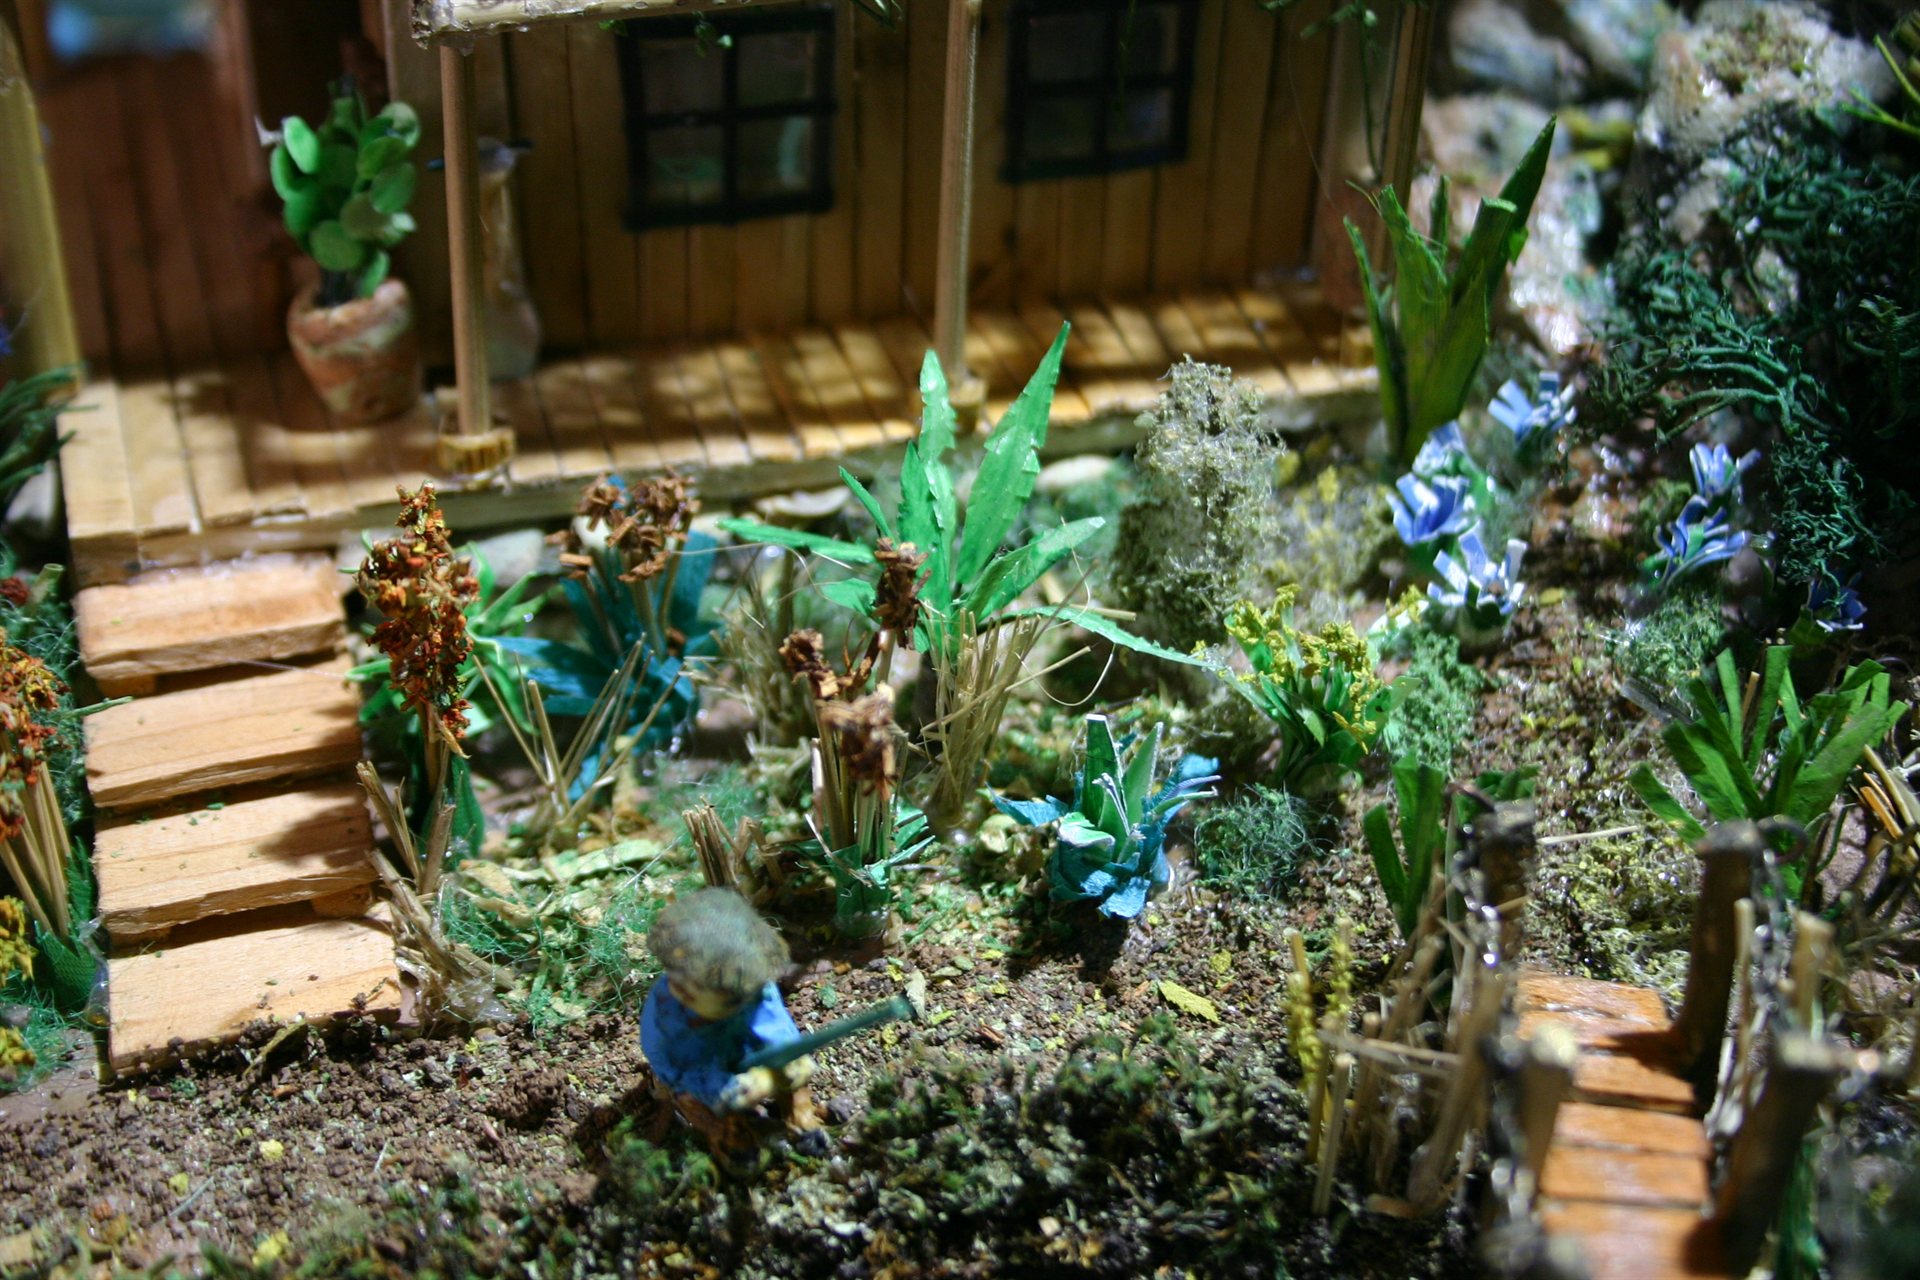
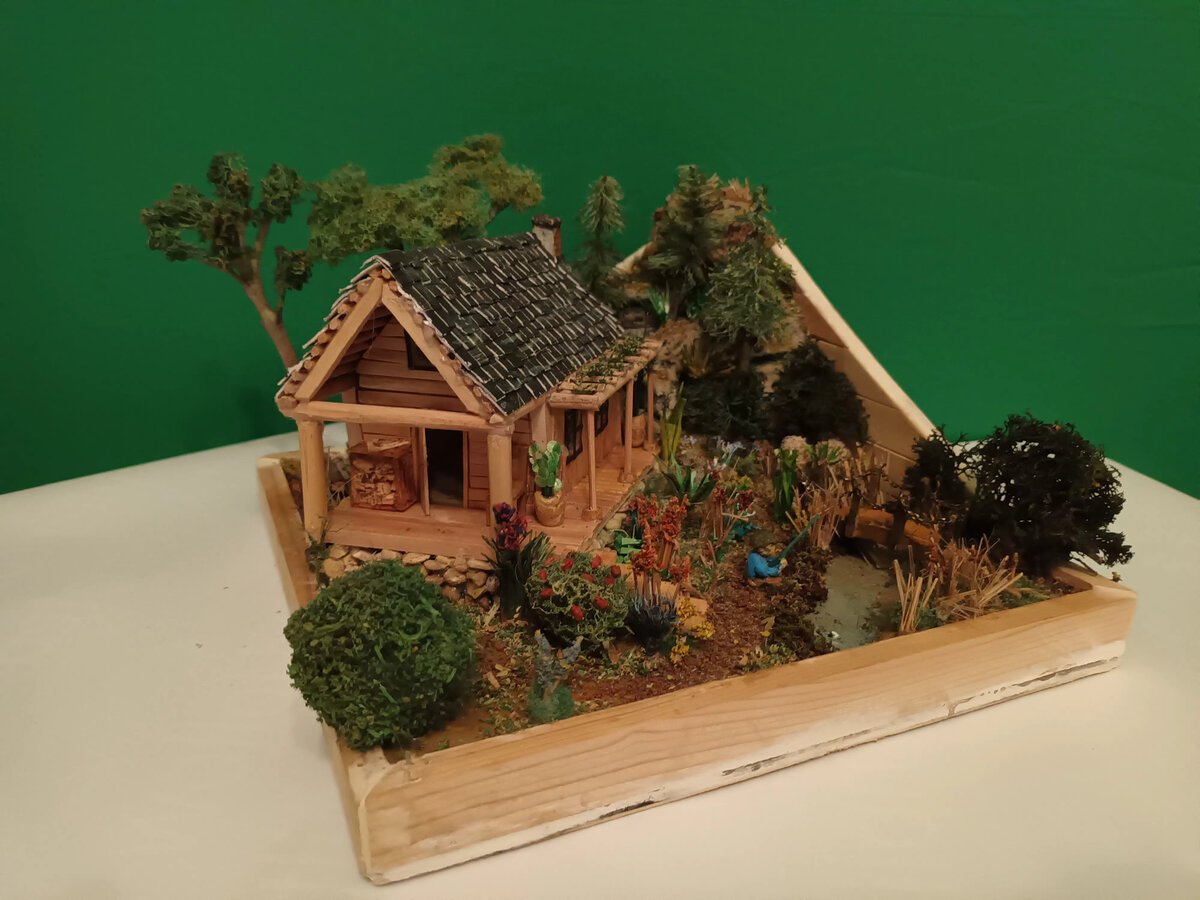
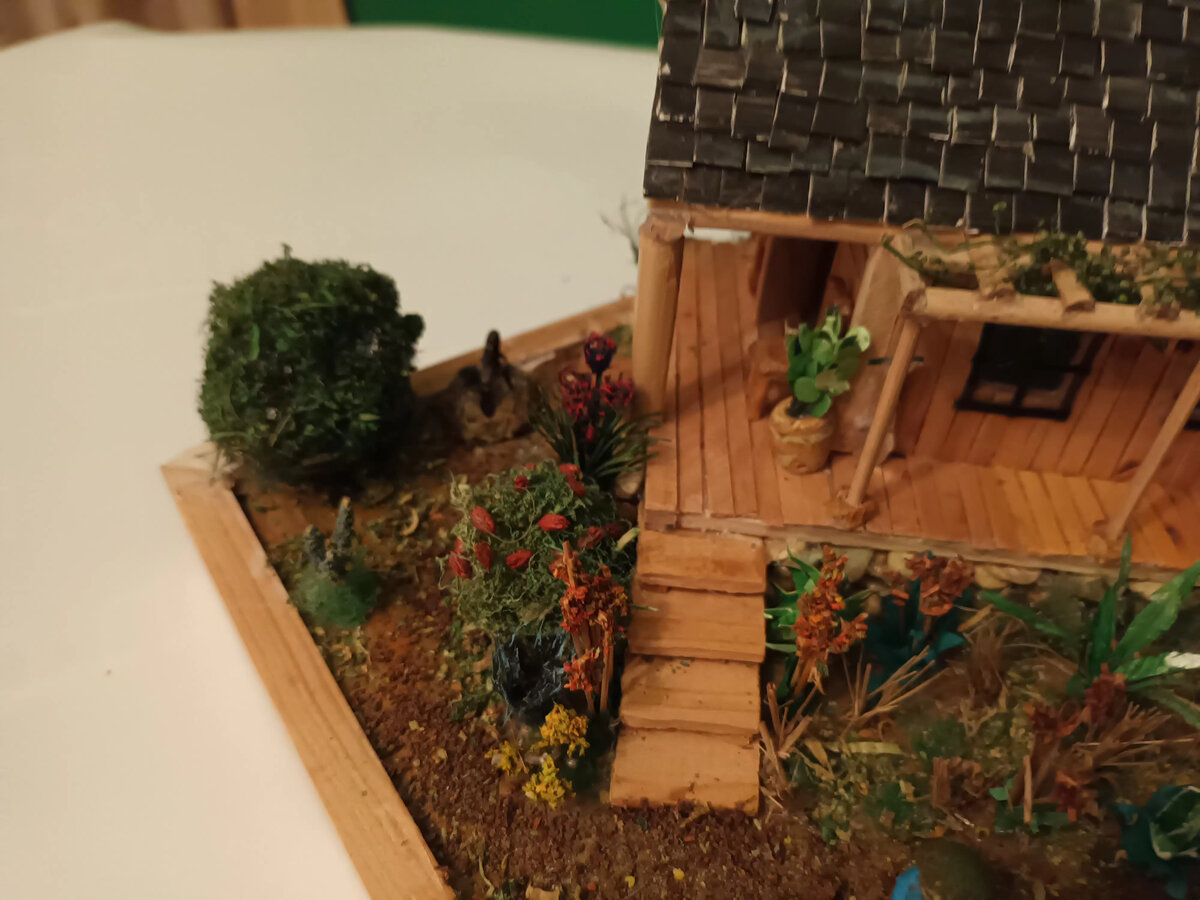
Porch Features:
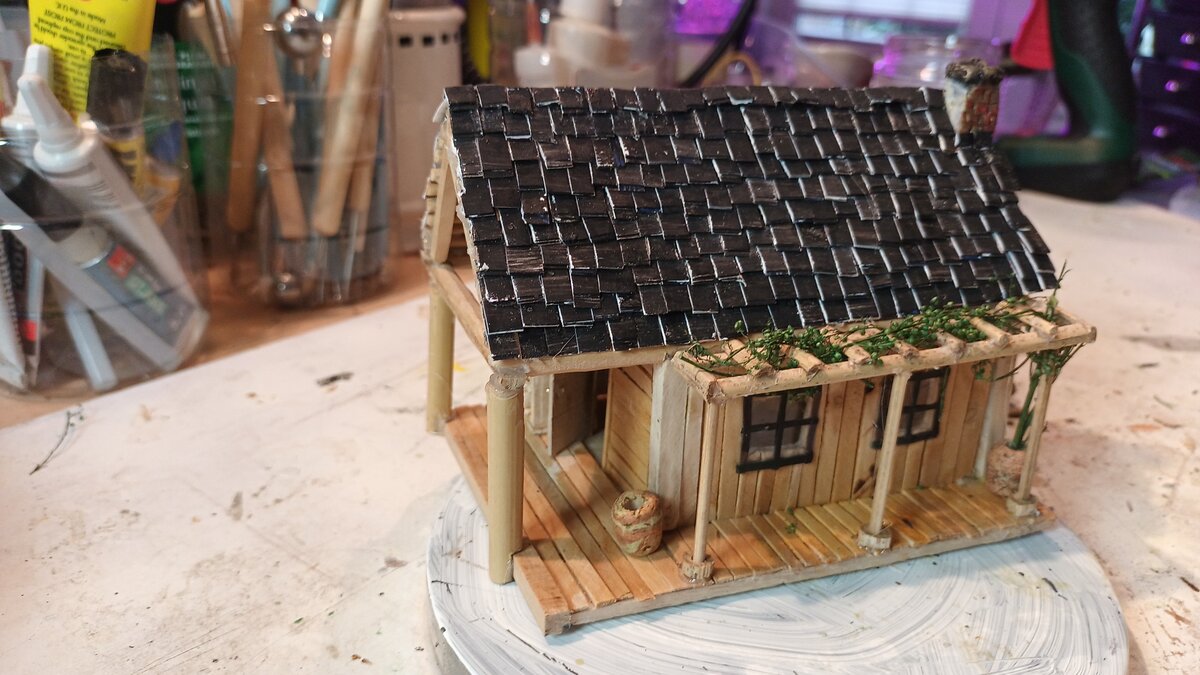
- Front porch posts with supporting beams
- Firewood rack with stacked ready-to-use wood
- Weathered wooden chair
- Clay flower pot with plant
- Trellis over side of porch with vine growing through (bamboo trellis with thicker bamboo base fittings)

Challenges:
- Maintaining consistent log dimensions
- Aligning corner notches precisely for tight fit
- Leveling of stone wall to fit base
- Wall, window, door, chimney alignment
- Miniature shaping and moulding: plant pot, chair, steps
Time Investment: Approximately 40-45 hours
Chapter 6: Creating the Forest - Trees and Vegetation
The Tree-Making Process
After completing the cabin structure (around early March 2024), I focused on vegetation. Built 8 main tree armatures (heights 5-12cm) and 15 smaller saplings/bushes.
Collection sources:
- Local woodland areas (small twigs and branches with appropriate scale)
- Garden prunings (fine branching structures)
- Dried flowers and seed heads (foliage texture)
- Moss and lichen specimens
- Fine grasses and stems
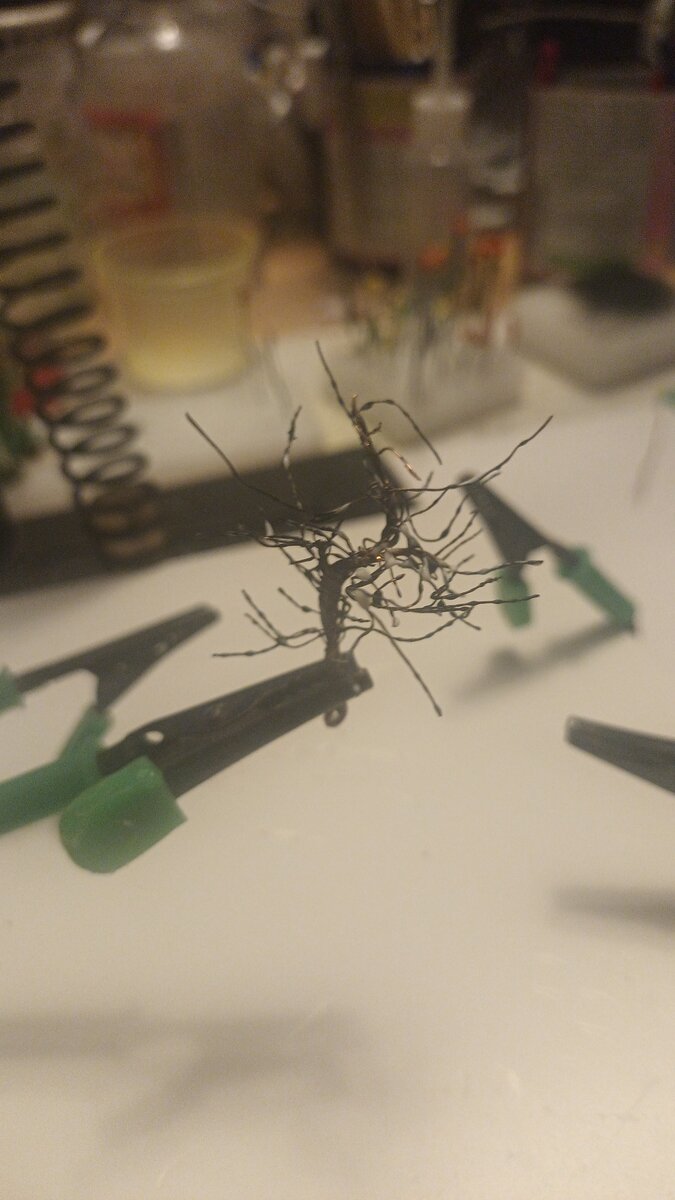
Tree Assembly Technique
Step-by-step process:
- Select main trunk with good taper and character
- Drill small holes at natural branch points
- Insert and glue secondary branches using CA glue, strengthened with steel wire pins
- Add finer twigs to branch tips for detail
- Paint trunk and branches with bark colors
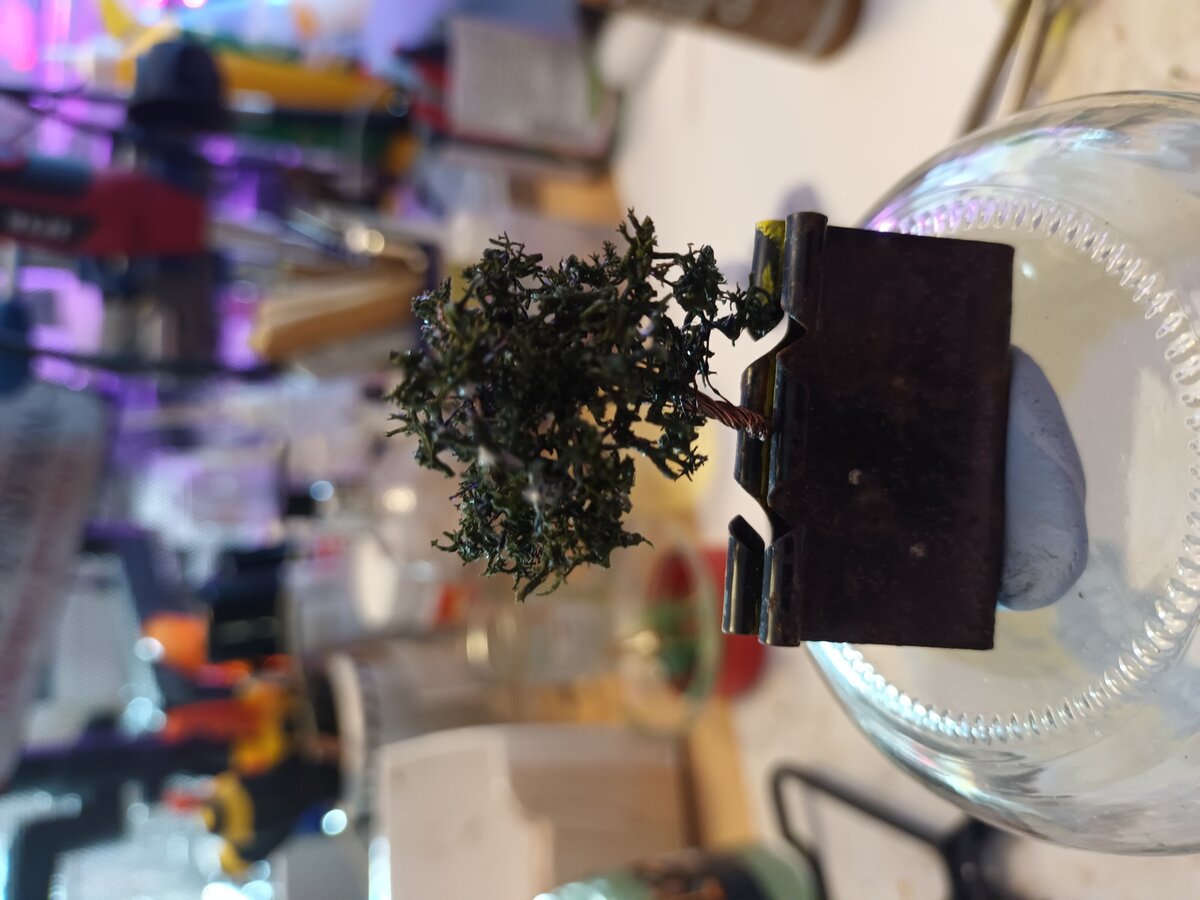
- Apply washes to enhance texture and depth
- Add foliage using scenic adhesive or hairspray
Material Processing and Preservation
- Air dried in dark, dry location to prevent color fade
- After painting and drying, sealed with diluted PVA (white glue)
- Foliage dried thoroughly with vinegar to suppress mould
- Broken into appropriately scaled pieces and sifted into different grades
- Sorted by texture and color
- Treated with diluted PVA to seal and strengthen
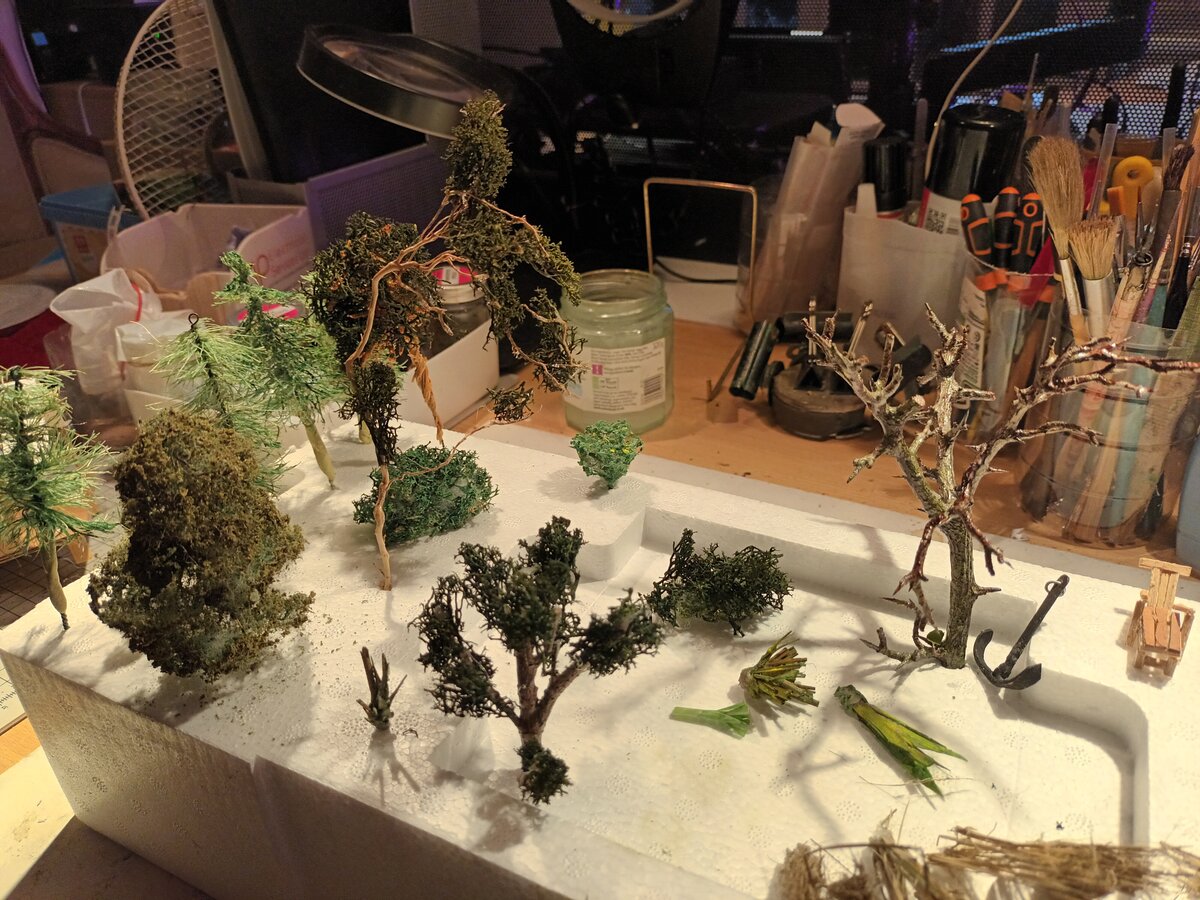
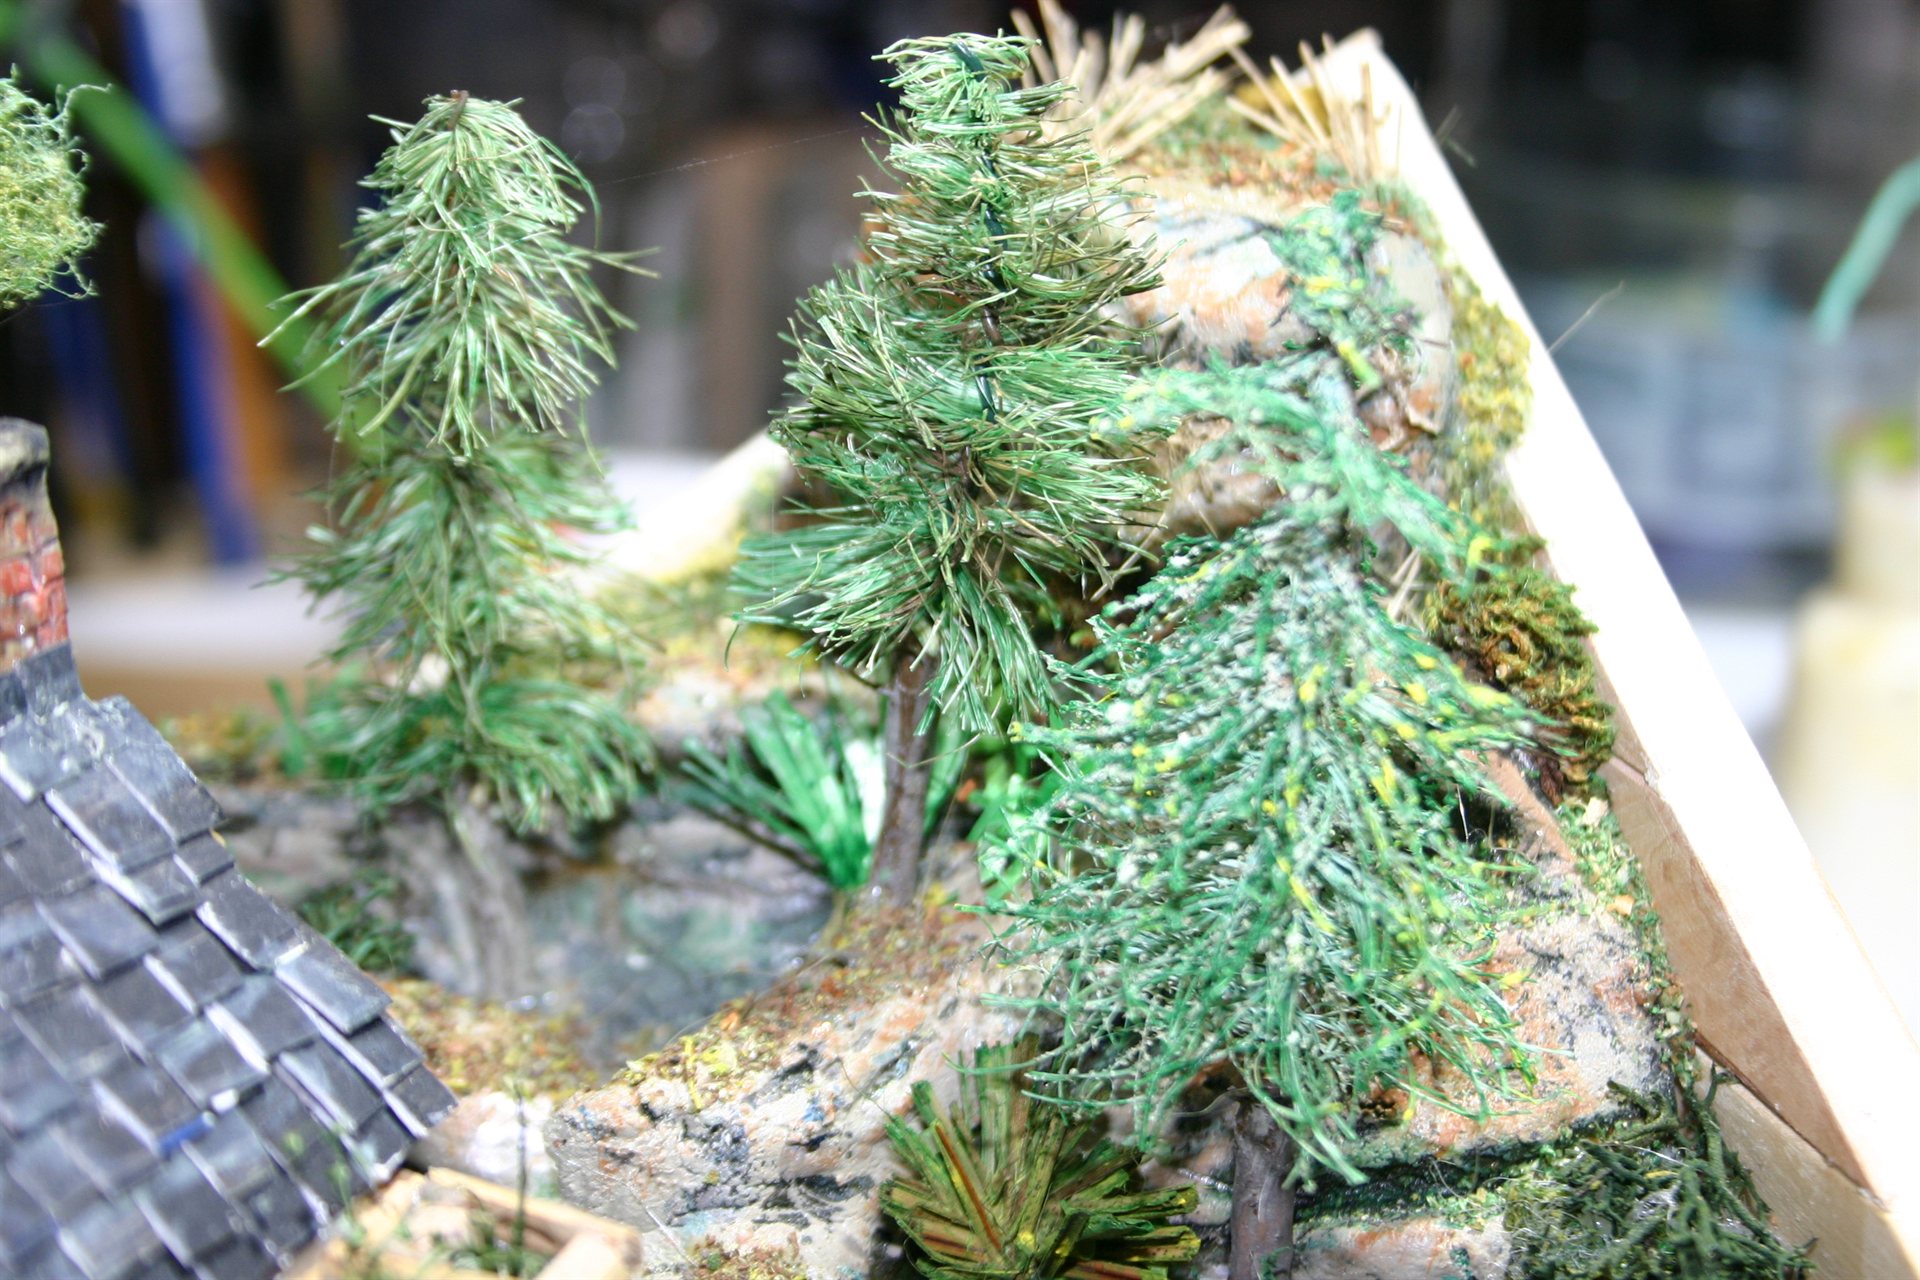
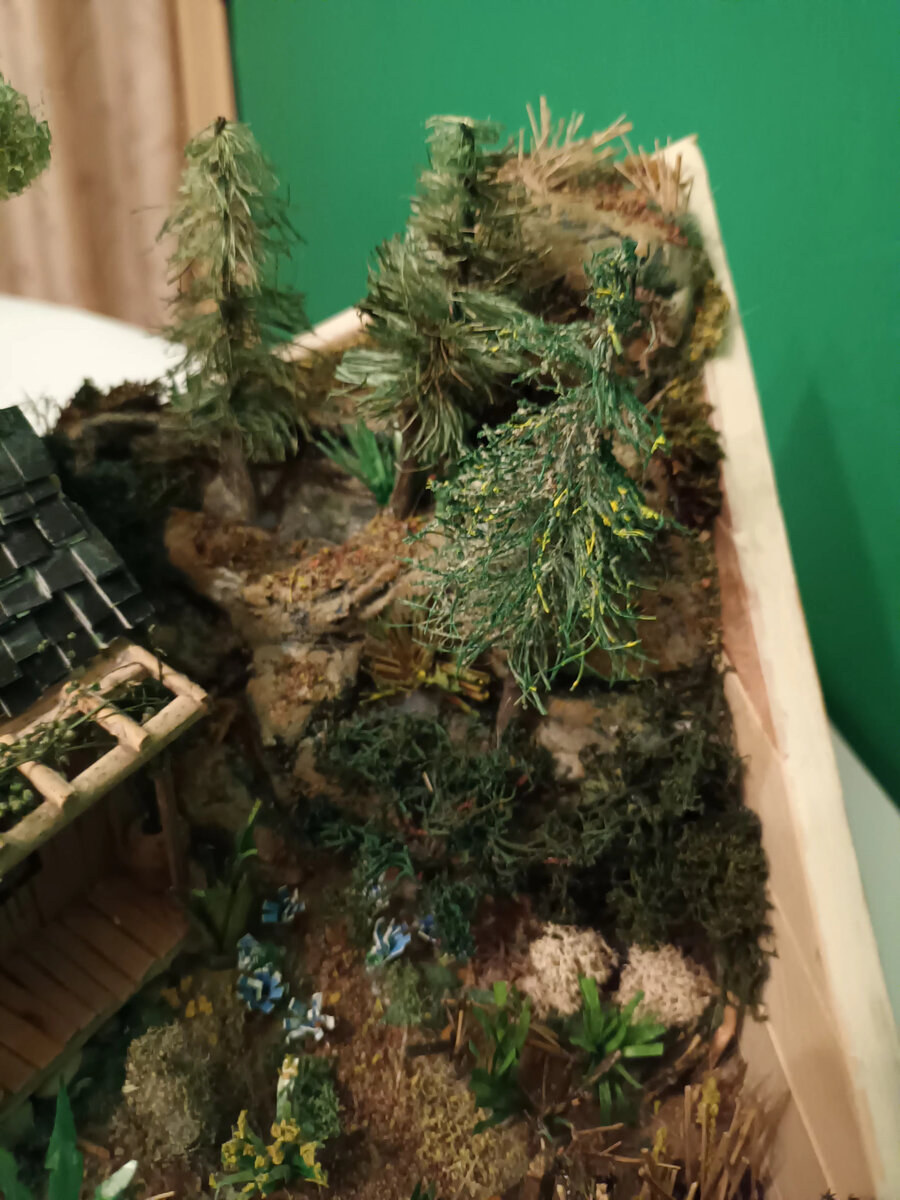
Tree Variety and Placement
Tree types created:
- Fir trees positioned on rocky cliff
- Two main tall trees positioned to the back of house
- Dried plant roots turned upside down to form trees
- Twigs selected for tree-like form, glued with moss
- Other twigs covered with fine pieces of hollow fiber from cushions, then colored sawdust
- Pyracantha shrub branches (with long thorns and tough wood) resembled tree frames perfectly - thorns covered with thinned and colored hollow fiber and sawdust
Challenges:
- Finding branches at appropriate scale required extensive searching
- Some materials proved too fragile after drying
- Quite a bit of experimentation had to be discarded
- Color changes during drying weren’t always predictable
- Organization of many small components
Time Investment: Approximately 25-30 hours
Chapter 7: Building the Landscape
Ground Texturing - A Layered Approach
Layer 1 - Base:
- Diluted PVA glue brushed over entire surface
- Fine sand and soil mixture sprinkled while wet
- Multiple coats for solid, durable base
- Allowed complete drying between coats
Layer 2 - Secondary Texturing:
- Coarser sand and small gravel in pathway areas
- Fine turf fibers in grassy areas
- Darker earth tones near cabin for trampled look
- Stone texture added with small pebbles
Layer 3 - Organic Materials:
Material collected and organized from various sources for easy access when matching texture and color:
- Sifted gravel (various grades)
- Grasses (multiple types)
- Dried moss from roof tiles
- Tea leaves
- Bark pieces
- Different coloring of hollow fiber
- Different colors and grades of sawdust
- Sphagnum moss colored in different shades
- Horticultural grit
- Sisal untwisted from ropes and cut into short pieces
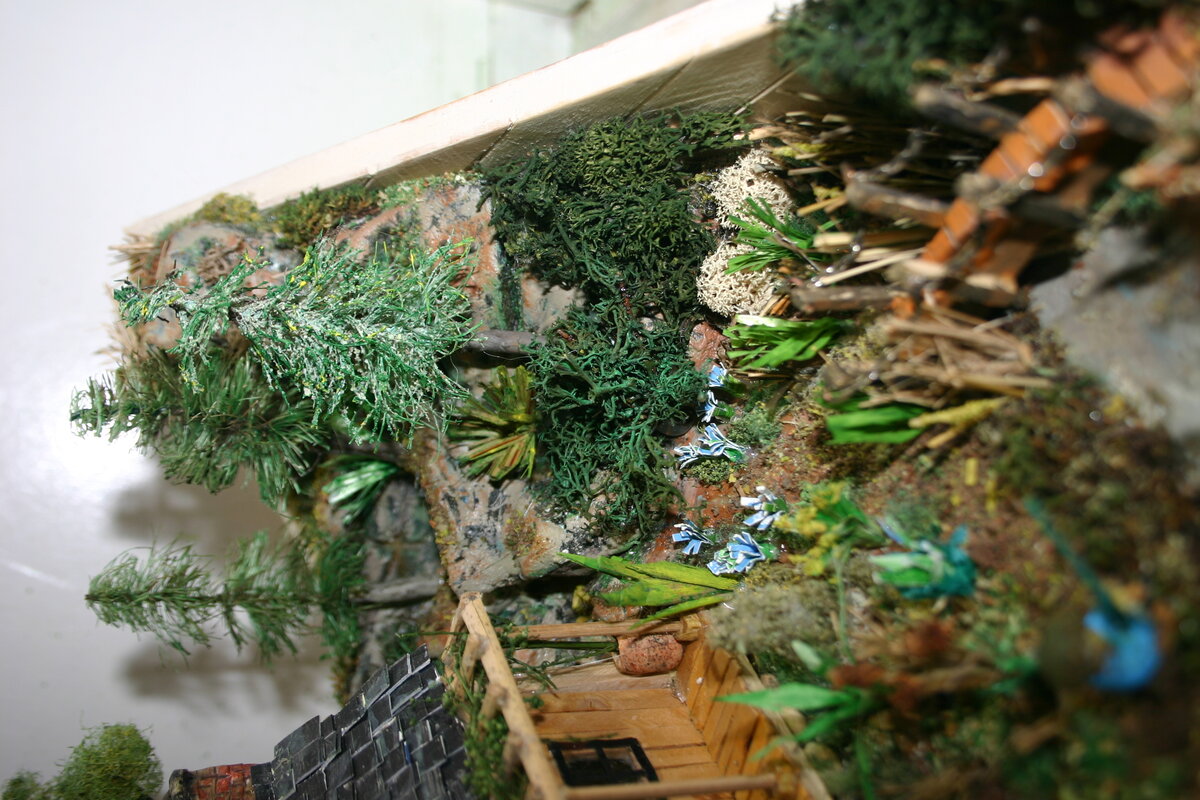
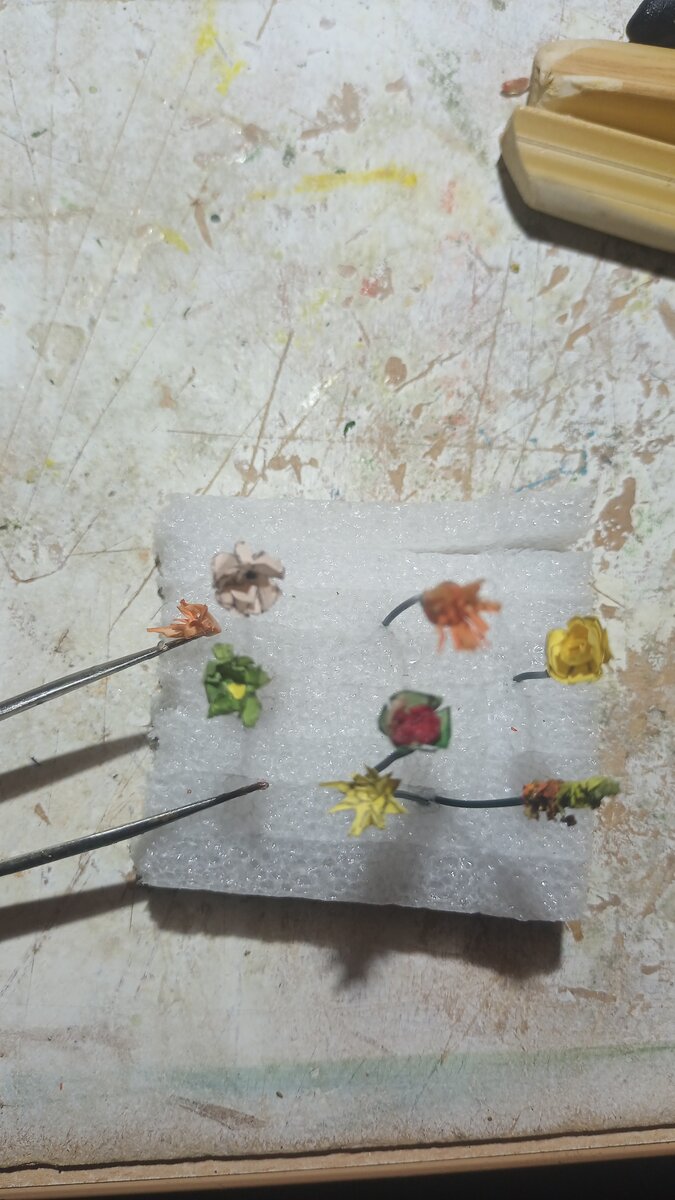
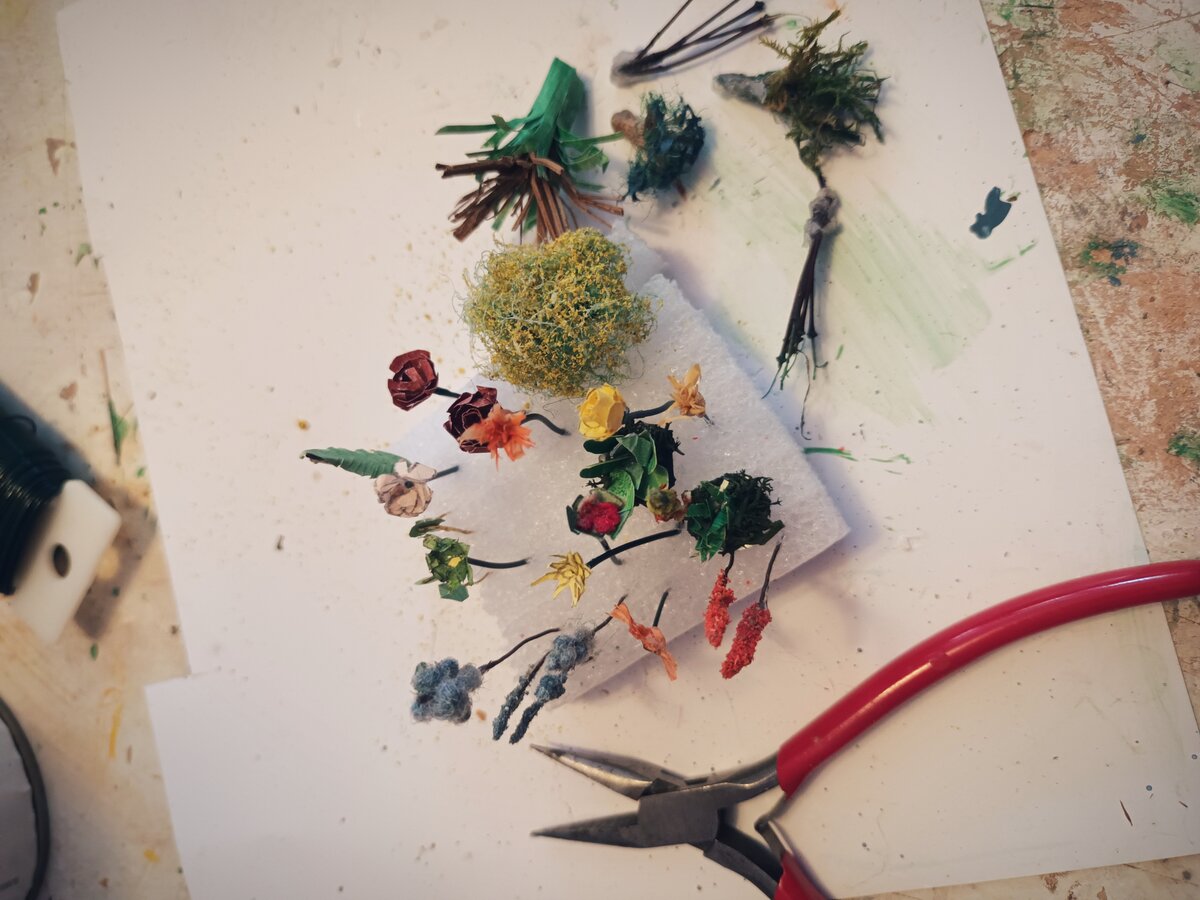
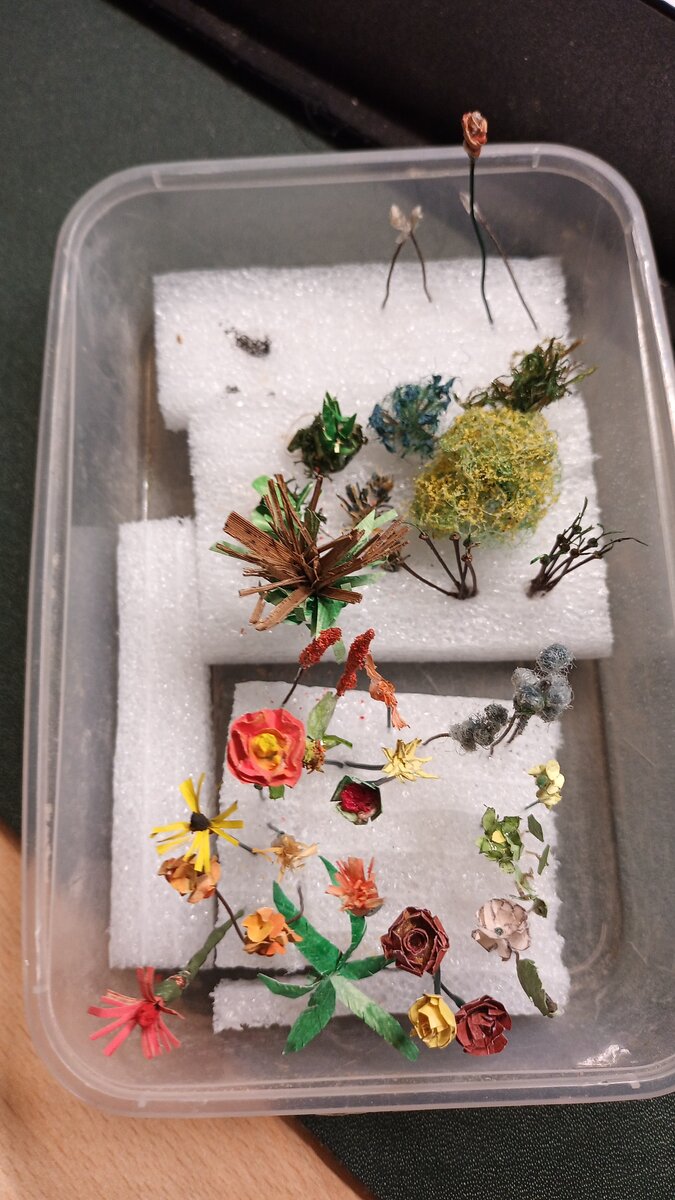
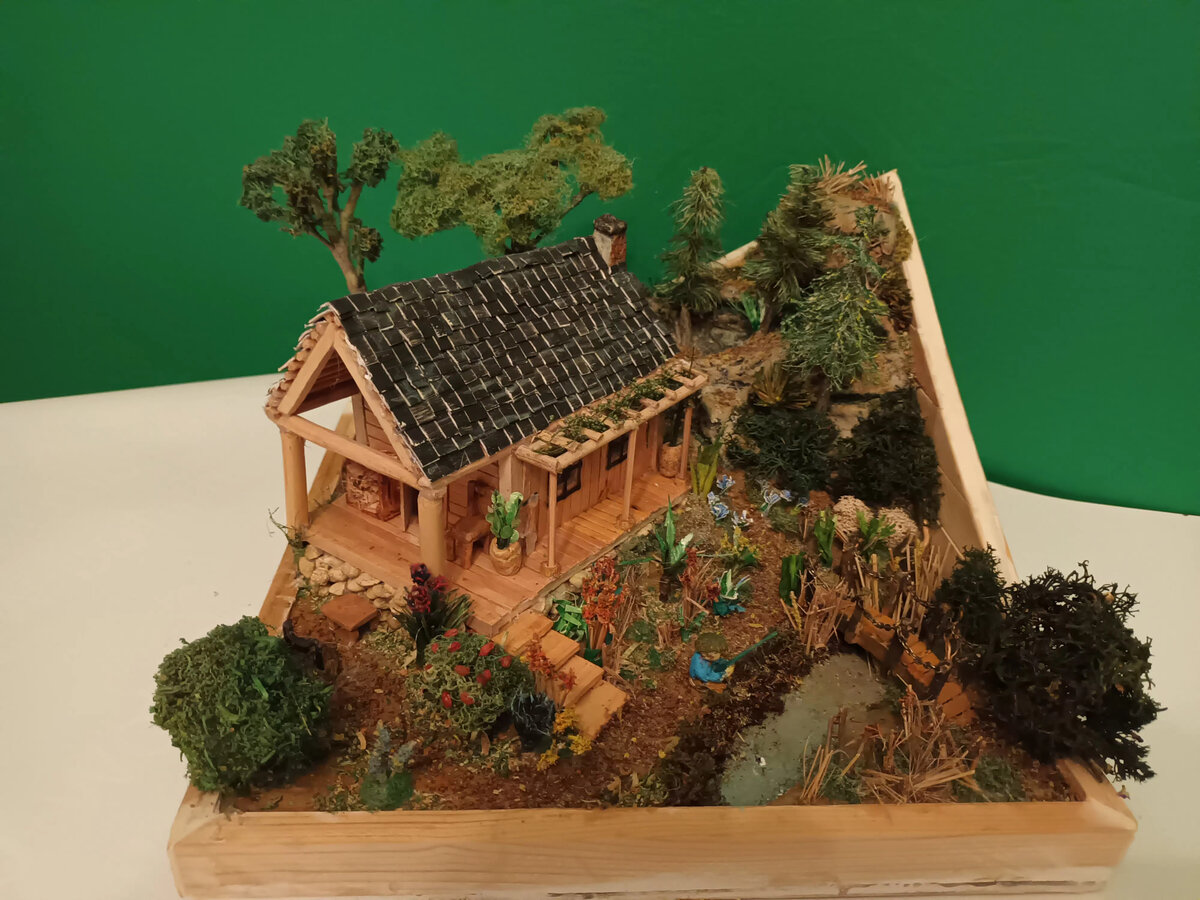
Flowering Plants
Experimented with making small flowers from prepared materials, adding wire stems to help with installation.
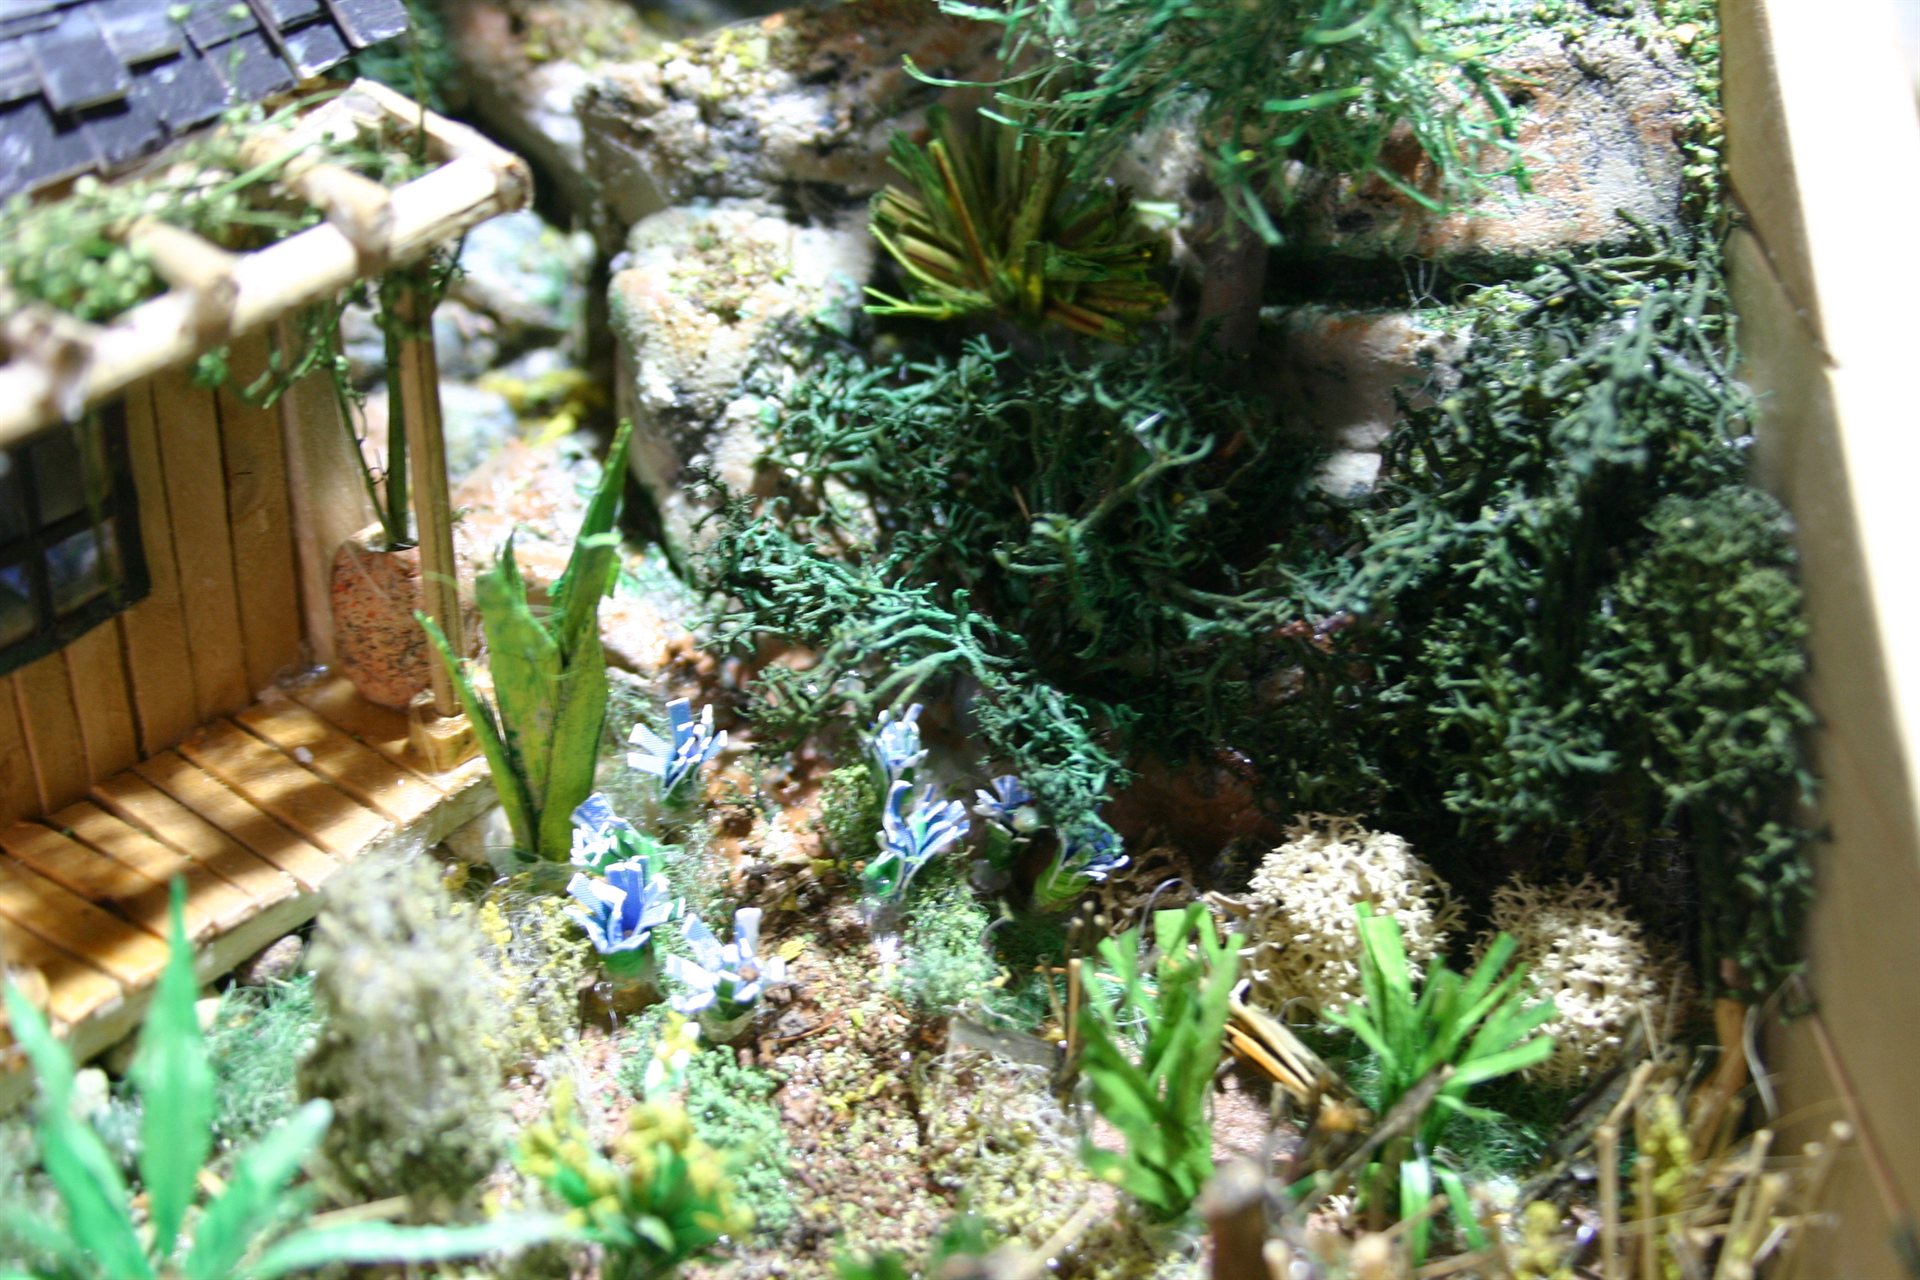
Pathway System
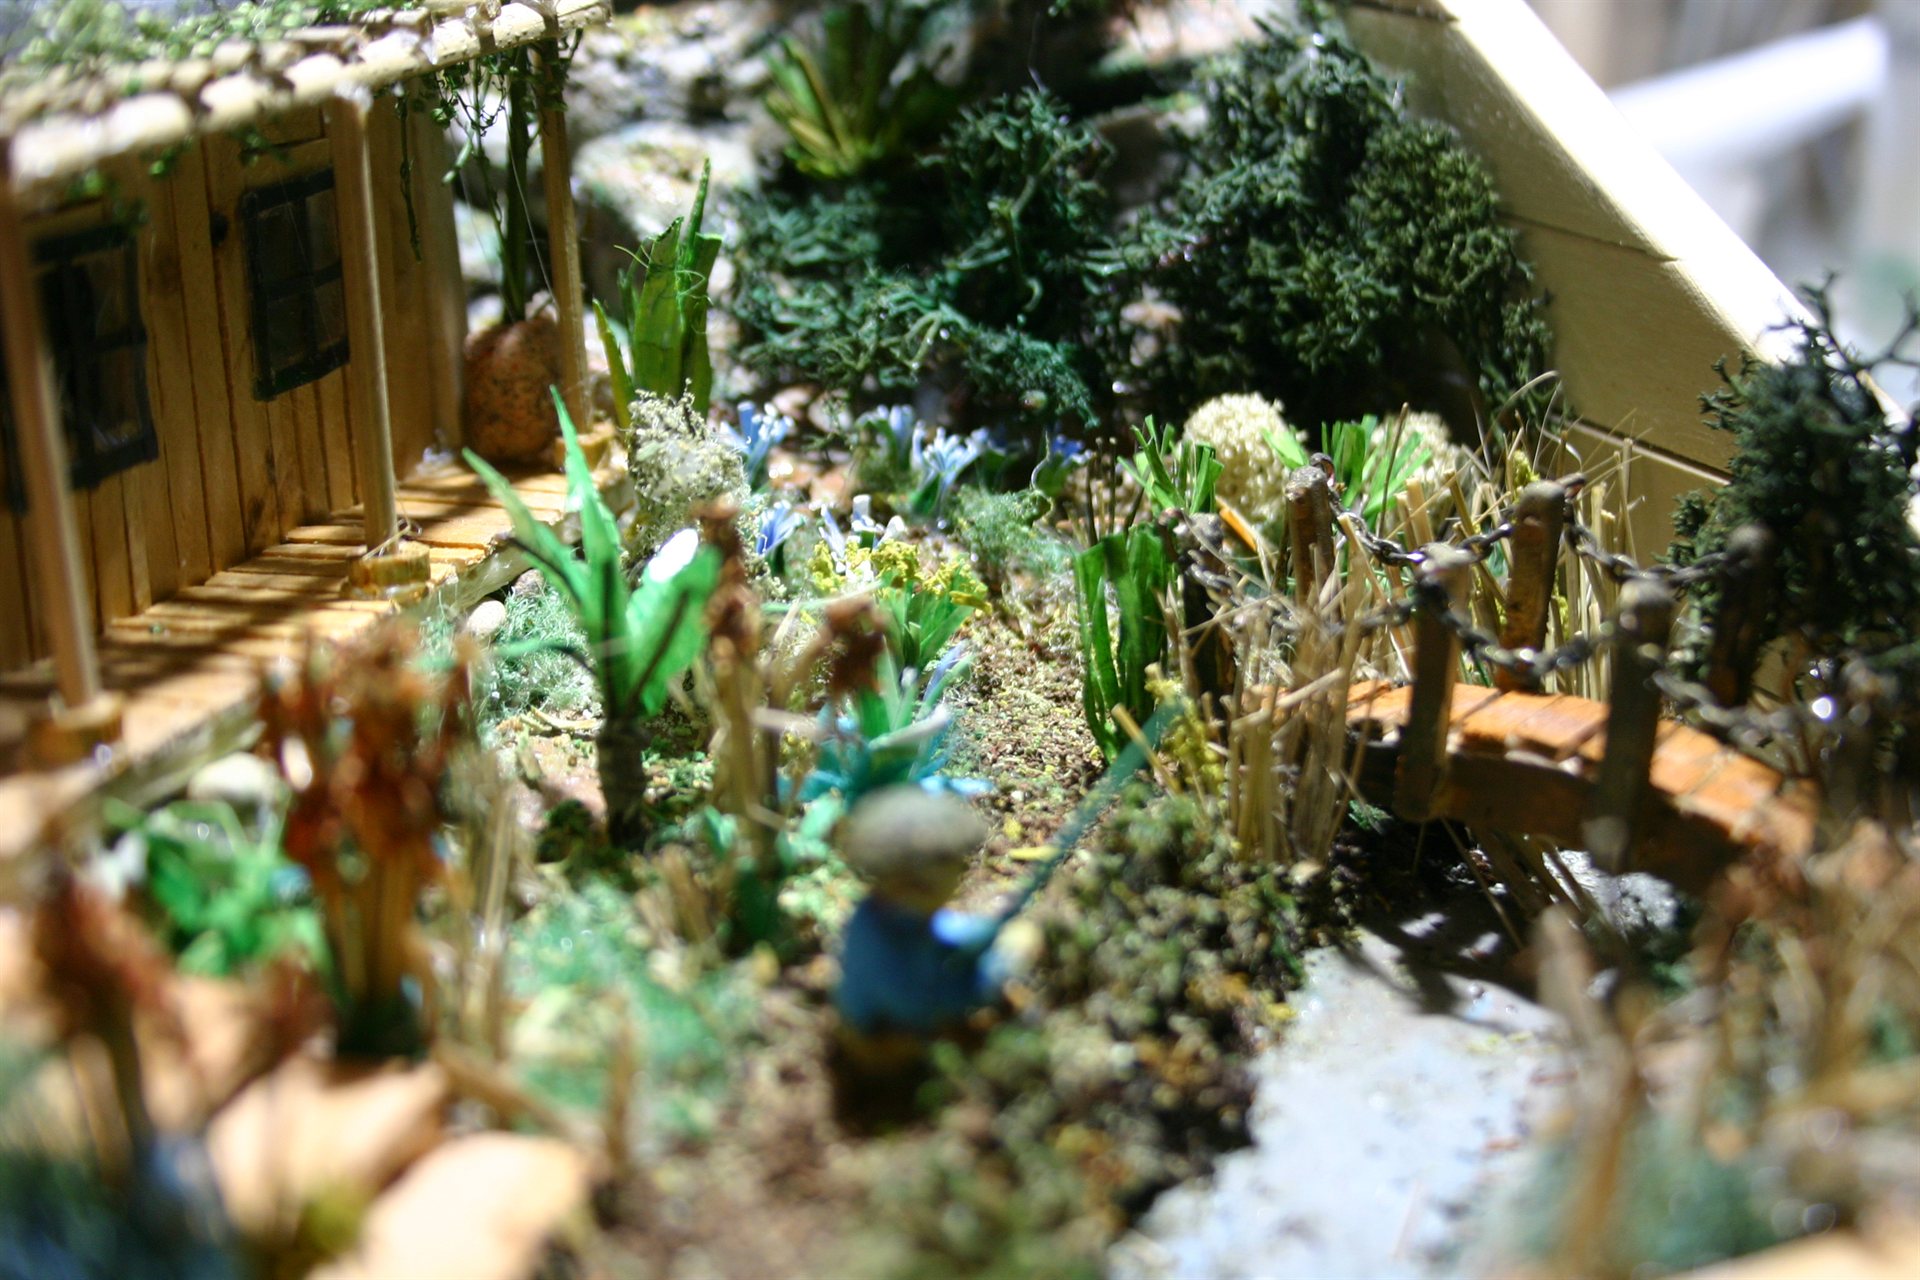
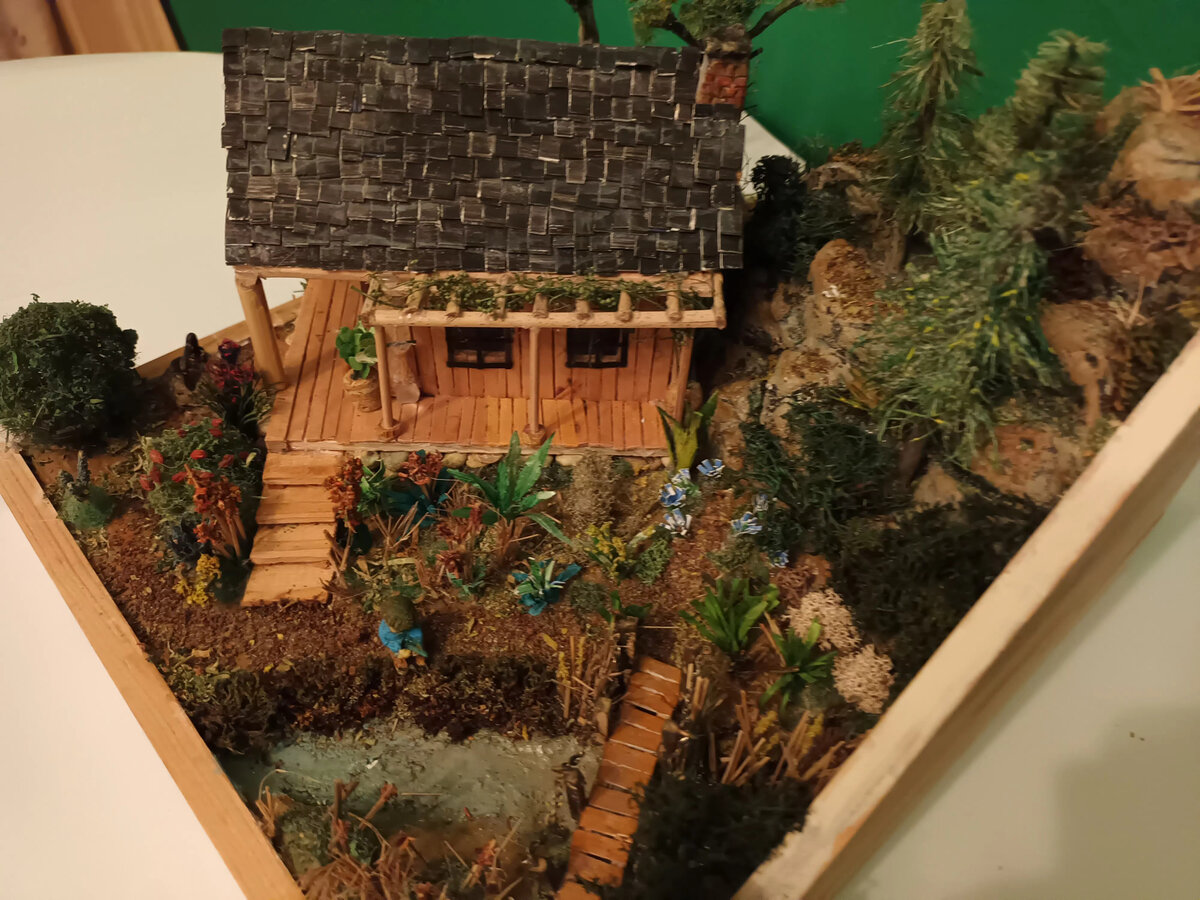
Rear Footpath: Path from river to rear of house, climbing up the cliff. Rich foliage of different forest plants and shrubs with small bluebells lining the path. Covered with mixture of tea bags and colored sawdust (greens and various browns).
Riverside Footpath: Rich set of plants on one side, river bank on the other, leading up to the bridge.
Composition Principles
Applied throughout the landscape:
- Depth and perspective (larger elements in foreground)
- Natural randomness (avoided symmetrical placement)
- Visual balance (cabin off-center for interest)
- Scale consistency (all vegetation appropriately sized)
Challenges:
- Balancing detail density - knowing when to stop adding materials
- Maintaining scale consistency with natural materials
- Working around already-placed trees to add undergrowth
- Preventing glue from showing through ground cover
Time Investment: Approximately 45-50 hours
Chapter 8: Structures and Figures - Adding Life to the Scene
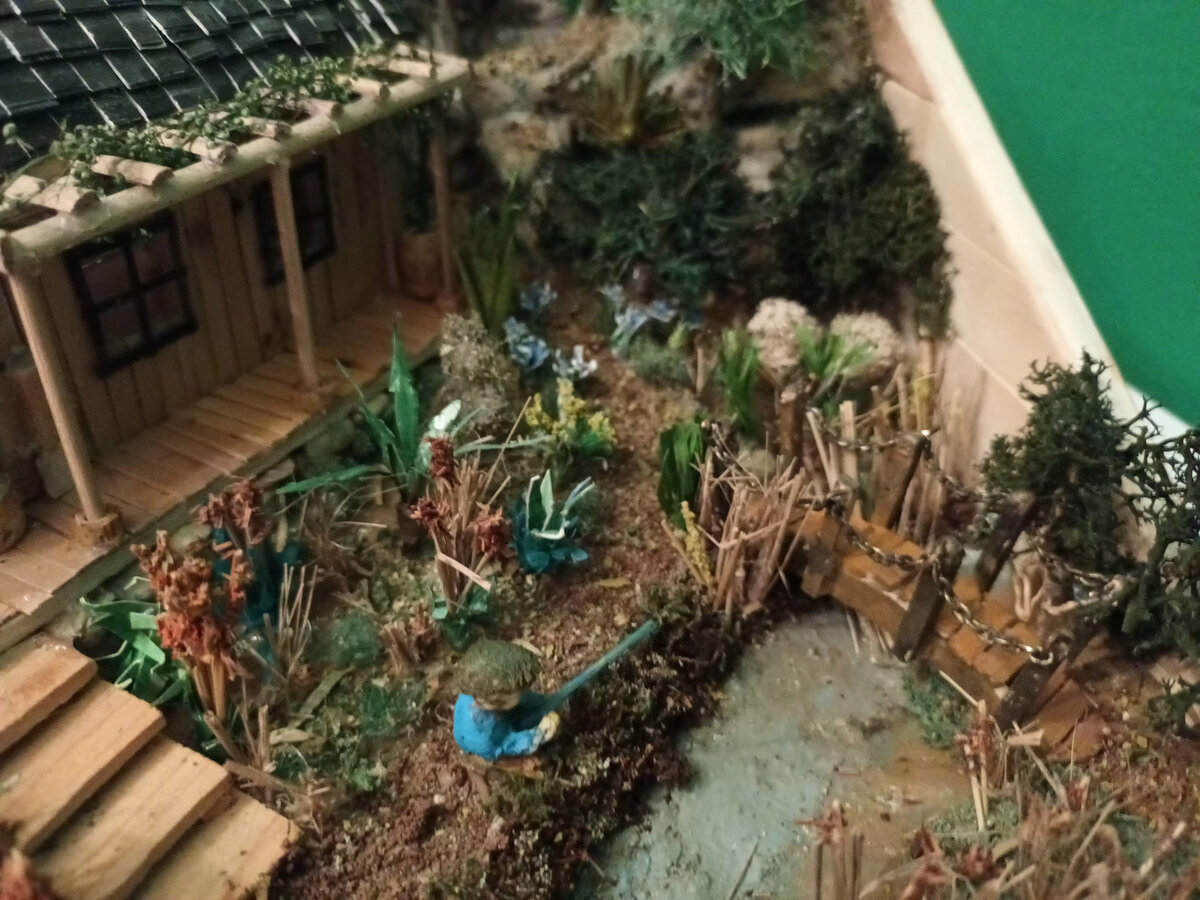
My First Figure: The Riverside Fisherman
I wanted to add a figure next to the river, but make the figure myself. At this point I had never made any figures - completely new territory. The only clay available was Milliput standard two-part epoxy putty.
After researching appropriate figures and techniques, I realized epoxy putty is not easy to work with at all. To make life easier, I selected a simple pose: a seated fisherman.

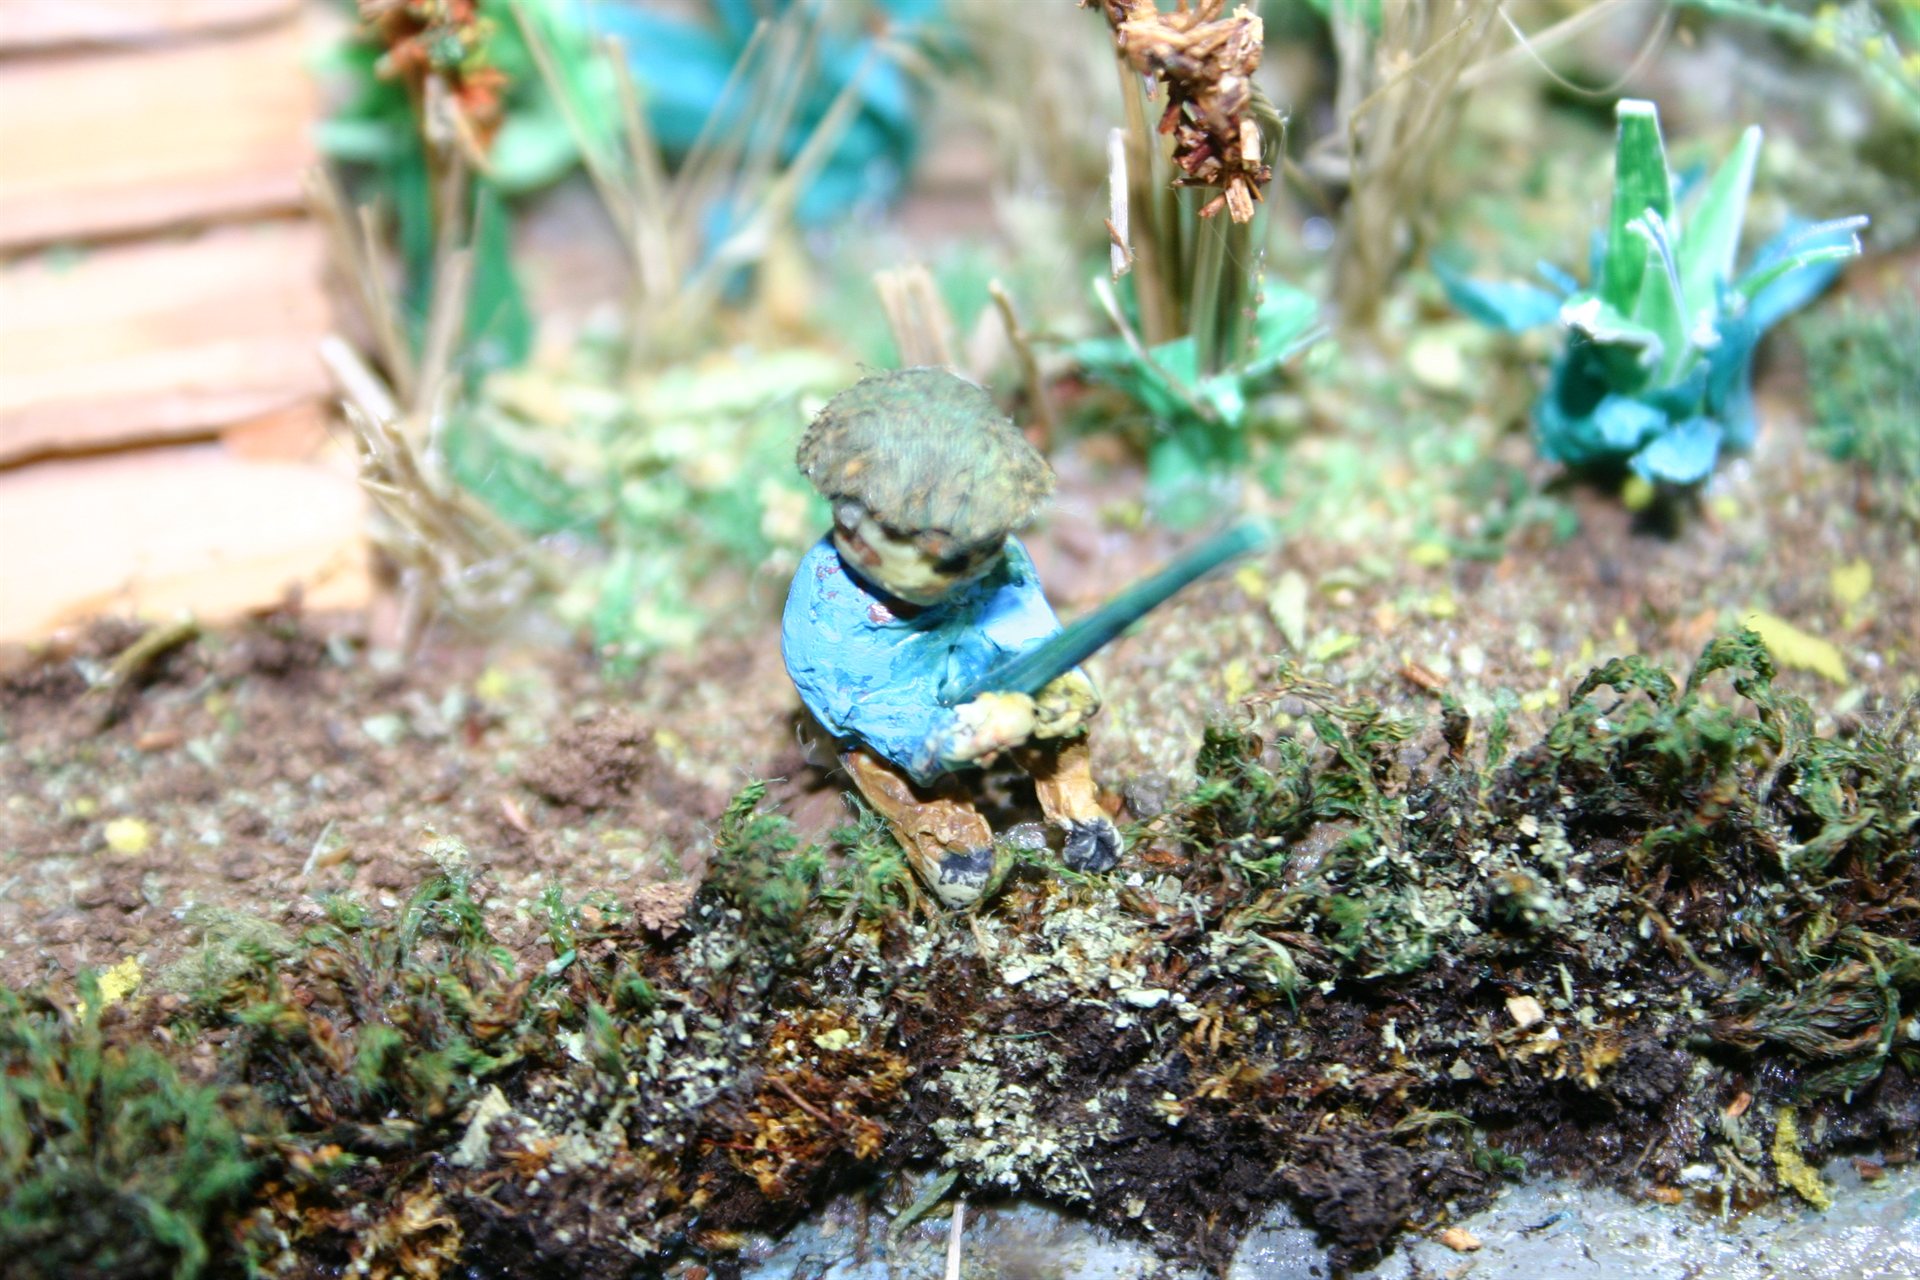
Challenges faced:
- Getting proportions right
- Epoxy putty difficult to work with - arms and legs kept breaking off
- Finer details (face, hands) impossible for me to master at this stage
Lessons for future: In later models I changed to different clay, added wire armatures for figures, studied proportions more carefully, and sought guidance. Nevertheless, I was proud of my first miniature man catching fish next to the river.
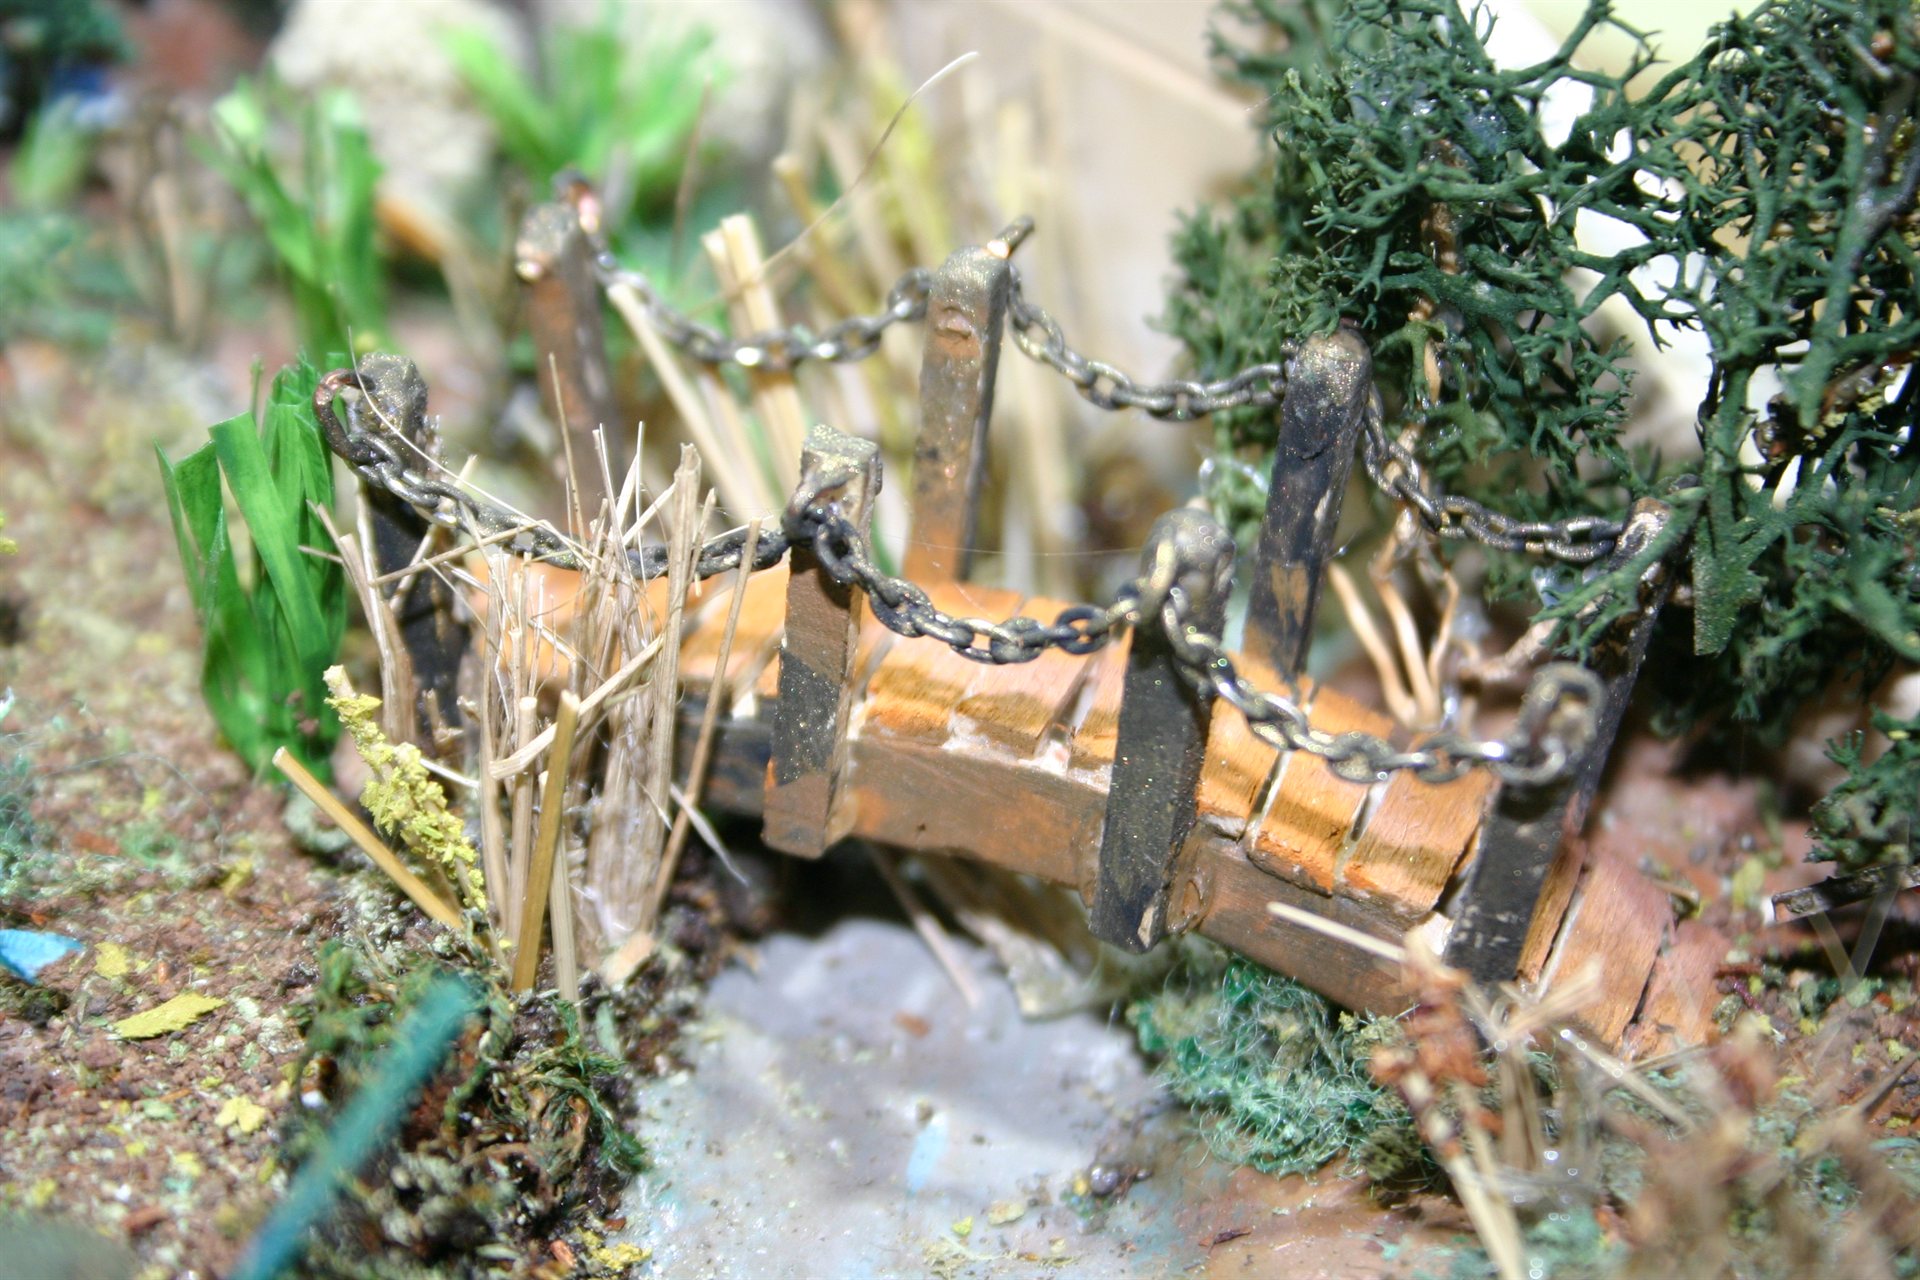
The Bridge Crossing
Construction method:
- Cut two strips in a bow for bridge sides
- Glued planks across
- Cut and sanded 1.5mm square poles to size
- Drilled holes in each pole
- Bent copper eyelets and fixed to old jewelry chain on each side
- Aging and weathering done with acrylic paint
Positioning evolution: Initially played with positioning the bridge from left to right across the river, but finally positioned it to allow more space for the fisherman at the model edge. This meant creating a pathway from the cabin stairs along the river to the bridge.
The Logging Station
No log cabin is complete without a logging area.
Construction:
- Two-man crosscut saw with logging stand
- Saw blade cut from tin can, two handles glued at ends
- Stand glued together from rough-cut wood strips
- Log pile made from garden twigs
Positioning: Finally positioned at rear of cabin, surrounded by a tree, grasses, moss, and tea leaves to cover the base.
Chapter 9: Reflections and Lessons
Project Statistics
Total Build Time: Approximately 130-140 hours over 3 months
- Cabin construction: 40-45 hours
- Plant preparation: 25-30 hours
- Scenery building: 45-50 hours
- Finishing and details: 20-25 hours
Final Dimensions:
- Base: 25cm × 25cm
- Height (tallest tree): ~15cm
- Cabin: 8cm × 6cm × 7cm (with chimney)
What Worked Well
- Individual log construction gave authentic appearance
- Corner notching technique created realistic joints
- Variation in wood tones added natural character
- Roof structure method was sturdy and realistic
- Natural materials provided instant realism
- Variety in collection gave options during scenery building
- Layered weathering approach created realistic aging
- Small details brought personality to the scene
- Color harmonization unified disparate elements
Challenges Encountered
- Paste mixture cracking (solved with multiple fill applications)
- Preparing all the wood work from scratch in terms of thickness, sizes and texture
- Finding scale-appropriate branches and other materials required extensive searching
- Some materials too fragile after drying, had to be preserved
- Color changes during drying unpredictable
- Knowing when to stop adding details
- Balancing weathering - not too clean, not too dirty
Skills Developed
- Fine detail work at small scale - lots of wood carving and shaping
- Scale woodworking techniques
- Building structural elements from scratch
- Weathering and aging wood surfaces
- Plant material selection and evaluation
- Miniature flower making with different materials
- Preservation and sealing techniques
- Tree armature construction
- Natural material organization and workflow
- Terrain building and contouring
- Composition and visual balance
- Working with natural materials at scale
- Layering techniques for realistic ground texture
- Advanced weathering techniques
- Micro-detail placement and creation
- Color theory and harmonization
- Scene composition and storytelling
- Protective finishing methods
- Basic figure sculpting (though much to learn)
- In all respects the learning was just an introduction with lots to discover, practice and refine in time to come
Final Thoughts
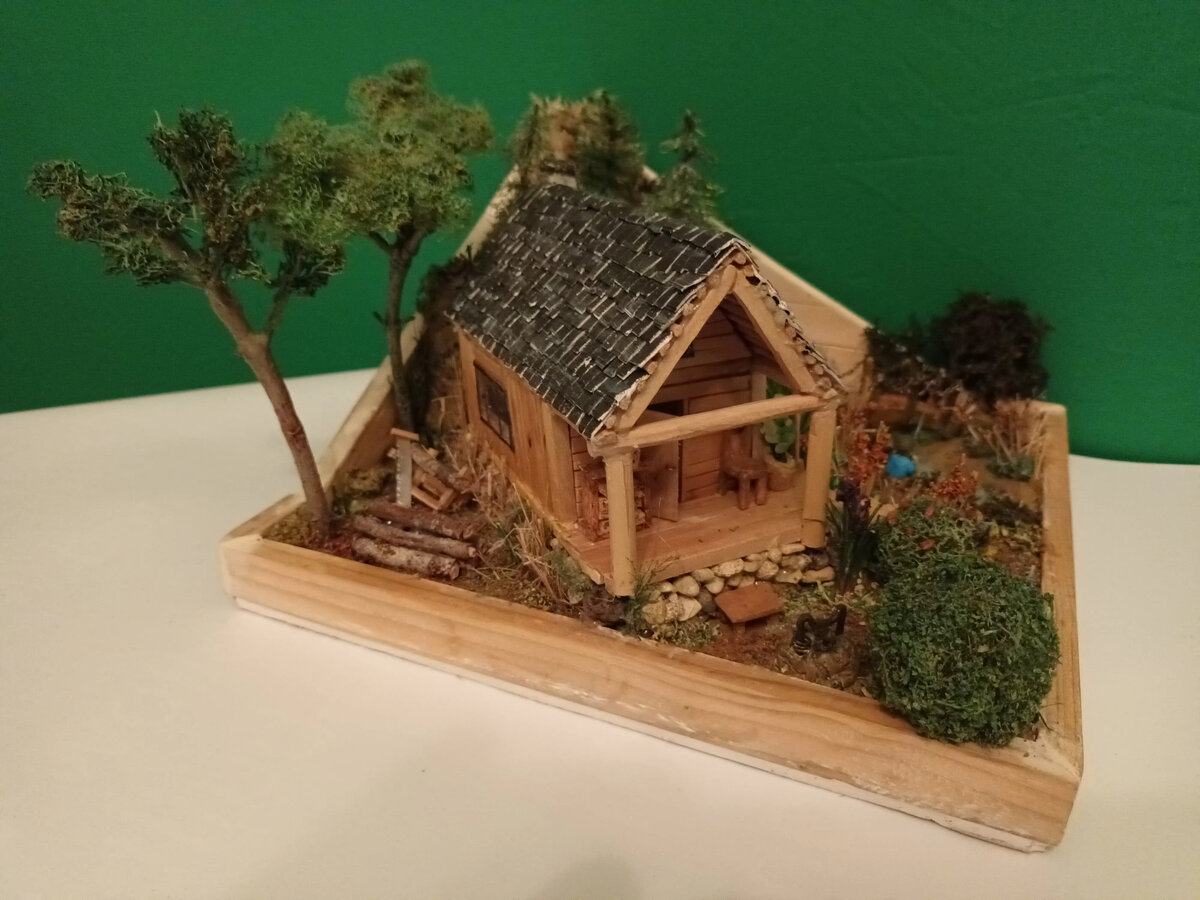
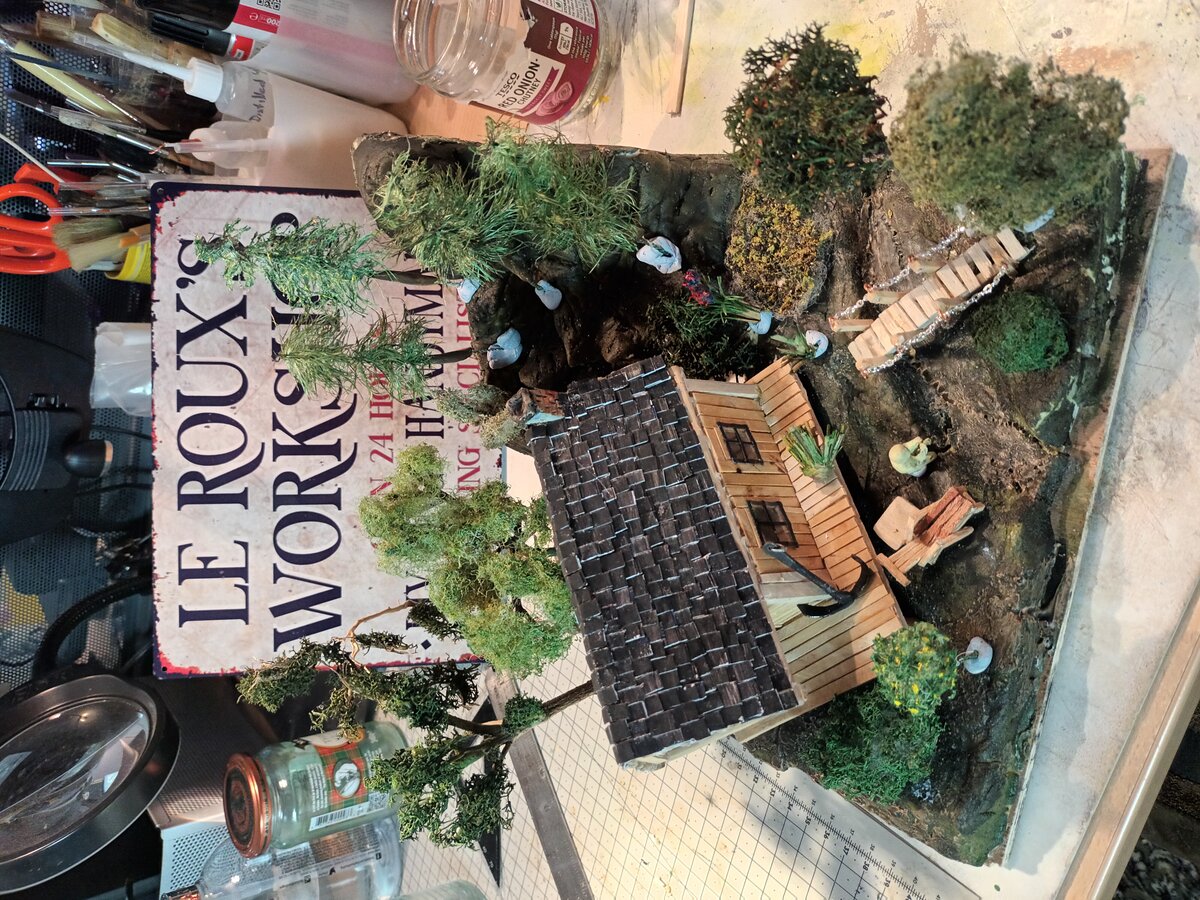
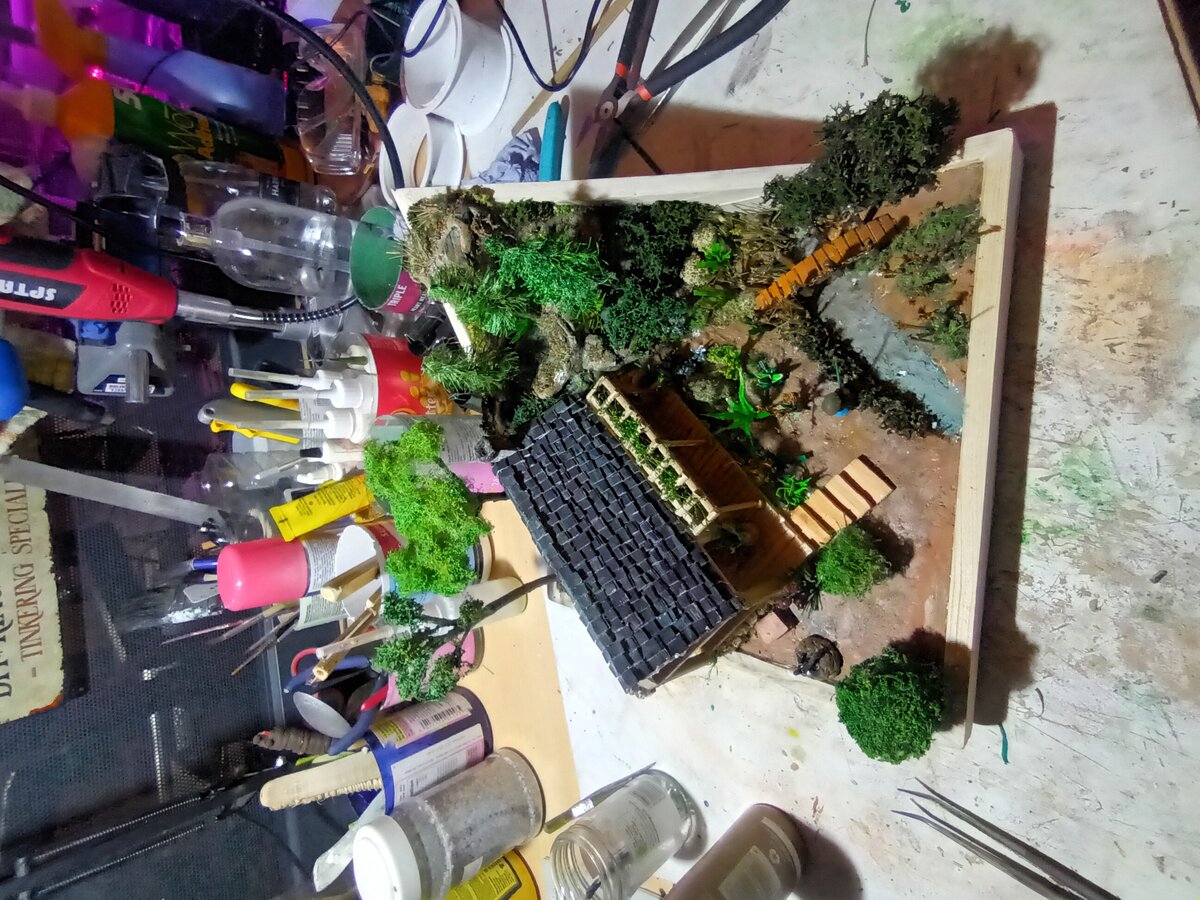
The Log Cabin in the Woods project was a rewarding journey into scratch building and natural material diorama work. The three-month build time allowed for careful development of each phase while the scratch-built approach provided complete creative control.
The combination of handcrafted cabin structure, carefully prepared vegetation, and thoughtful scenery building resulted in a cohesive woodland scene that captures the peaceful isolation of a cabin deep in the forest. Each viewing reveals new details, from the weathered cabin logs to the tiny bluebells along the path to my first attempt at figure-making.
This diorama demonstrates that patience, attention to natural details, and thoughtful weathering can transform basic materials - garden waste, household items, and collected natural specimens - into a convincing miniature world.
Completion Date: April 10, 2024
Gallery
Have questions or feedback about this project? I'd love to hear from you.