Caravaning in Wales
Project Inspiration
“Can you build our new caravan and car on a campsite next to a river?”
With the English Country Garden completed in November 2024, I was looking for inspiration for my next project. One relaxing evening with my son and his family, I jokingly asked, “So do you have anything that I can build for you?” - being overconfident from my newly discovered skills with the garden build.
“Yes!” they responded without hesitation. “Can you build our new caravan and car on a campsite next to a river?”
And that was it. The commission was set.
This meant I needed to figure out how to make a model of an Eriba Triton caravan and a VW Golf estate - in red. It must feature my son, daughter-in-law, and Tilly, their beloved dog. Obviously on a campsite next to a river in Wales.
The challenges were immediate:
- My previous attempts at modelling figures were not very successful, especially making them resemble specific people
- I had never modelled miniature animals
- I had never attempted to model any type of vehicle
- The first river I made in the log cabin wasn’t nearly realistic enough
There was lots to learn and lots to discover. Maybe it was too ambitious, but the planning phase started anyway.
Project Overview
Build Type: Commissioned scratch build
Scale: 1:42
Base Dimensions: 25cm × 25cm (dictated by available shelf space)
Project Timeline: December 15, 2024 - July 24, 2025 (7 months)
Total Build Time: Approximately 80 hours
Status: Completed and delivered
Commission Brief: Recreate family’s camping setup with accurate caravan and vehicle models
Project Goals
The key requirements for this commissioned piece:
- Must fit on a 25cm × 25cm base (shelf space constraint)
- Feature a realistic Eriba Triton caravan
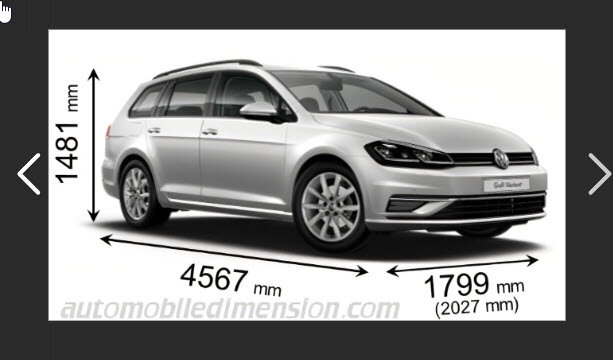
- VW Golf estate in red
- 2 realistic figures and a dog (resembling the actual family and Tilly)
- Camping on a grassed campsite
- Located near a river in the backdrop
- Vegetation and plants from a Welsh rural area
Personal Challenges:
- First attempt at vehicle modeling (both caravan and car)
- Creating recognizable portrait figures
- Sculpting a realistic dog
- Improving water/river techniques from previous attempts
- Working to client specifications rather than personal design choices
Chapter 1: Planning and Scale Calculations
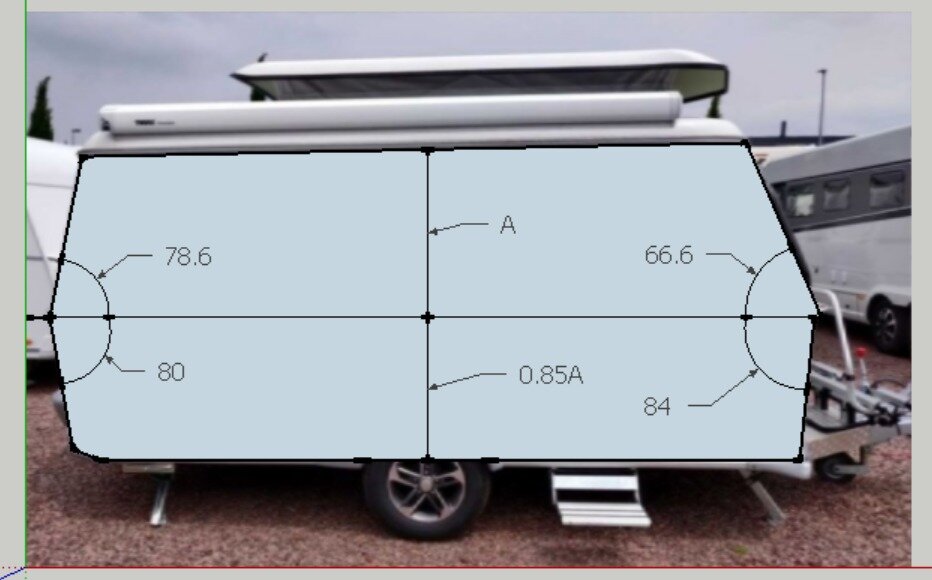
Determining the Scale
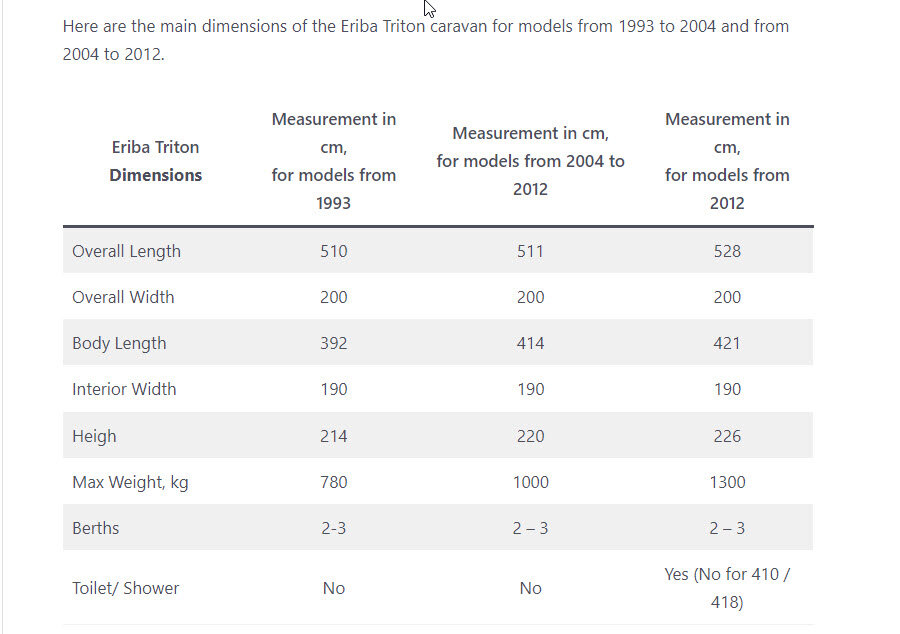
I managed to find key measurements of the Eriba Triton caravan from the internet and converted them to a detailed scale worksheet. Working within the 25cm × 25cm base constraint, everything calculated to a scale of 1:42.
Caravan Conversion Table (in mm):
| Dimension | Model Scale | Actual Size |
|---|---|---|
| Body Length | 100mm | 4210mm |
| Overall Length | 125mm | 5280mm |
| Width | 48mm | 2000mm |
| Height | 54mm | 2260mm |
Related Elements at 1:42 Scale:
| Item | Model Dimension | Actual Size |
|---|---|---|
| Base board length | 250mm | 10,525mm |
| Man | 48mm | 2000mm |
| Woman | 40mm | 1700mm |
| Dog (Tilly) | 12mm | 500mm |
| Car | 90mm | 3800mm |
| Tree height | 143mm | 6000mm |
| River width | 71mm | 3000mm |
| Paddle board | 59mm | 2500mm |
| Small plant | 24mm | 1000mm |
| Large plant | 48mm | 2000mm |
| Flower head | 1mm | 40mm |
This mathematical foundation gave me confidence to proceed, knowing everything would be proportionally correct.
Research and Reference Gathering
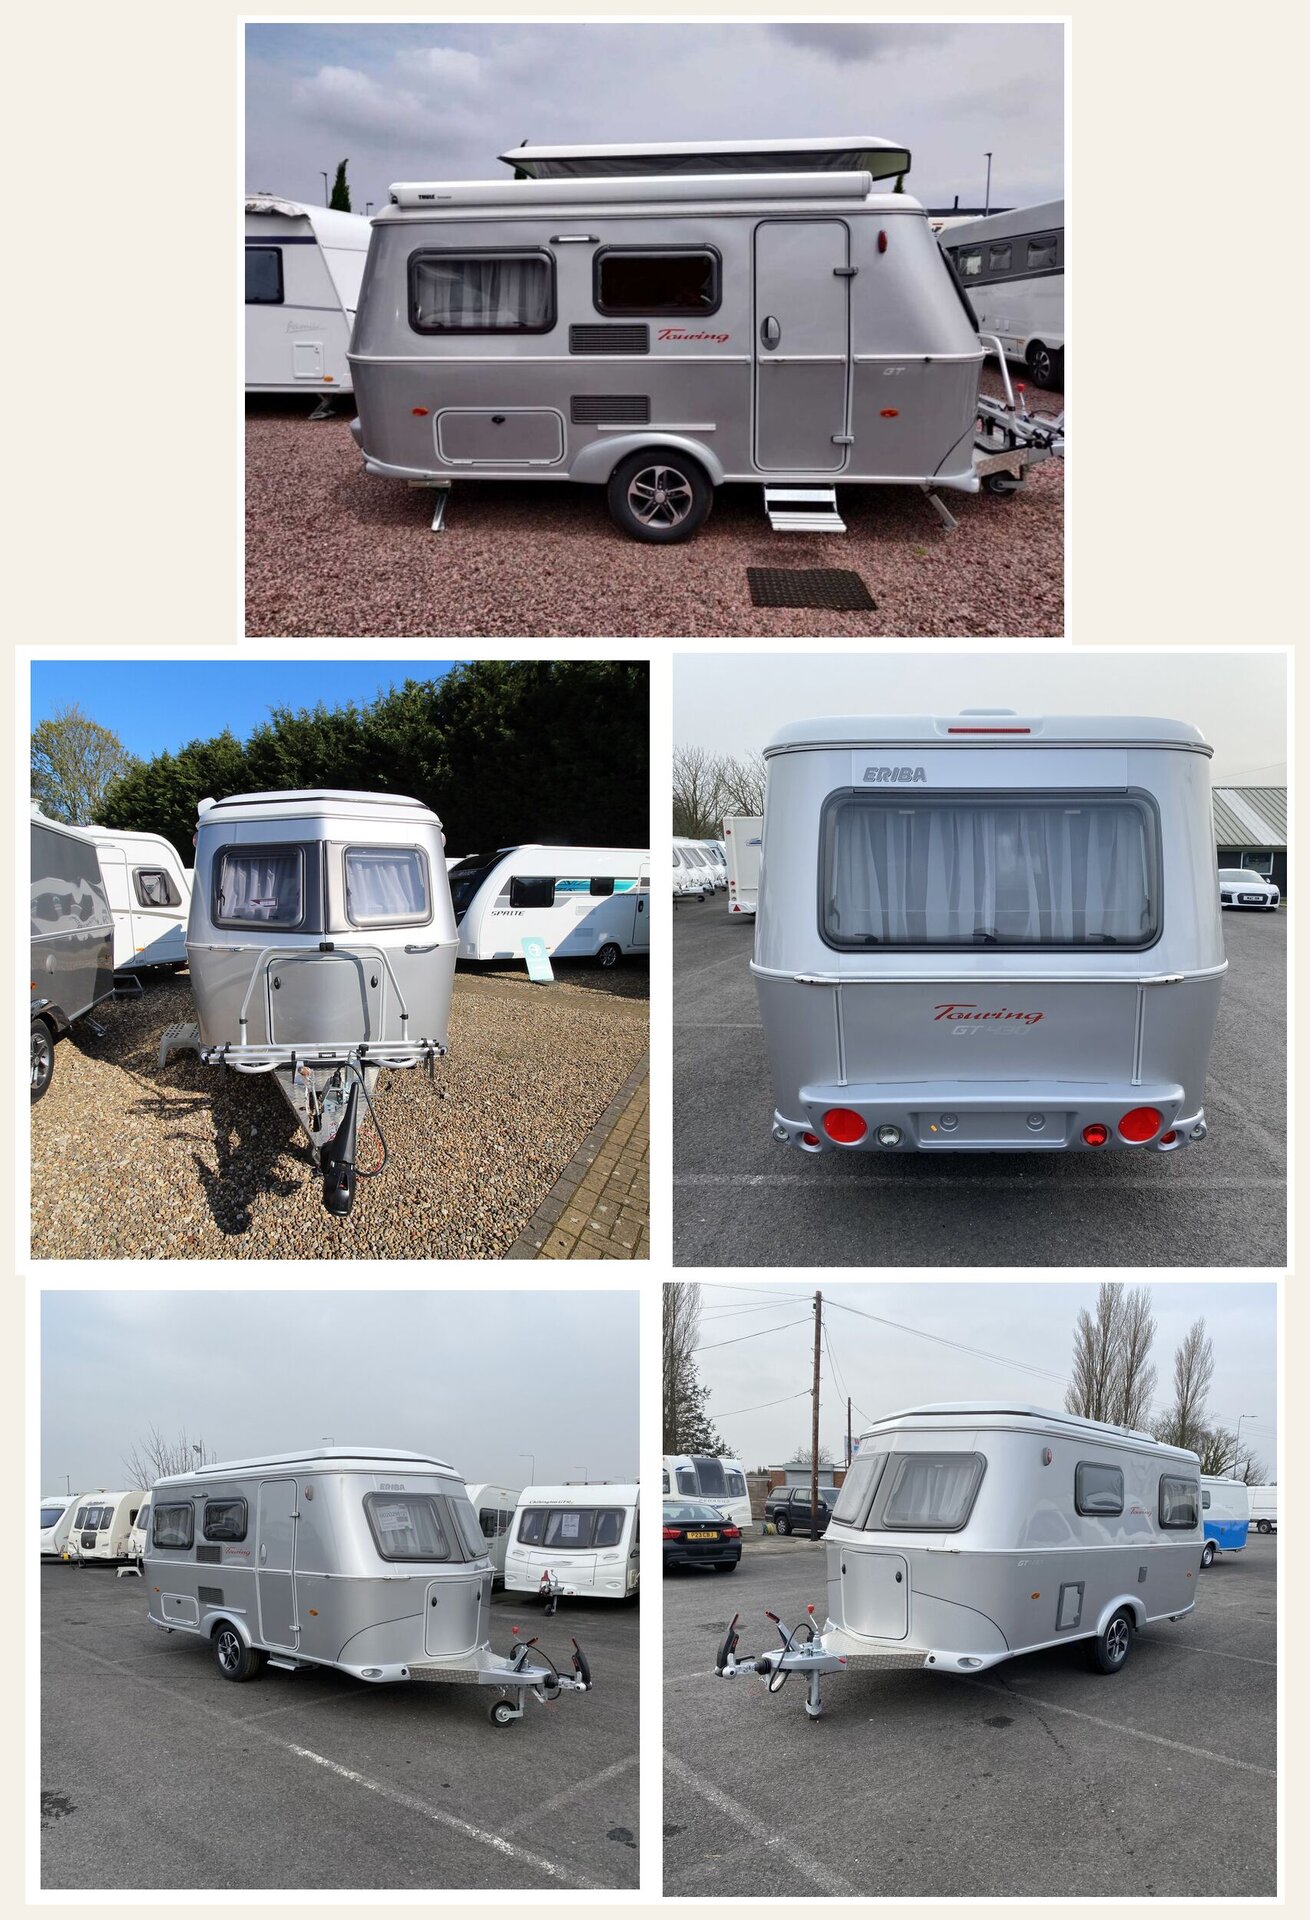
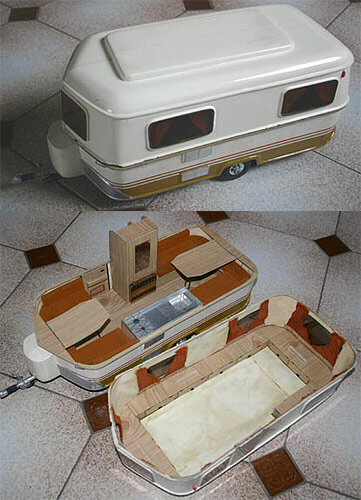
Fortunately, there were lots of photos on the internet of the Eriba, although I couldn’t find many other model examples. Unfortunately, I couldn’t find any model building plans or kit models. However, I did find one picture of a model that someone had built, which gave me hope it was possible.
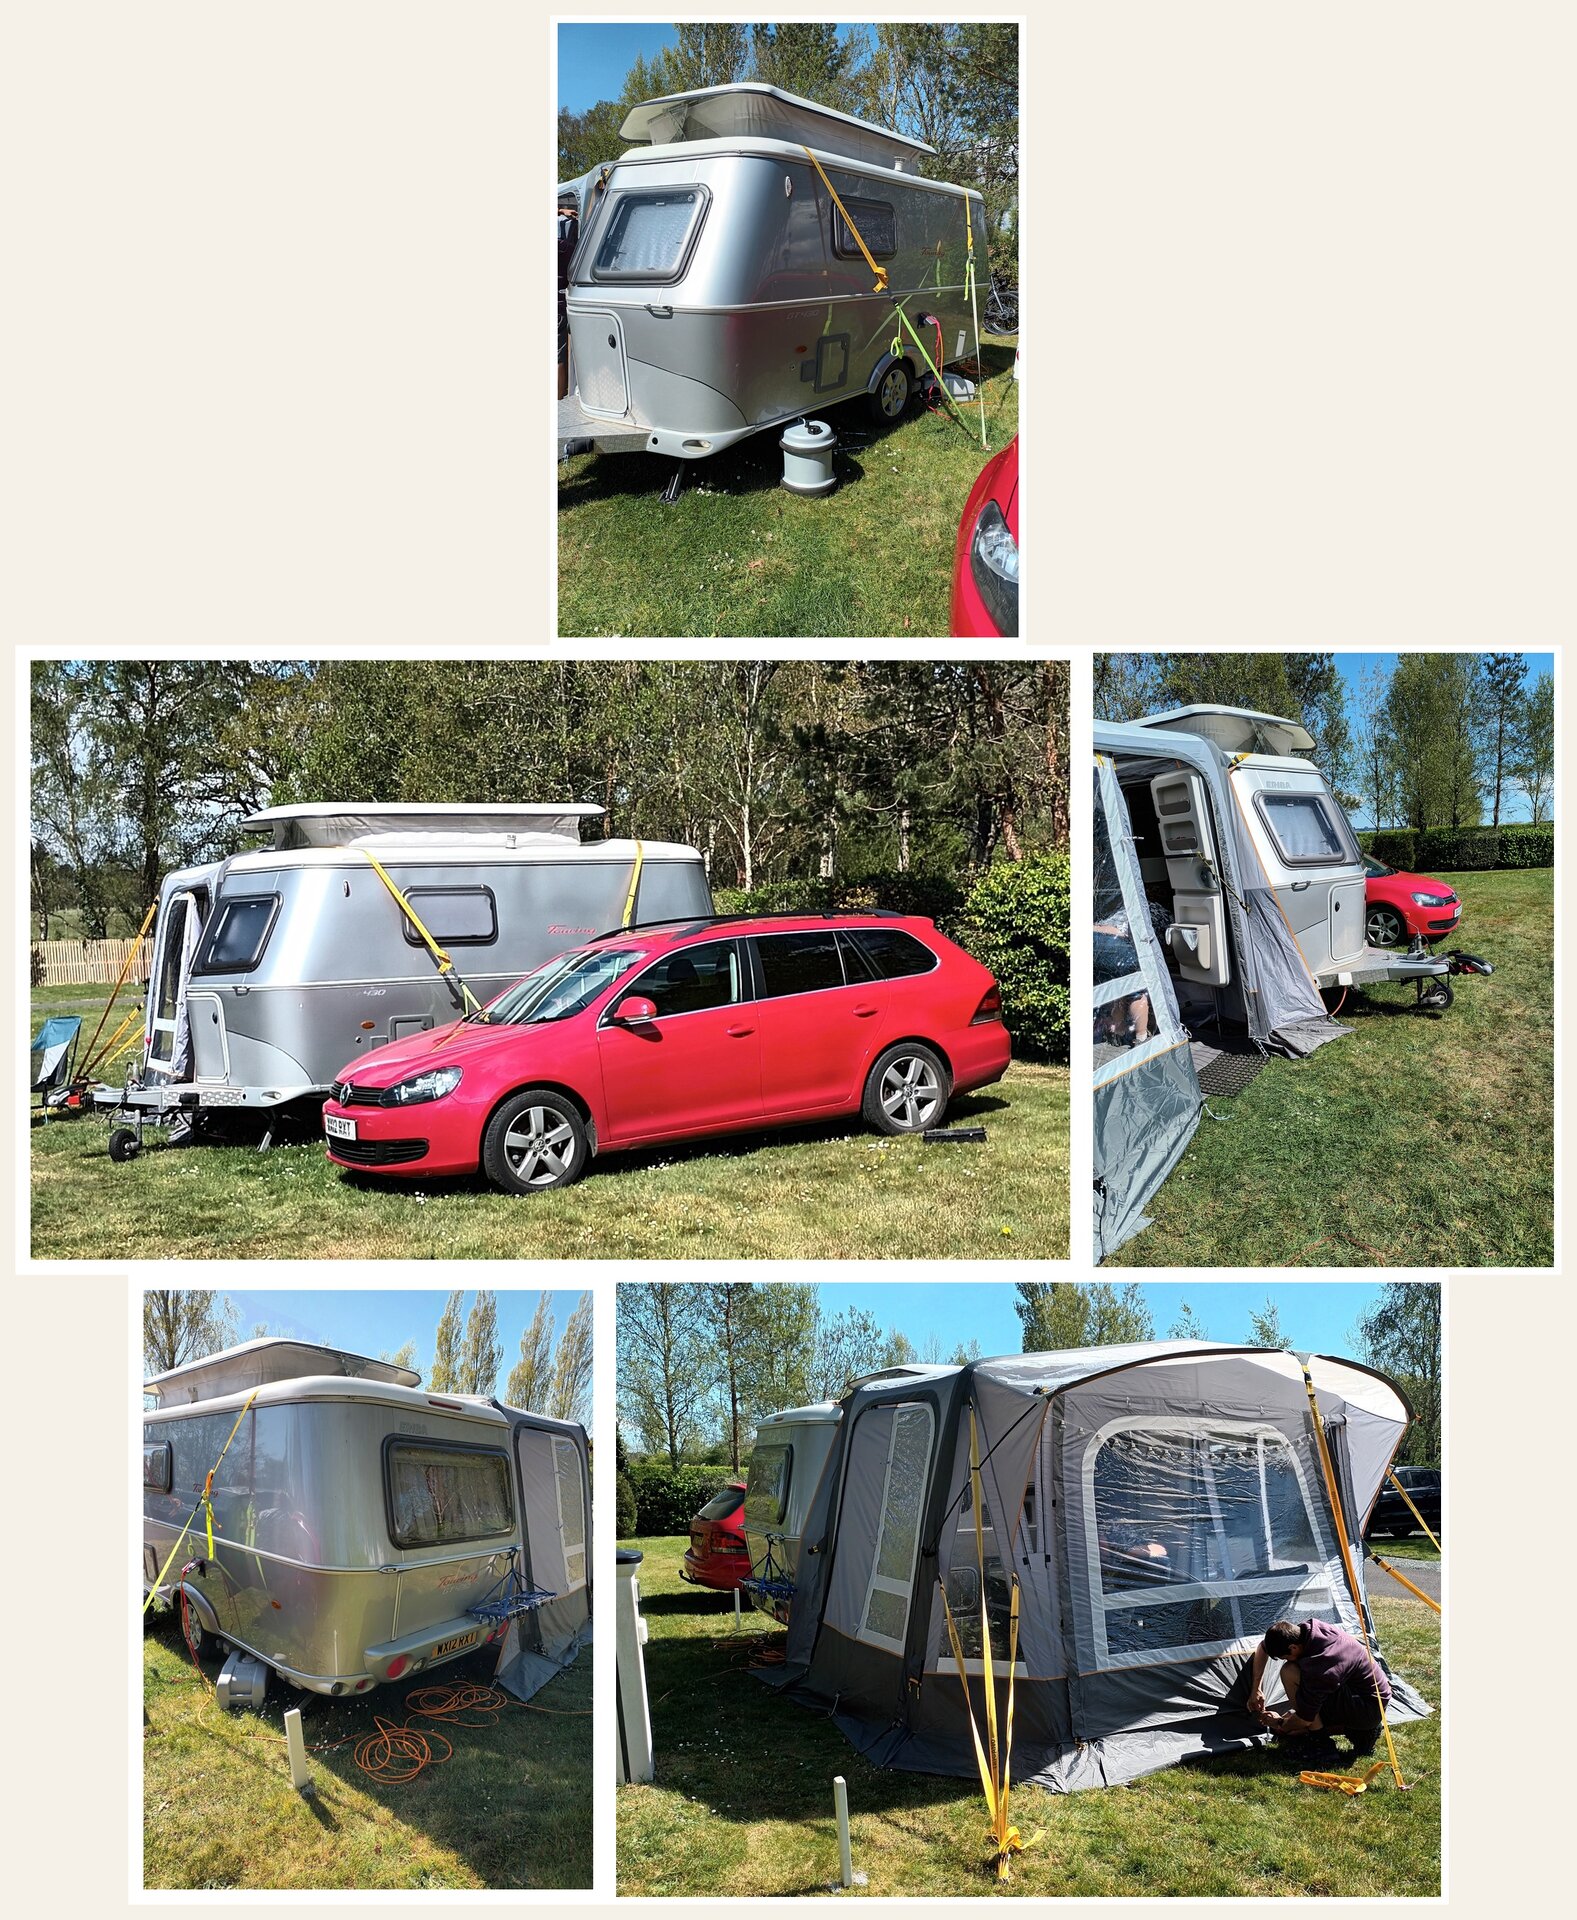
I also visited my children’s actual campsite to get a better understanding of the caravan and car in situ, taking my own reference photos.
Creating Working Plans
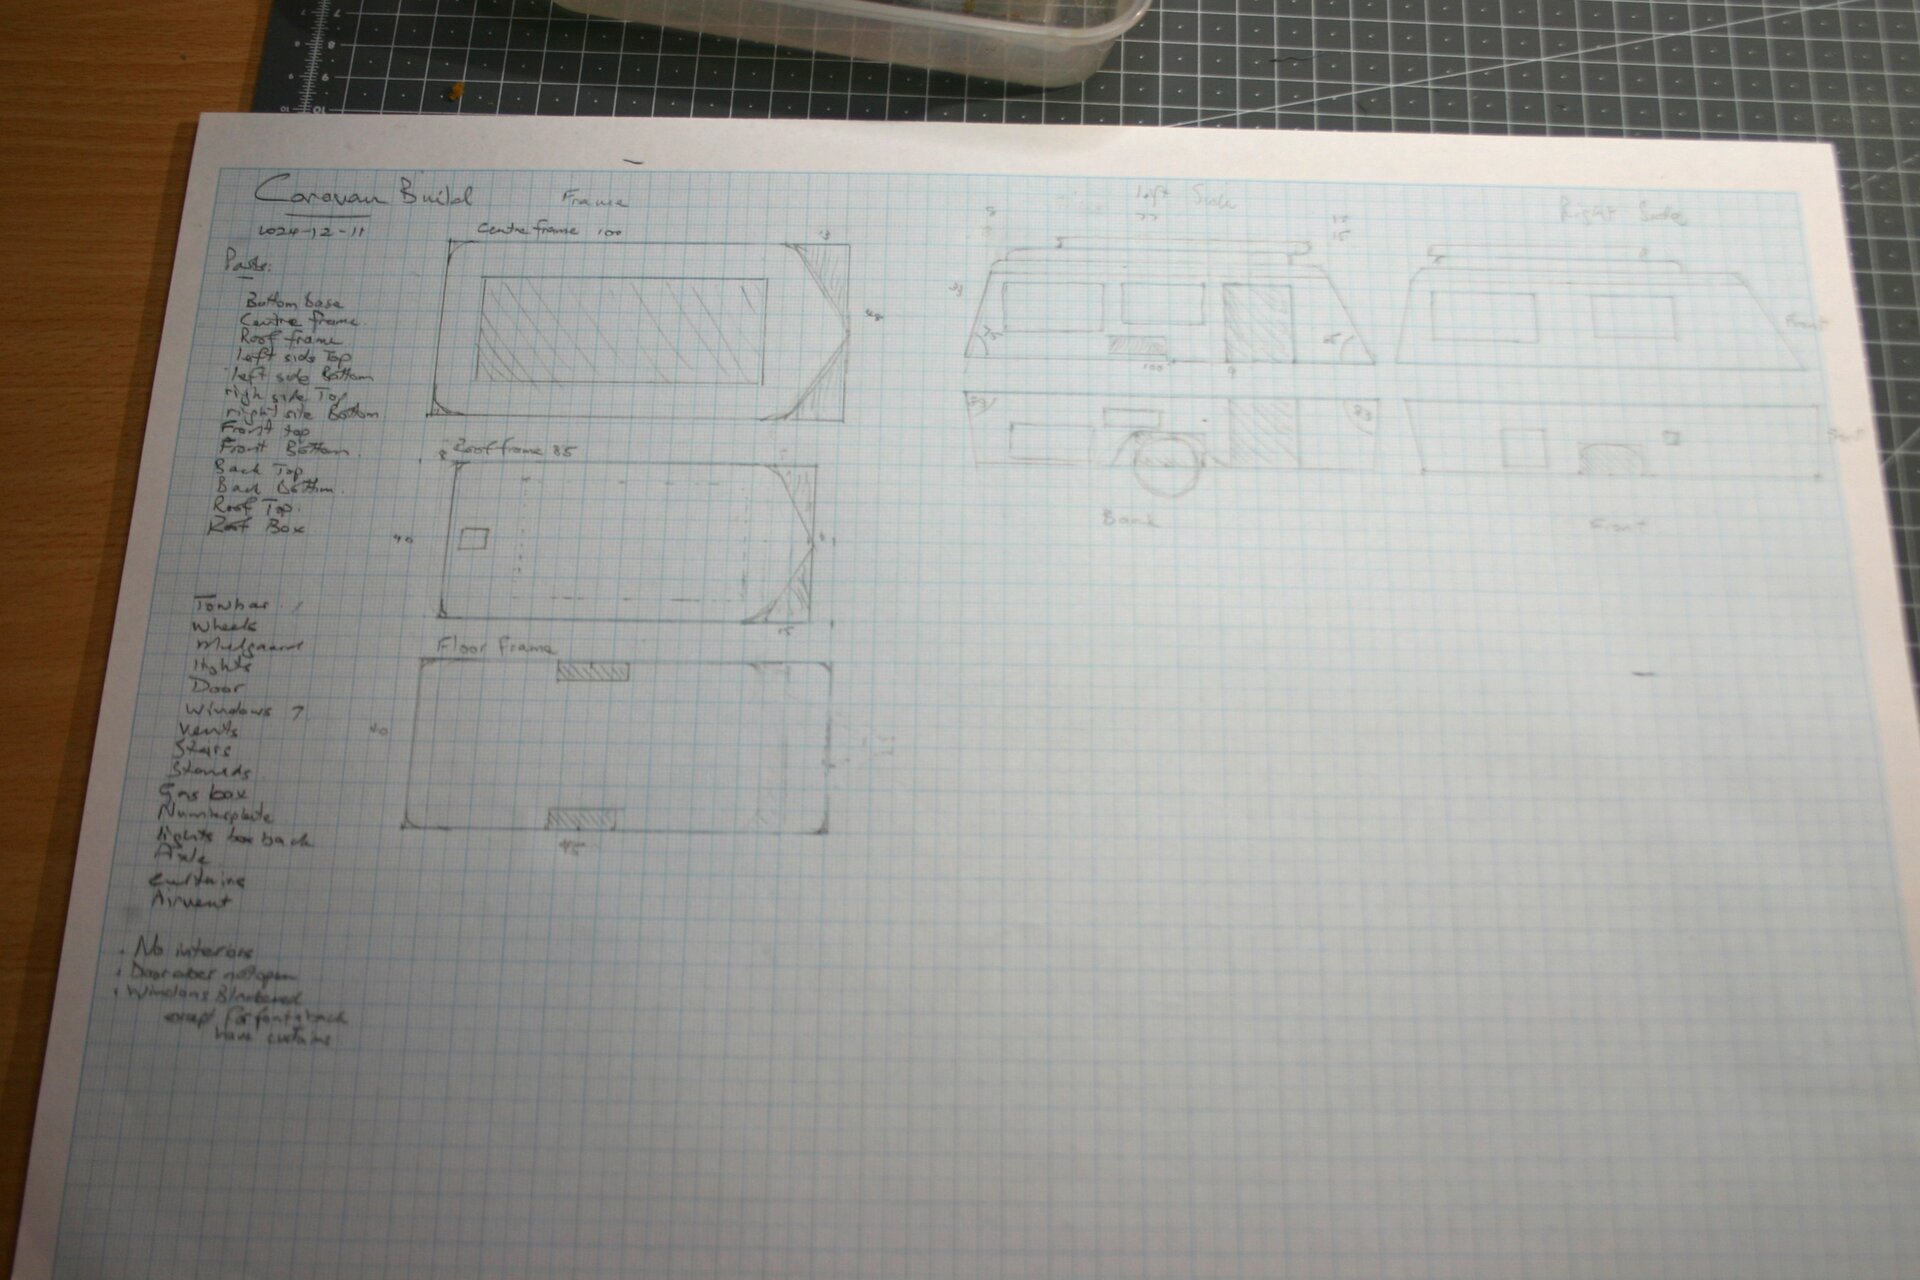
With all the information at hand, I created a rough cutting sheet drawing. This would be my blueprint for tackling the most daunting component first: the caravan itself.
Chapter 2: Building the Eriba Triton Caravan
The Make-or-Break Component
Building a replica of an actual caravan turned out to be a daunting task, and I decided to tackle this first. My reasoning: if this failed, I would not attempt the rest of the challenge. The caravan was the centerpiece - if I couldn’t get it right, the whole commission would fall apart.
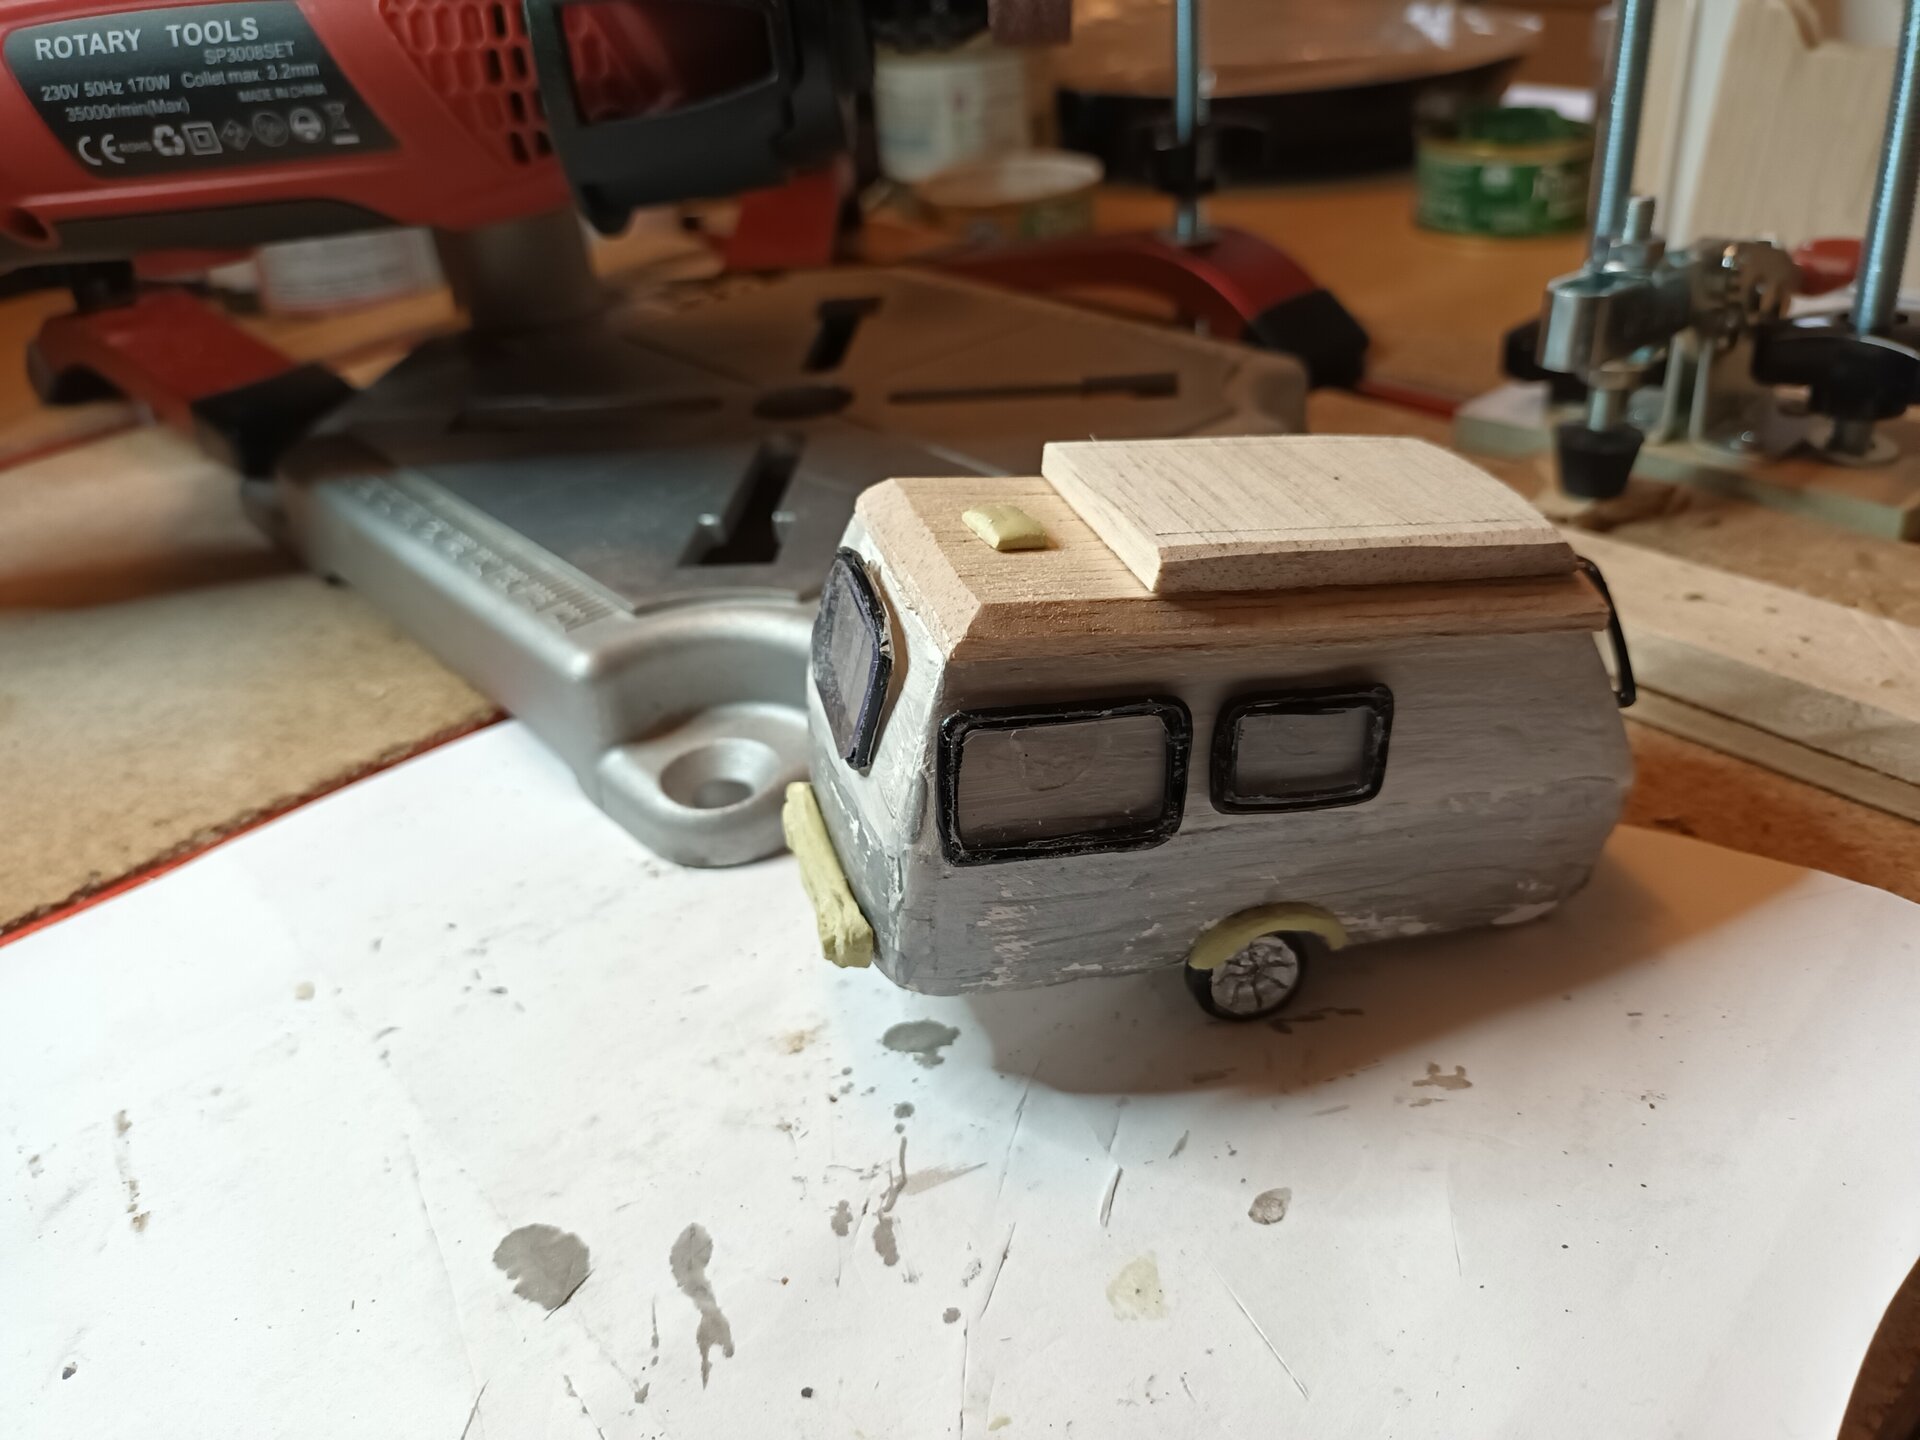
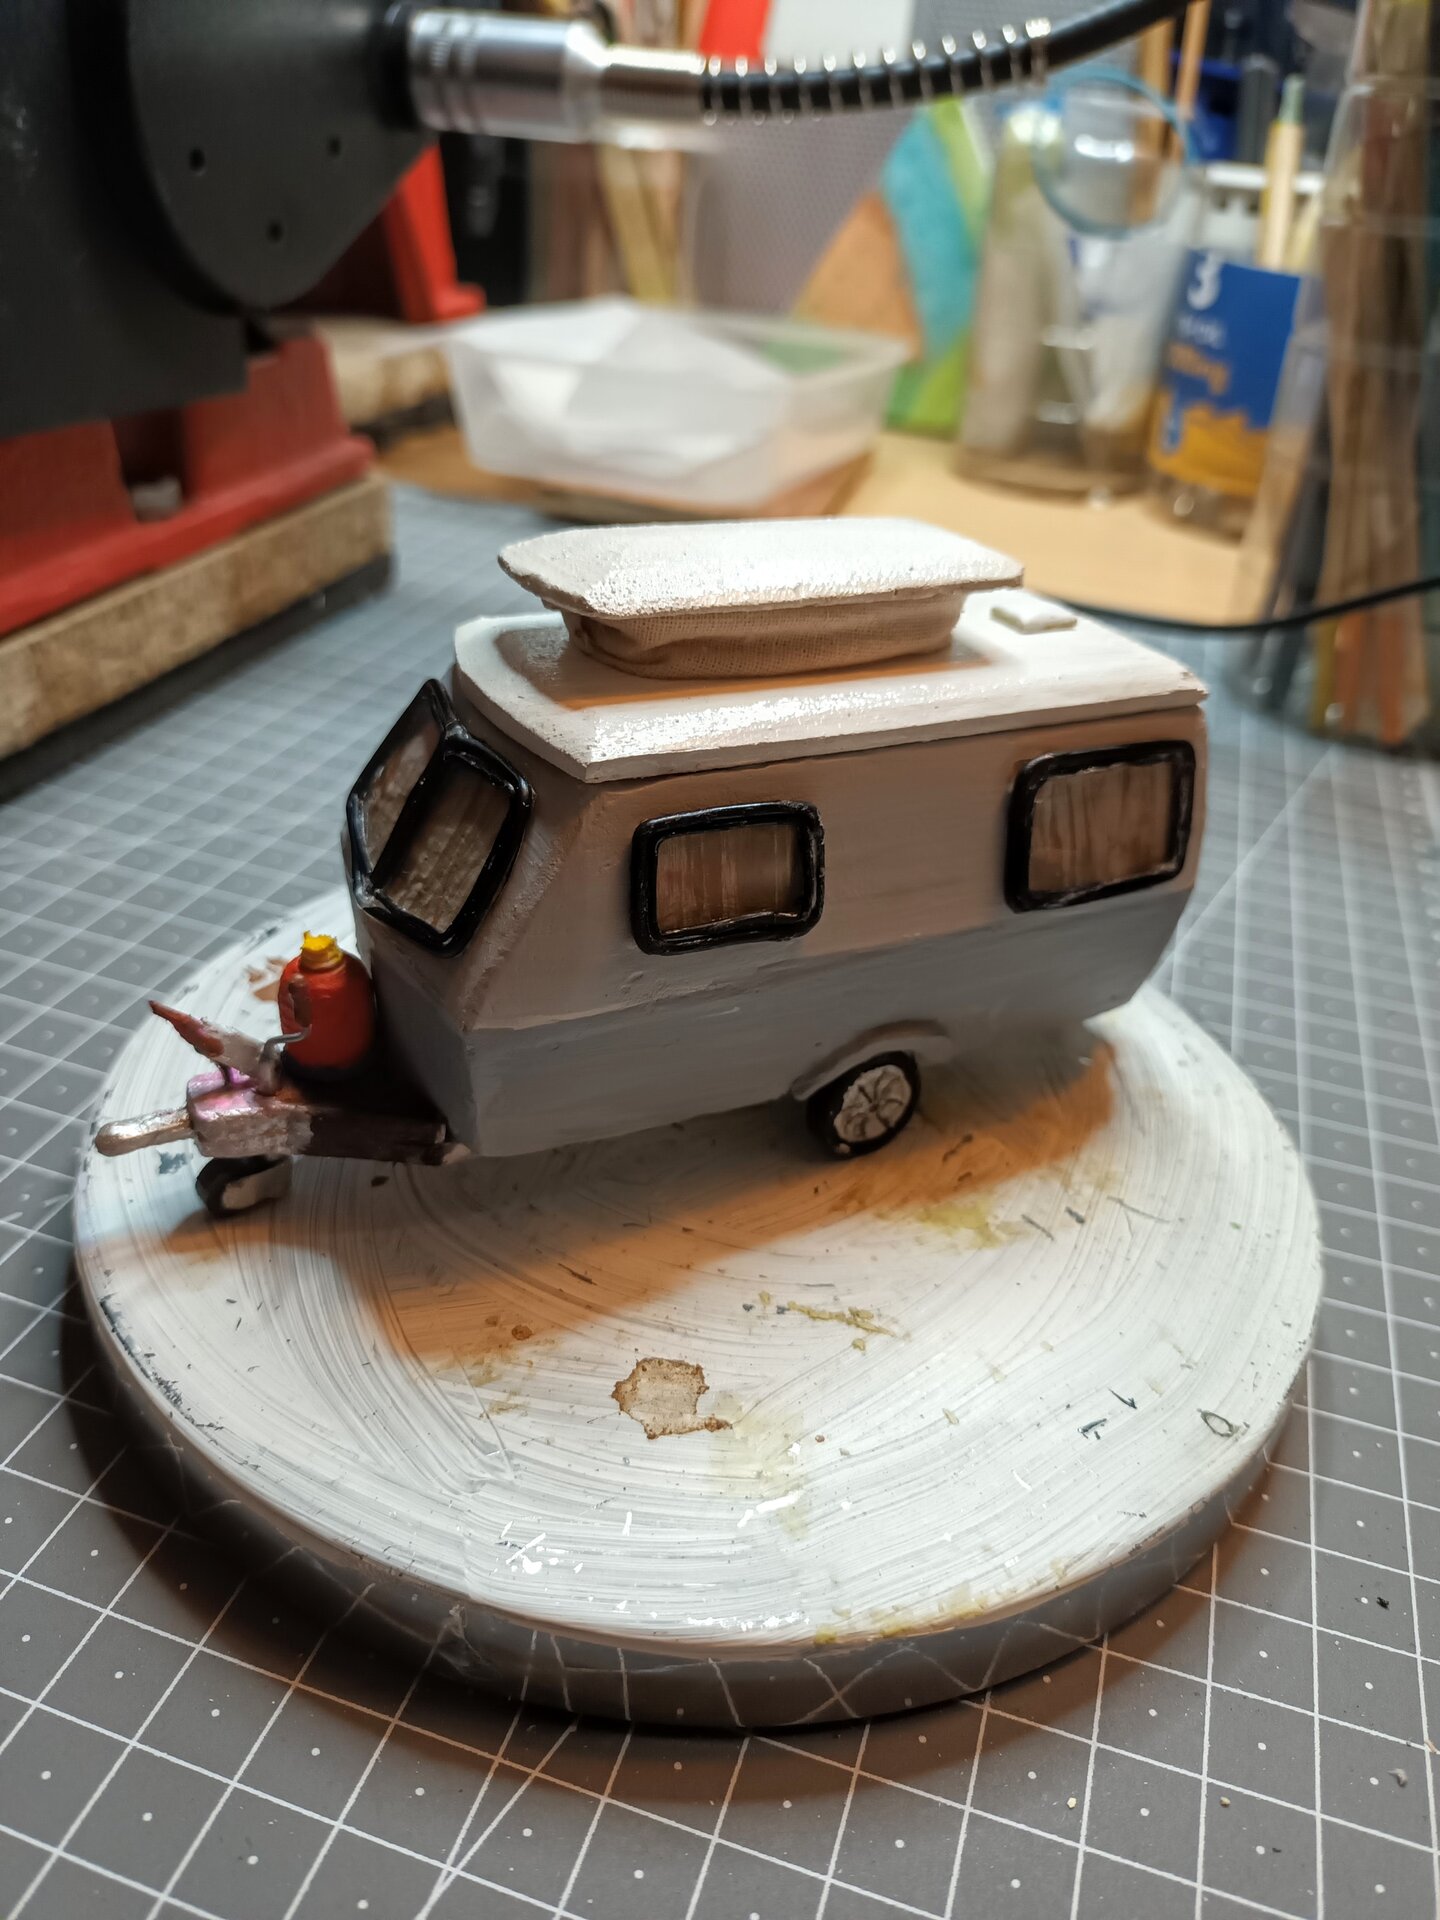
Body Construction - Balsa and Epoxy Putty
Construction Process:
- Base Structure: Three layers of balsa wood cut for the body
- Spacing: More balsa wood pieces added to achieve correct height from floor to center, and center to top
- Shaping: Body covered and shaped with Milliput two-part epoxy putty to get the characteristic Eriba angles
- Refinement: After hardening, further shaped with files and sanders
- Multiple Adjustments: As visible in the photos, I had to make several adjustments to get the angles representative of the real caravan
- Undercoat: Applied to assist with the final body finish
The characteristic curved shape of the Eriba was particularly challenging to achieve using flat materials. The compound curves required patience and multiple layers of epoxy putty, each carefully filed and sanded.
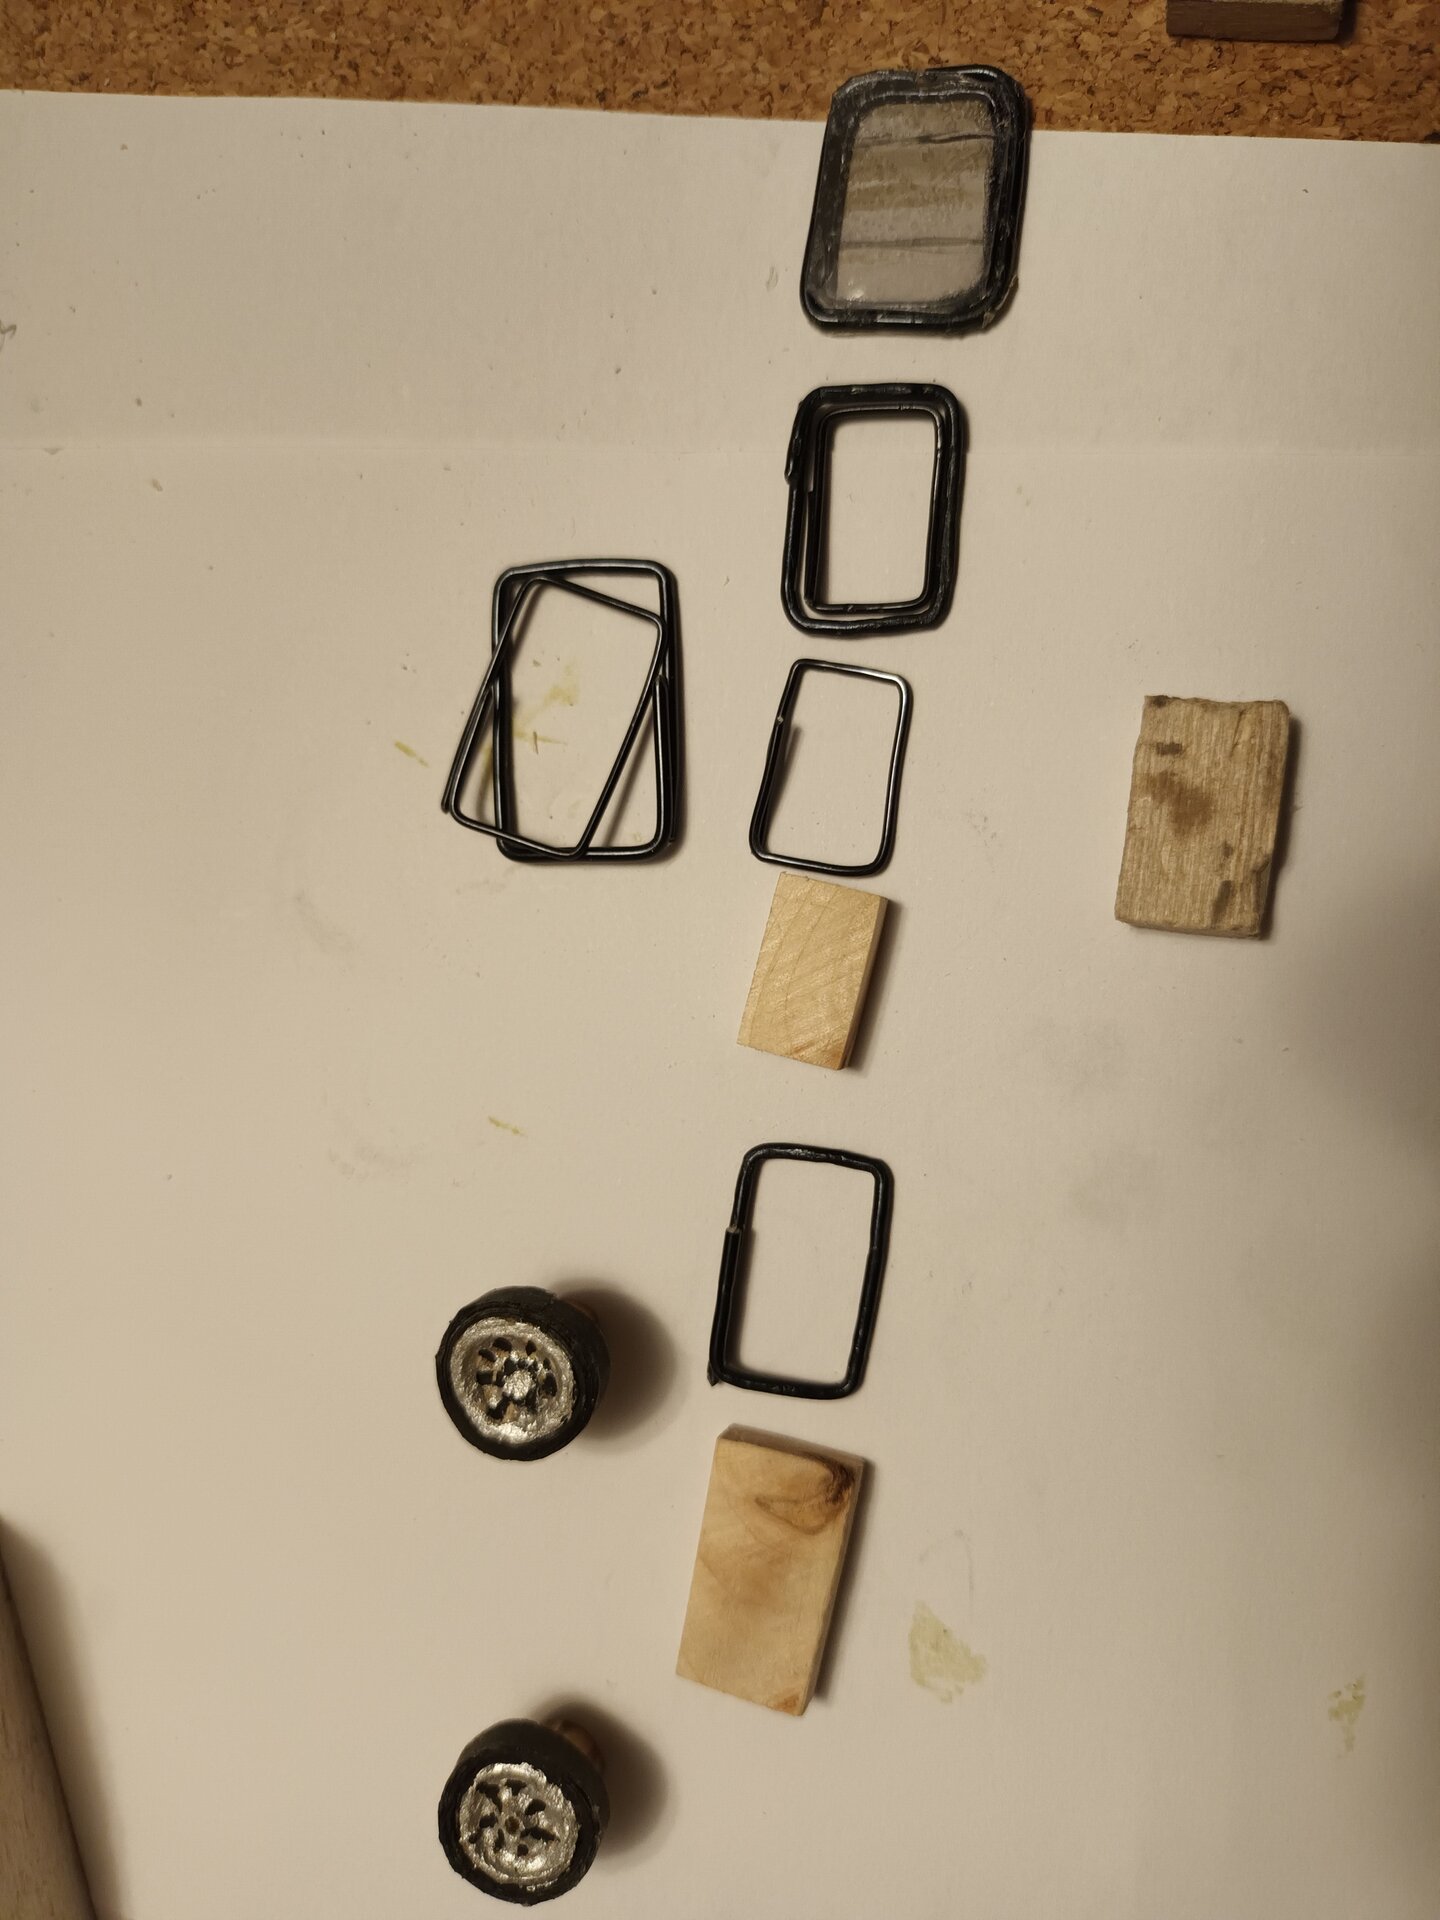
Windows - A Fiddly Challenge
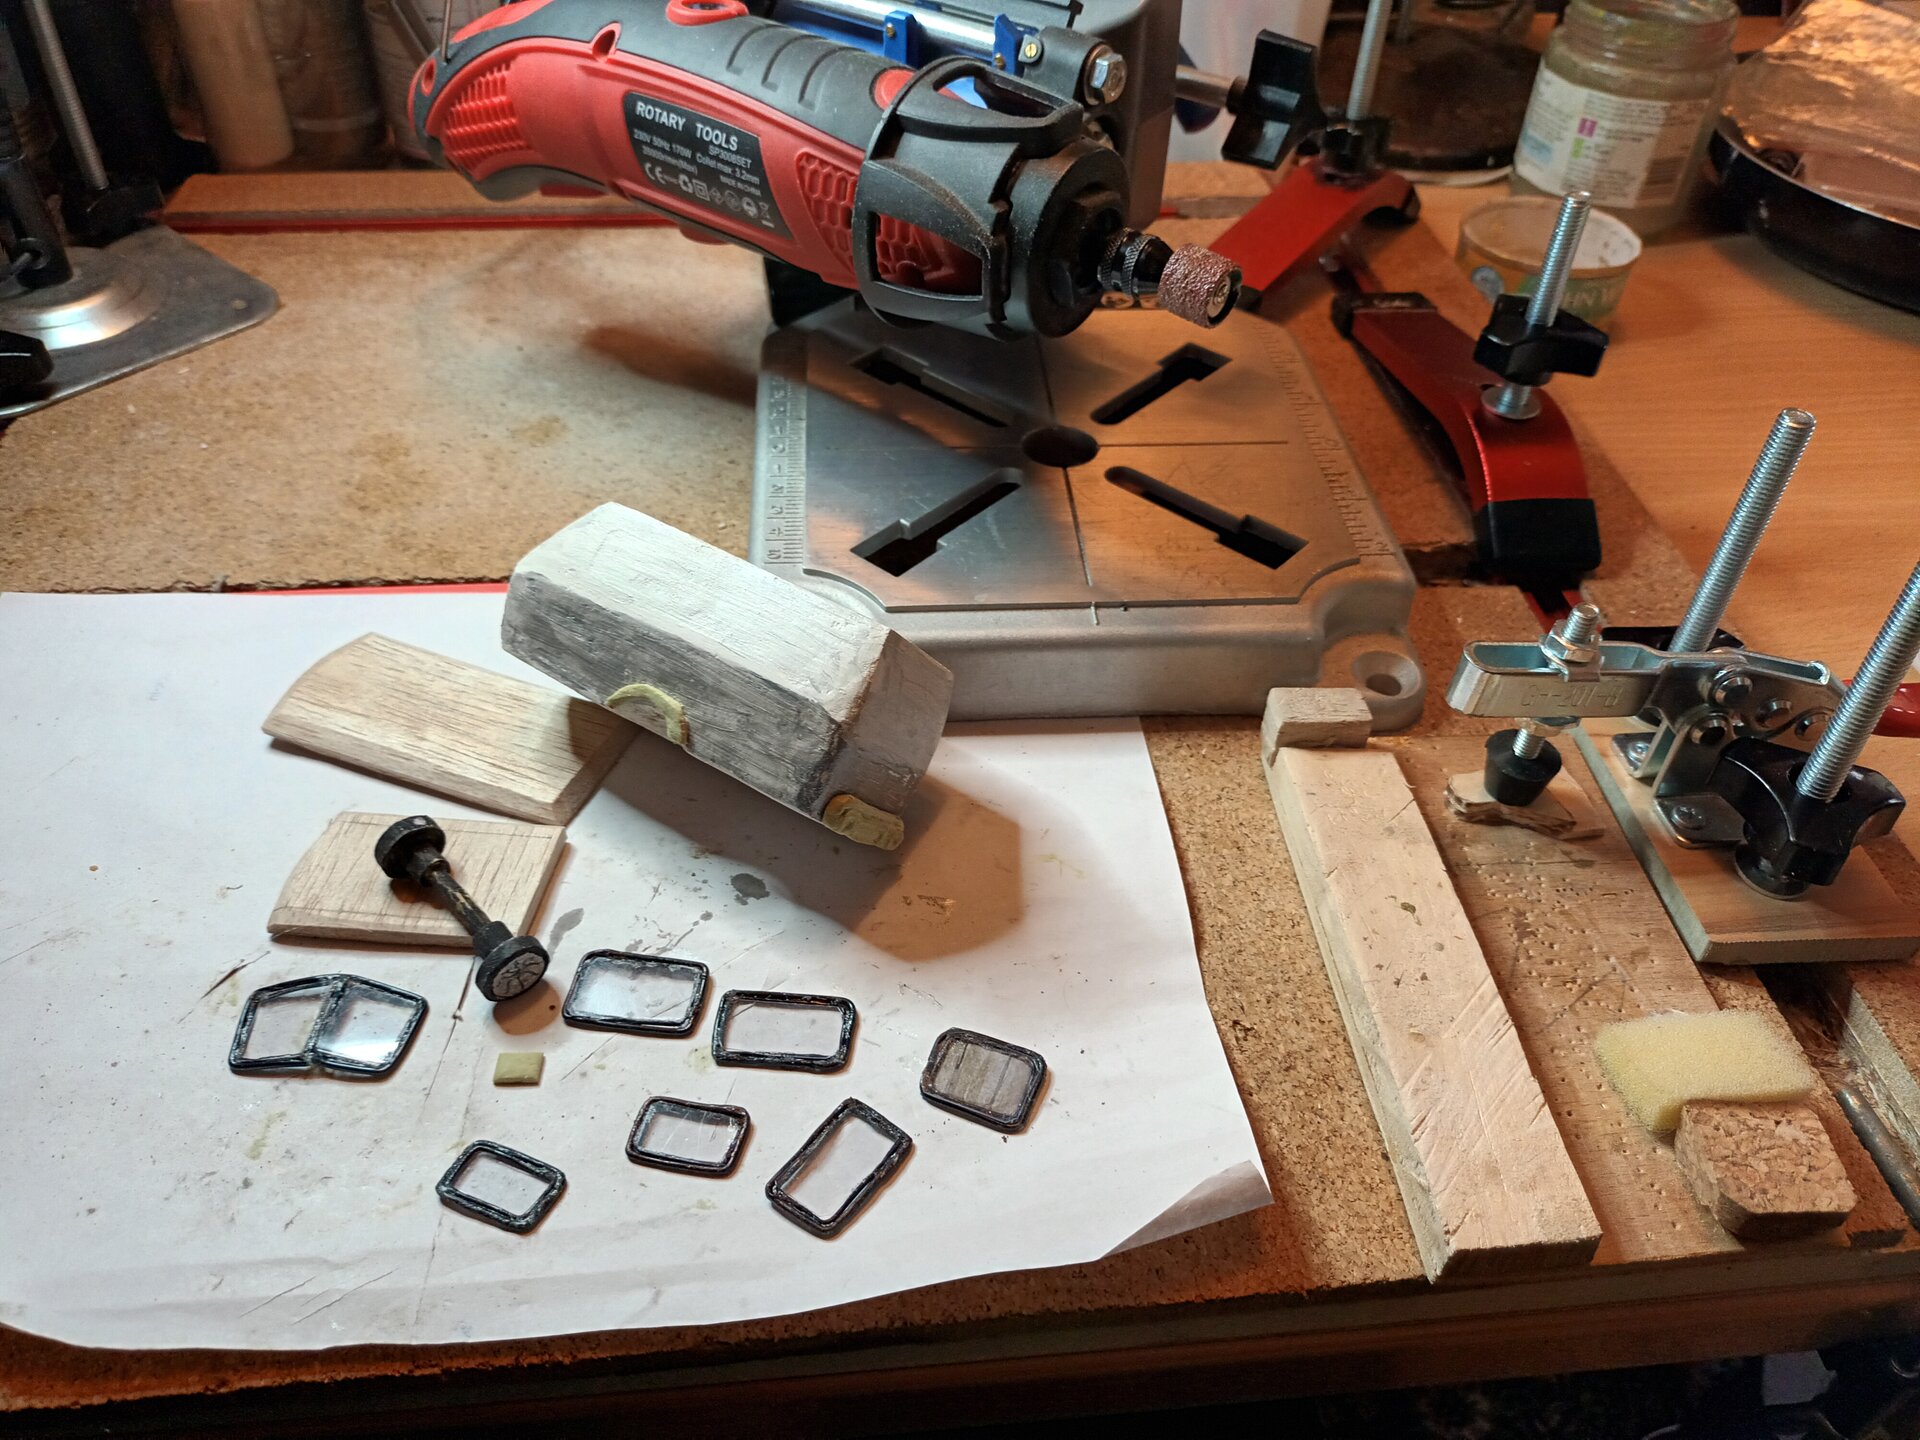
Window Construction:
- Templates: Windows first cut from hardwood for visual check and to serve as bending templates
- Outer Frames: 1.5mm black-coated aluminum wire bent to form window frames
- Inner Frames: Additional 0.5mm aluminum wire for inner window detail
- Glass: Transparent hard plastic cut to size and glued on the inside
- Curtains: Made from painted tissue paper, glued to transparent plastic to show through windows
The front nose windows were particularly hard to form given their very odd curved shape - getting the compound curves right took several attempts.
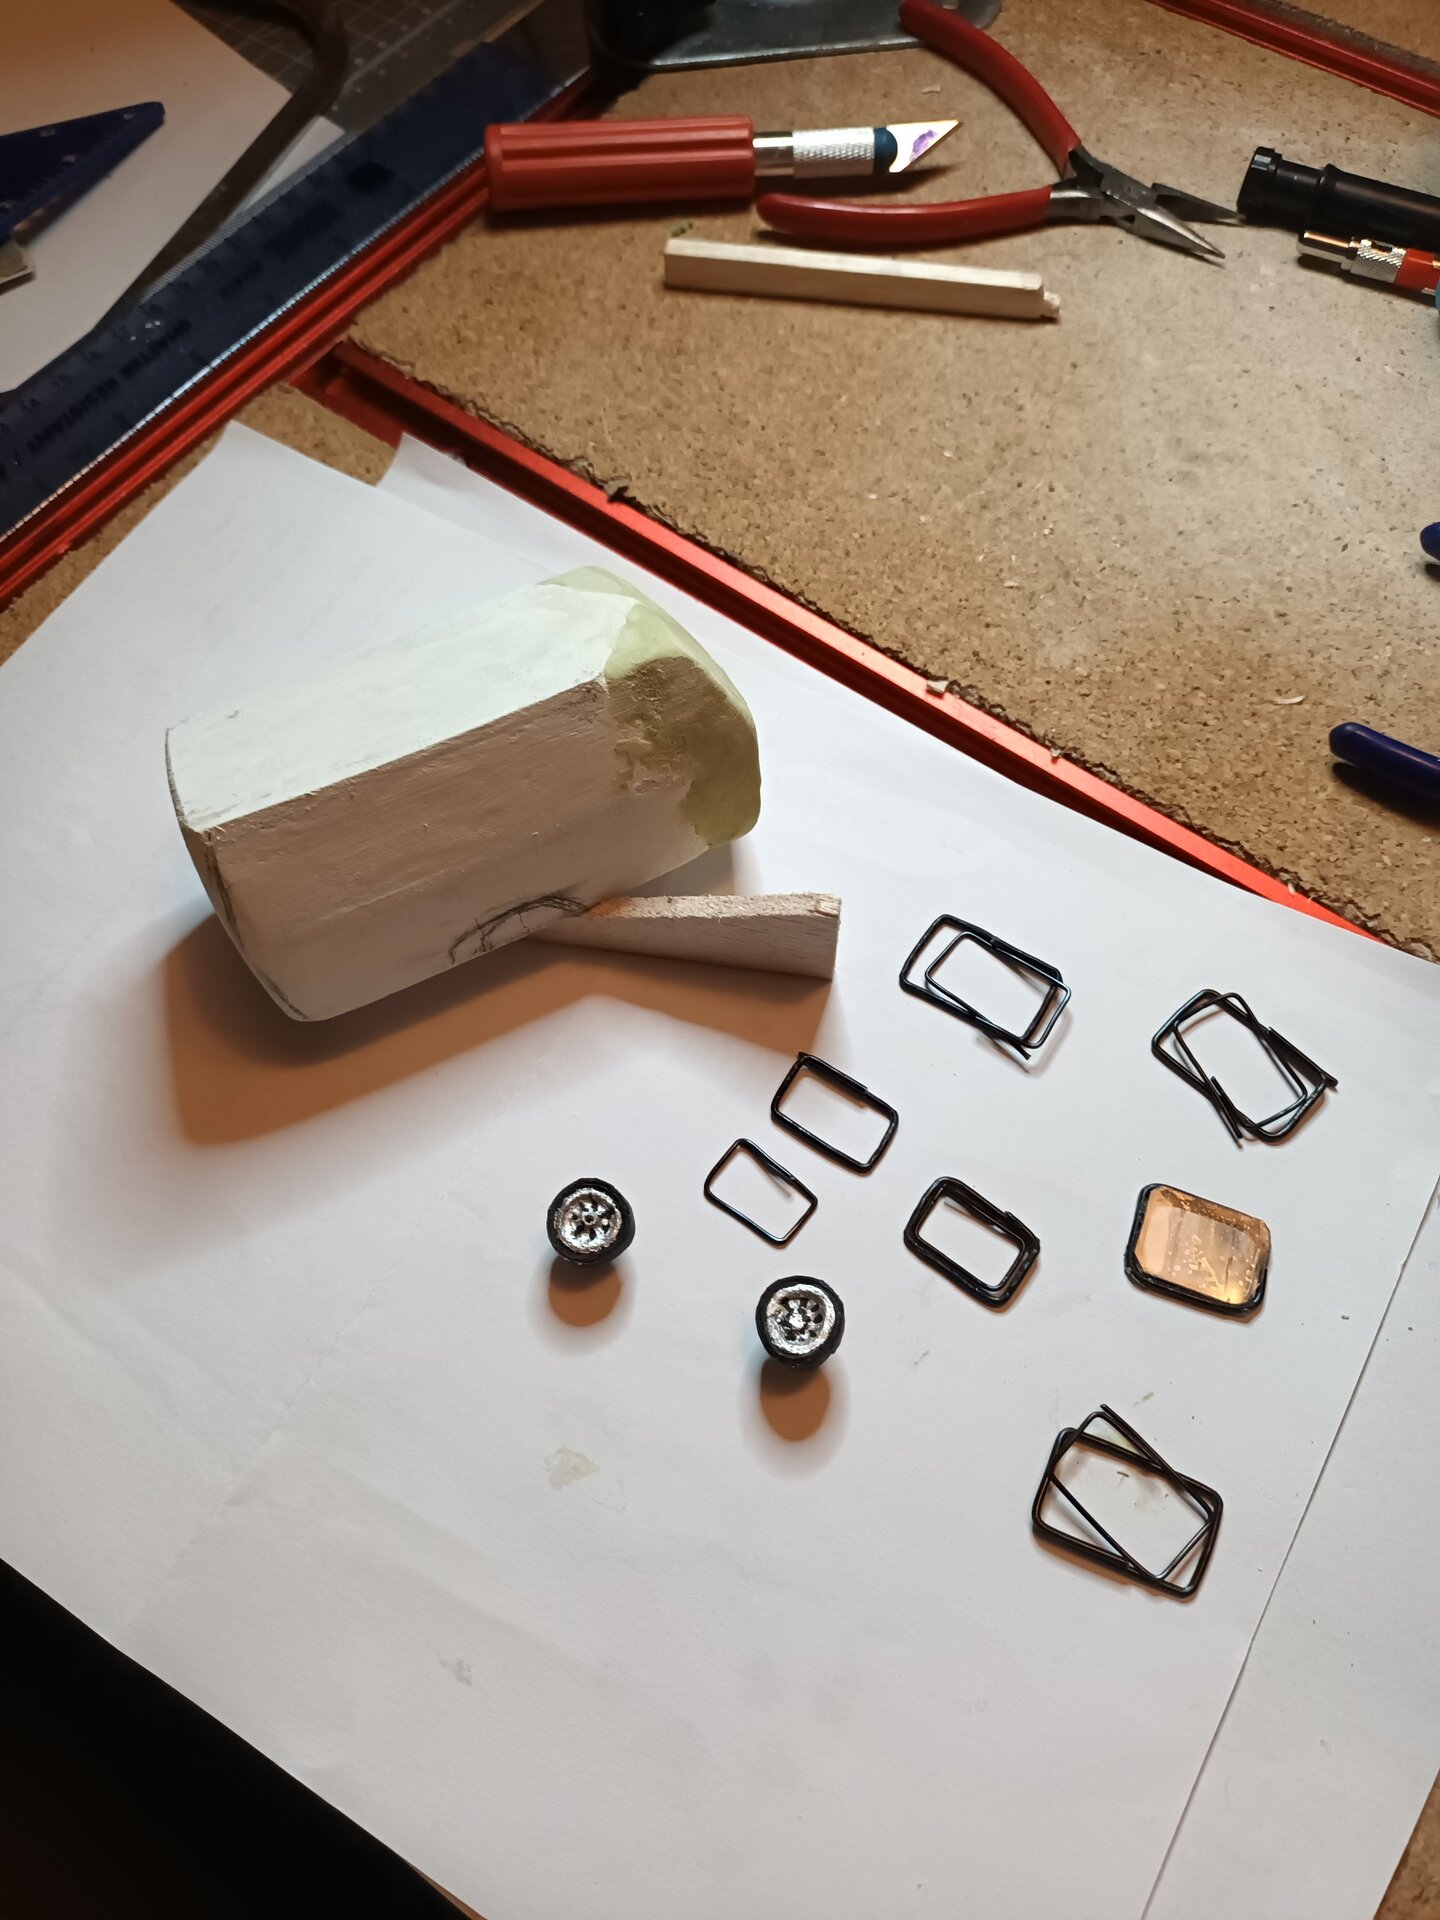
Wheels and Running Gear
Wheel Construction:
- Hub and Rim: Three layers of bamboo fitted into each other
- Spokes: Middle section cut away to create spoke effect
- Tires: Black paper strip wrapped and glued for tire effect
- Axle: Glued assembly connecting both wheels
Details and Final Assembly
Additional Details:
- Mudguards and rear bumper formed with epoxy putty
- Rear lights sculpted and painted
- Roof cut and sanded from balsa wood
- Jockey wheel (front support leg)
- Brake assembly
- Tow bar and hitch
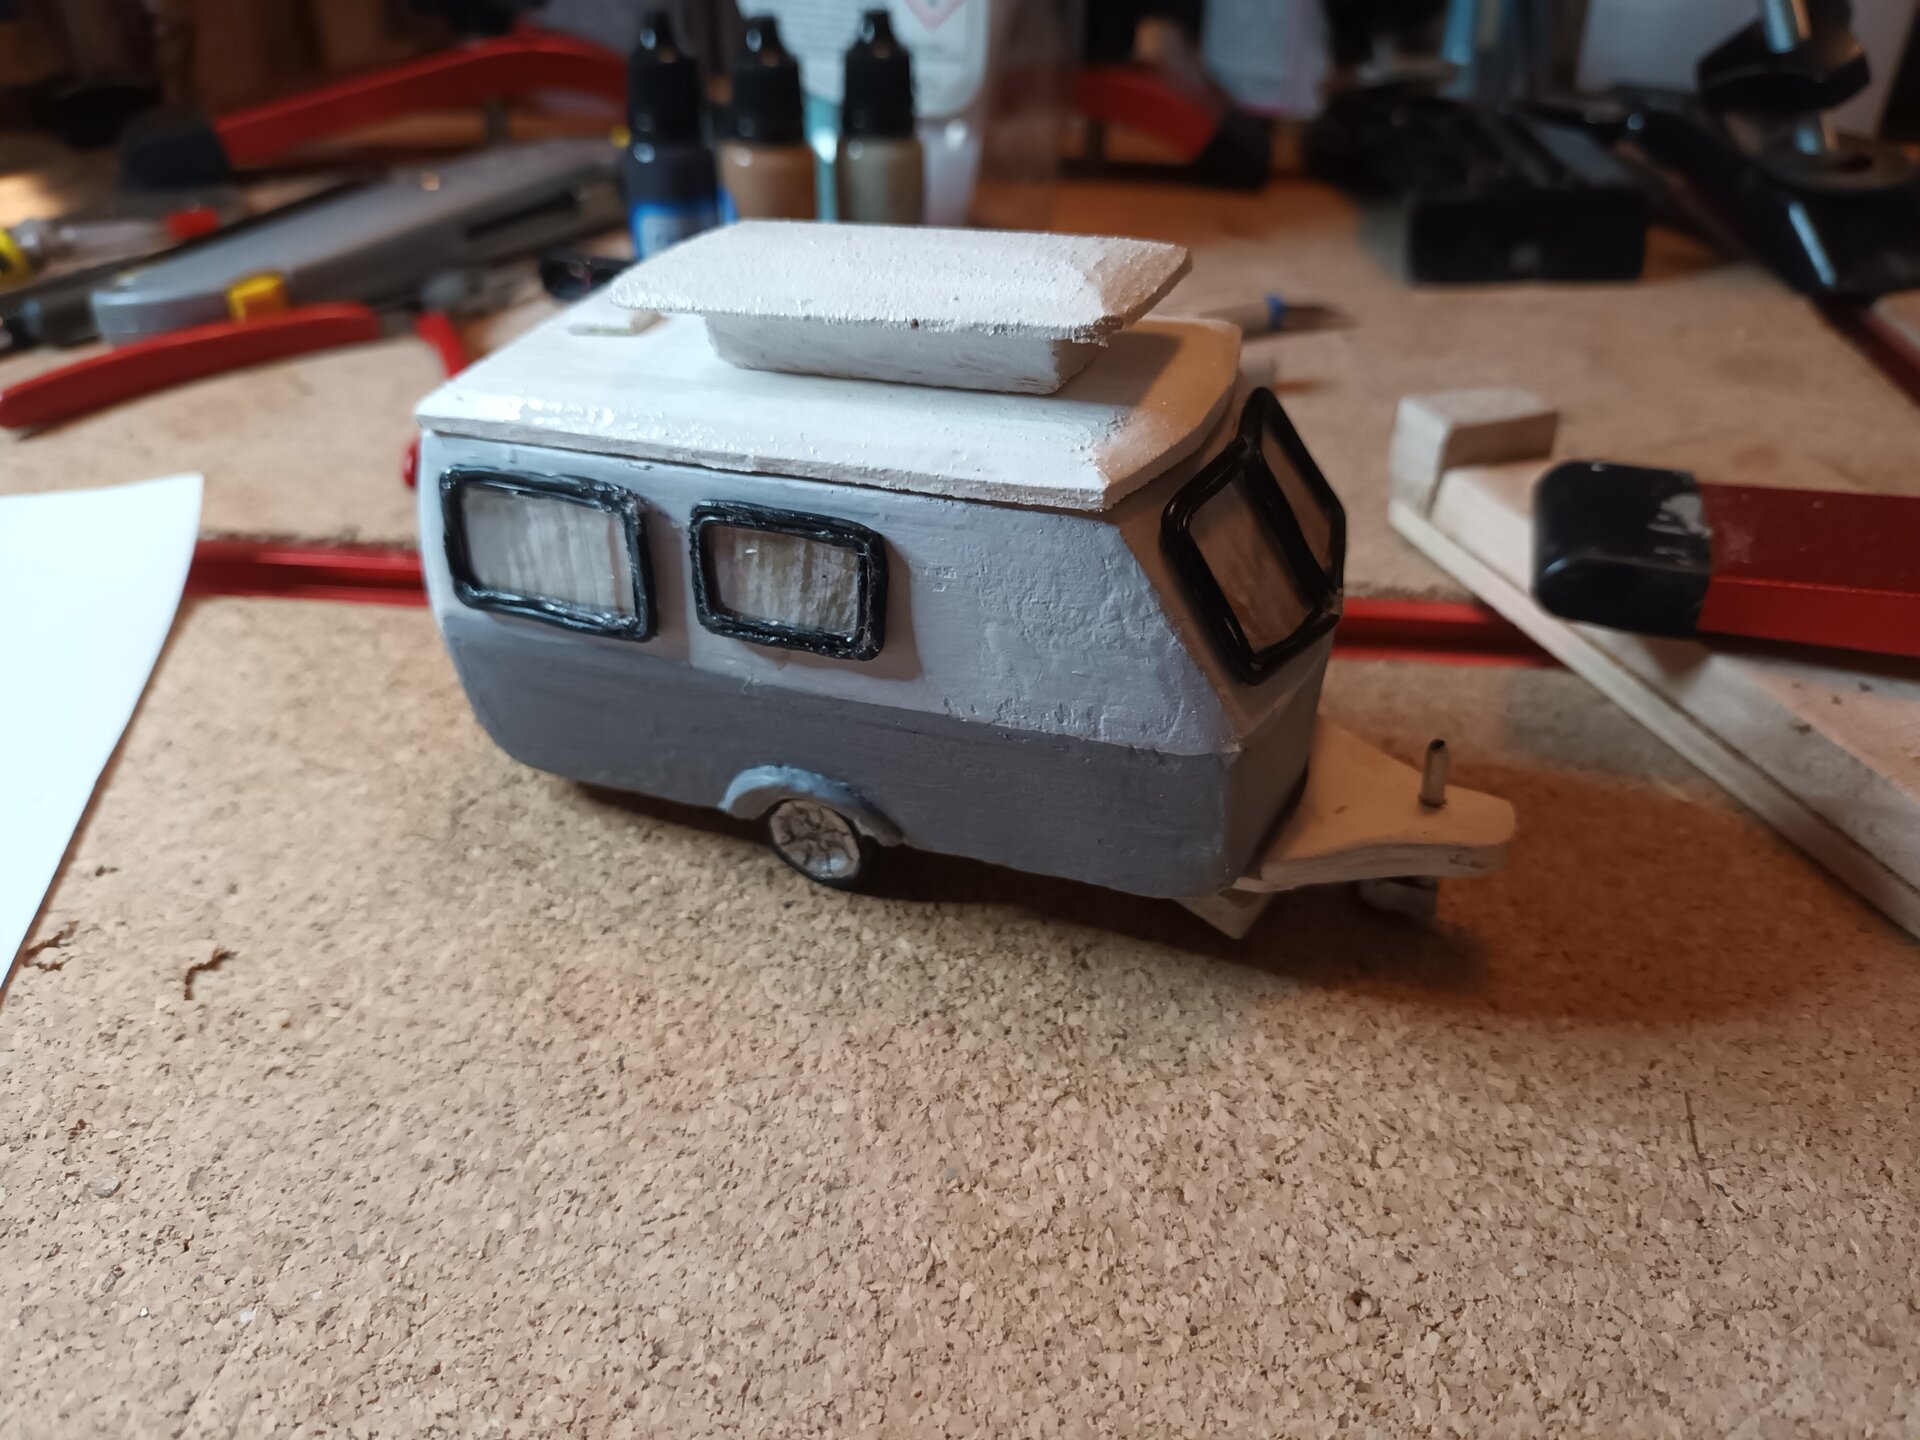
The Painting Disaster and Recovery
After several attempts to paint and smooth the body, I made the difficult decision to rip off all the windows and start the finishing process again. The paint finish wasn’t smooth enough, and I could see imperfections that would be visible in the final piece.
This setback was frustrating but necessary. I sanded the body down completely and started the painting process fresh, taking more time between coats and being more careful with sanding between layers.
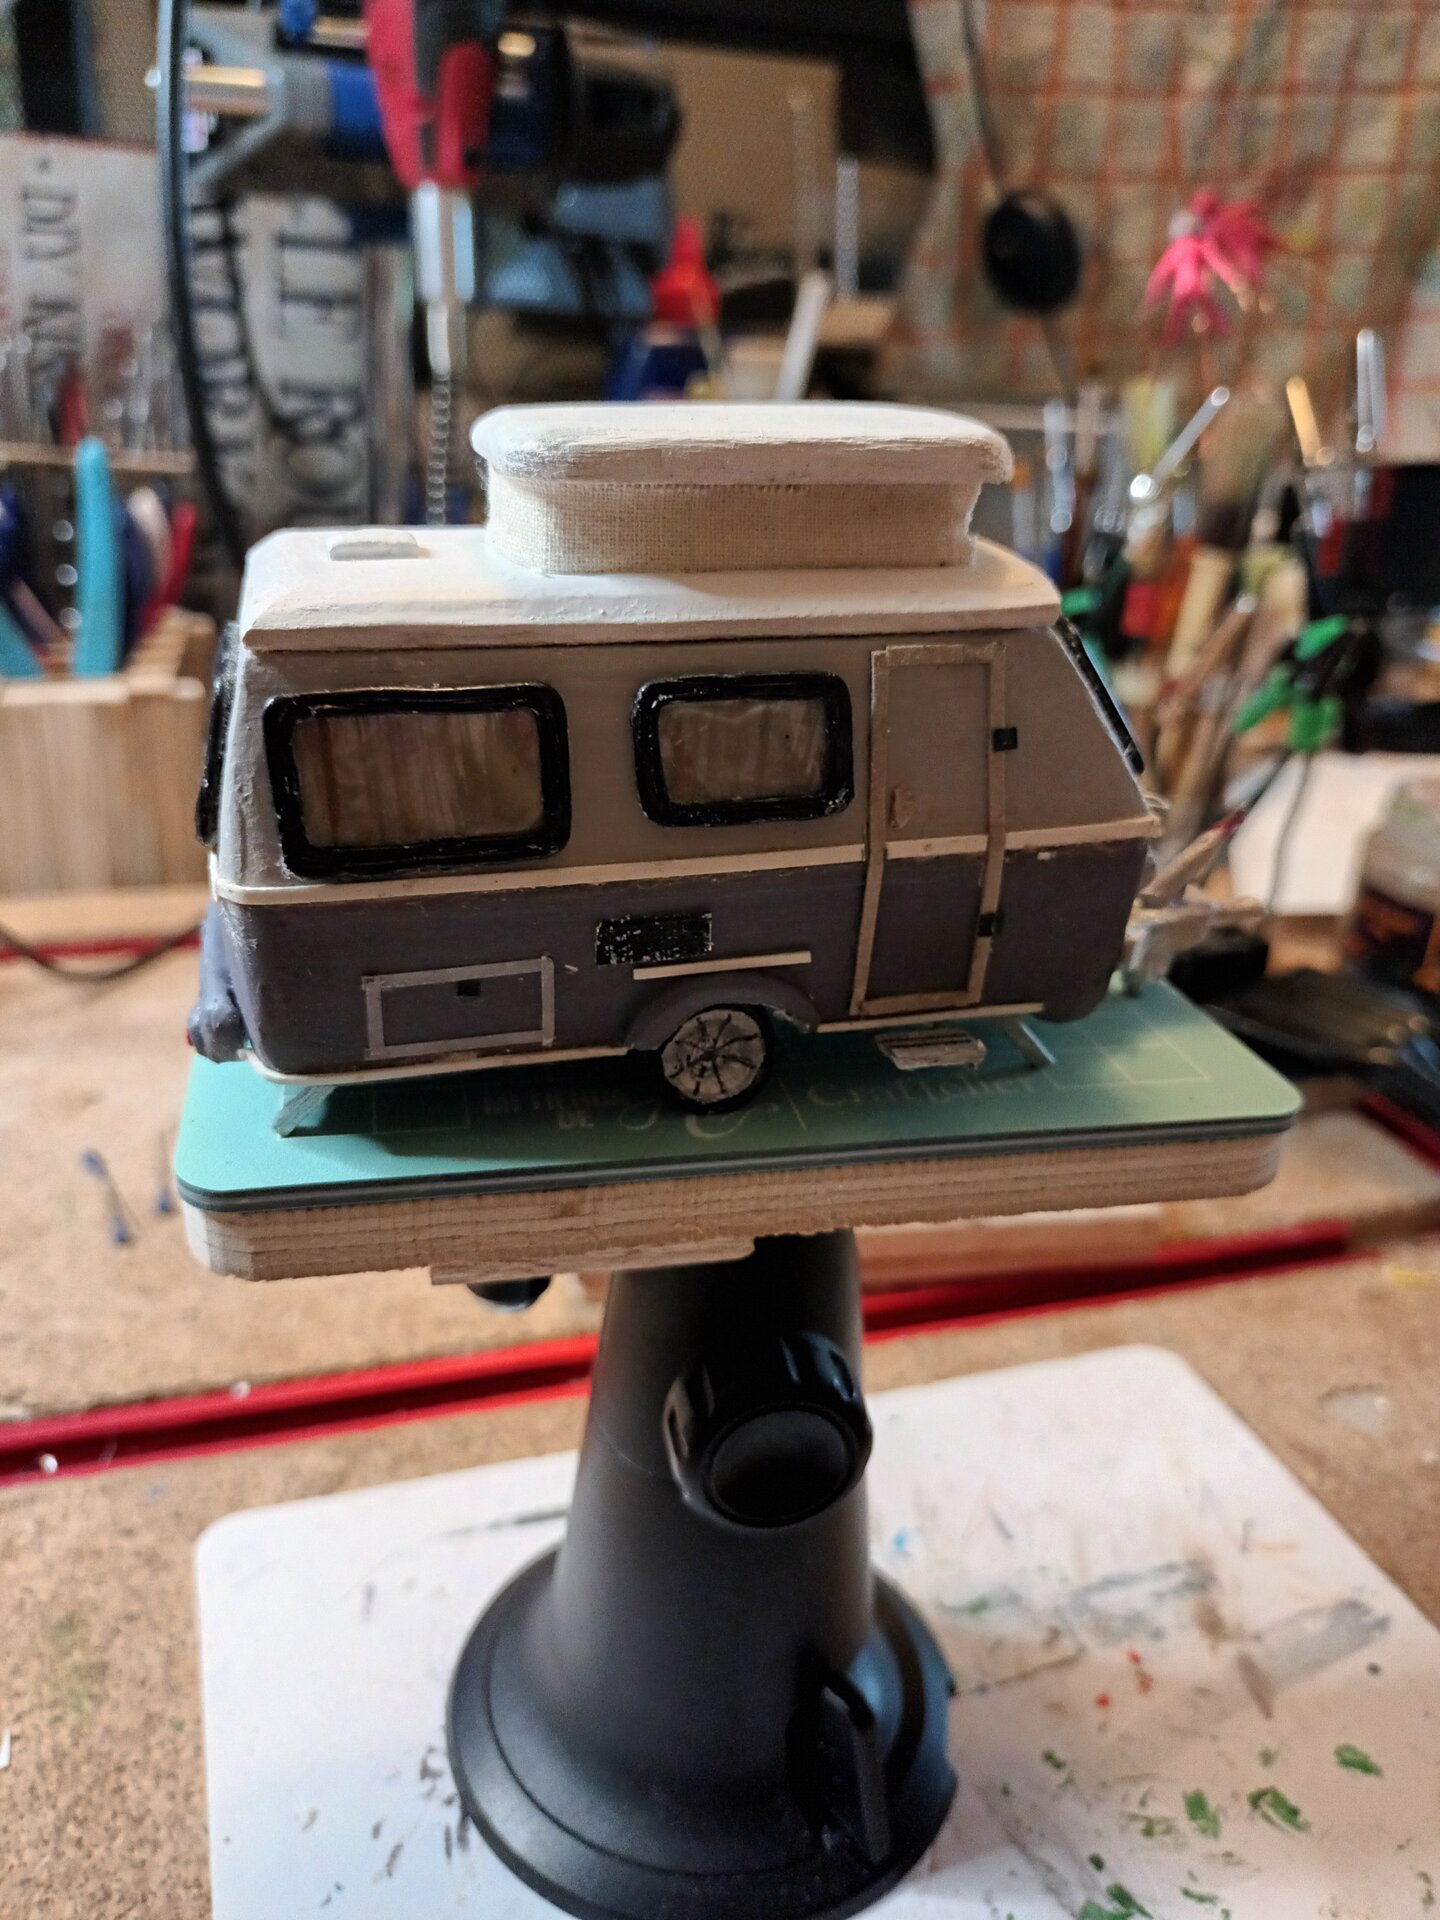
The completed caravan was a triumph. All the frustration and rework was worth it - this was proof I could tackle the ambitious vehicle modeling required for this commission.
Chapter 3: The VW Golf Estate Challenge
The Temptation of the Easy Way Out
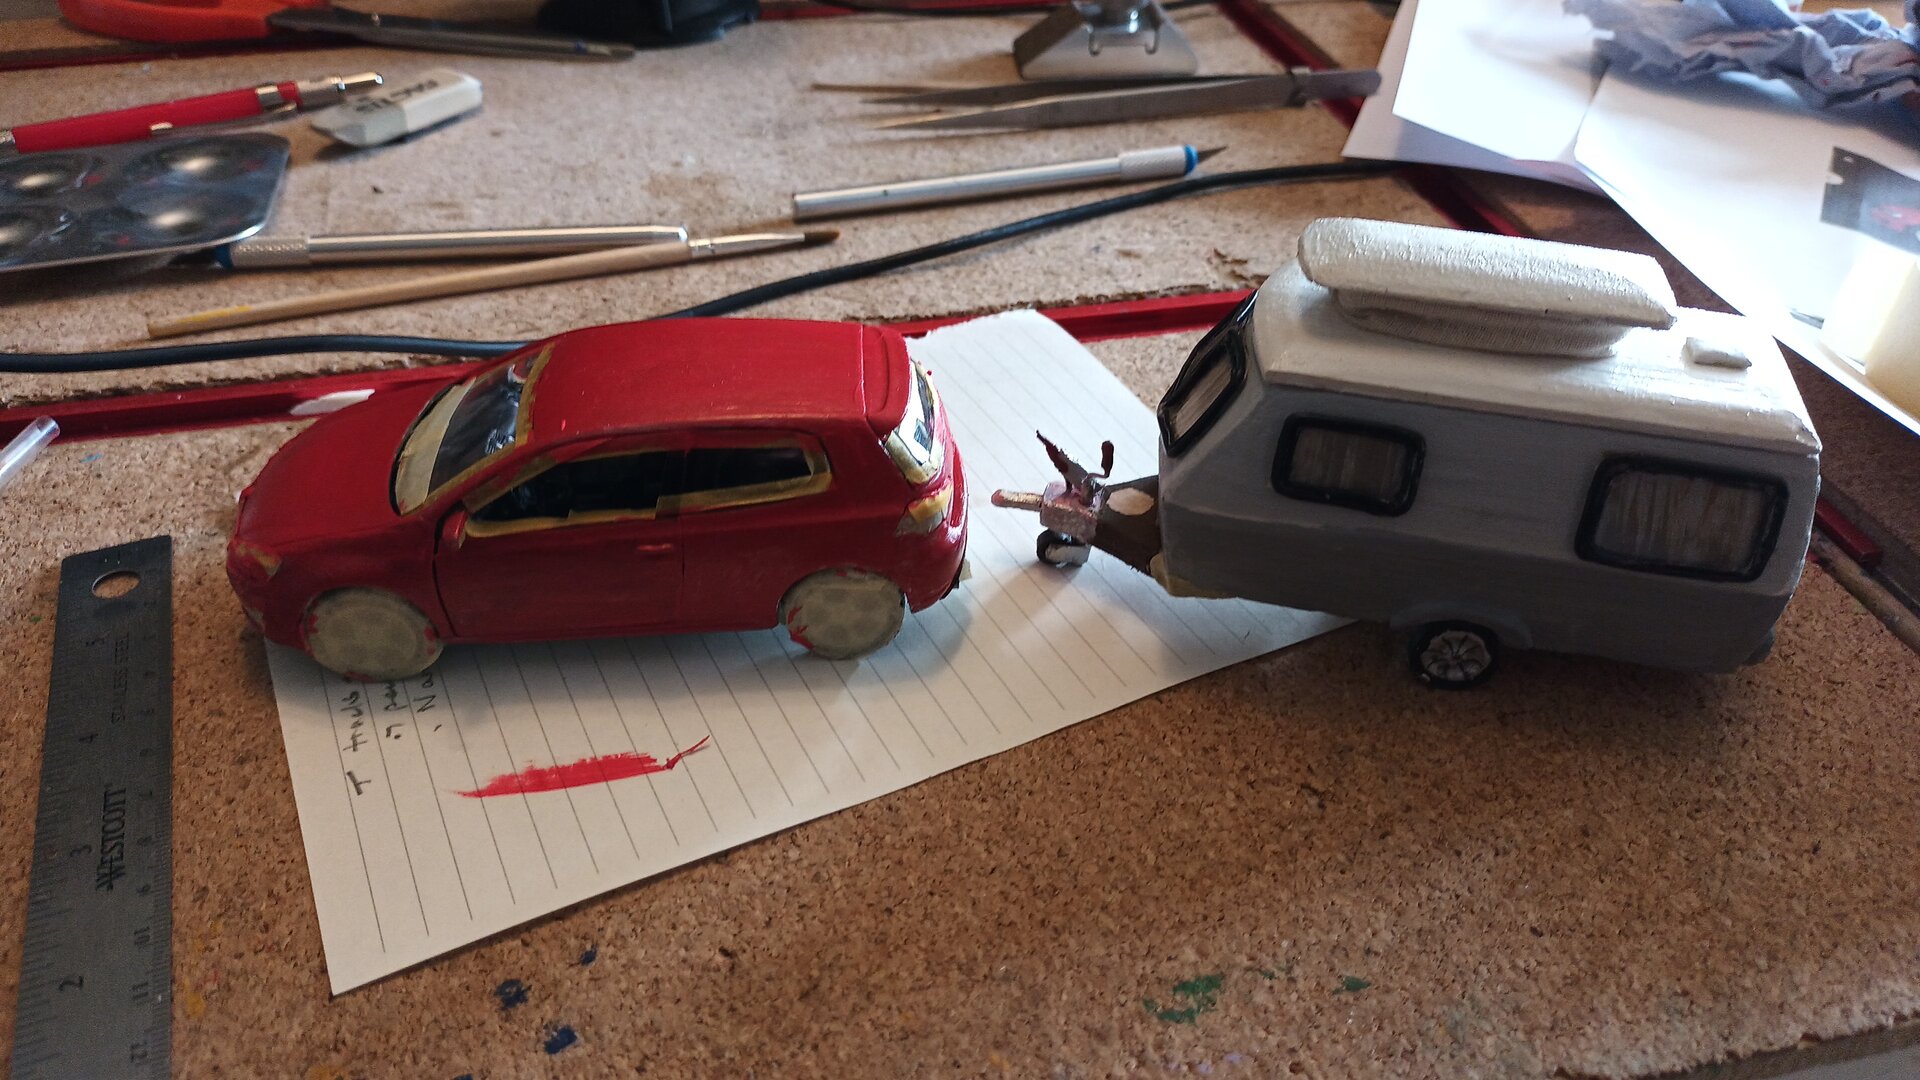
With the caravan completed, I was tempted to use a red Golf model car I had purchased instead of making another vehicle from scratch. There were just two issues: the car was not at the same scale as the caravan, and it was a sedan, not an estate.
The temptation was quickly put aside, and the next major journey started - to make the car.
Finding References and Building a Template

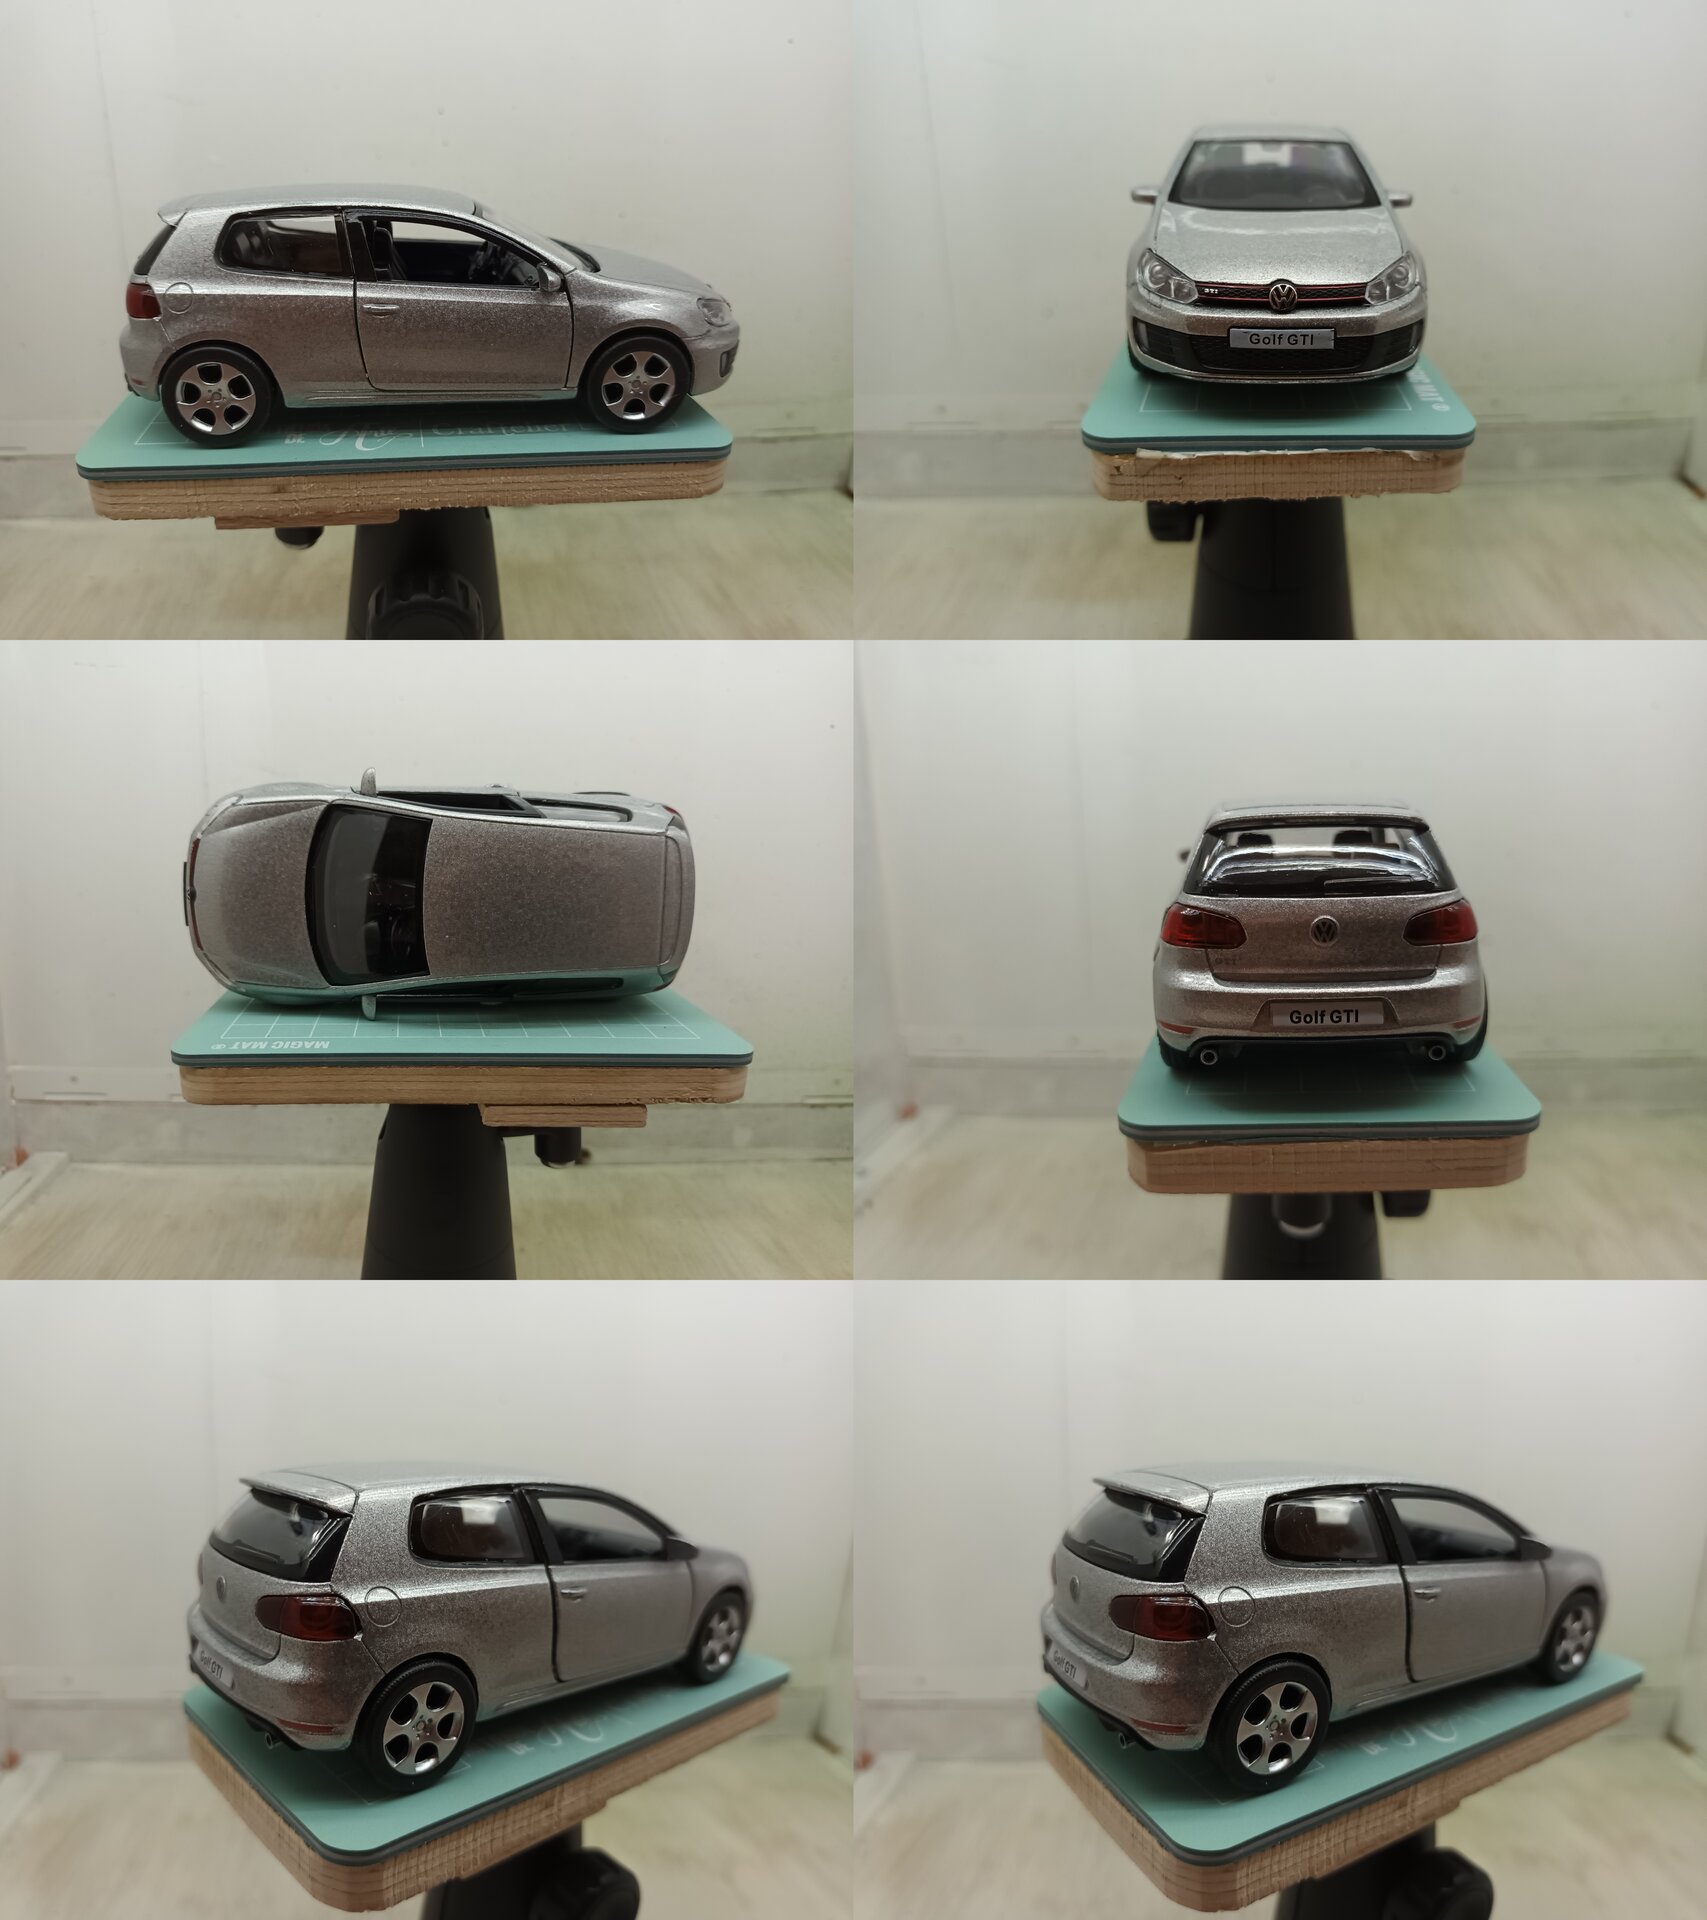
I found a nice picture of exactly the car I wanted. The only problem: even after searching everywhere, I just couldn’t find a model in the right scale of an estate version. The only way forward was to make it myself.
I did buy a VW Golf sedan model to help with shaping and sizing the parts. With the help of more pictures of estate versions, I could visually make the adjustments needed to extend the rear and modify the roofline.
Measurements and Paper Prototype


It was exactly at this point, when comparing my paper template to the beautifully painted reference model, that my heart sank into my shoes. How was I going to achieve that level of finish and accuracy?
Discovering Air-Dry Clay

It was then that I discovered air-dry clay and saw a way forward. The epoxy putty was just too difficult to work with for the extended shaping time needed. I thought using air-dry clay would be much more workable - I could take my time shaping it before it hardened.
Construction Approach:
- Internal Structure: Bulked out the inside with scrap materials for strength
- Clay Application: Covered with air-dry clay, building up the estate body shape
- Extended Rear: Added length and the characteristic estate roofline
- Gradual Refinement: Worked the clay while still malleable to get smooth curves
Details and Disasters
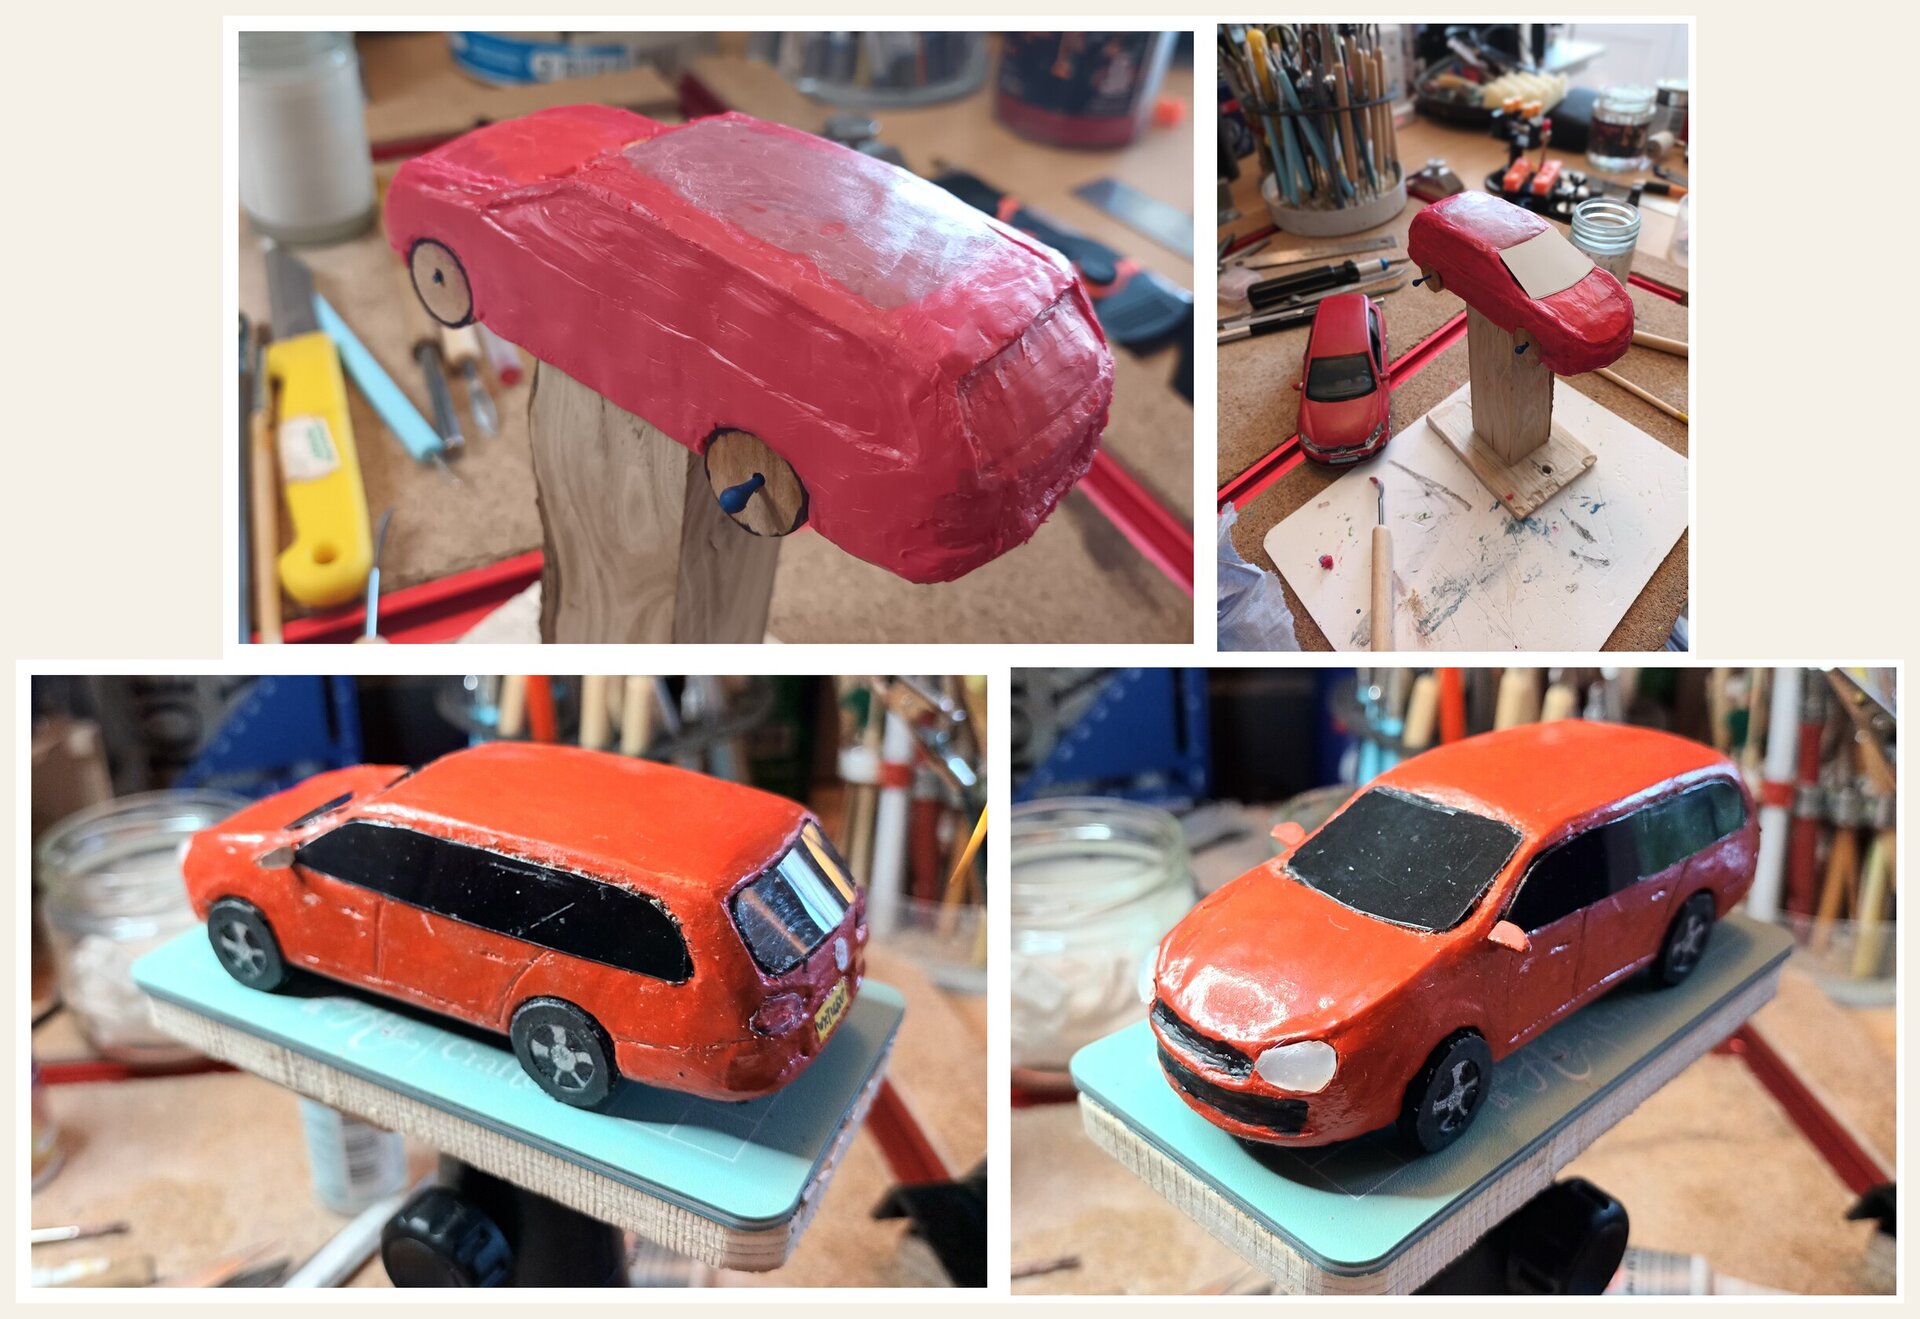
Final Details:
- Lights: Formed from hot glue and painted
- Windows: Plastic painted black on the inside for glass effect
- Number Plate: Made from yellow paper with the actual license plate number of the real car
- Wheels: Repurposed from parts with custom painting
The Rework Cycles
The process did not go without disasters and reworks. I took apart all the fittings several times to:
- Reshape problematic areas
- Re-sand surfaces that weren’t smooth enough
- Re-paint the body to get it smoother and better shaped
One thing is for sure: my attitude of “good enough” was tested again and again. My patience and endurance were stretched to the limit. But this was a commission - it had to be right.
Chapter 4: Figures and Tilly the Dog
With the car and caravan ready, I could turn my attention to the figures and Tilly, the dog - arguably the most personal and challenging aspect of this commission.
Initial Figure Attempts with Air-Dry Clay
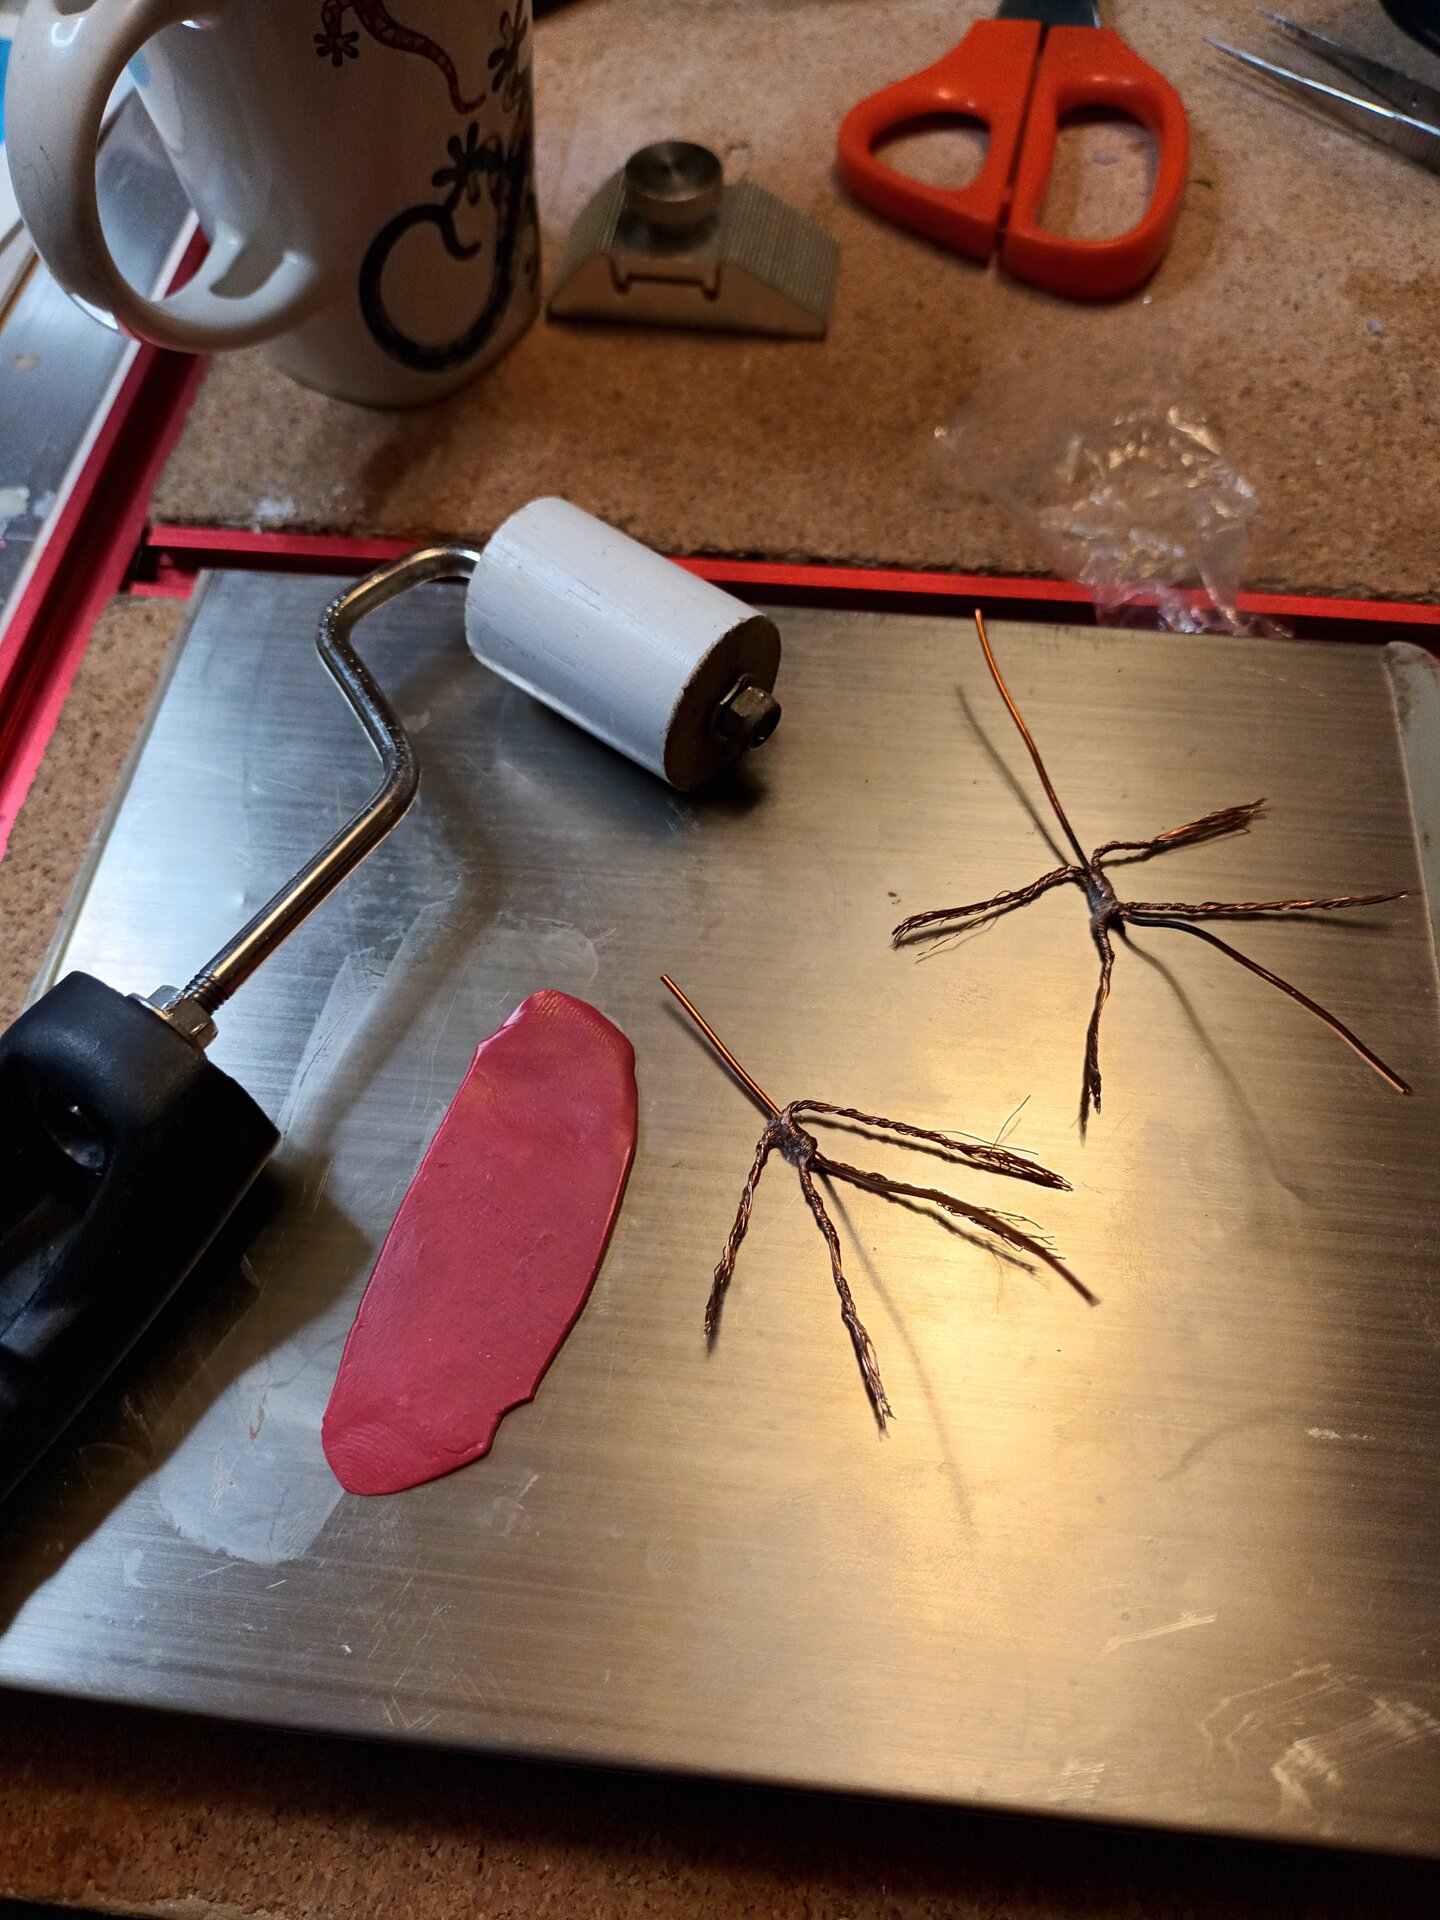

Up until now, I had really struggled to make figures with epoxy putty. With the air-dry clay that worked so well for the car, I thought figures would be a breeze.
Process:
- Created wire armatures for stability and pose
- Rolled the clay
- Started forming the bodies around the wire frames
Reality set in quickly - creating recognizable human figures at this tiny scale is incredibly difficult!
Tools and Refinement
More work with a router and fine carving tools helped a bit, but I realized I still have a long way to go with figure sculpting. The challenge isn’t just making a human figure - it’s making figures that capture a likeness of specific people. That’s an entirely different skill level.
Tilly the Dog - A Wood Carving Solution
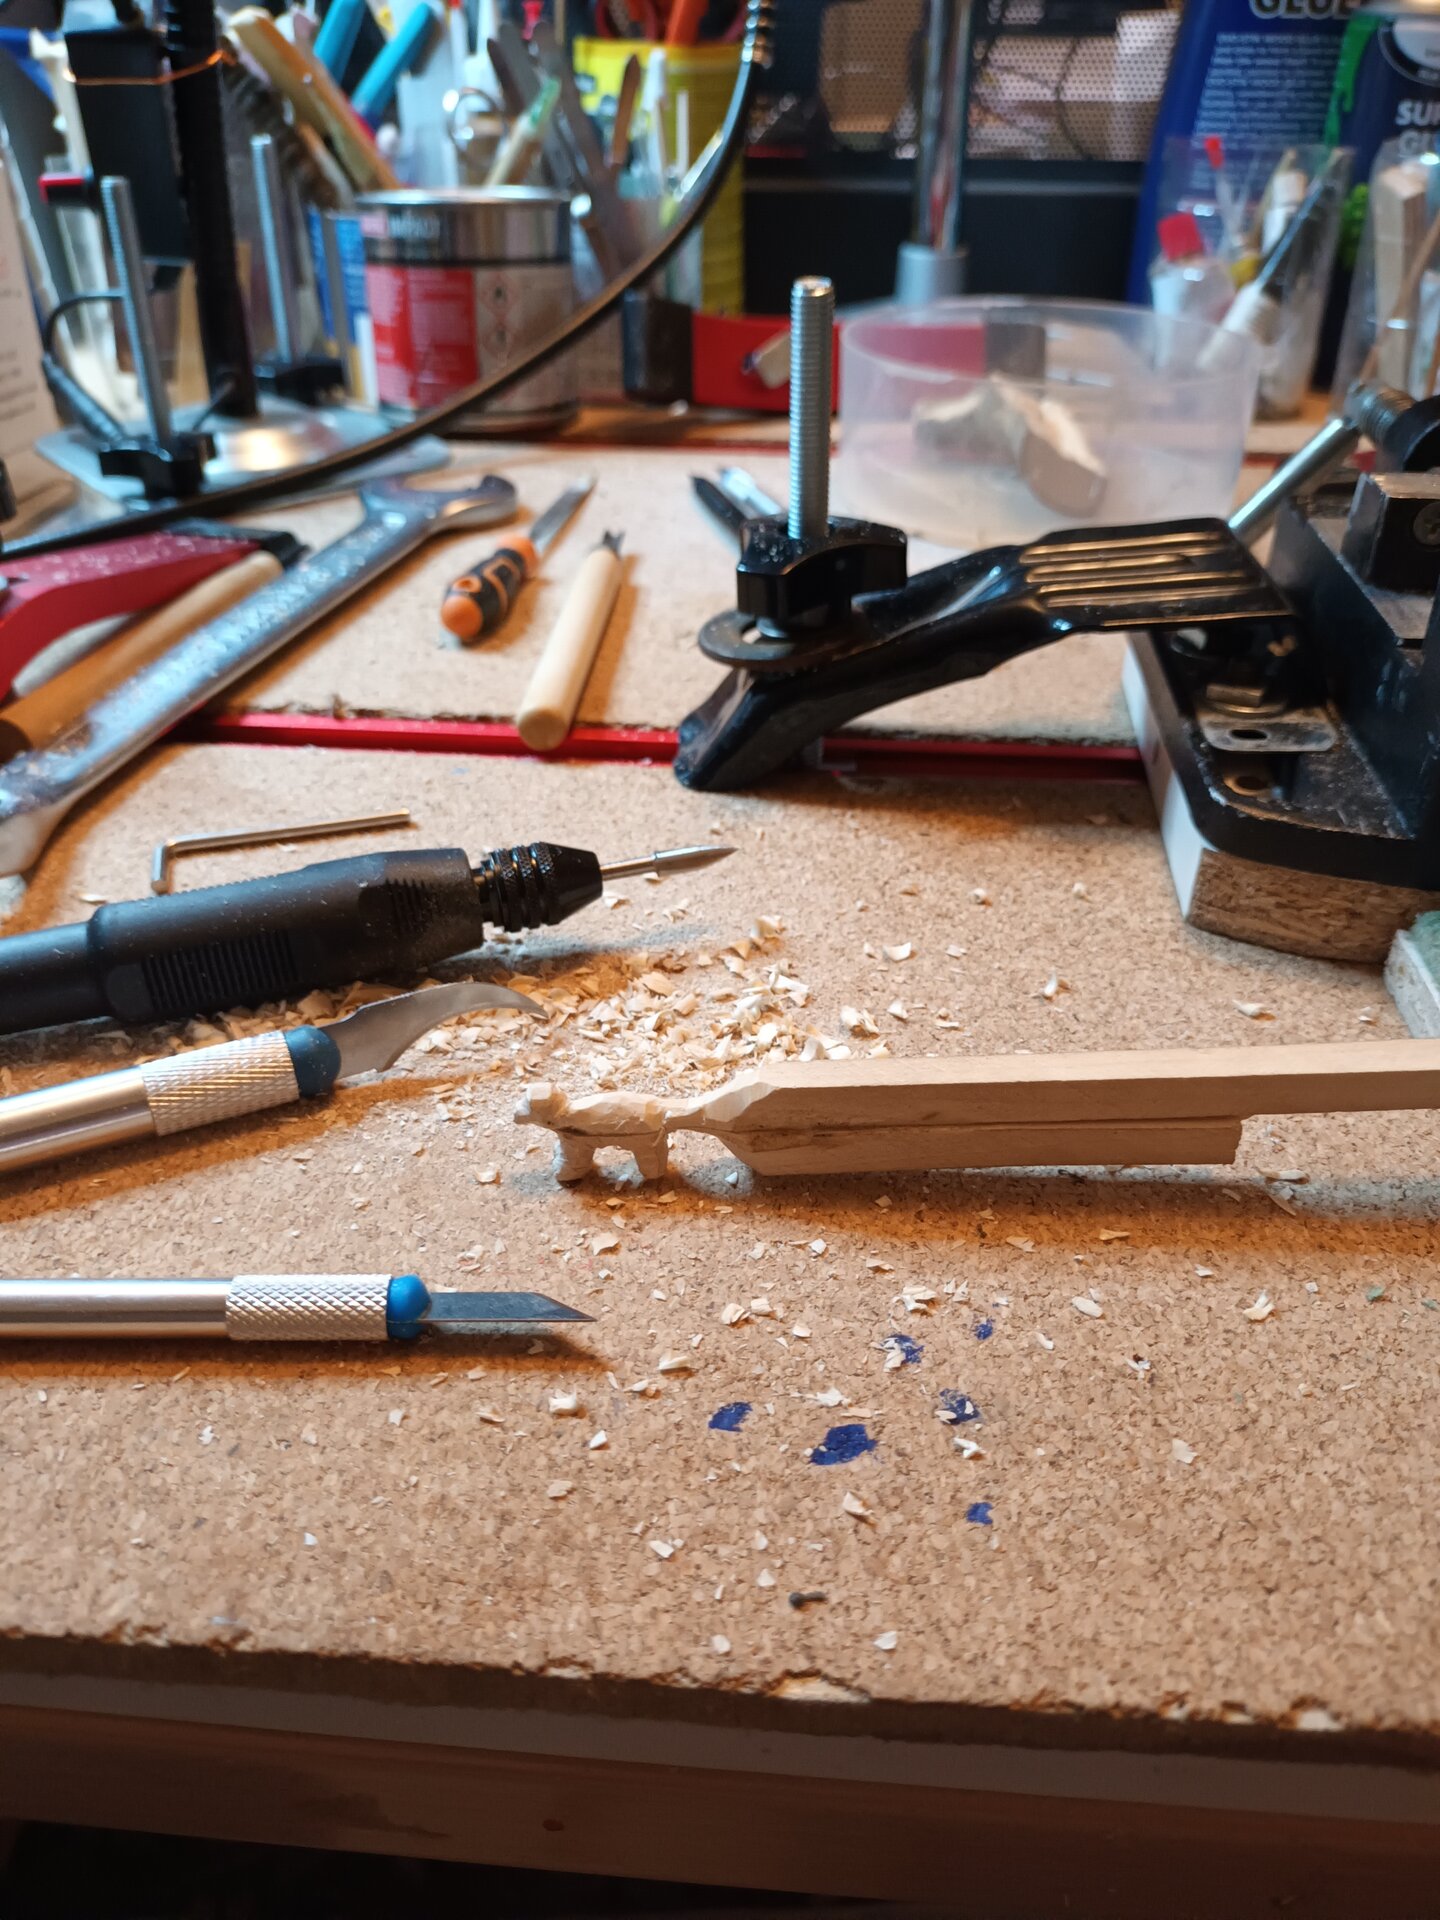
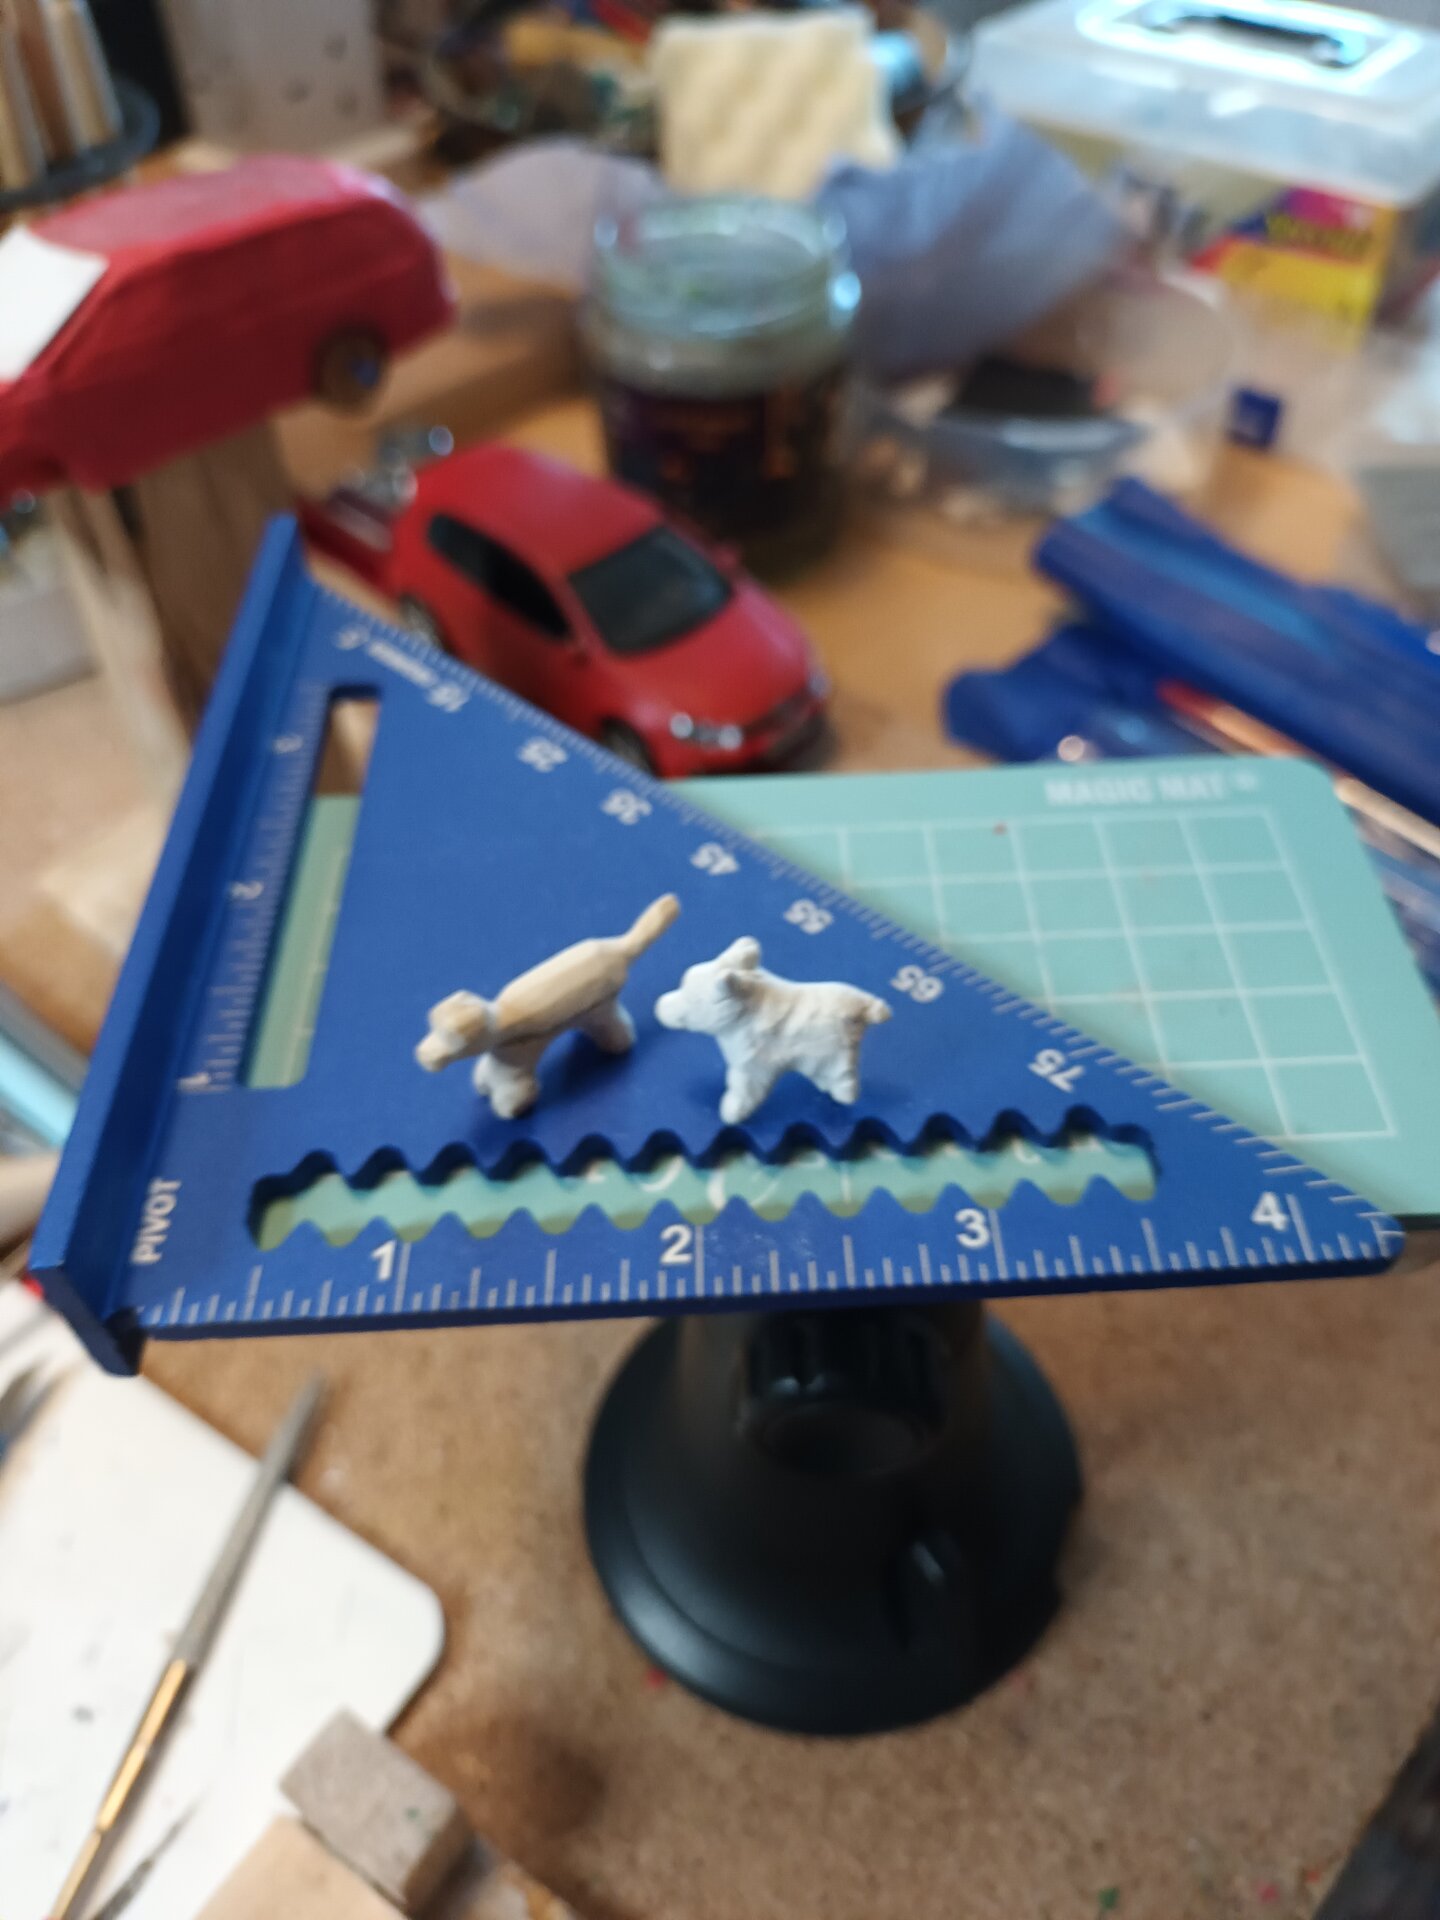
My first attempt to make Tilly the dog with clay was poor. So I tried carving it out of wood instead. There was definitely an improvement - the firmer material allowed for more precise detailing and the dog’s characteristic shape was easier to maintain.
Final Figure Assembly
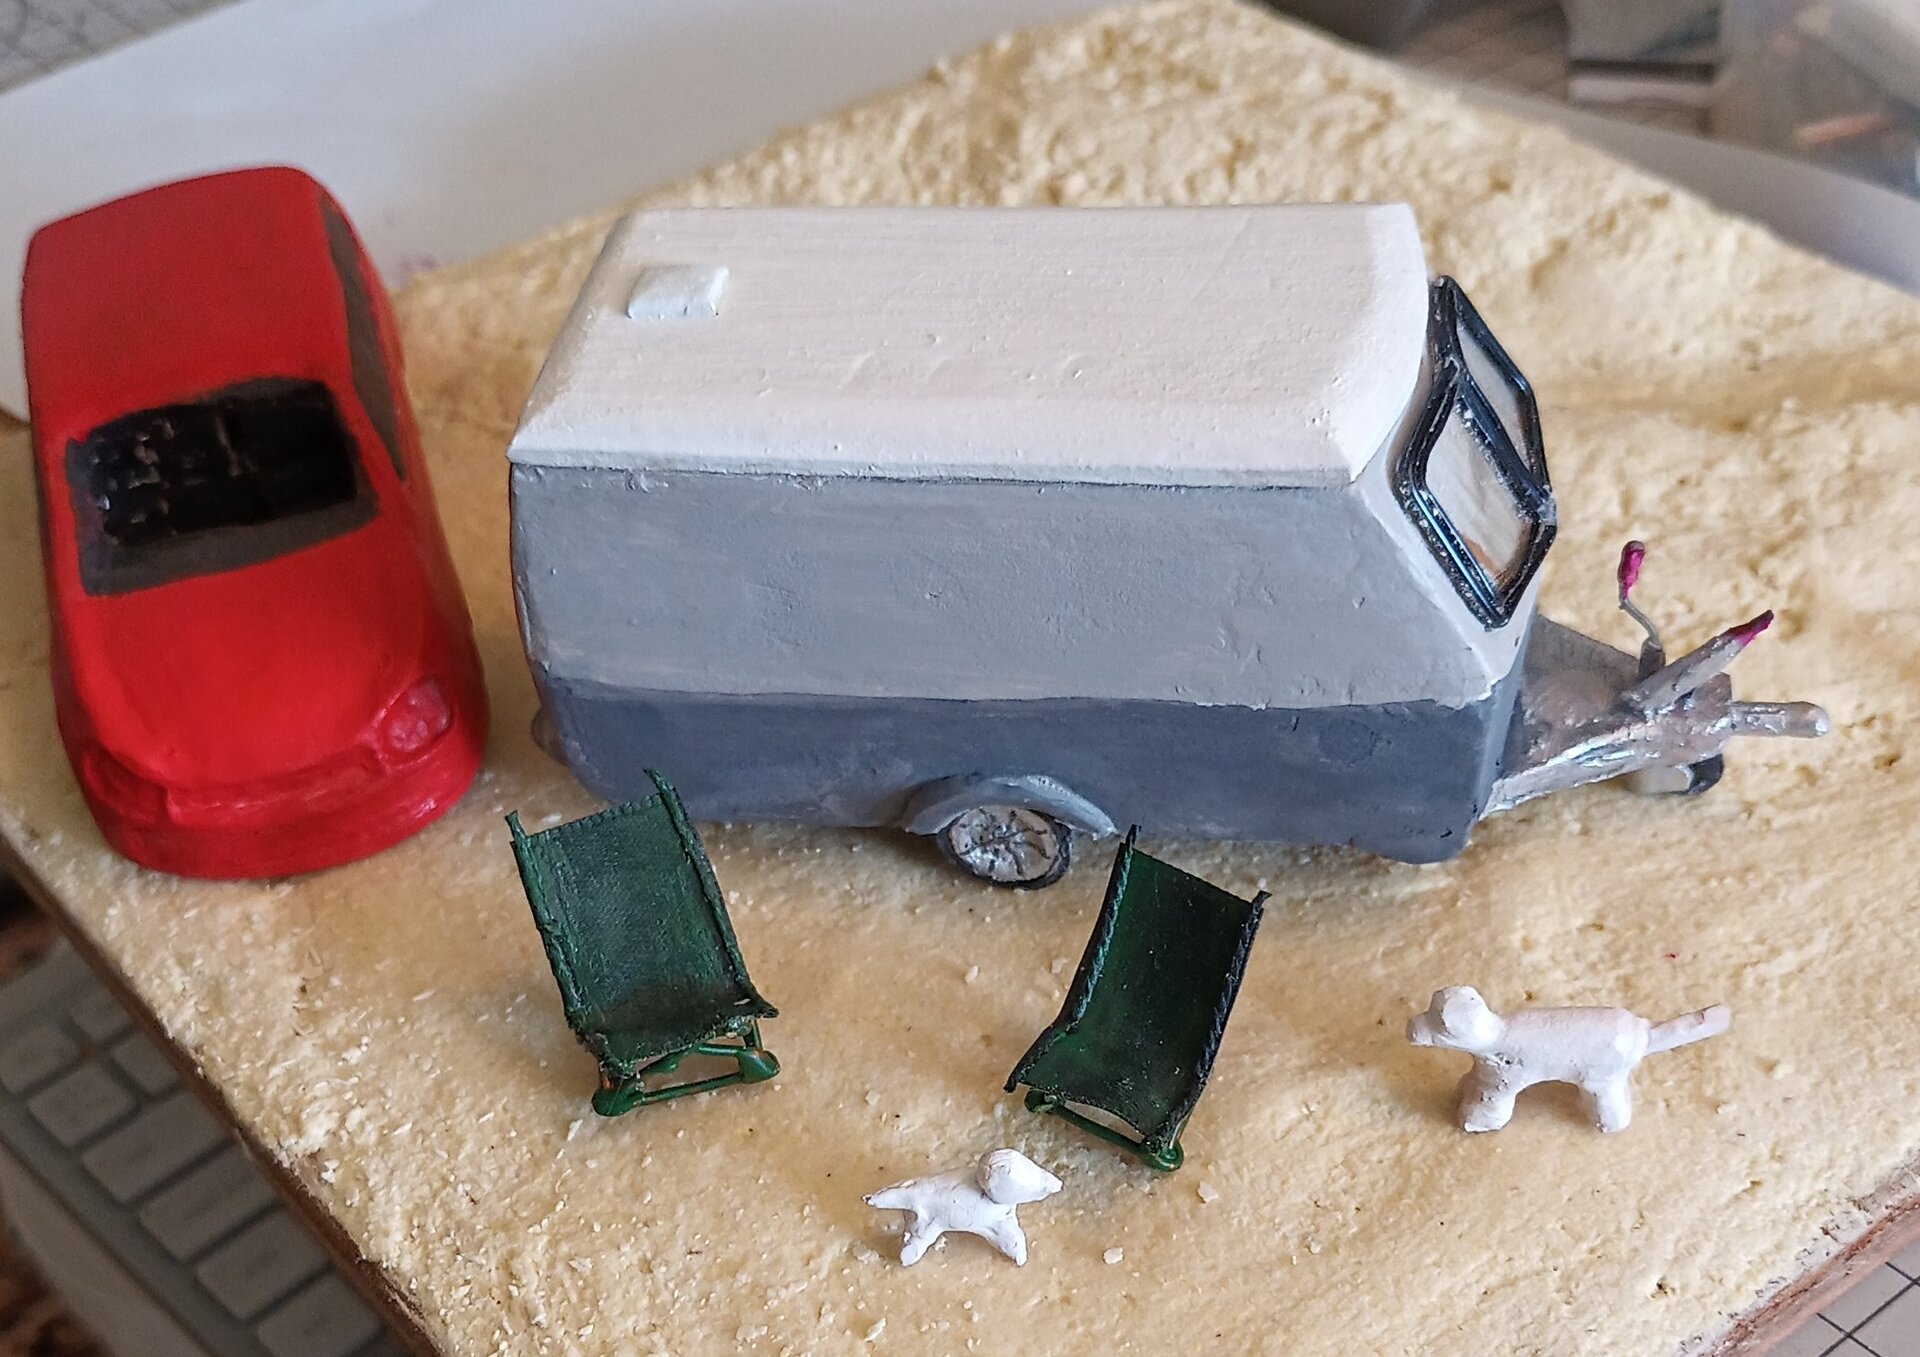
The final figures didn’t come out too bad. While they’re not portrait-quality likenesses, they capture the general appearance and most importantly, they read as a couple with their dog at the correct scale. For a first serious attempt at portrait figures, I’m accepting of the result, while recognizing it’s an area that needs much more practice.
Chapter 5: Layout and Positioning
With the main components completed - caravan, car, and figures - I could start to get a perspective on positioning everything on the 25cm × 25cm base.
Confronting Space Constraints
I realized at this stage that my initial ideas were not feasible within the space constraints:
- Path into campsite: Not enough room to show an entrance path
- Fence: Would cramp the composition
- Canopy: The caravan’s roll-out awning wouldn’t fit in the space
- Activity elements: Initial plans for camping chairs and other accessories had to be simplified
Design Decisions:
- Focus on the core elements: caravan, car, figures, and Tilly
- Create an intimate scene rather than an expansive campsite
- Use the river as a backdrop feature rather than a major element
- Concentrate detail on vegetation and ground textures
This is a common challenge in small-scale dioramas - the story must be told with fewer elements, requiring each component to work harder visually. The 25cm × 25cm constraint forced me to be ruthless about what to include.
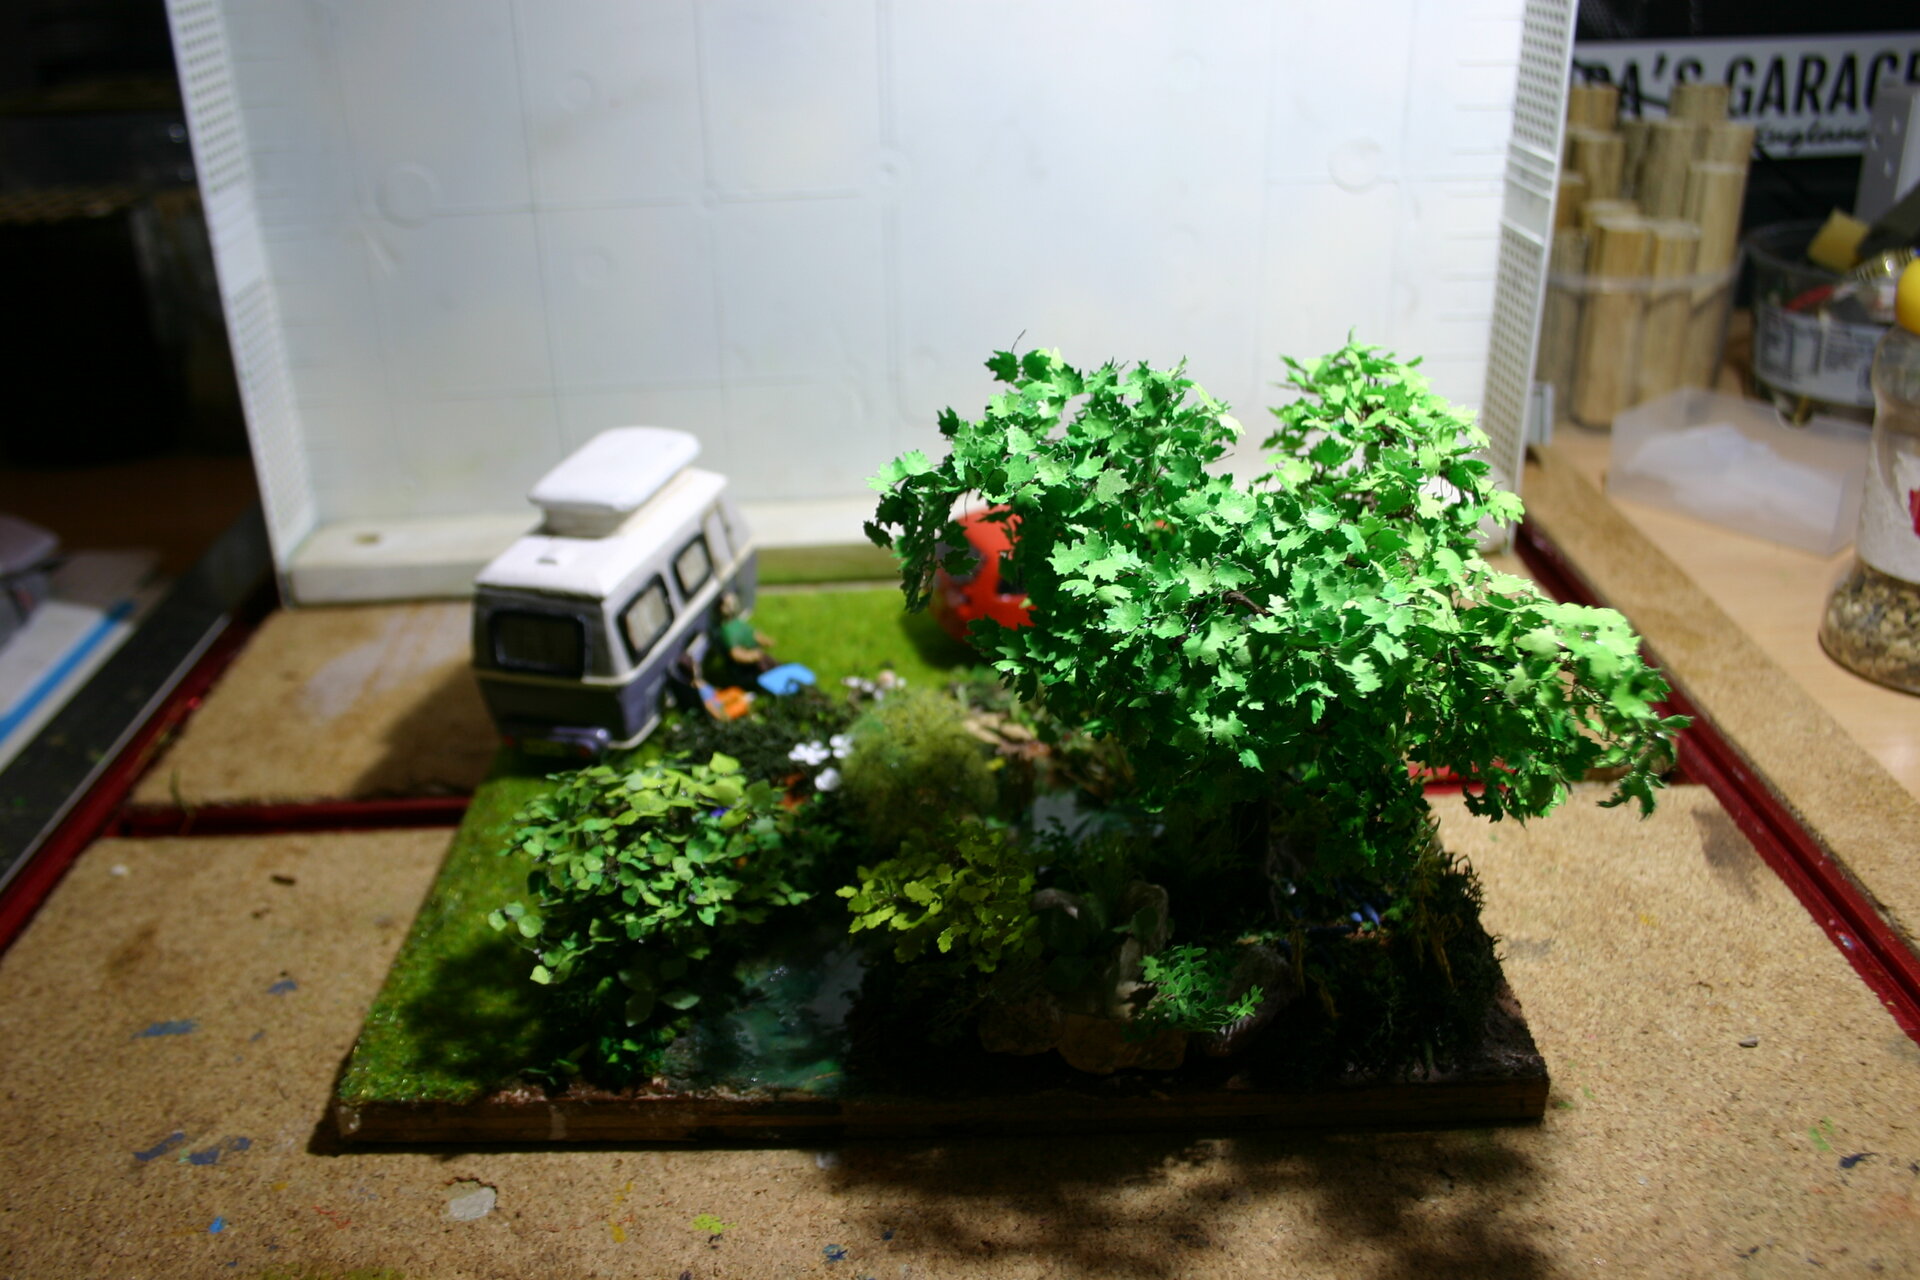
Chapter 6: Vegetation and Scenery
With positioning established, it was time to create the Welsh countryside setting that would bring the scene to life.
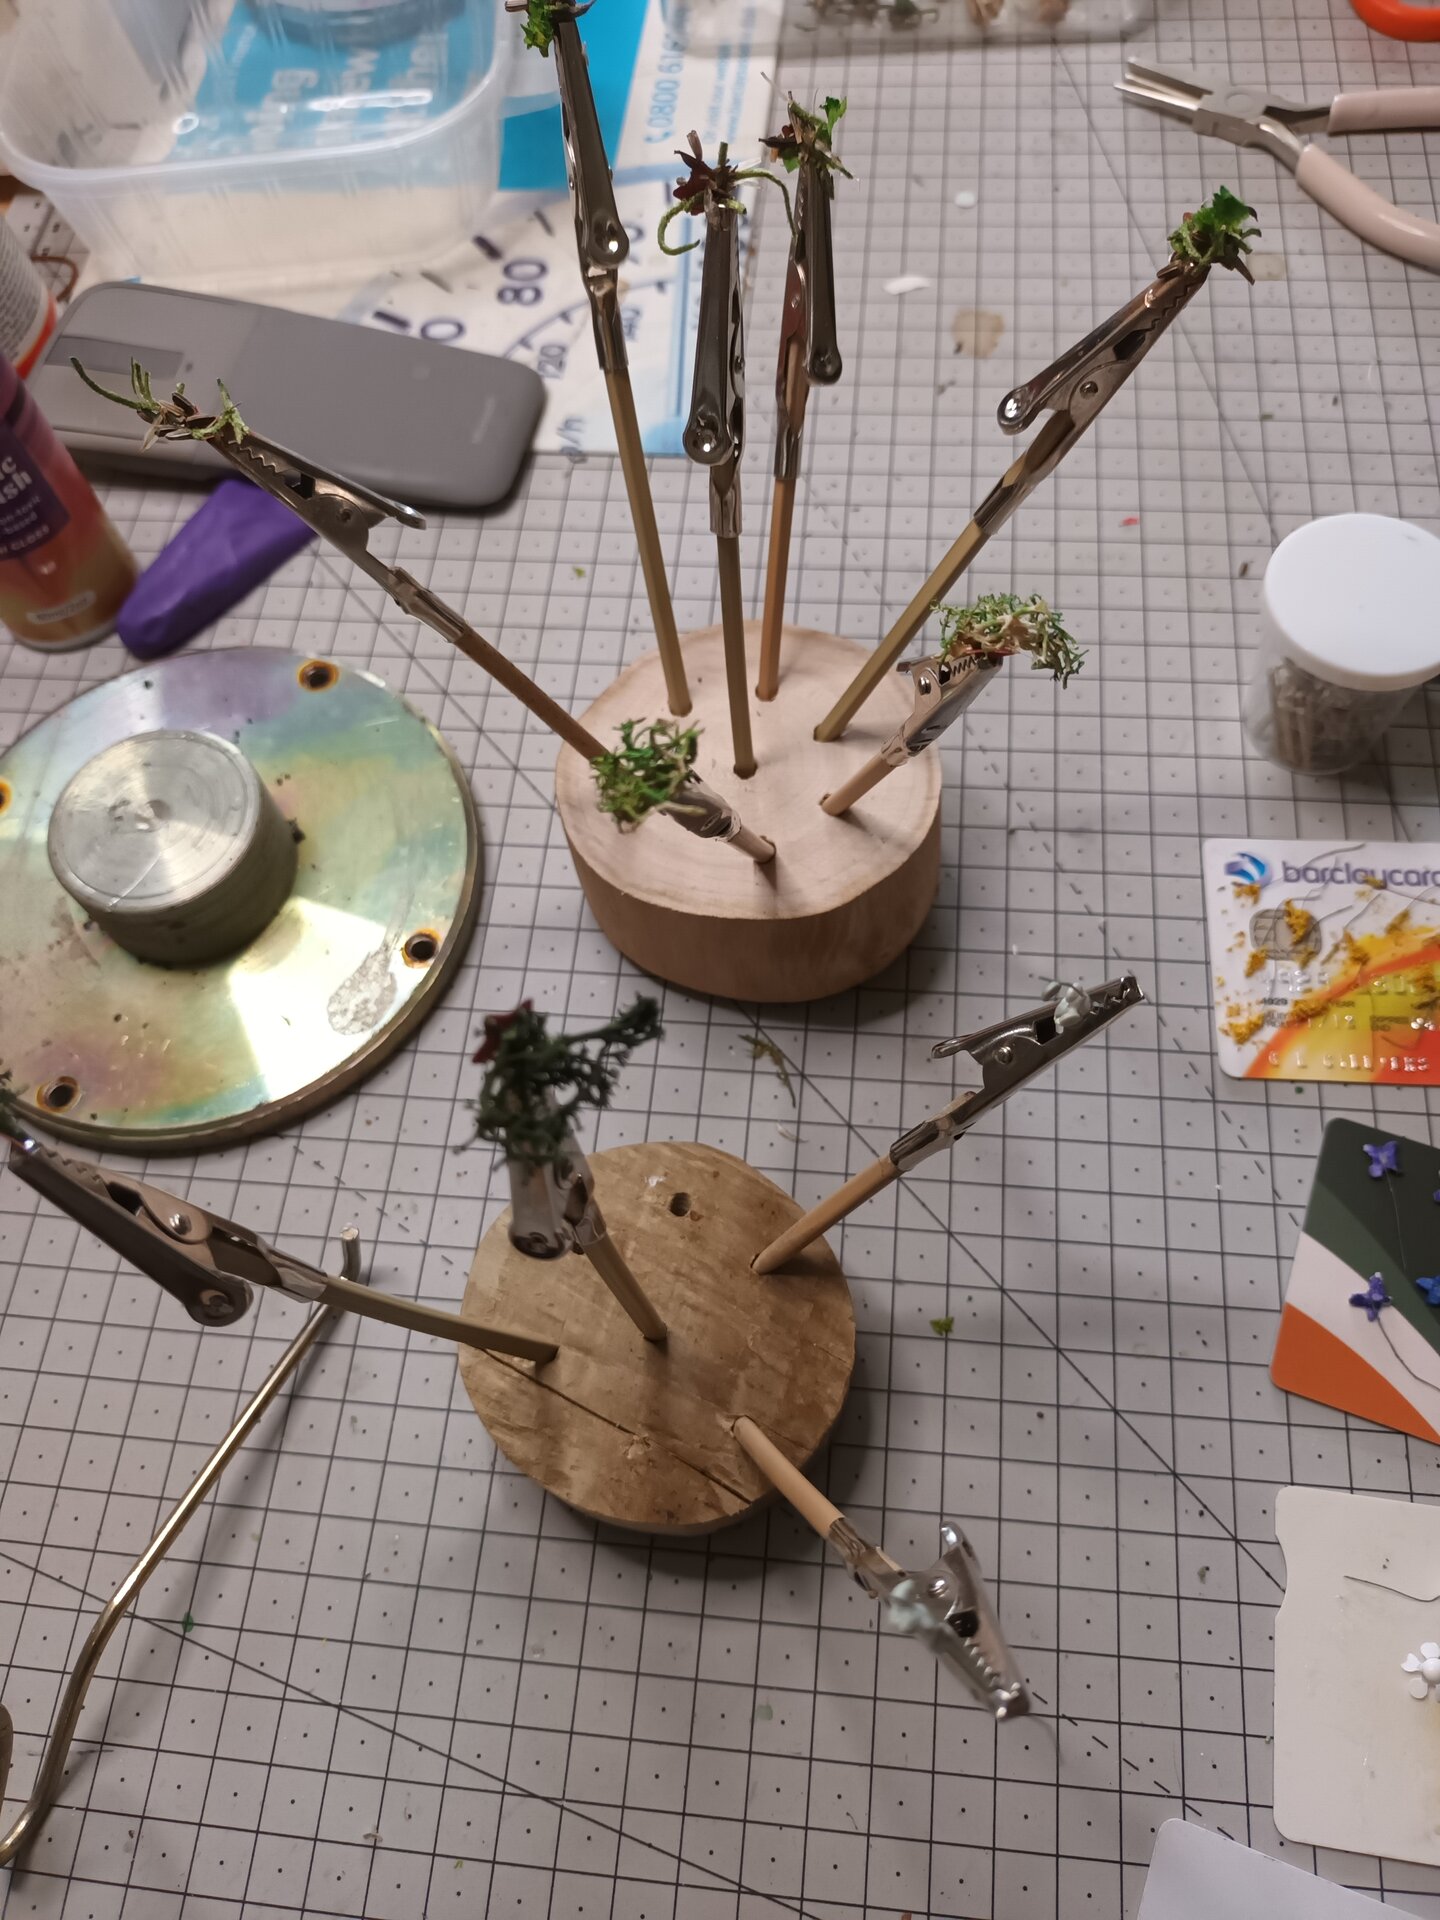
Tool Development - Custom Drying System
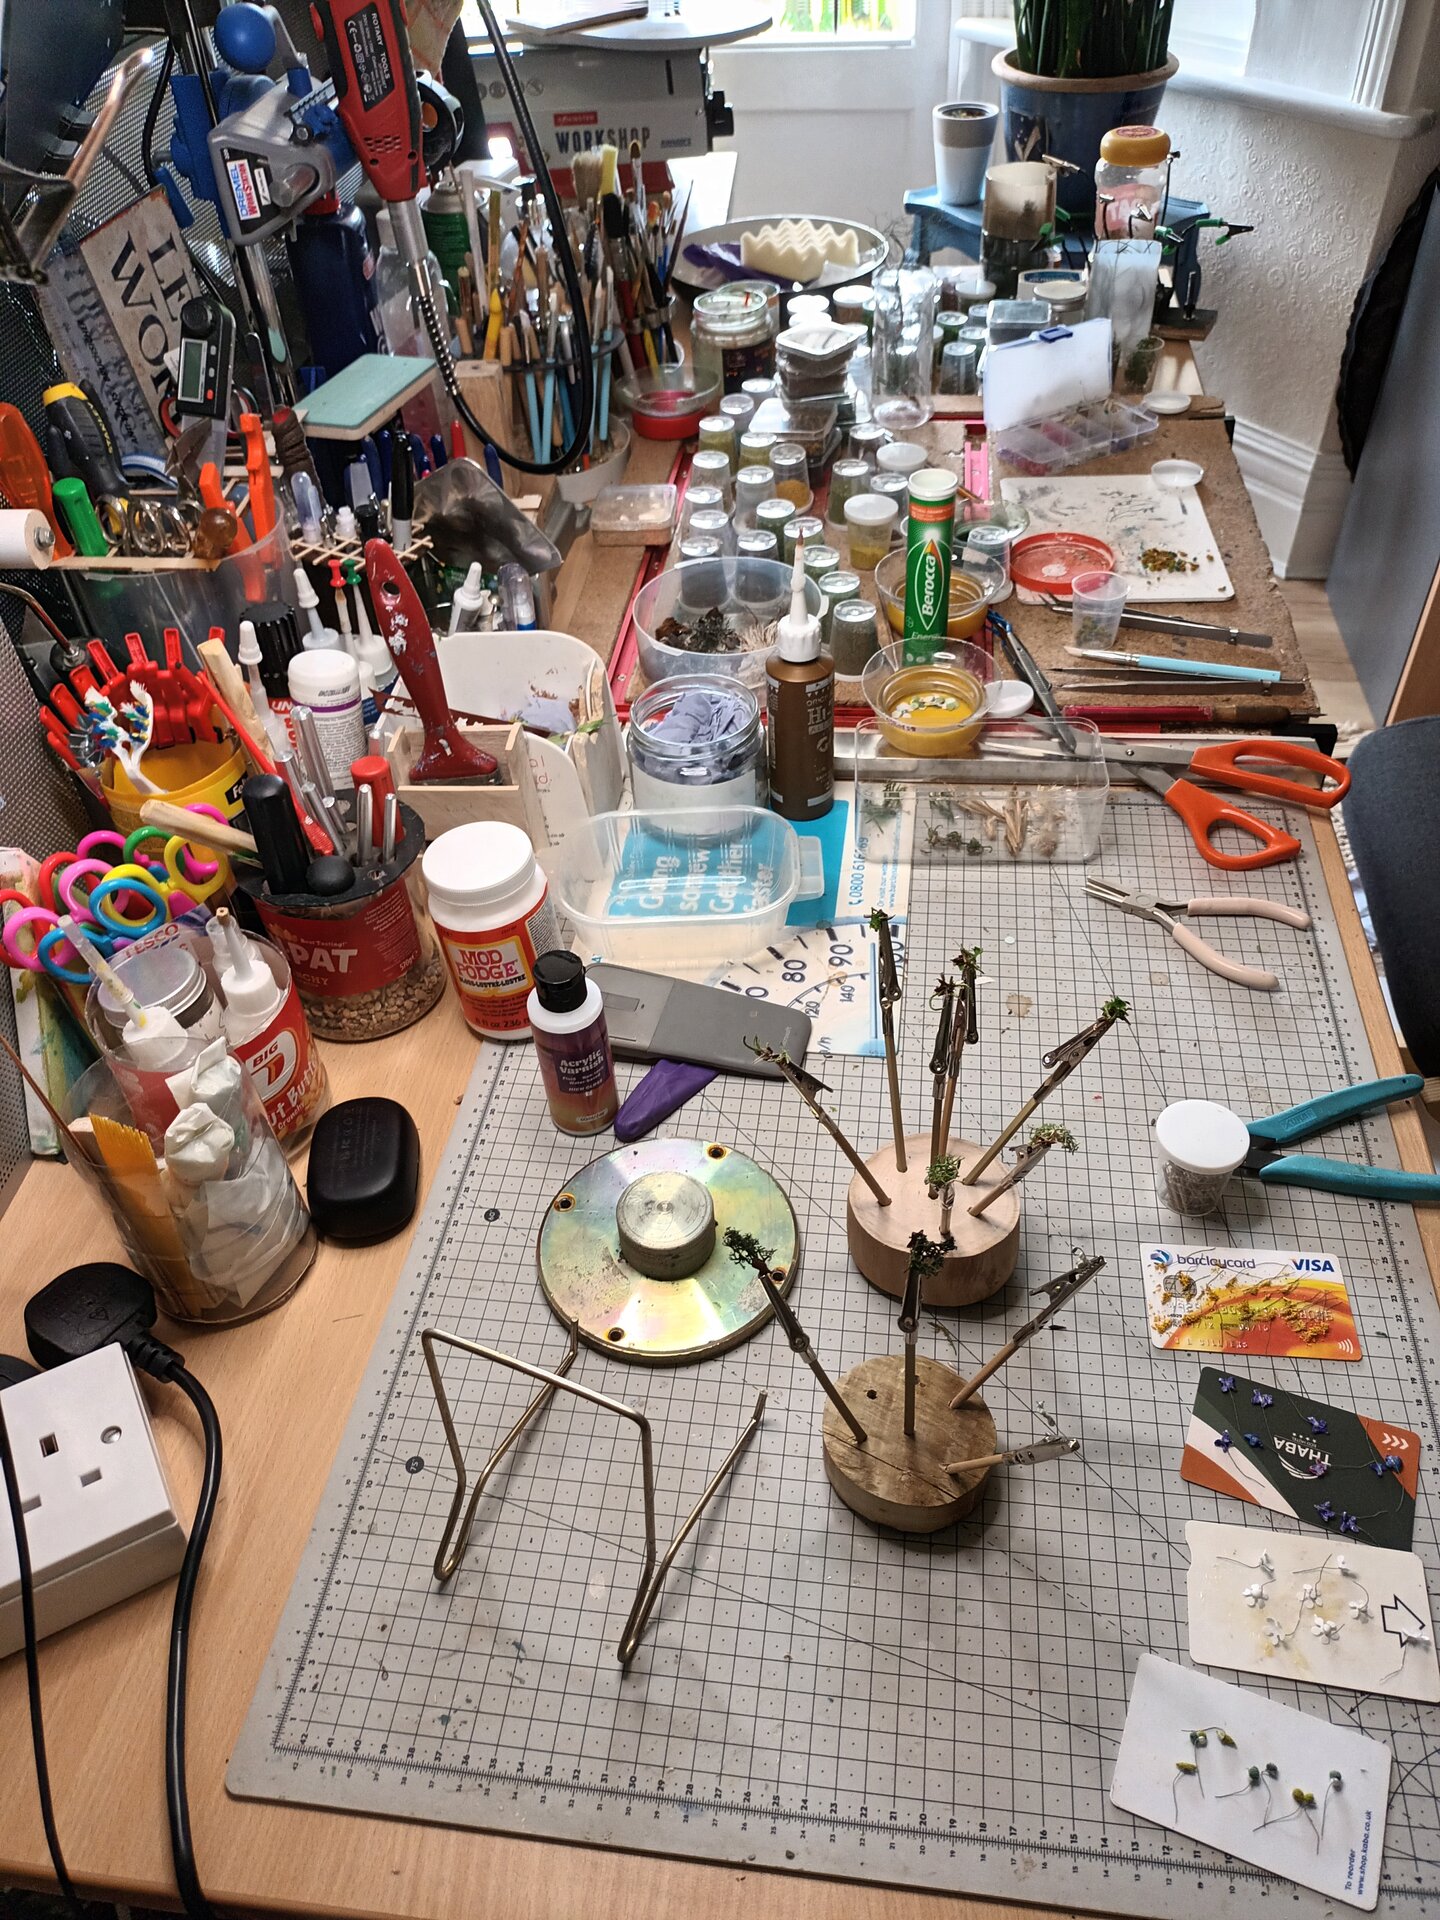

Building on lessons from the English Country Garden, I had developed better tools for miniature plant making:
- Custom drying clamps for holding wire stems
- Repurposed credit cards as flat drying surfaces for leaves and flower petals
- Organized workflow for producing multiple plants efficiently
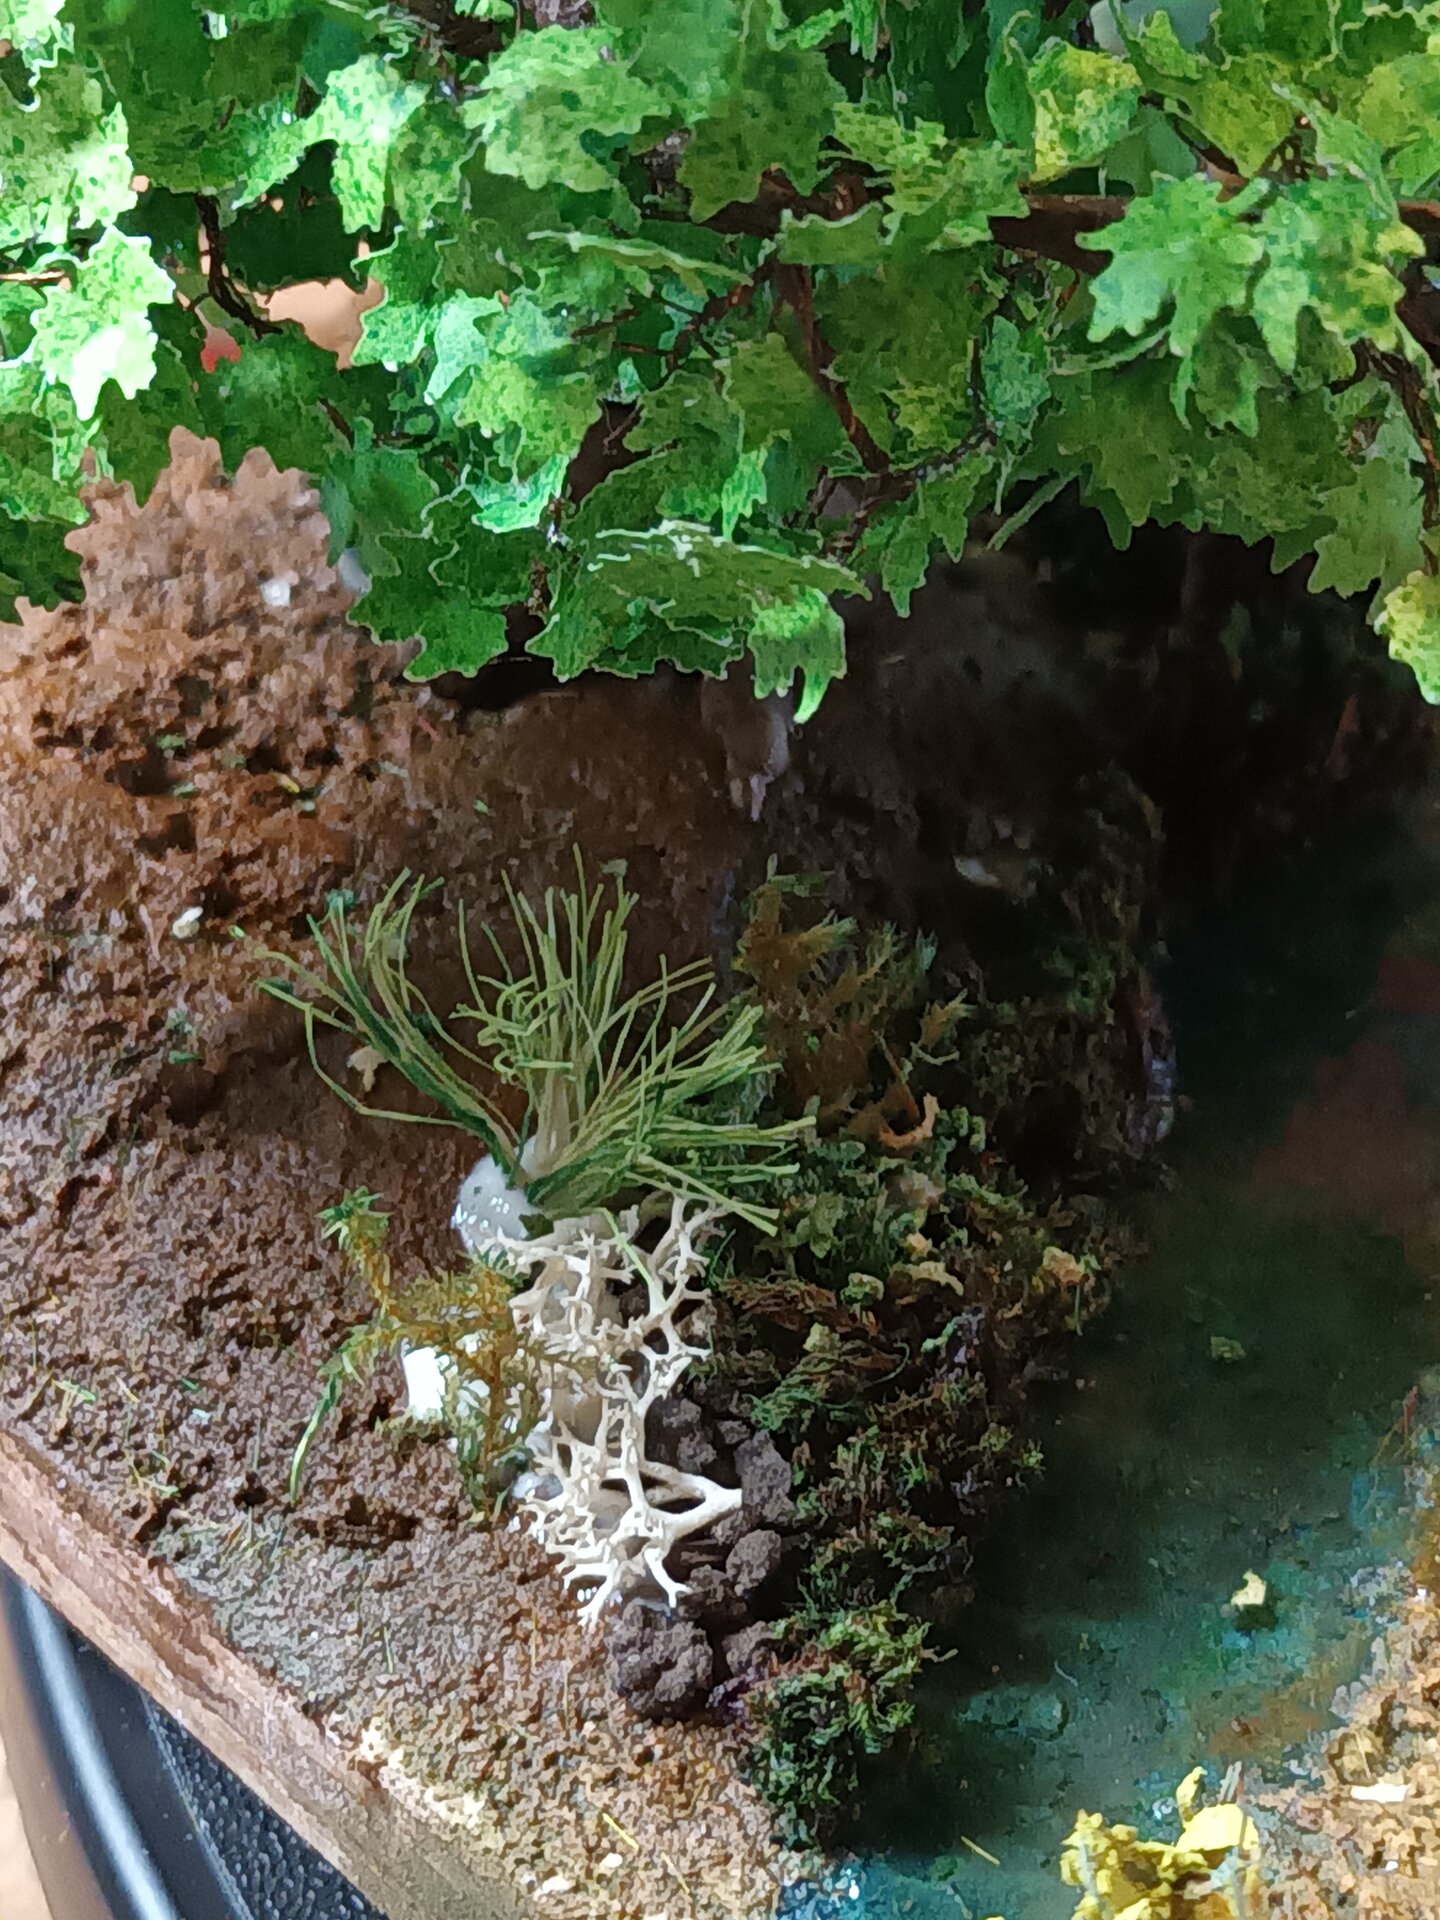
Creating Riverside Plants and Shrubs
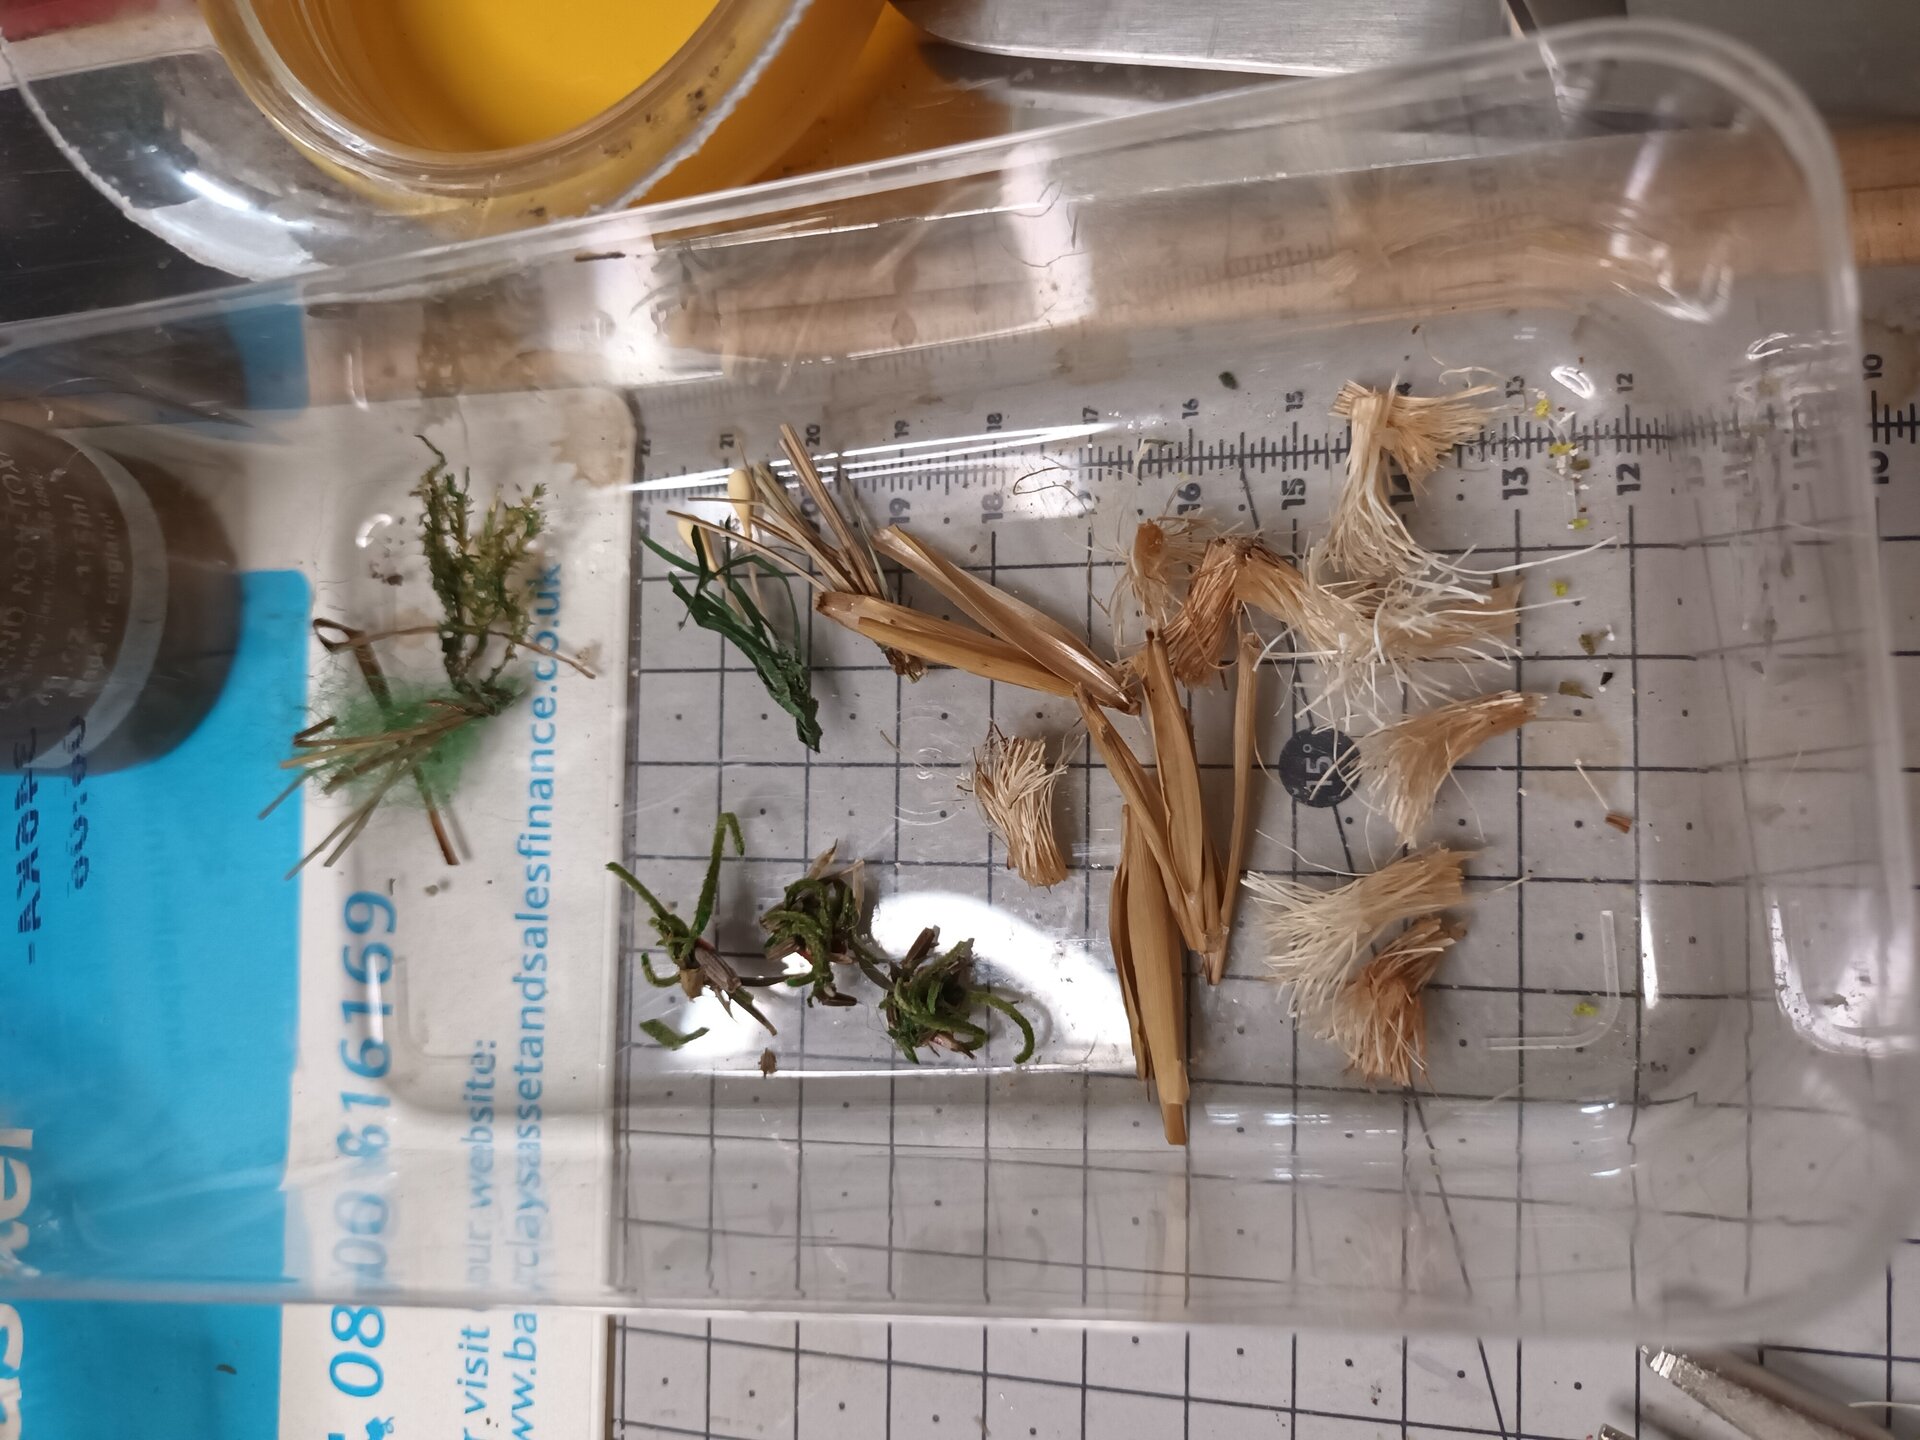
The riverside vegetation needed to look natural for a Welsh countryside setting:
- Water-loving plants near the river’s edge
- Taller grasses and sedges
- Small flowering plants for color spots
- Varied textures to create visual interest
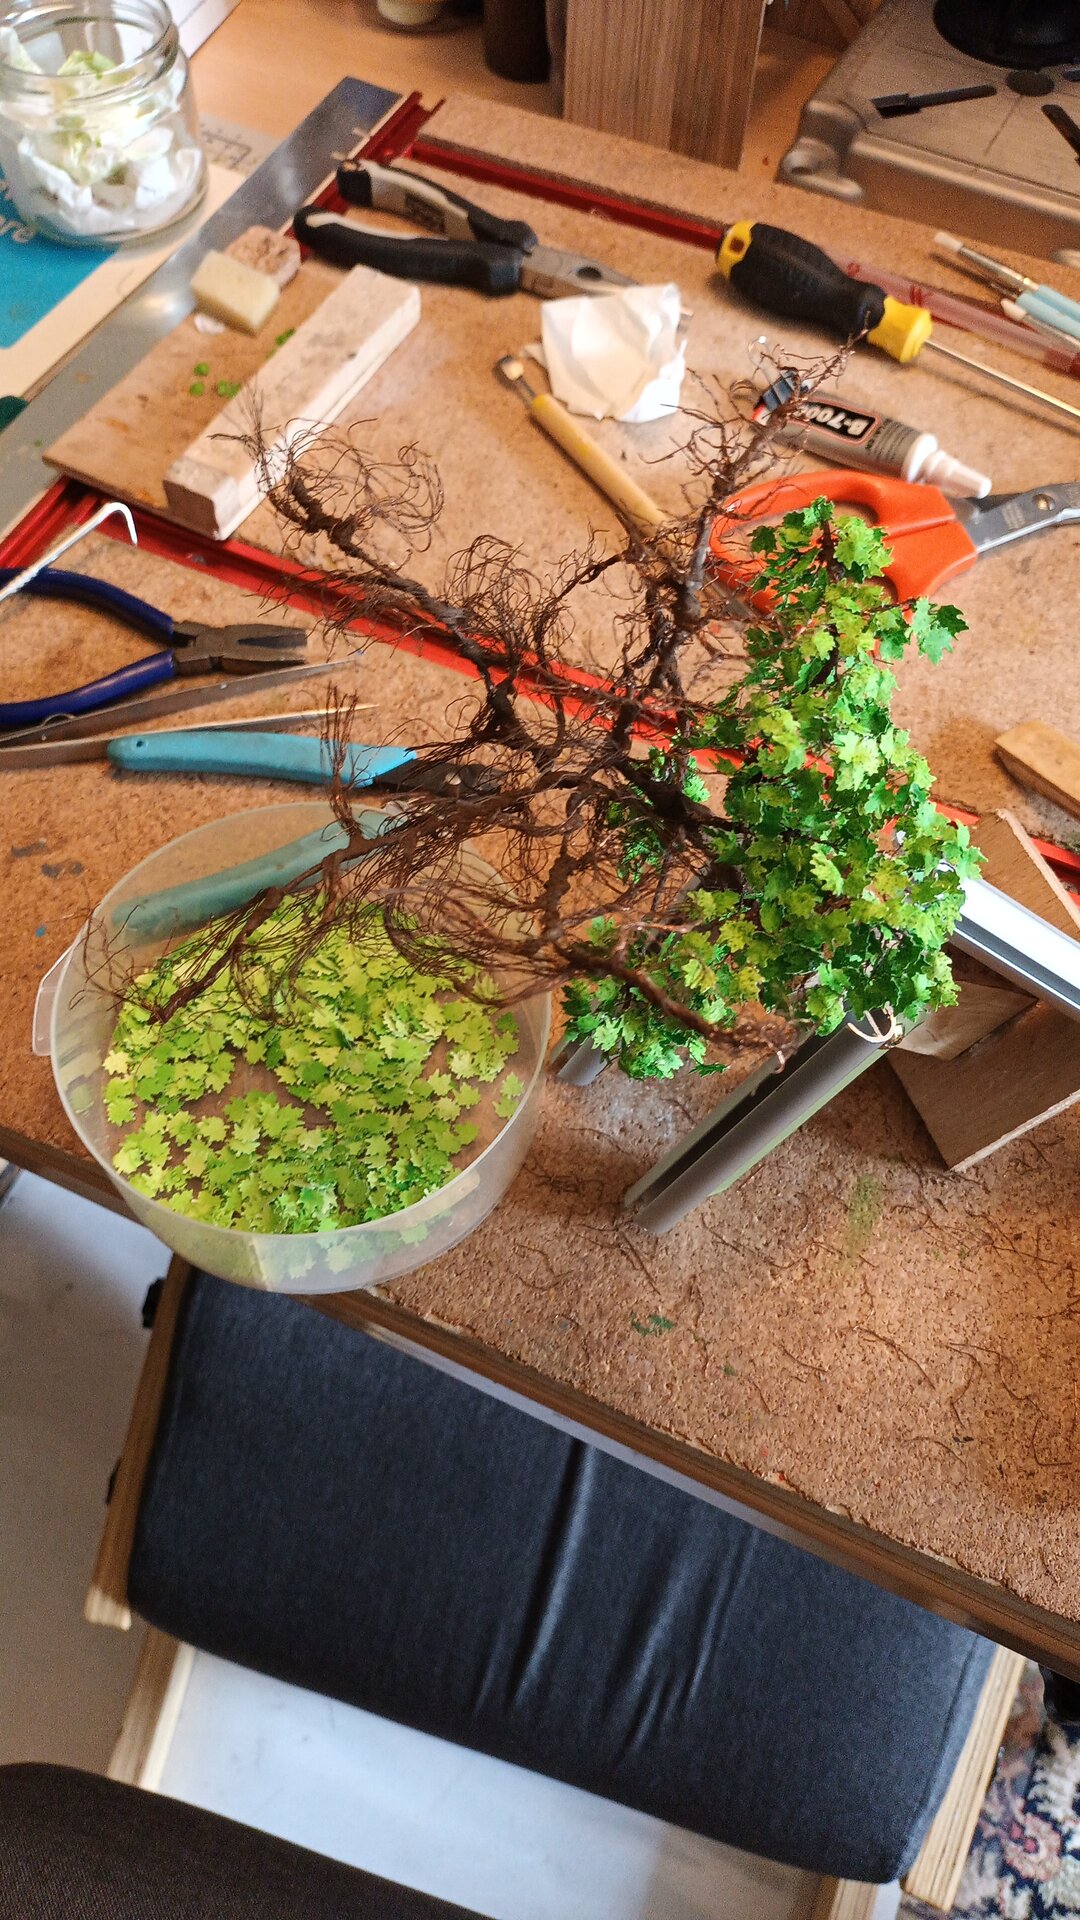
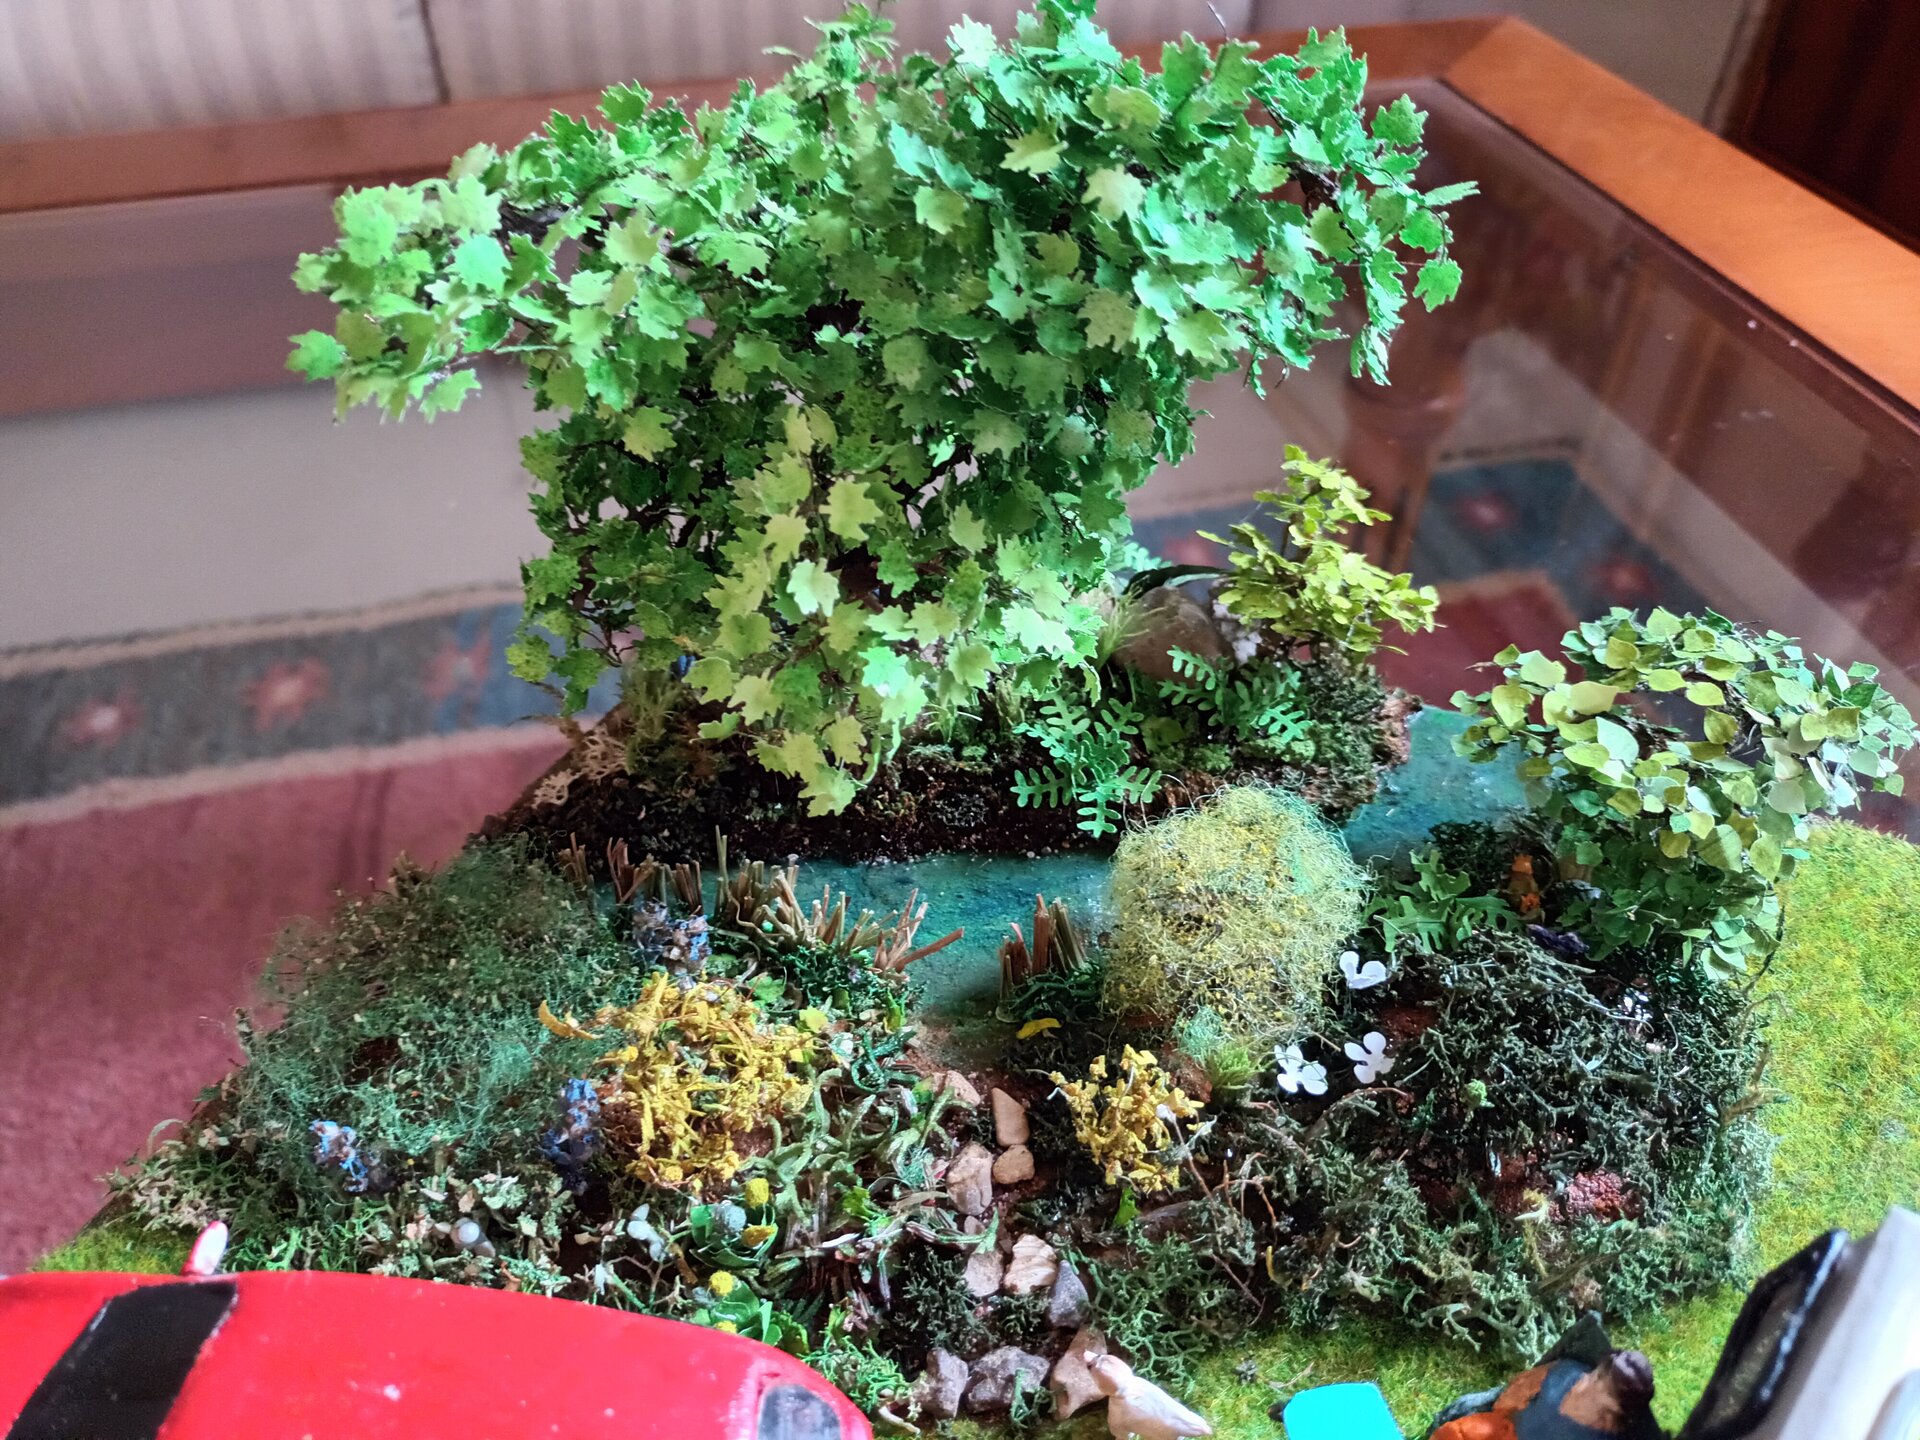
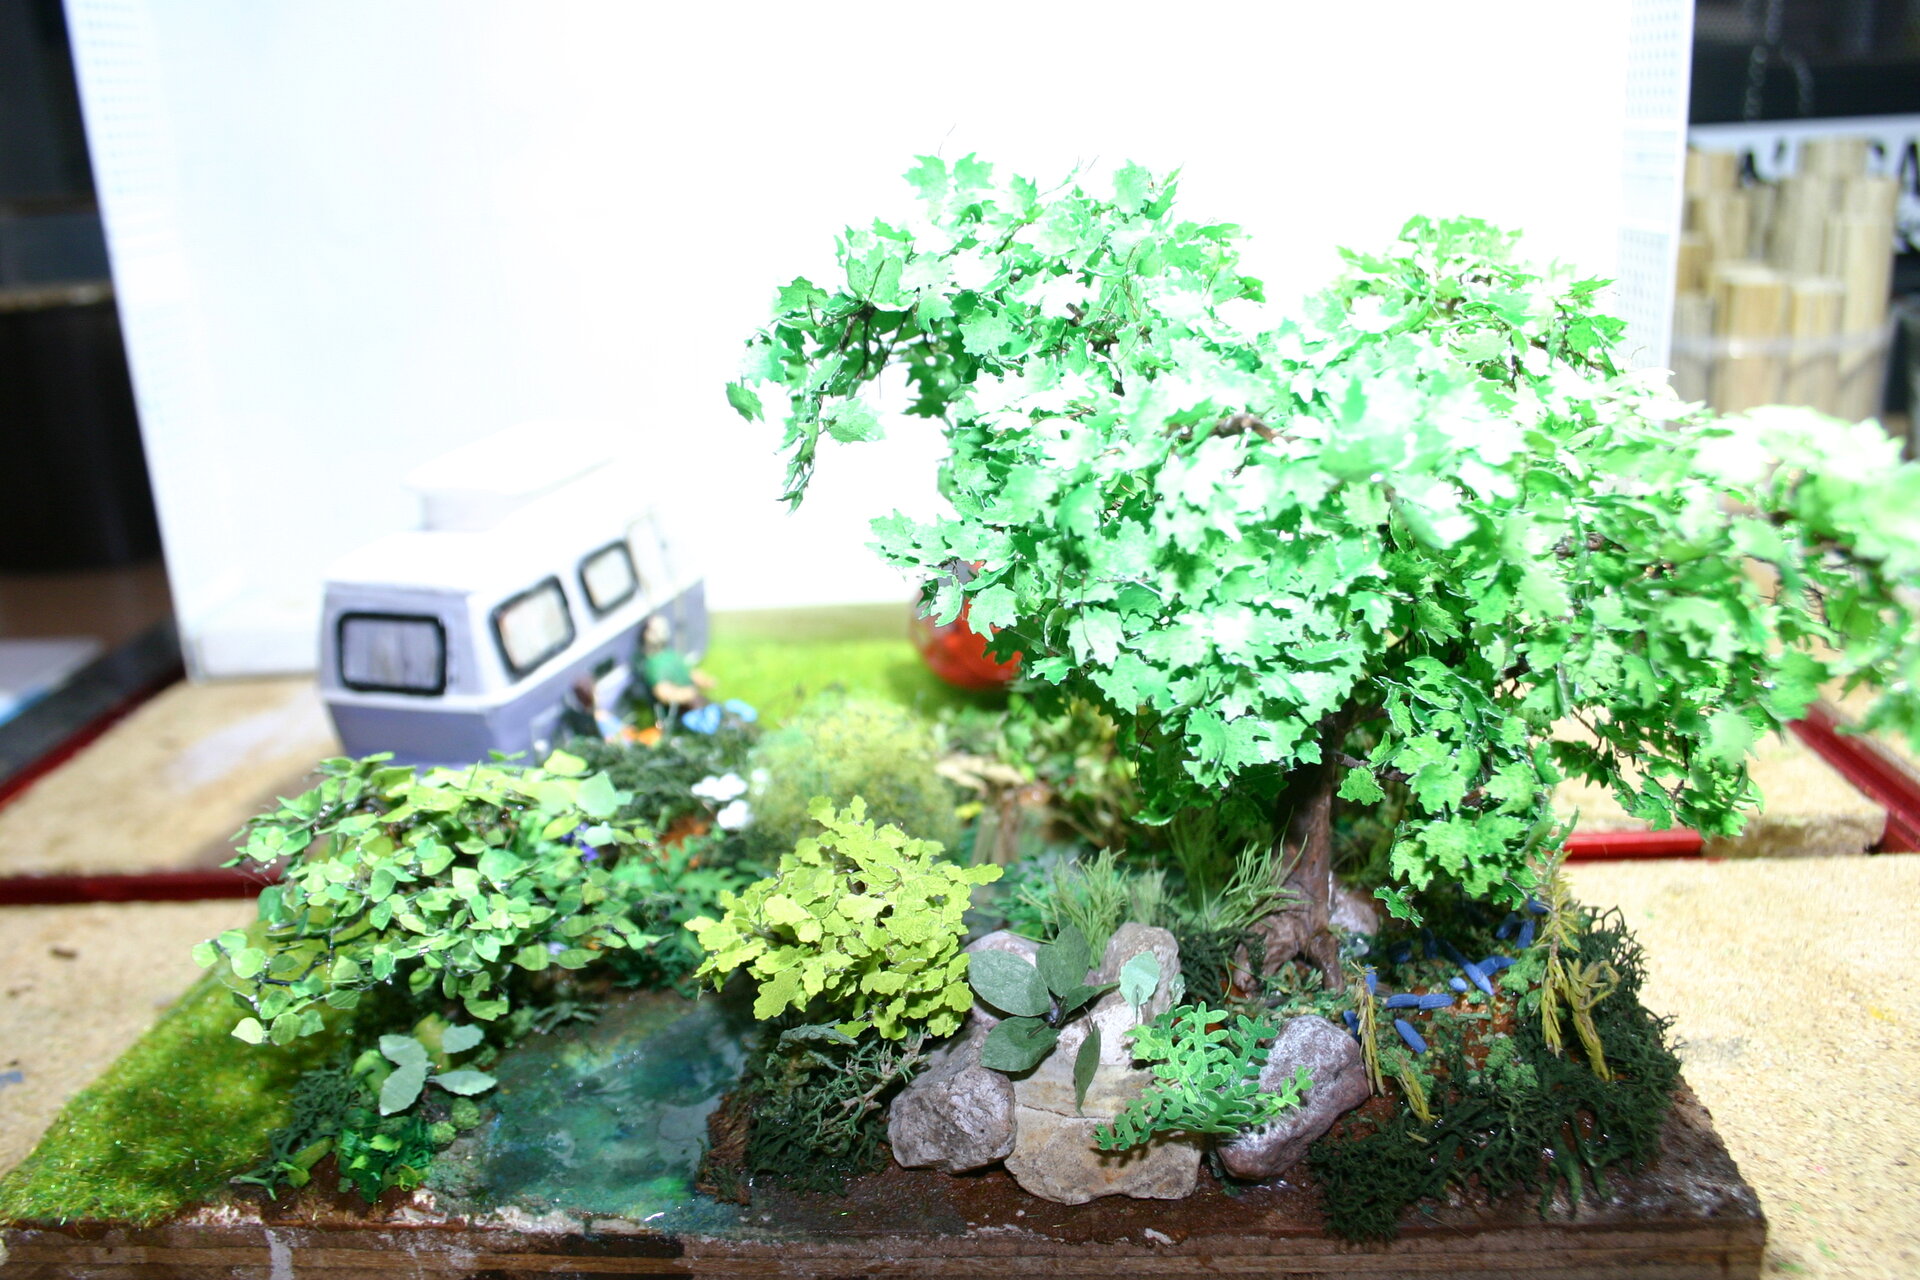
Tree Construction - Field Research
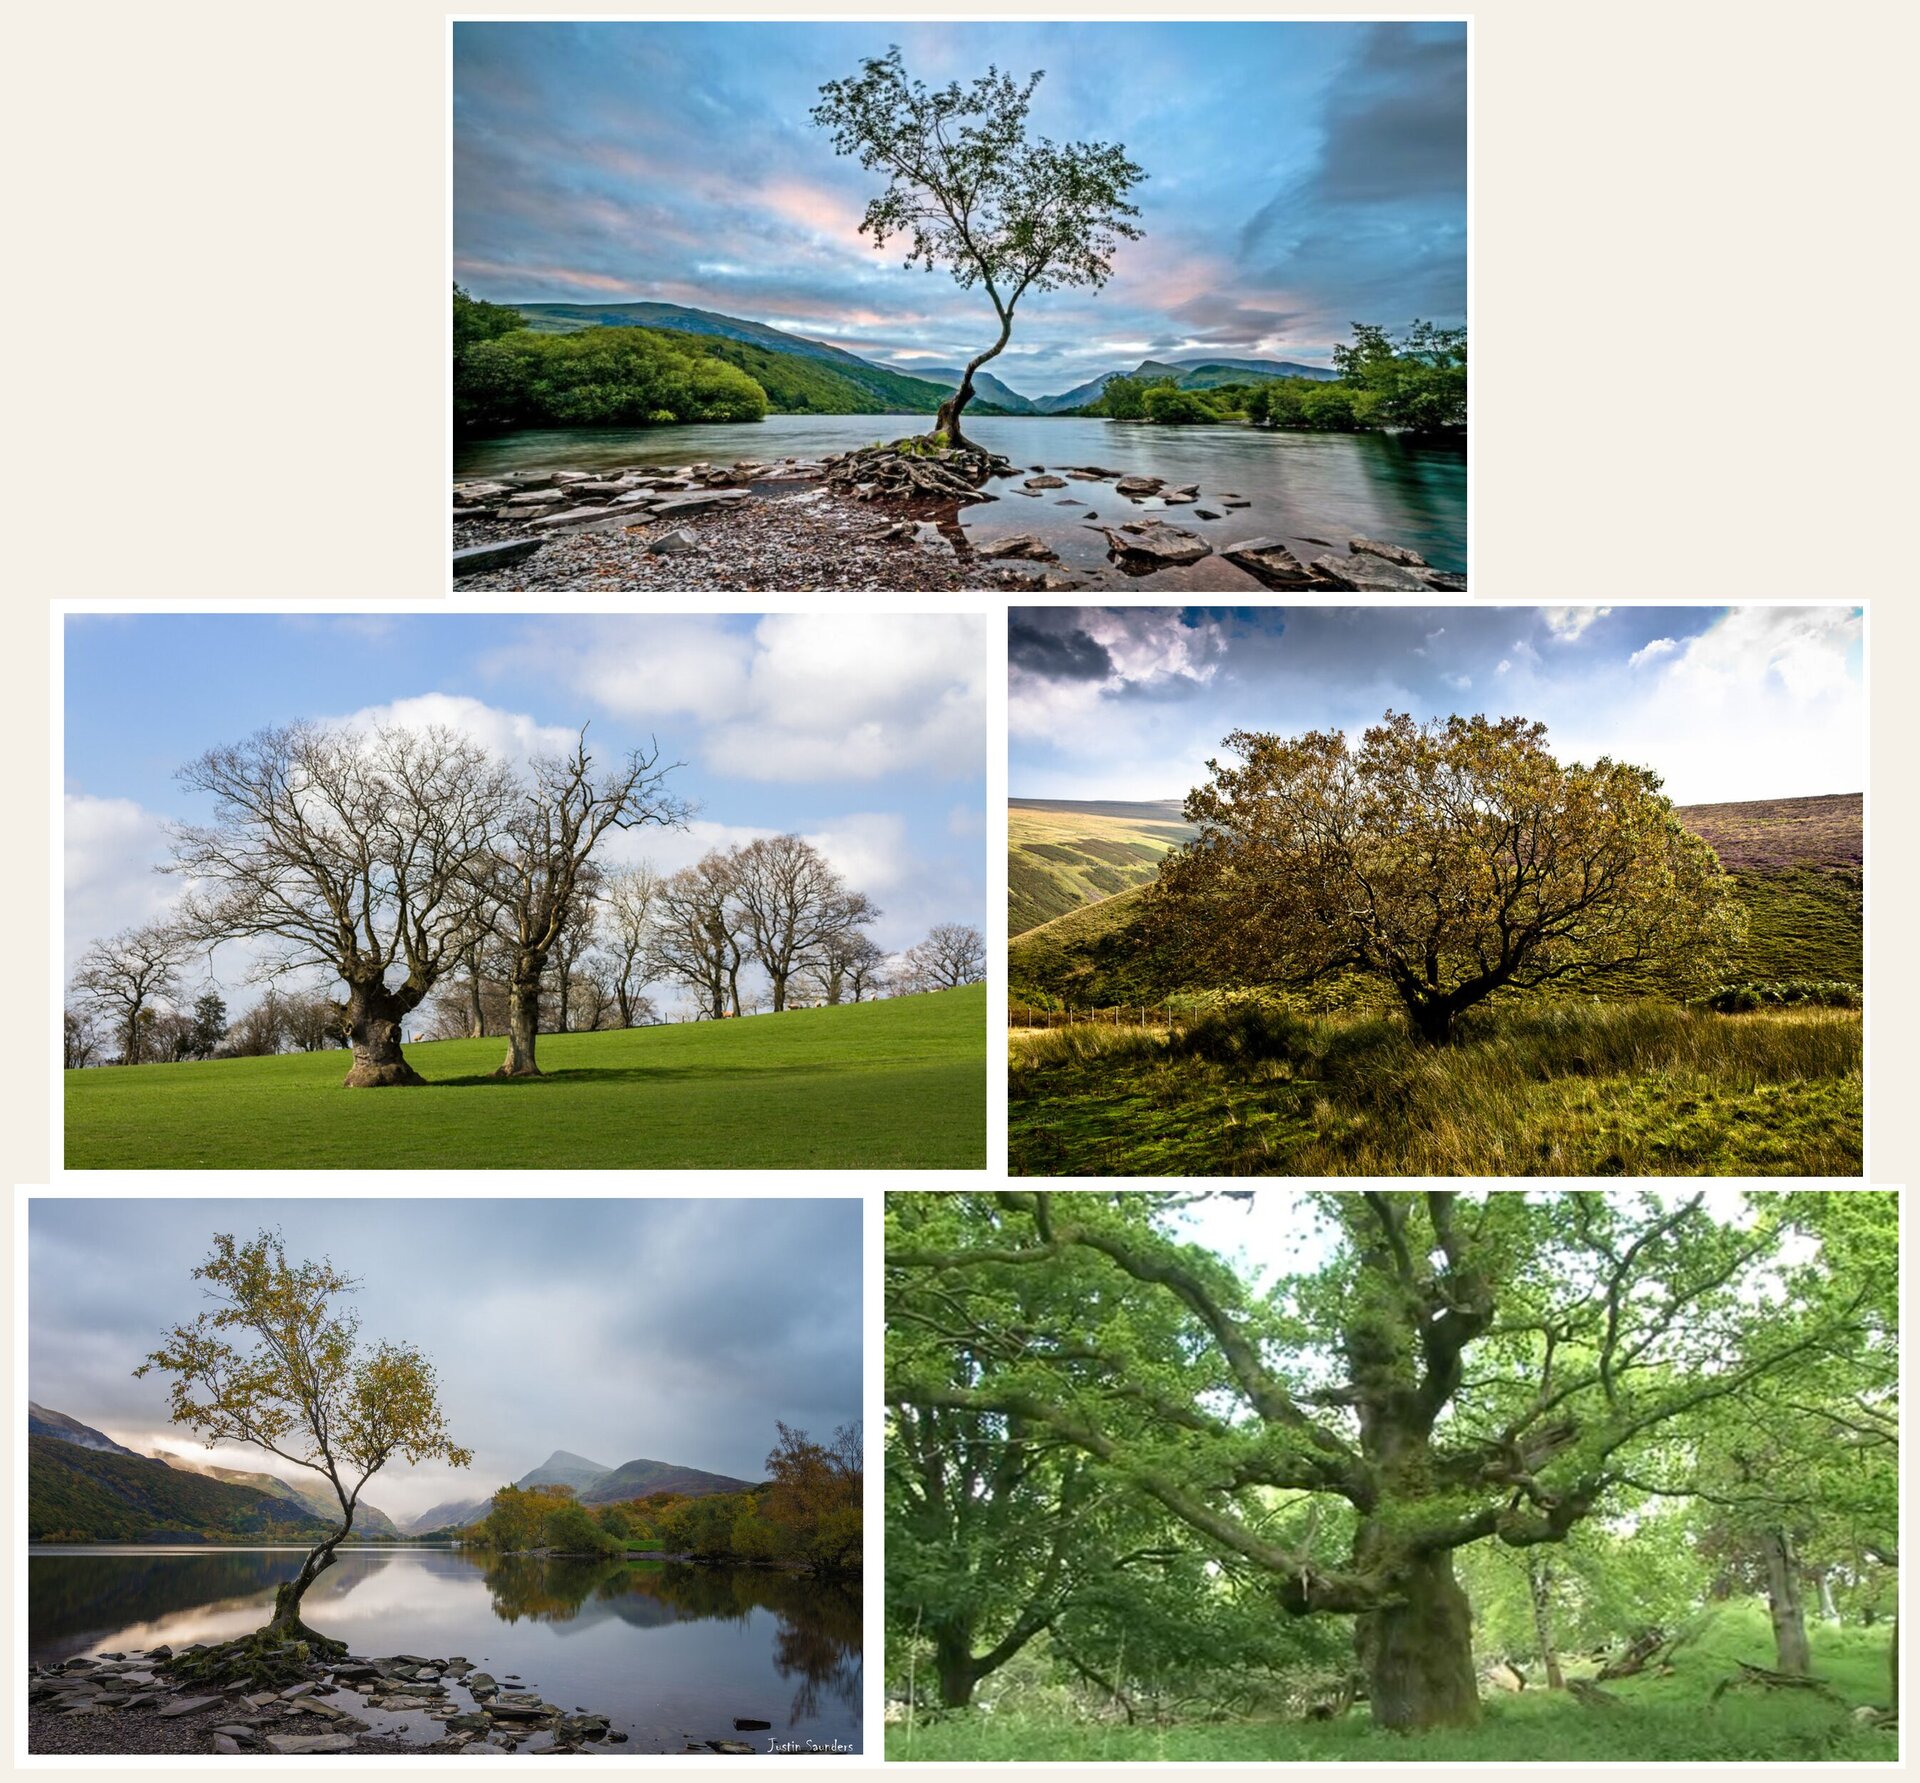
Before starting the larger trees, I went back to studying real trees - a valuable practice I learned from previous projects. Understanding how branches actually grow, how foliage masses sit on the structure, and the characteristic shapes of different tree species makes a huge difference in creating believable miniature trees.
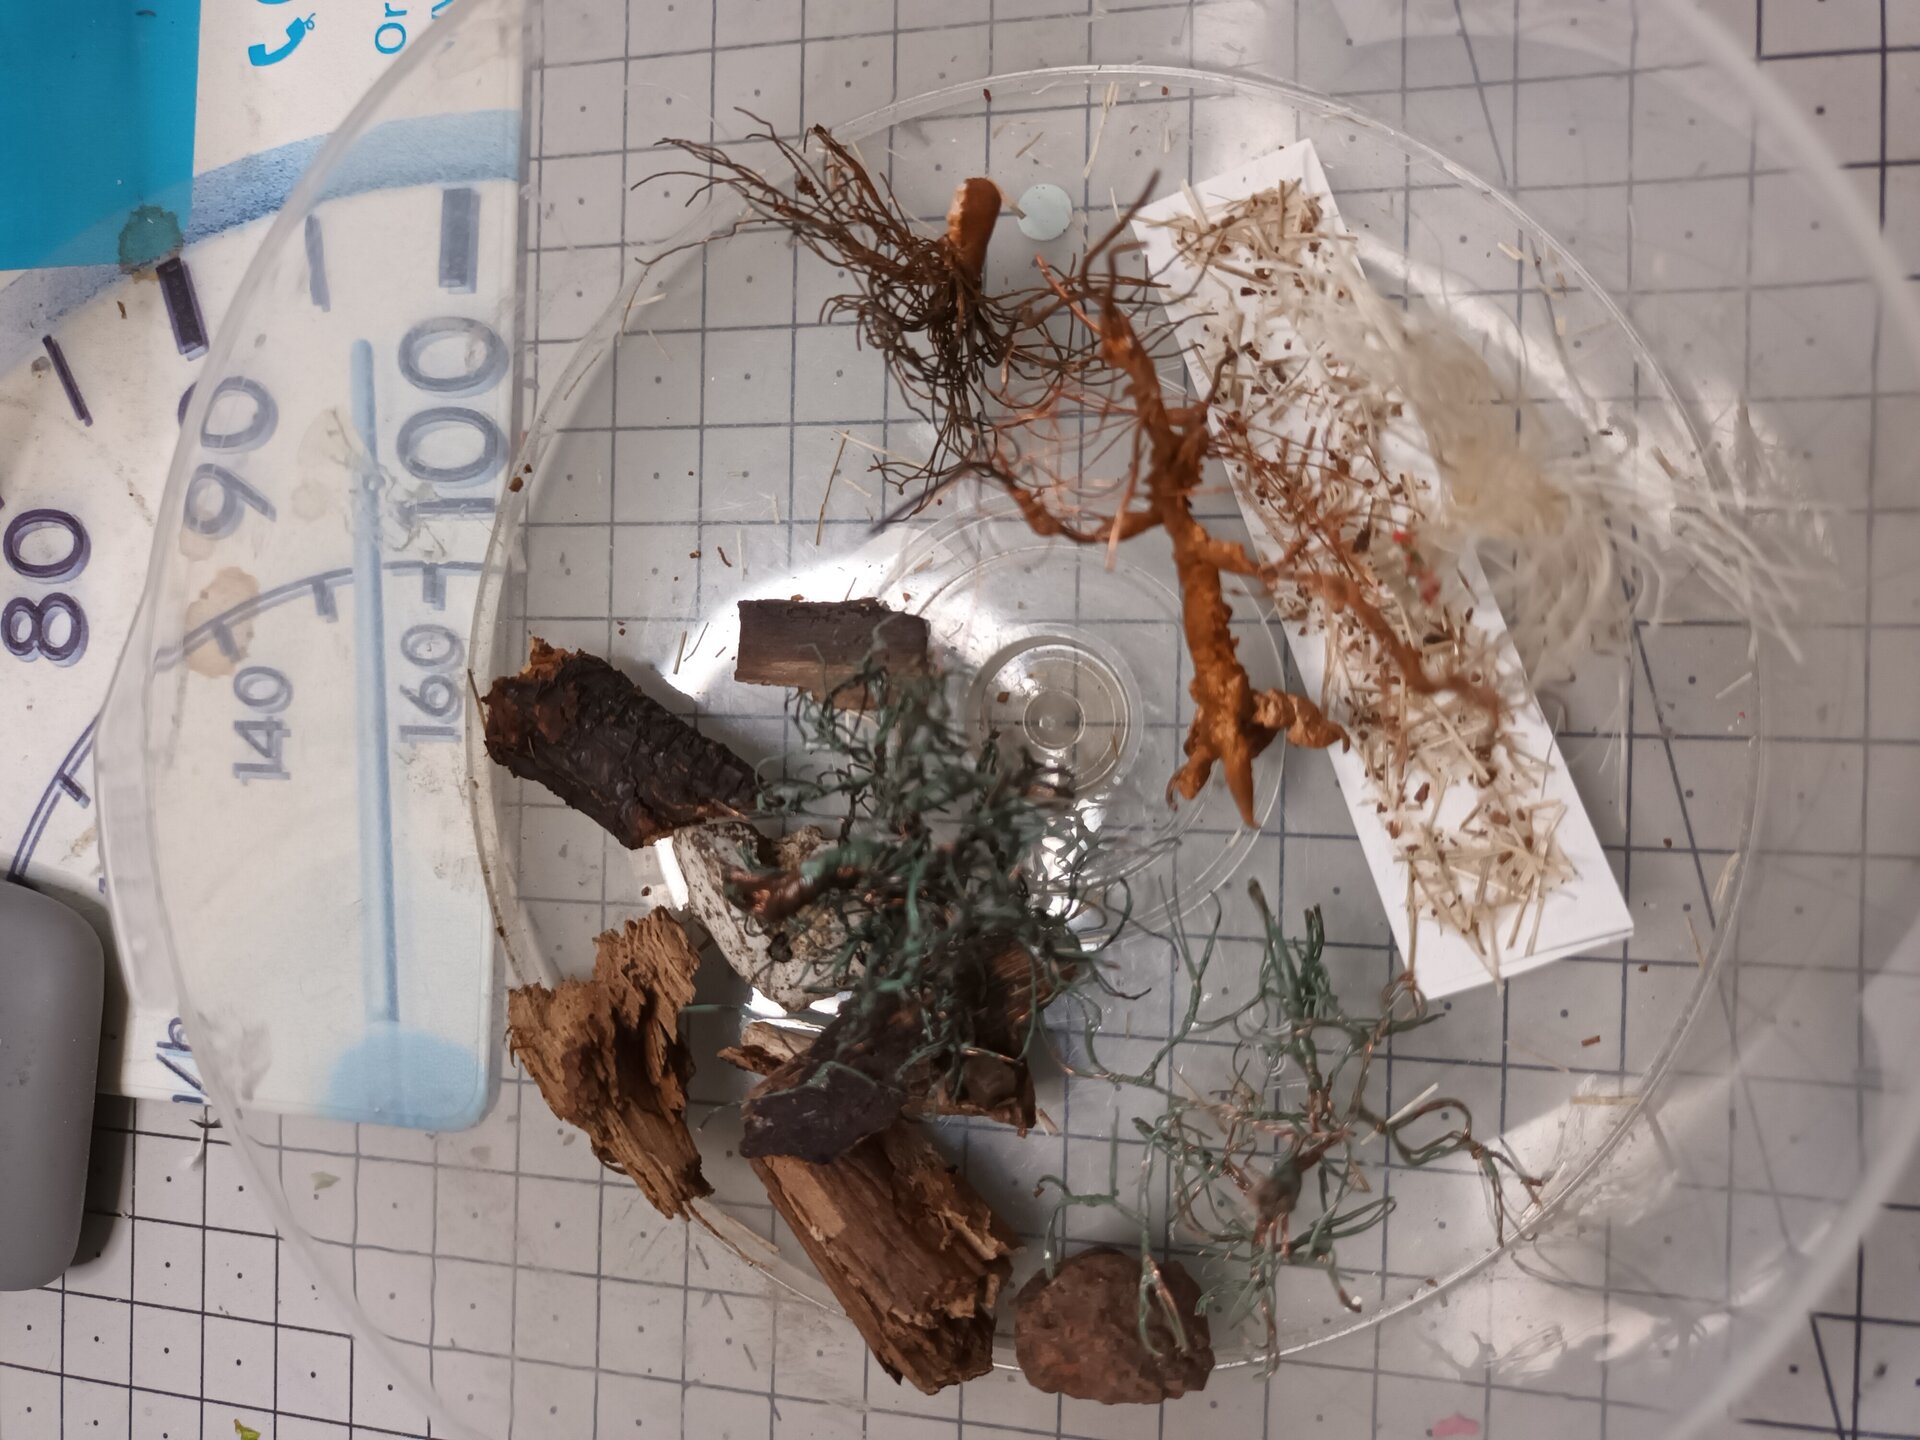
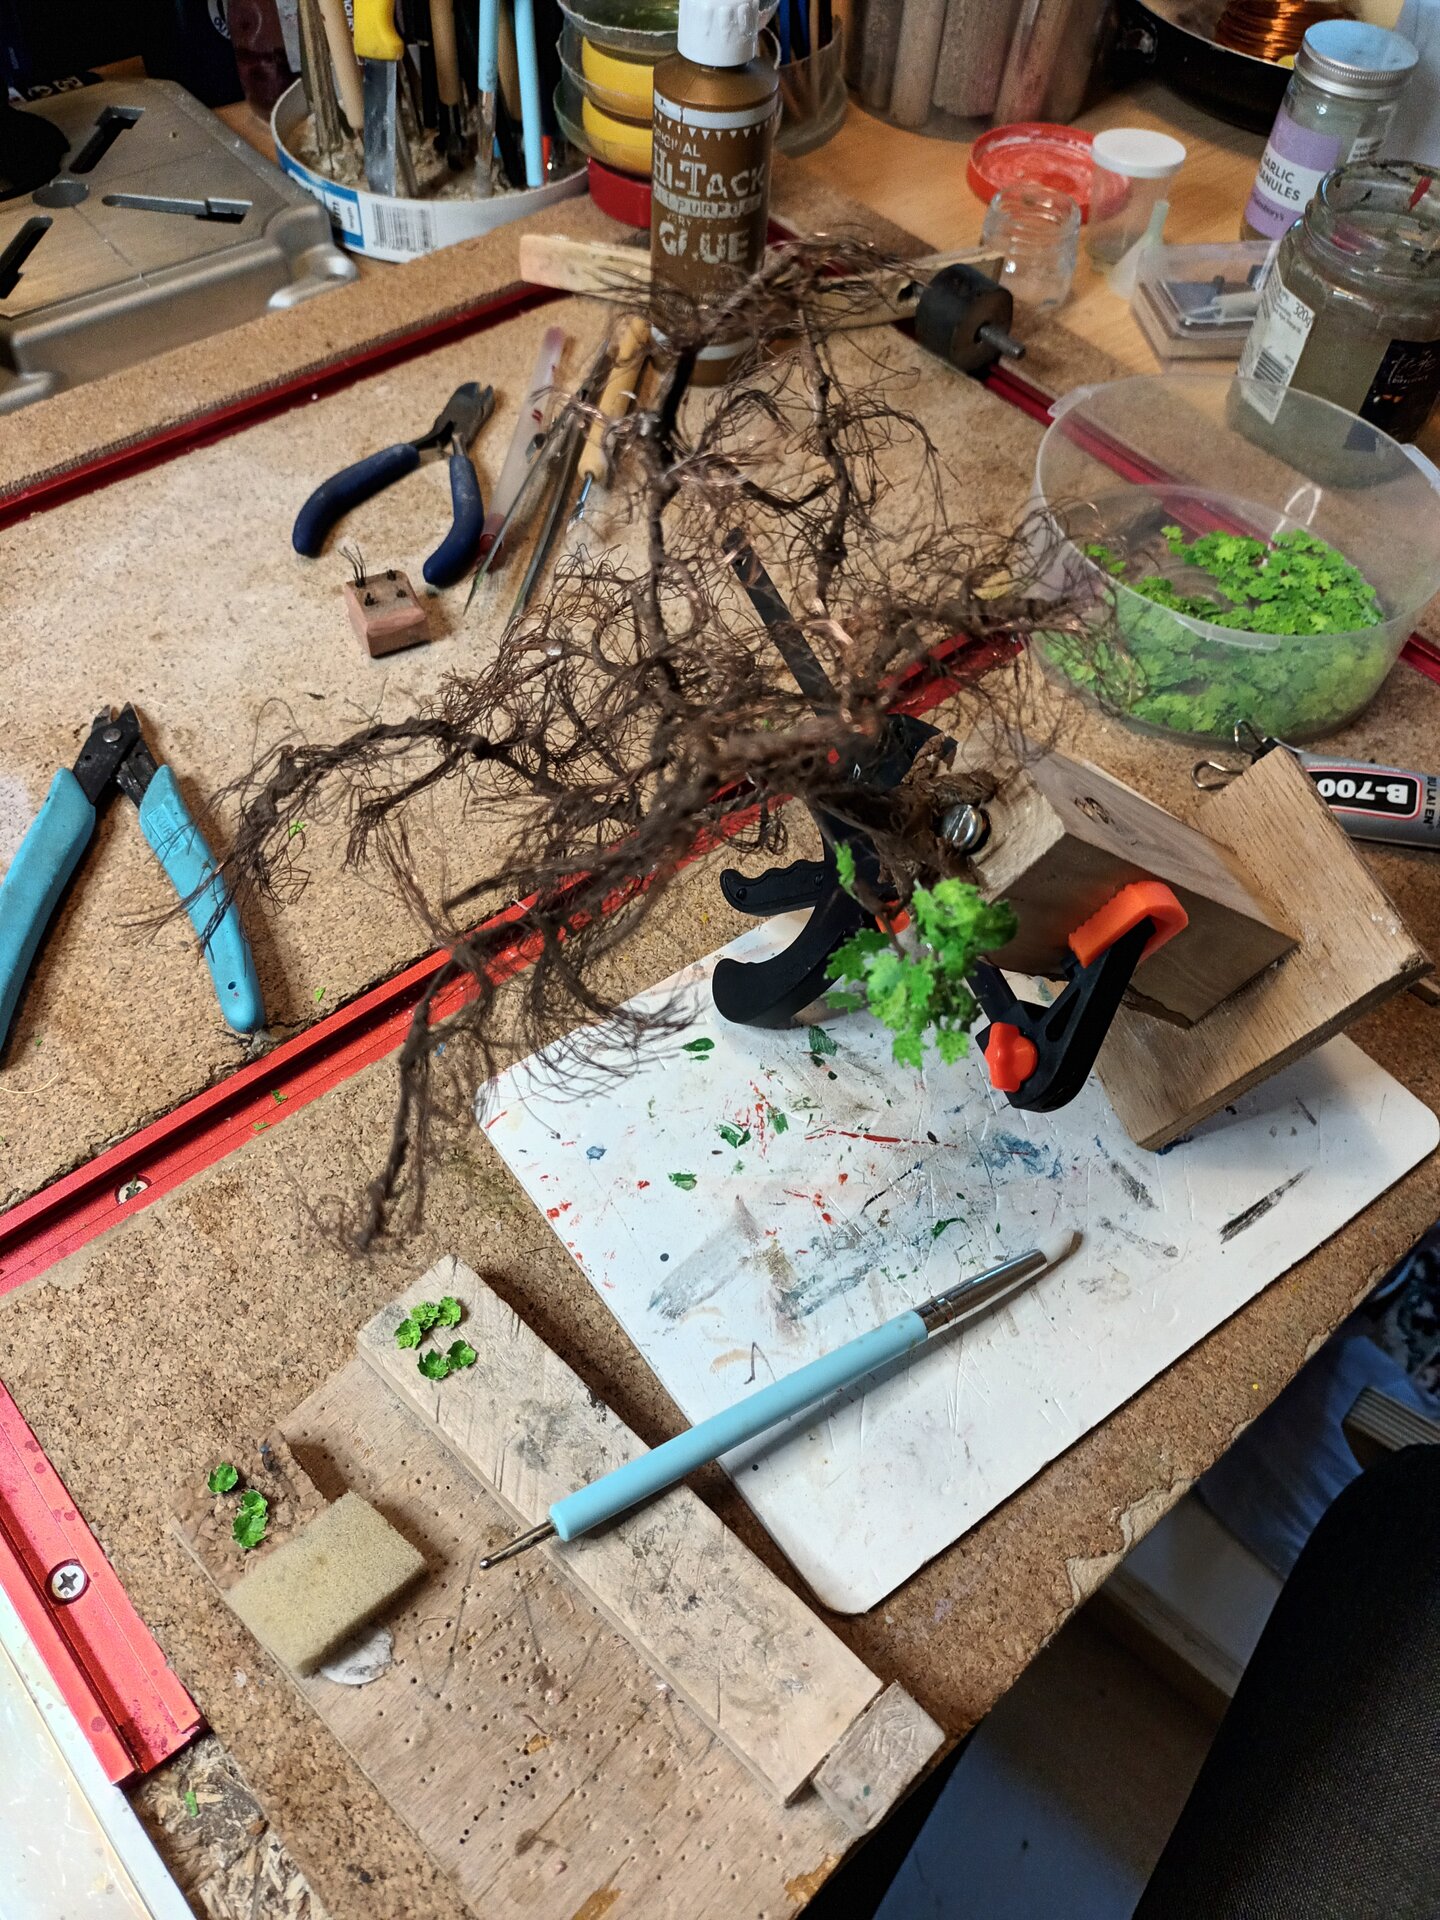
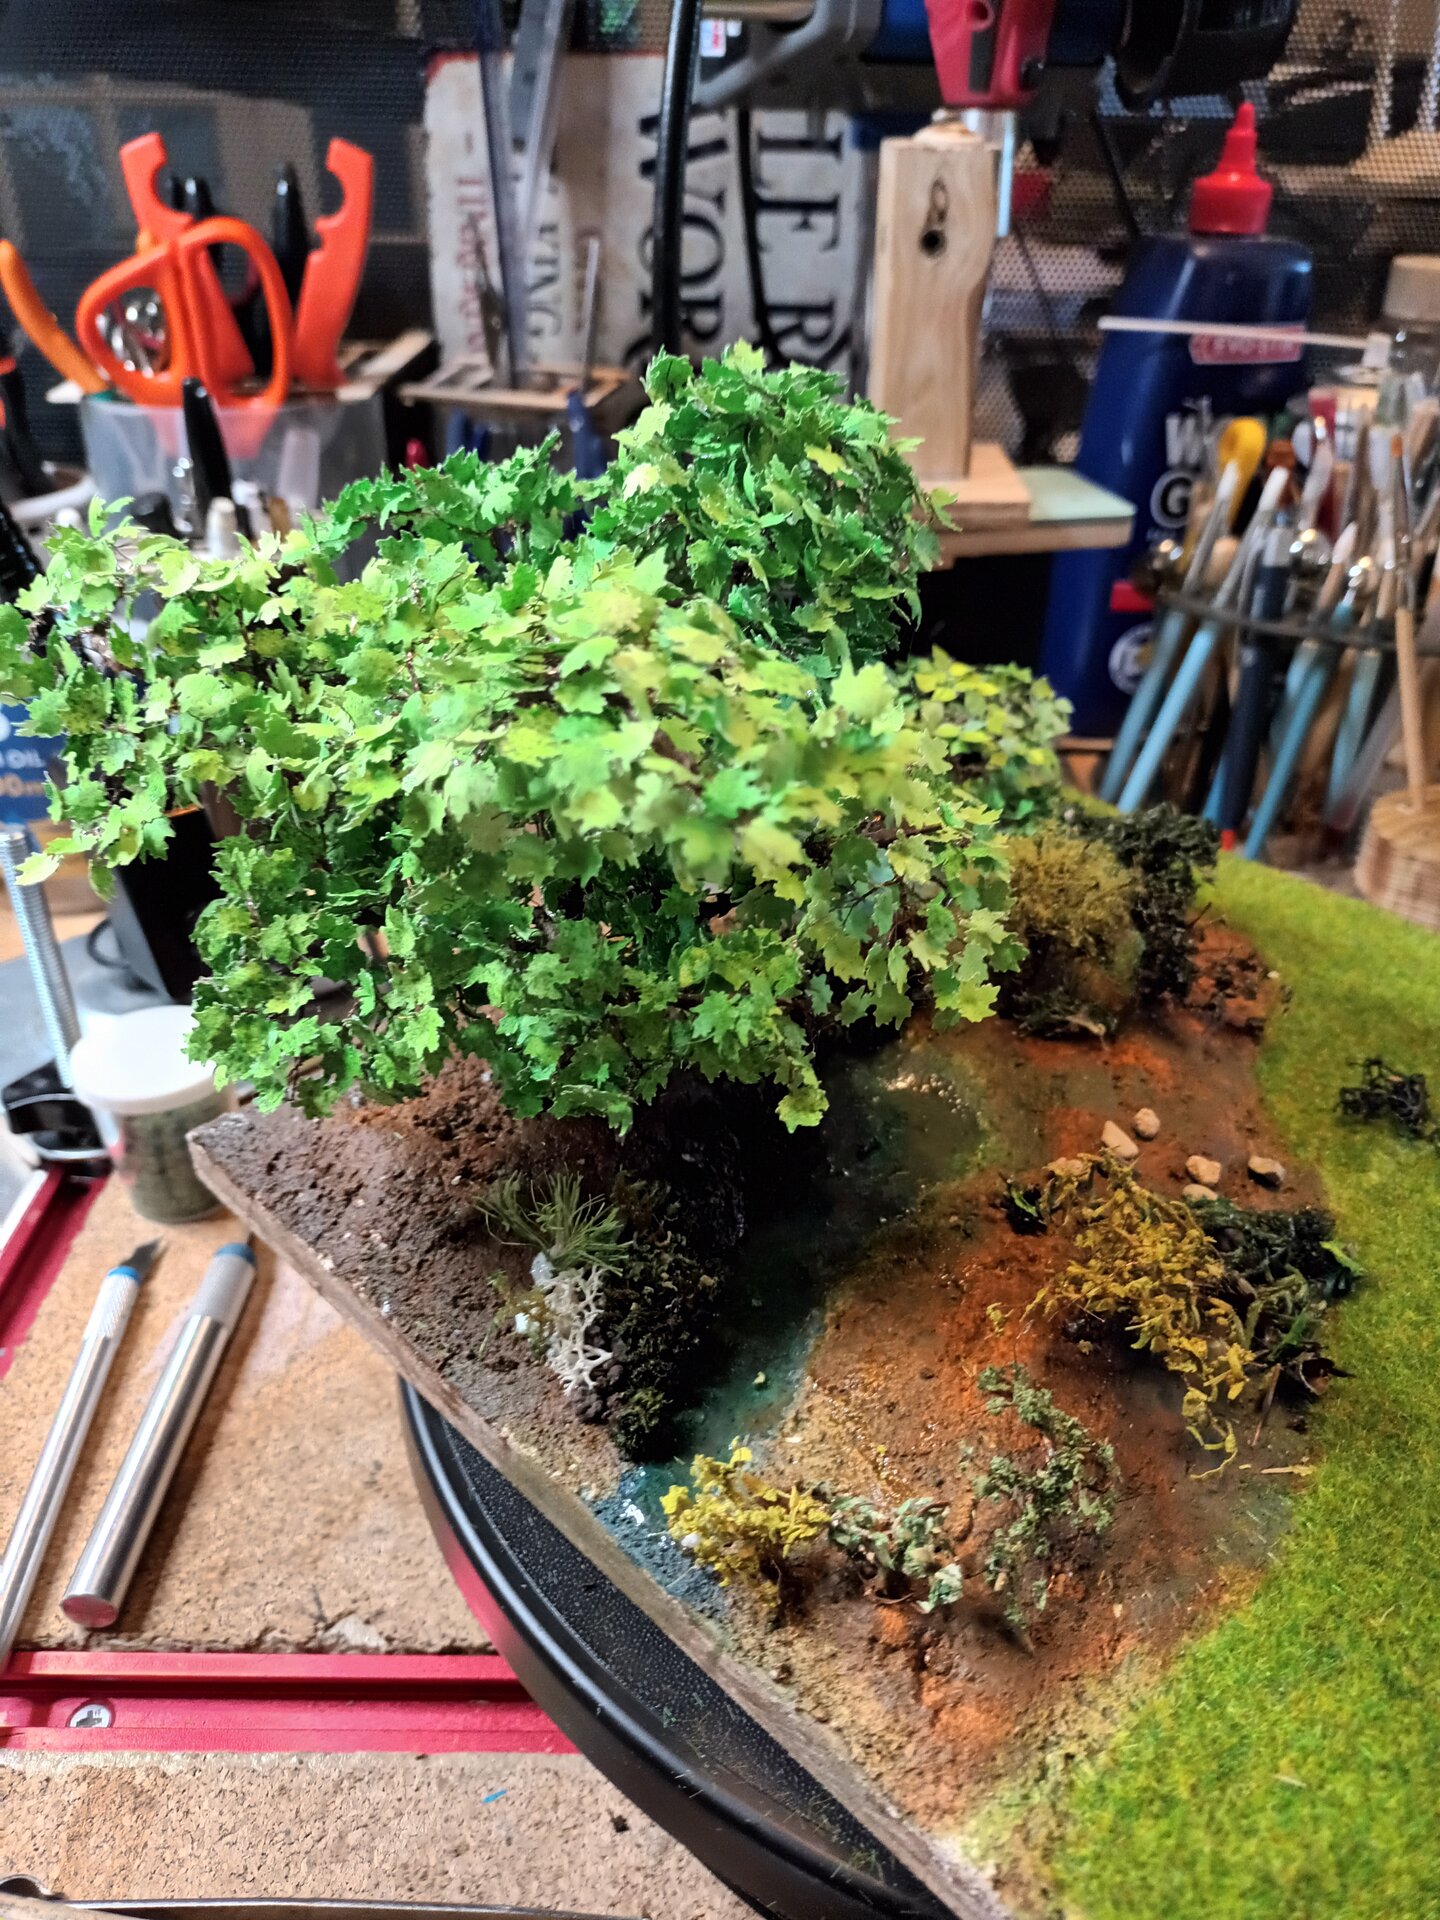
Tree Building Process:
- Wire armatures twisted to create realistic trunk and branch structures
- Texture added to trunks (paint, filler, or natural materials)
- Foliage materials prepared (sawdust, foam, or wire-and-paper leaves)
- Foliage attached in natural clumps and masses
- Final color refinement and highlights
Chapter 7: Grass and Groundwork
Researching Campsite Grass Appearance

Before finishing the grass, I spent time looking at various open space scenes in caravan parks. Real campsite grass has a different character from garden lawns or wild meadows - it’s more worn in places, has bare patches, and shows traffic patterns. Capturing this authenticity was important for the scene.
Static Grass Application - A New Technique
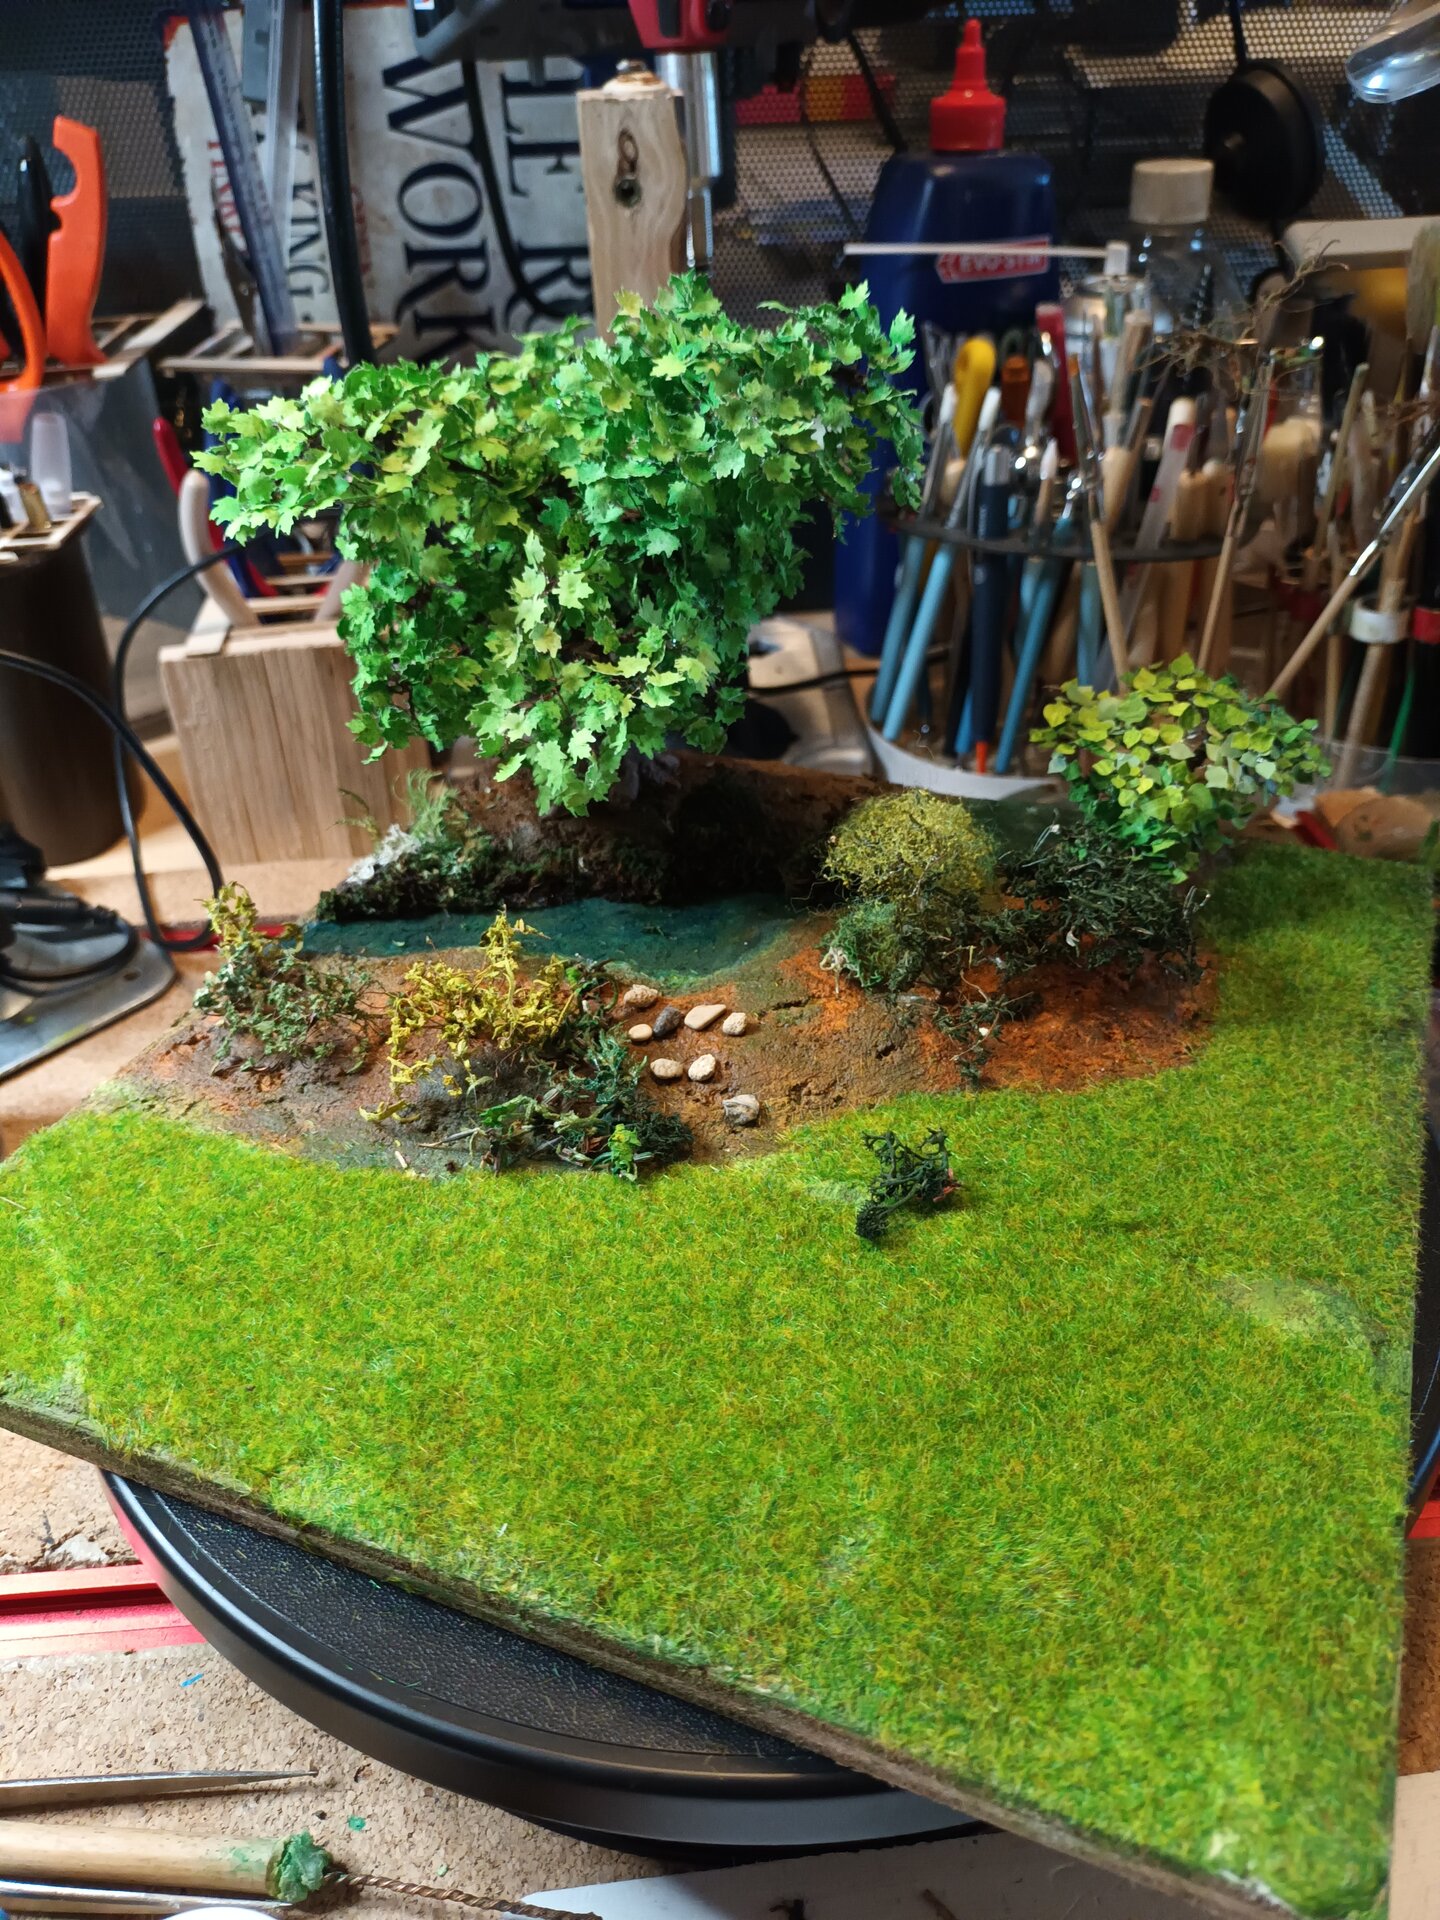
For the first time, I used a static grass applicator to create the green grass around the caravan. This tool uses static electricity to make grass fibers stand upright, creating a much more realistic effect than glued-down fibers.
Static Grass Lessons:
- Apply glue in sections (it dries quickly)
- Use varied grass lengths for natural appearance
- Mix colors slightly for depth and realism
- Create worn pathways by leaving some areas less densely grassed
- Seal with diluted matte medium after application
The static grass created exactly the well-maintained but lived-in campsite appearance I was aiming for.
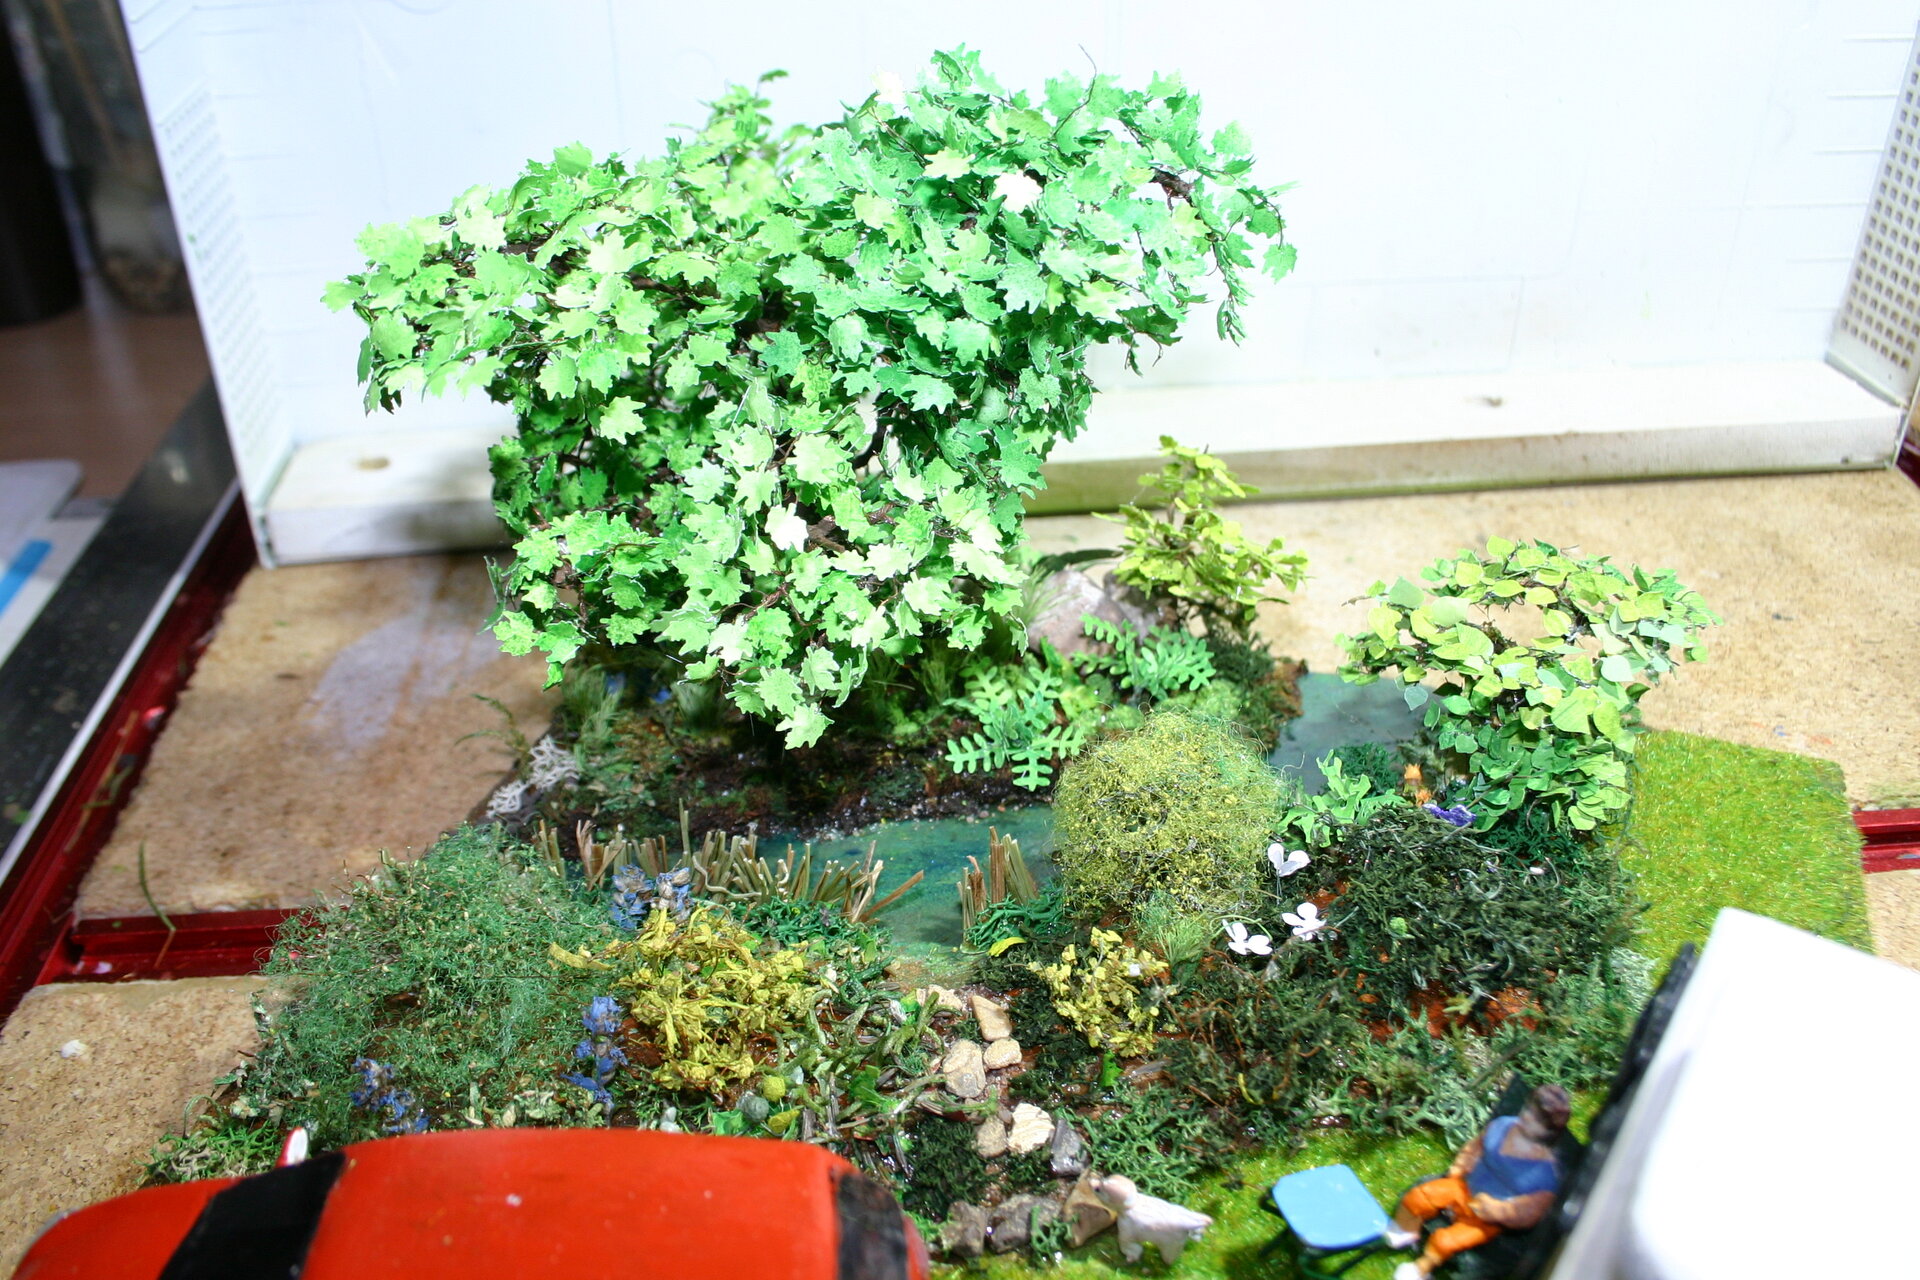
Chapter 8: The River - Getting It Right This Time
After the less-than-convincing river in the Log Cabin project, I was determined to improve my water effects for this commissioned piece.
River Research
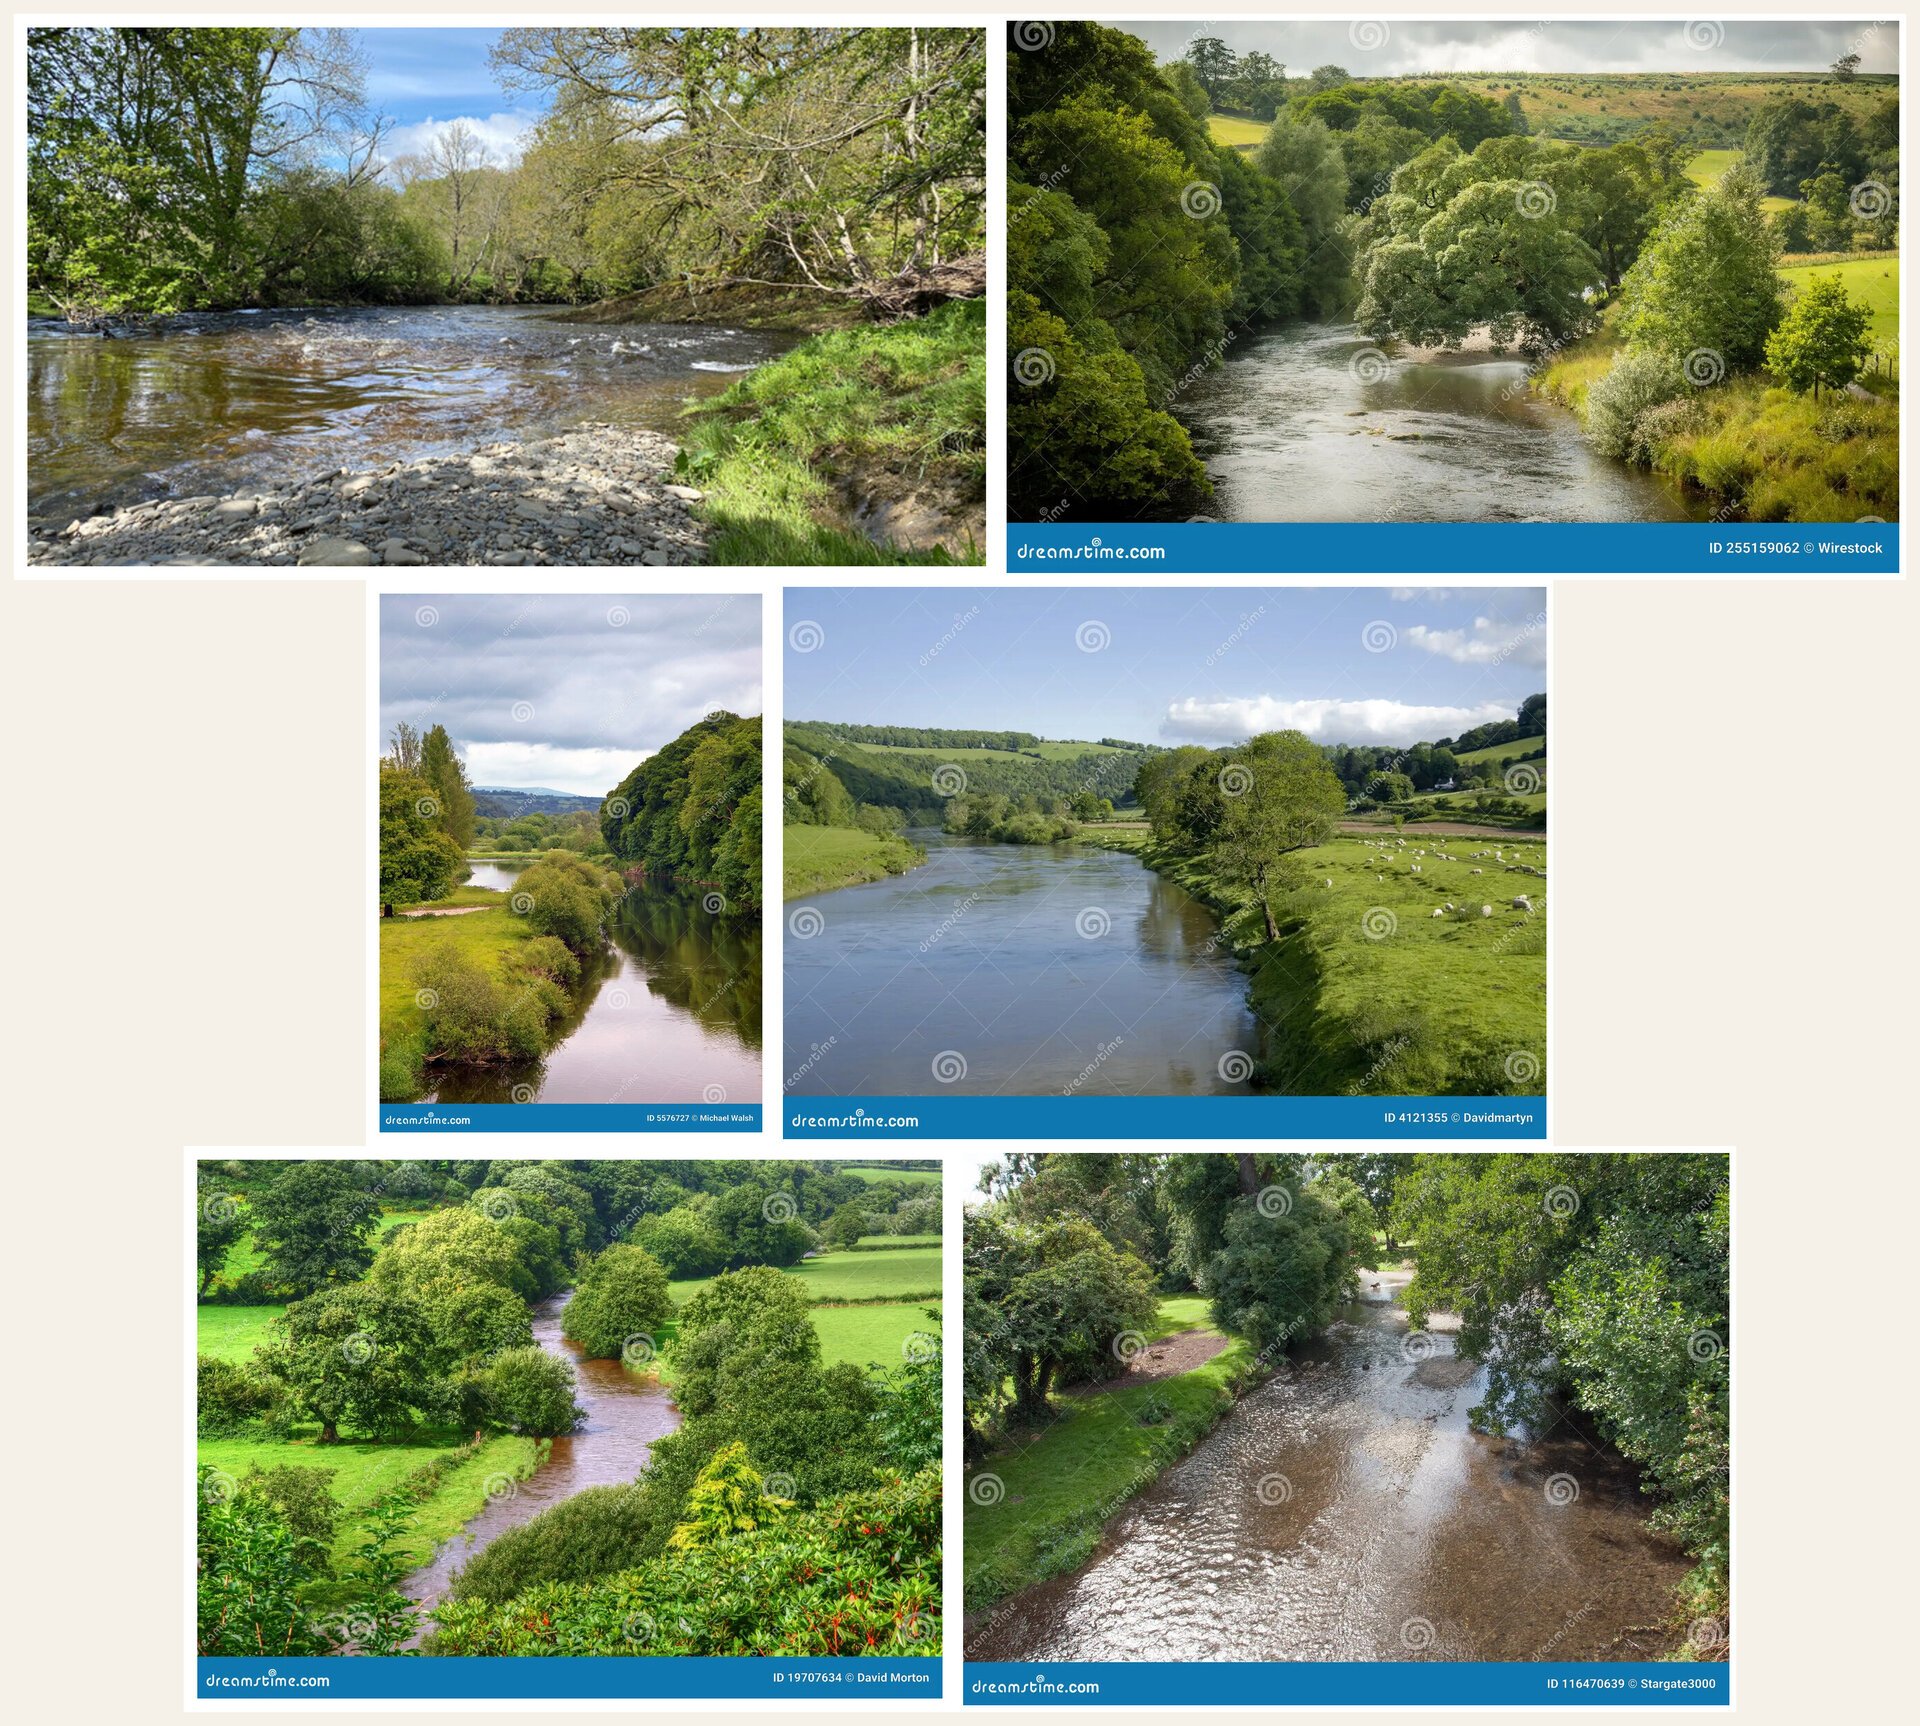
I studied real river scenes carefully, paying attention to:
- Water color in shallow vs. deep areas
- Bank transitions from grass to water
- River bed visibility through clear water
- Vegetation patterns at the water’s edge
- Surface texture - is it still or flowing?
River Construction Process
Building the Riverbed:
- Shape the Base: Carved the river channel into the baseboard
- Texture the Bed: Added small stones, sand texture for the bottom
- Paint in Layers:
- Dark brown/green base for depth
- Lighter colors for shallow areas
- Subtle variations for natural appearance
Applying the Water Effect:
- Clear Resin Layer: Poured clear casting resin for the water surface
- Leveling: Ensured even thickness for realistic depth
- Curing: Allowed full cure time (24-48 hours) for crystal clarity

The resin technique was far more successful than my previous attempts. The key lesson: proper preparation of the riverbed and patient layer building creates convincing water effects.
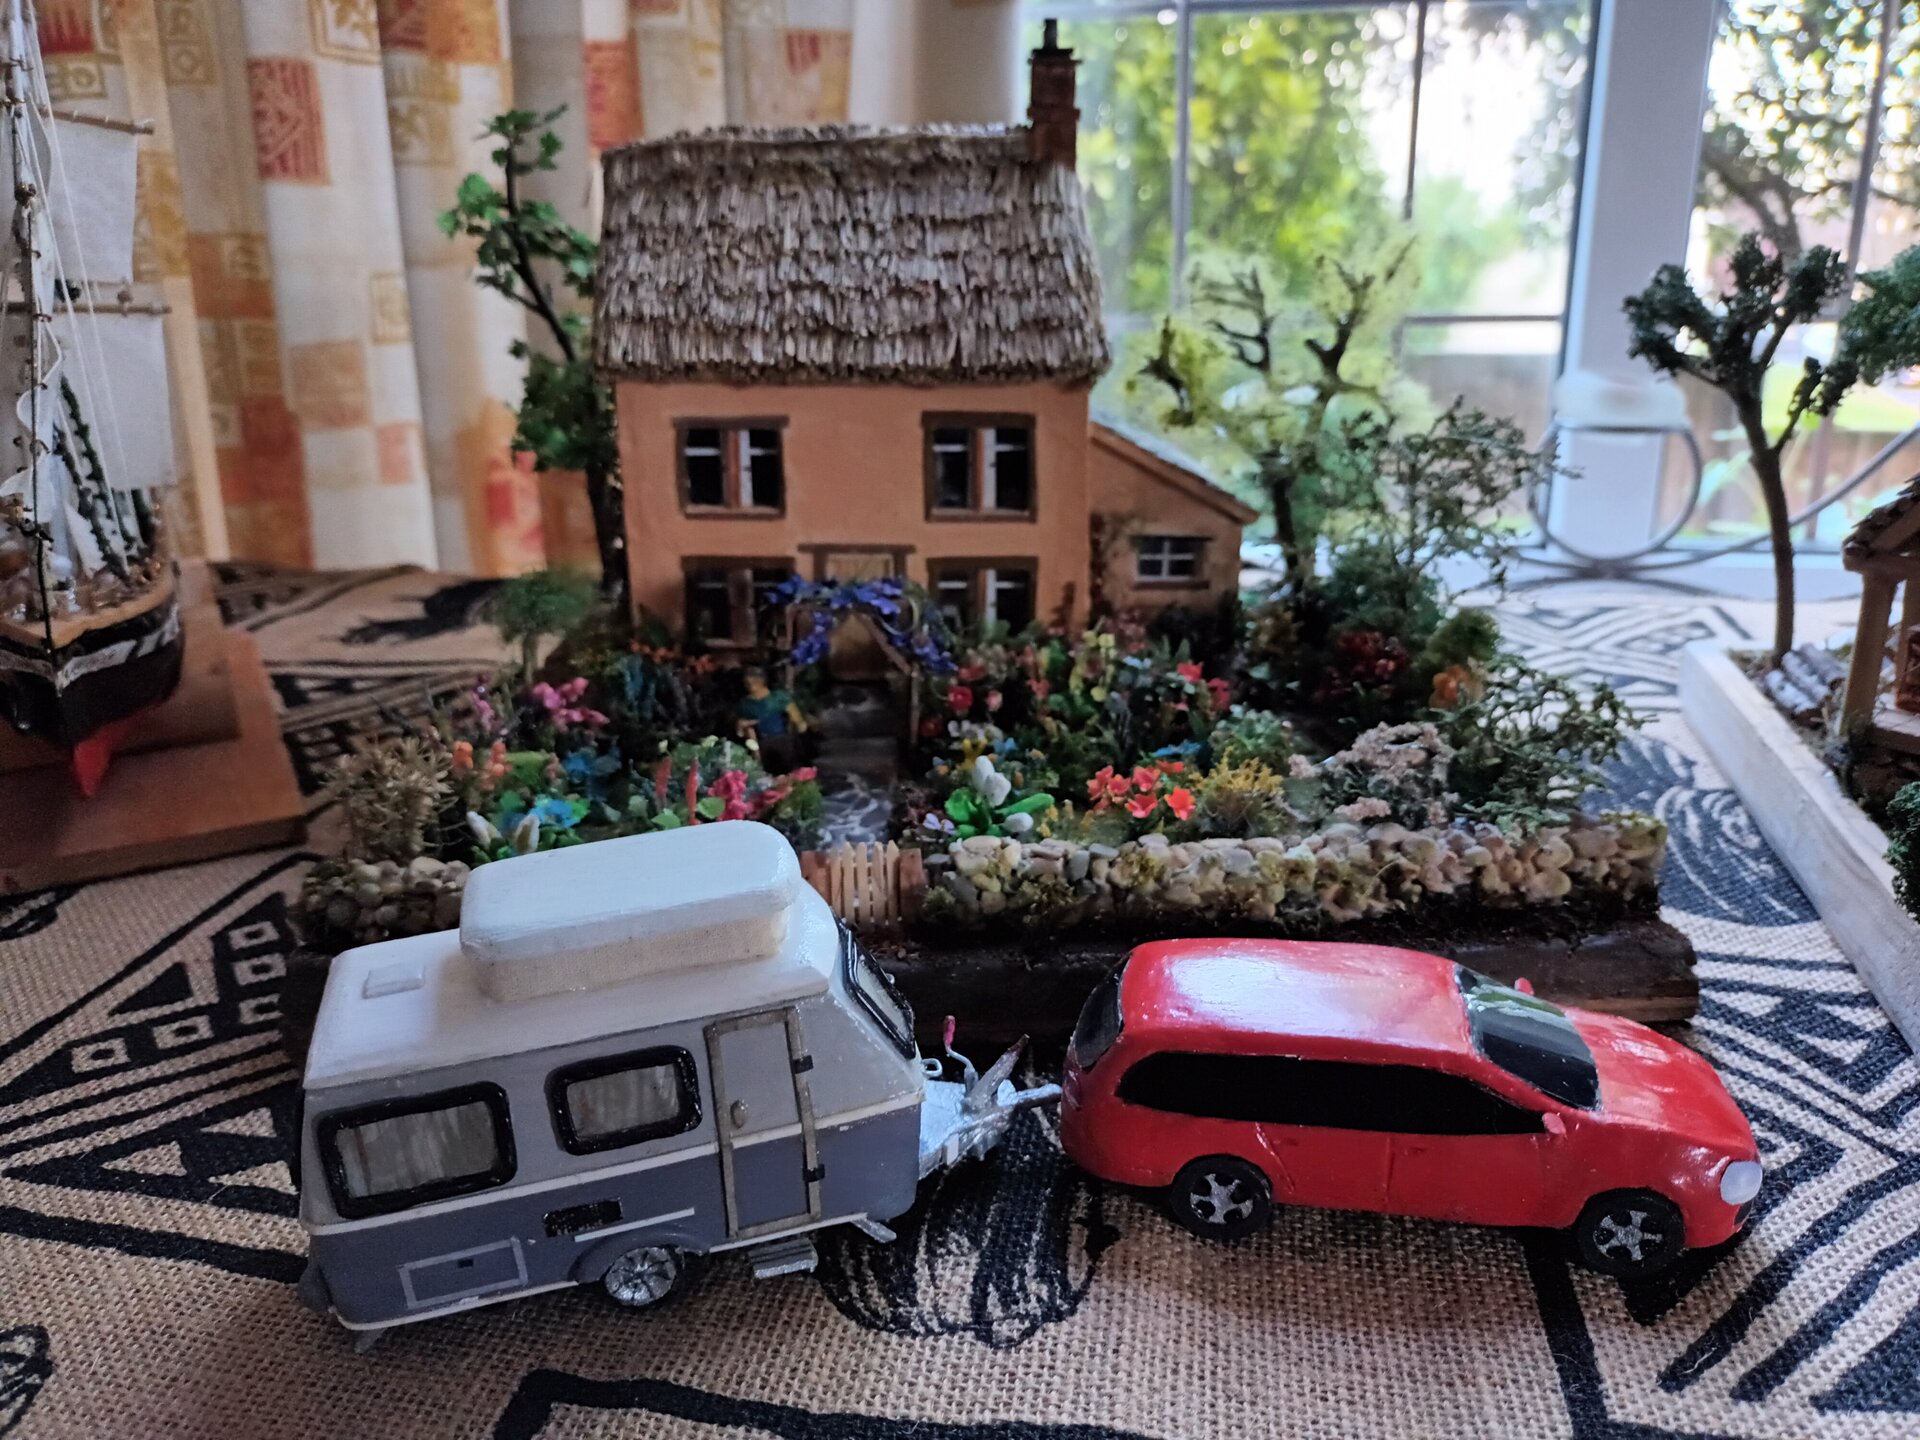
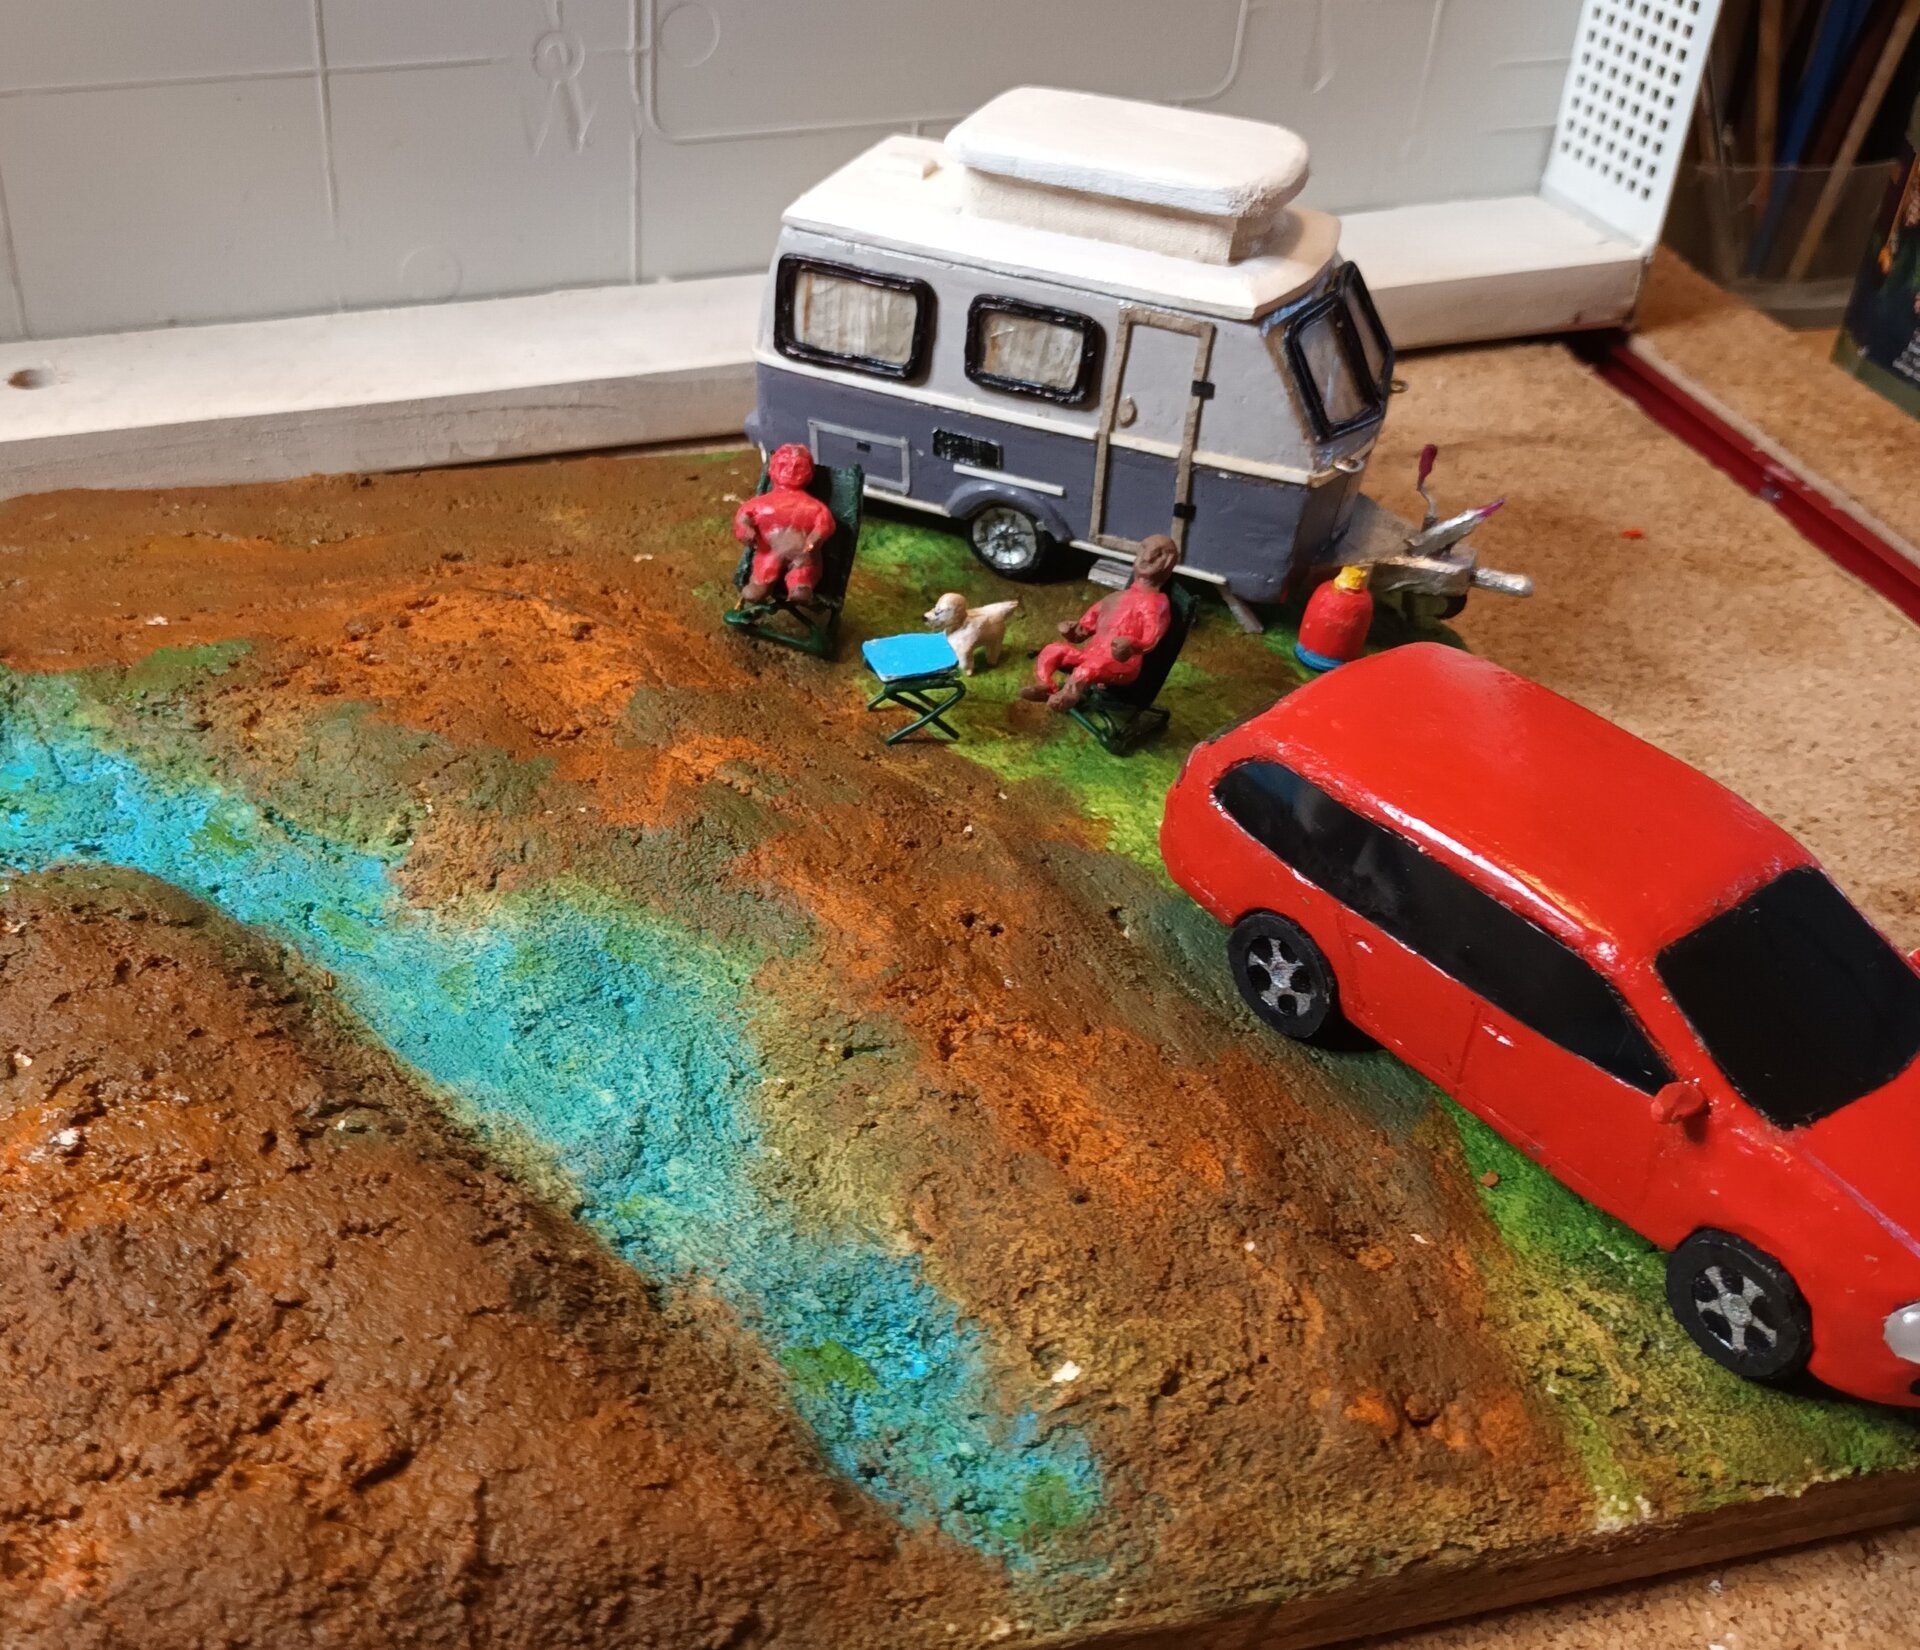
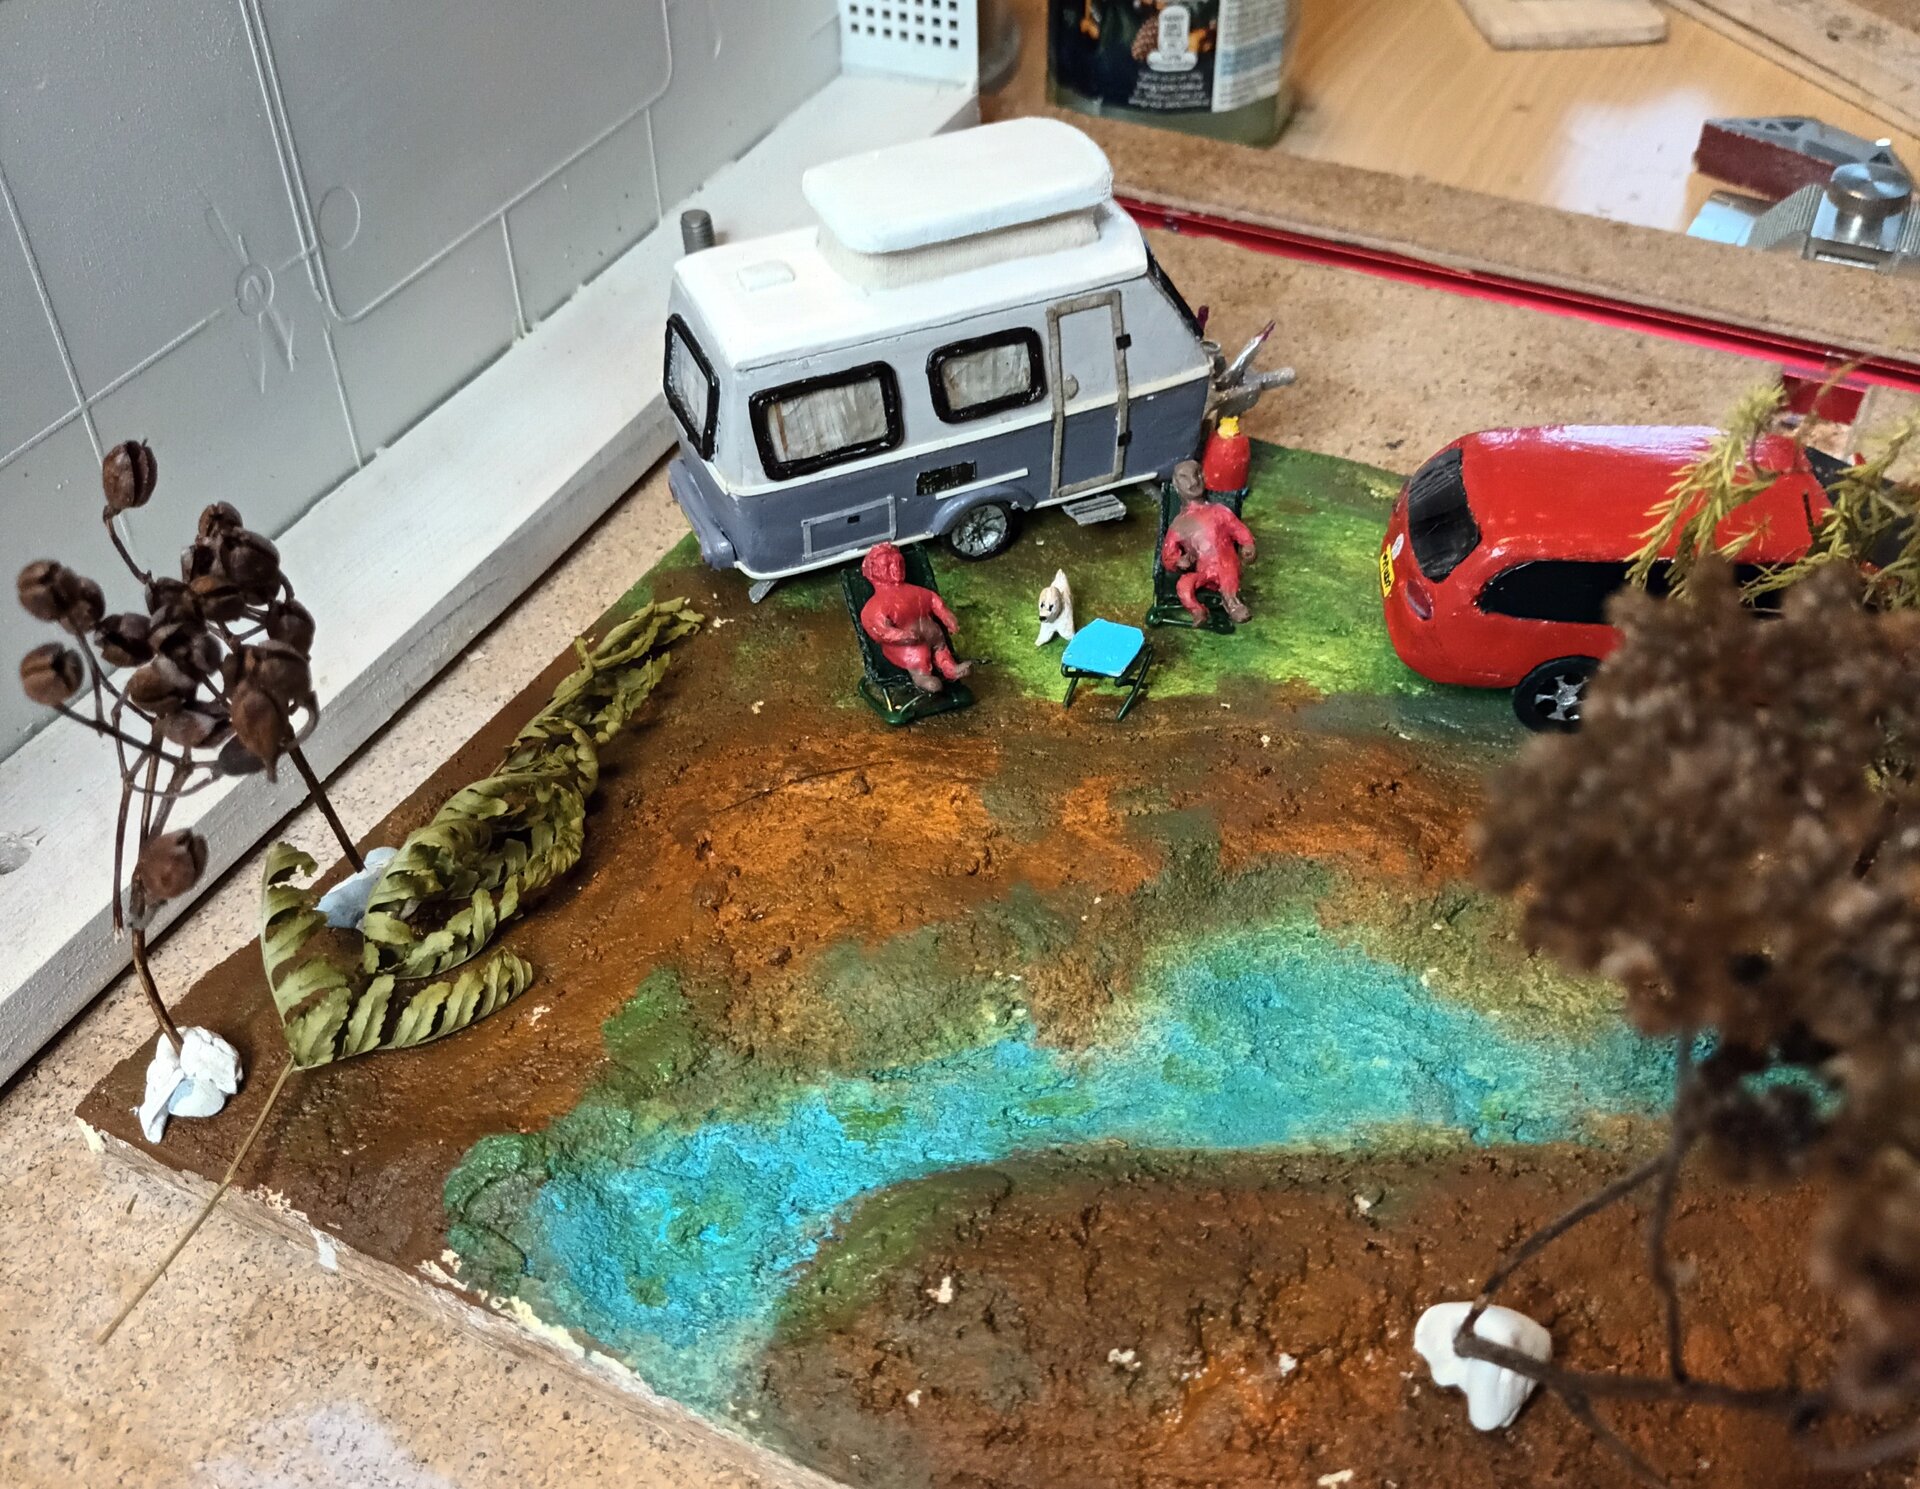
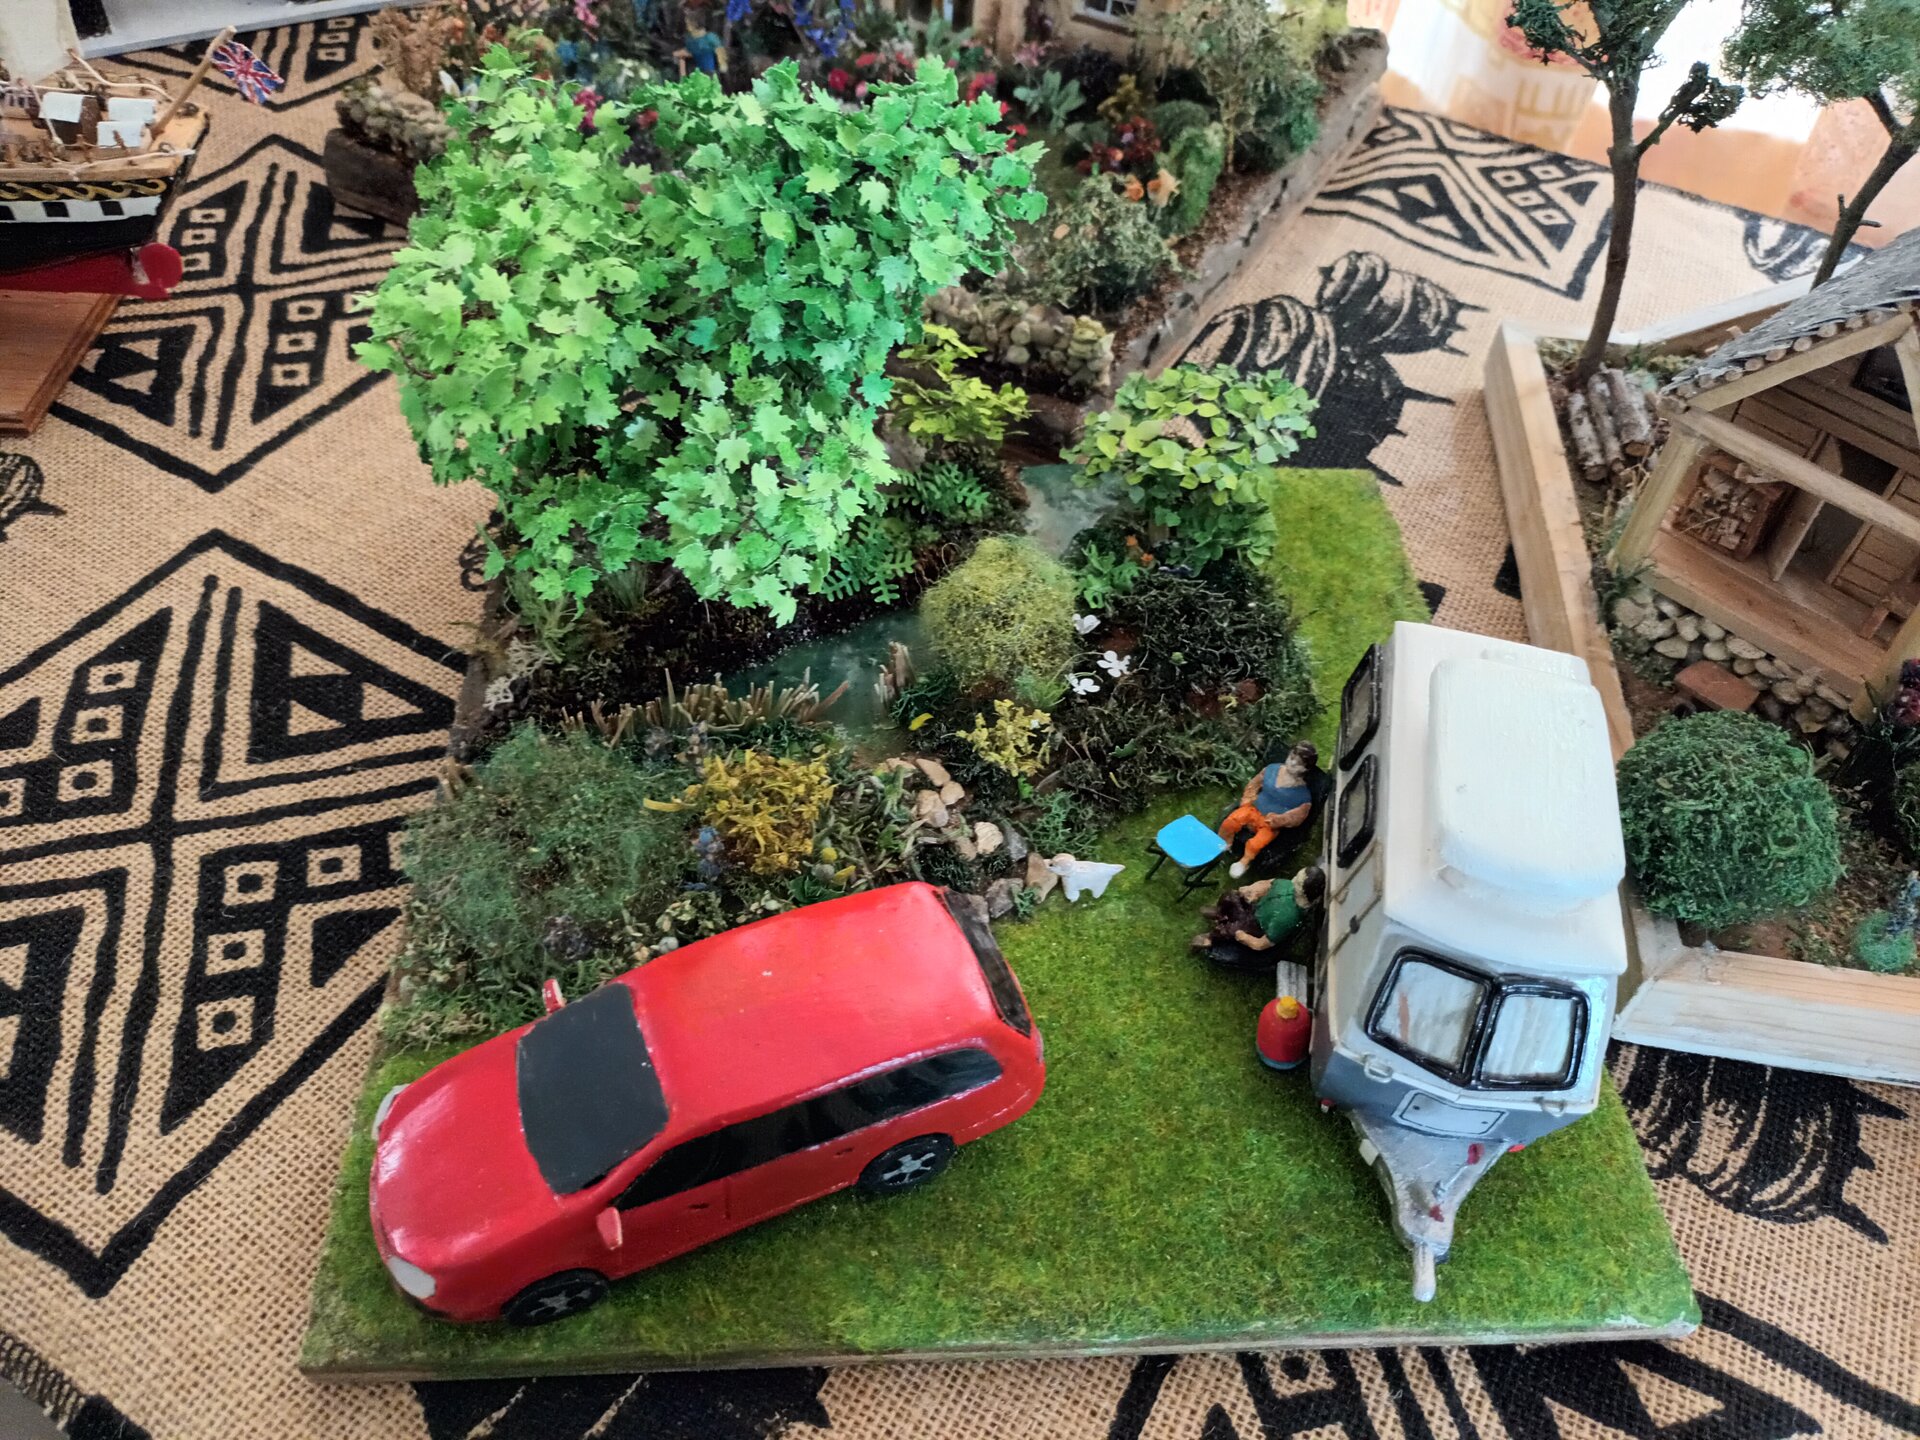
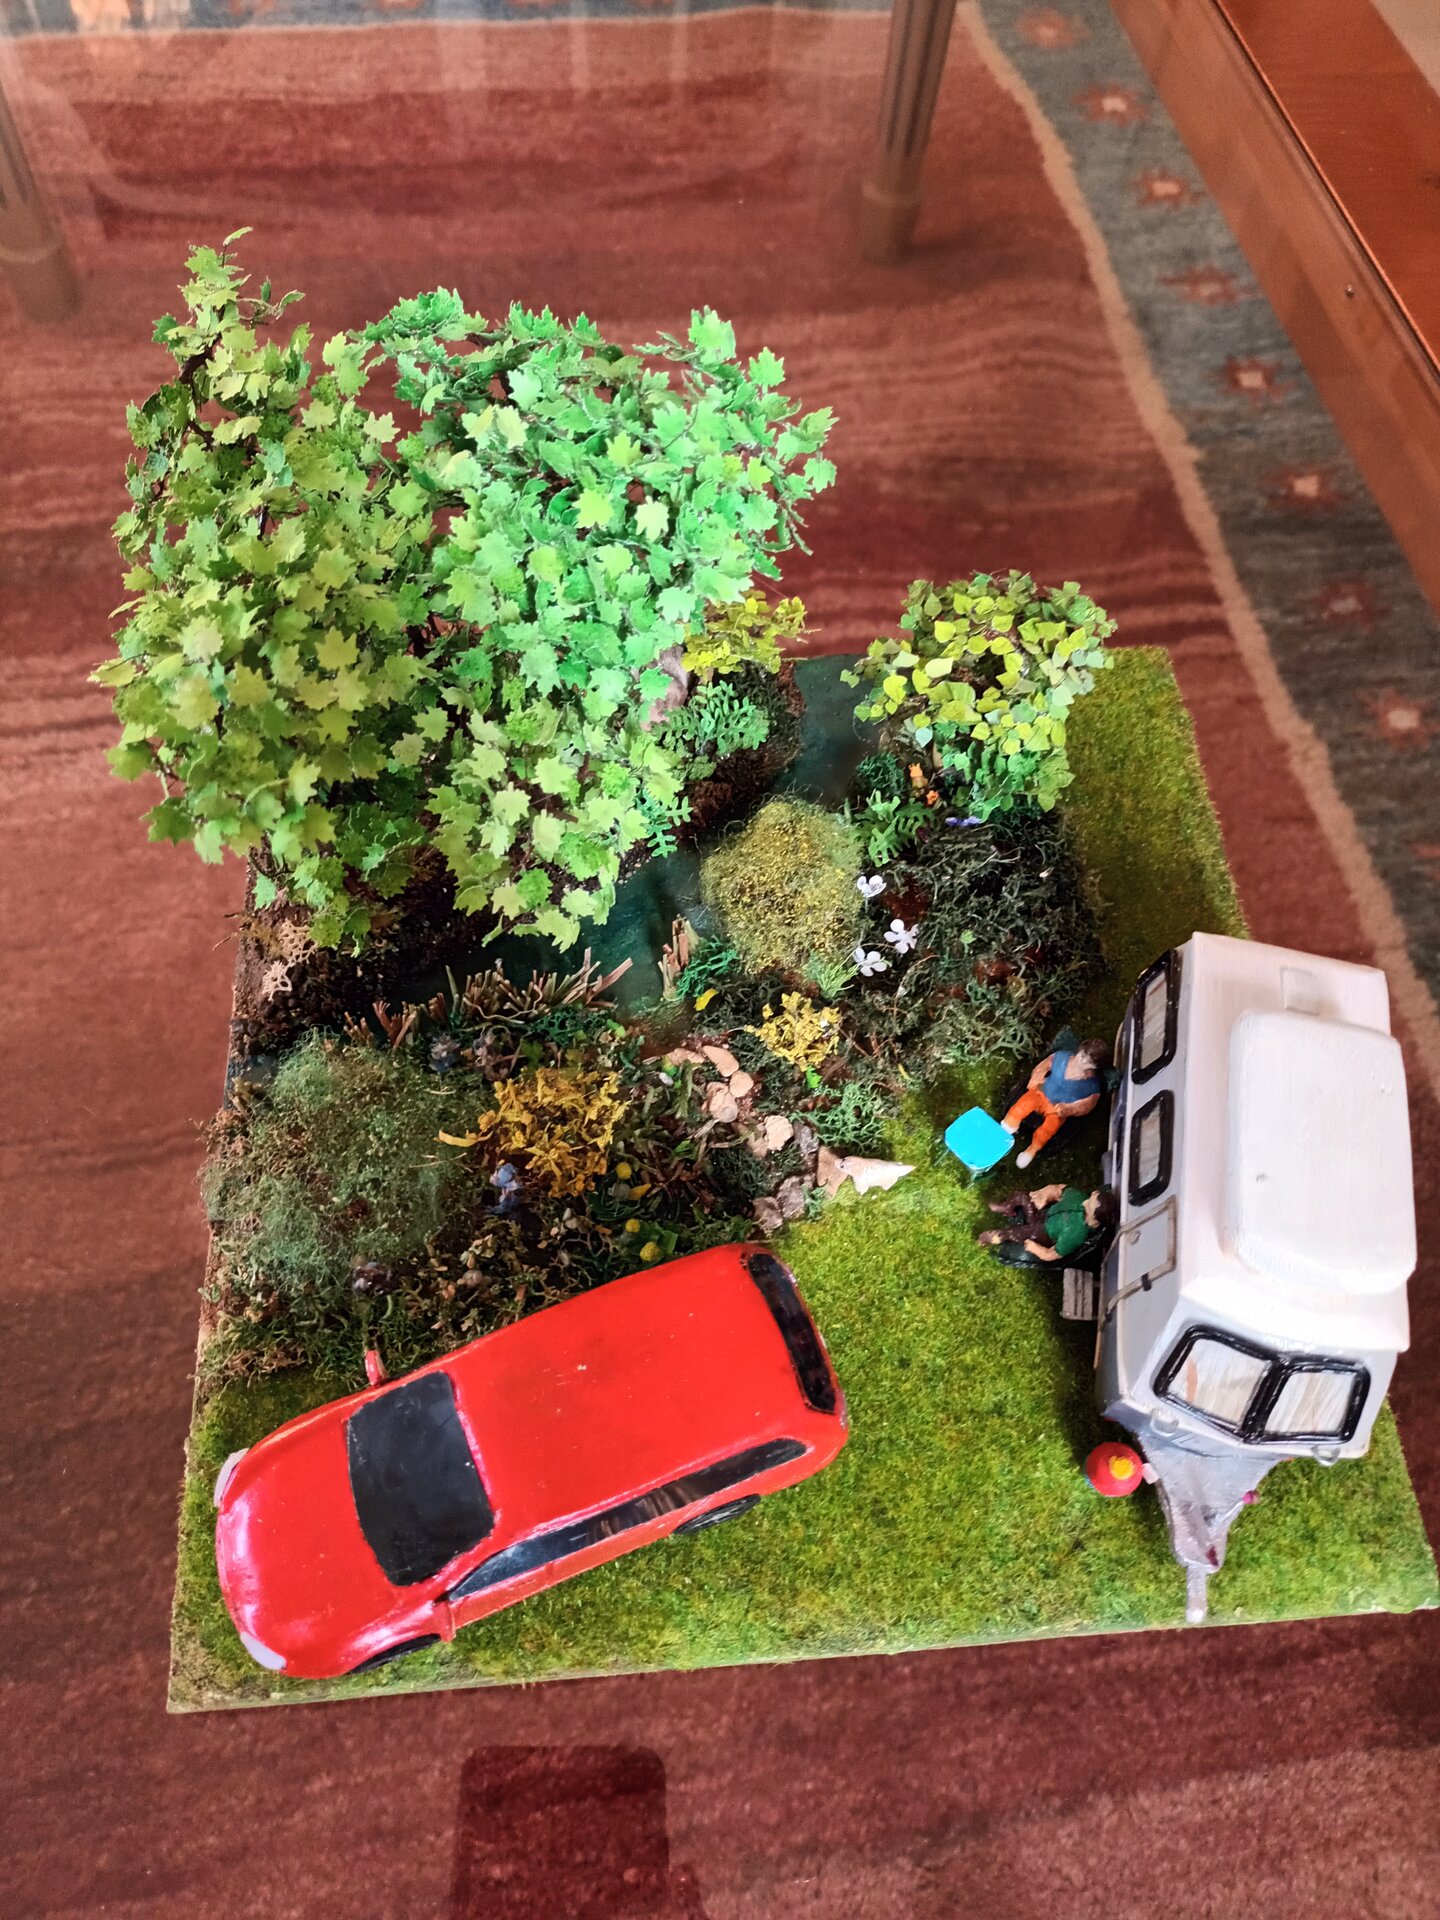
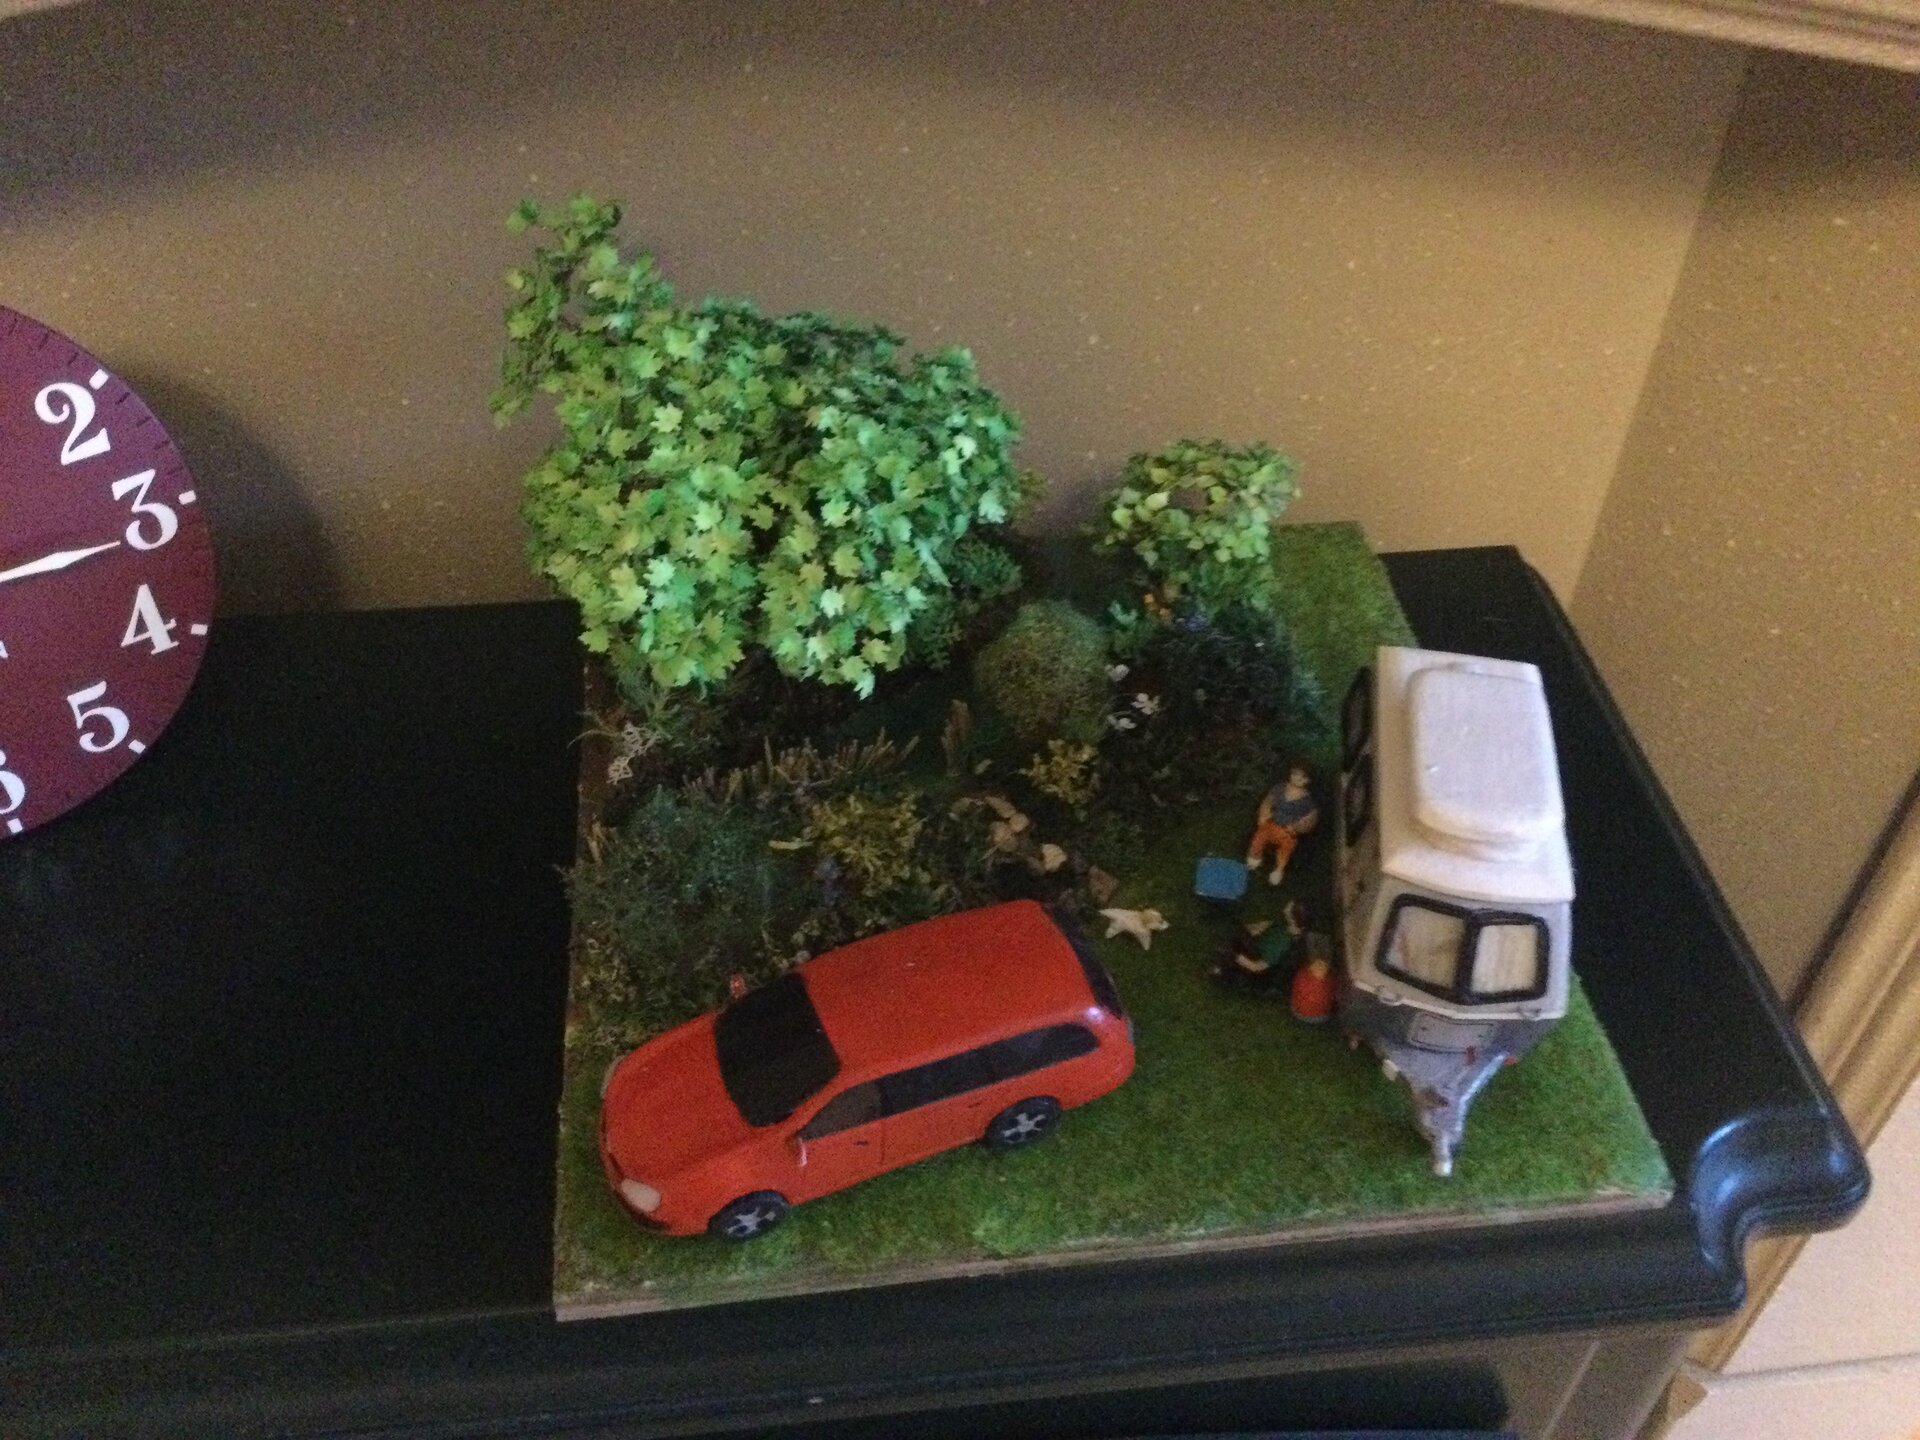
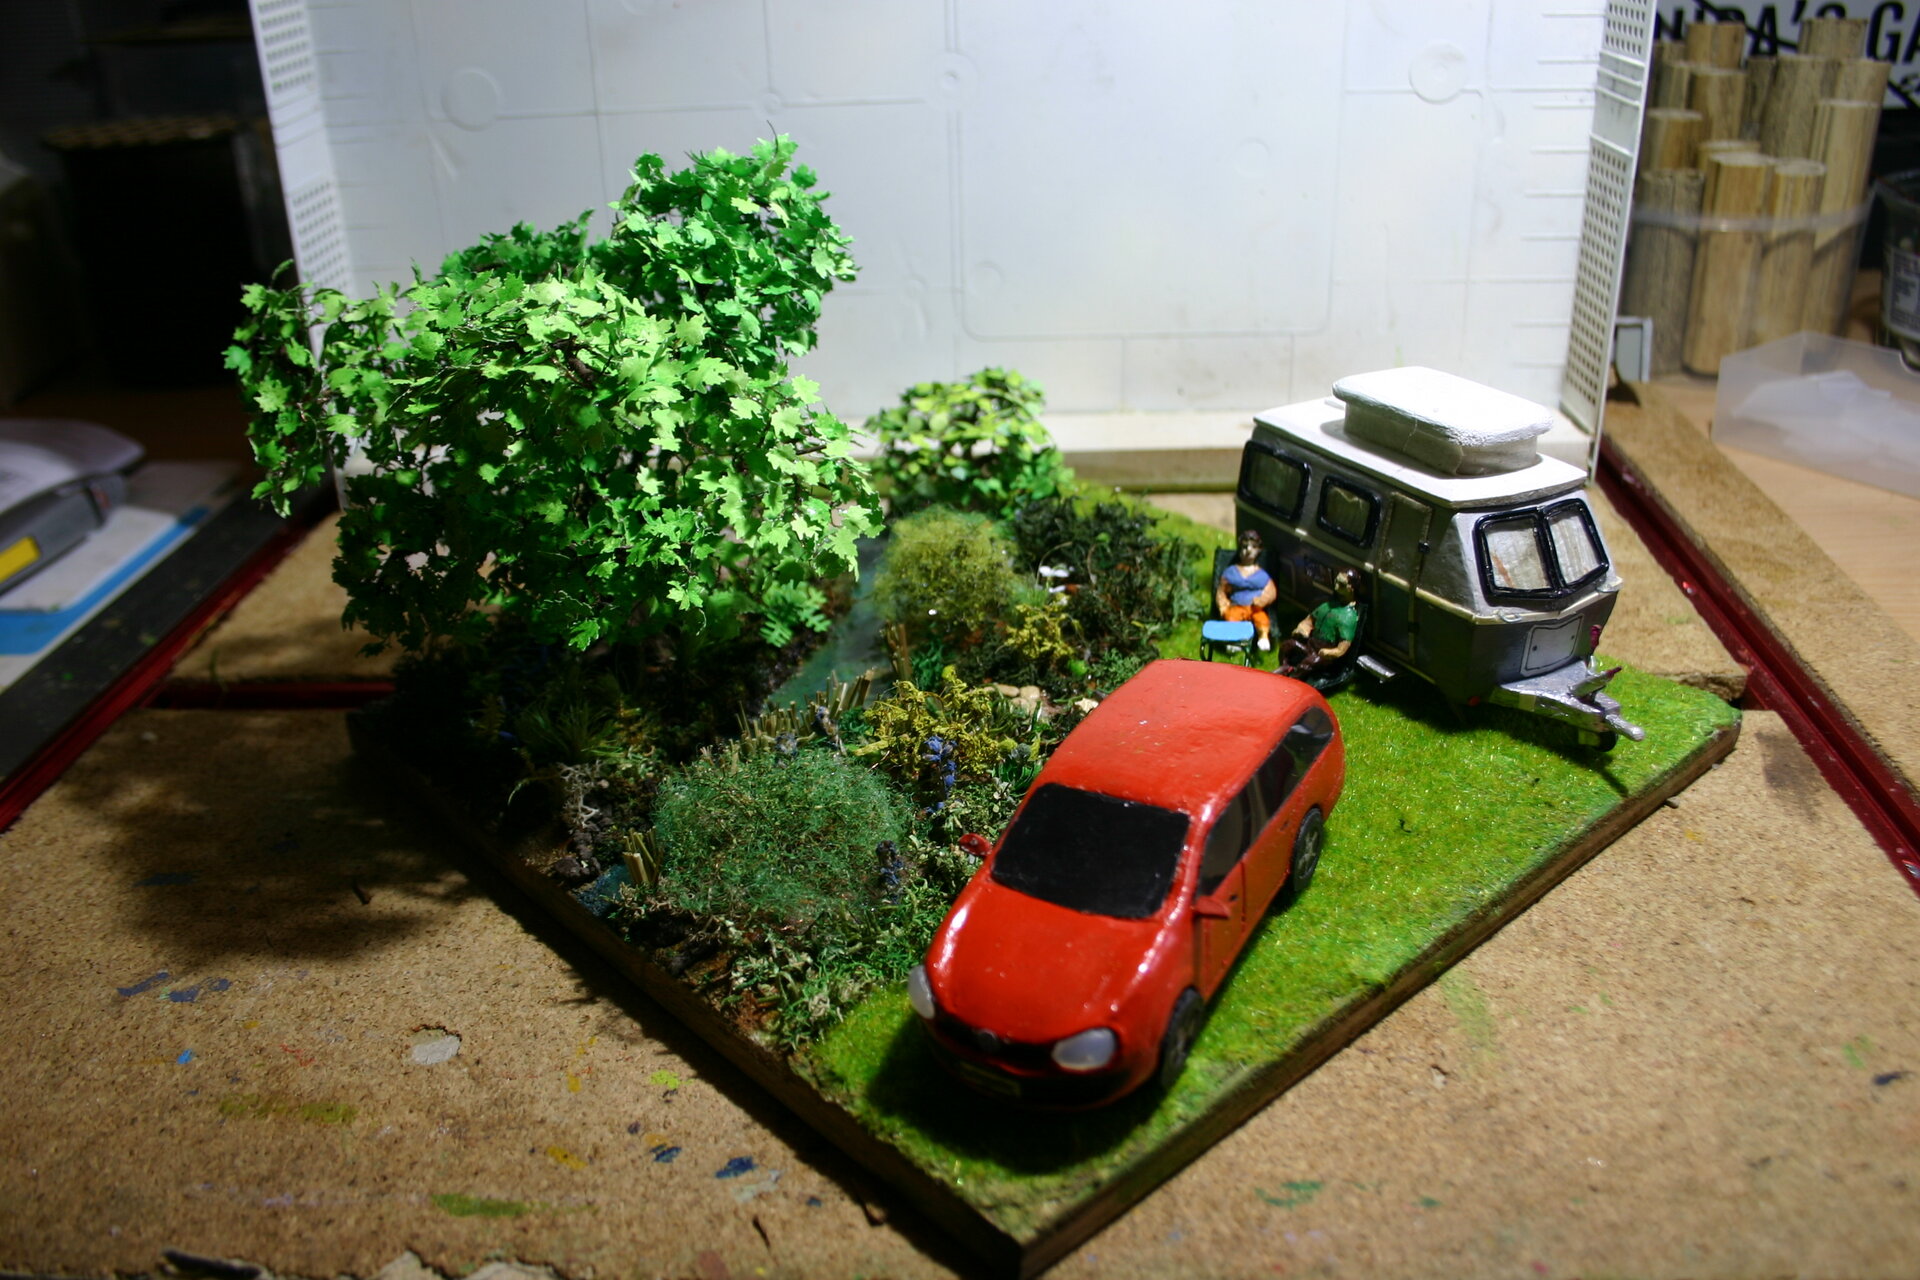
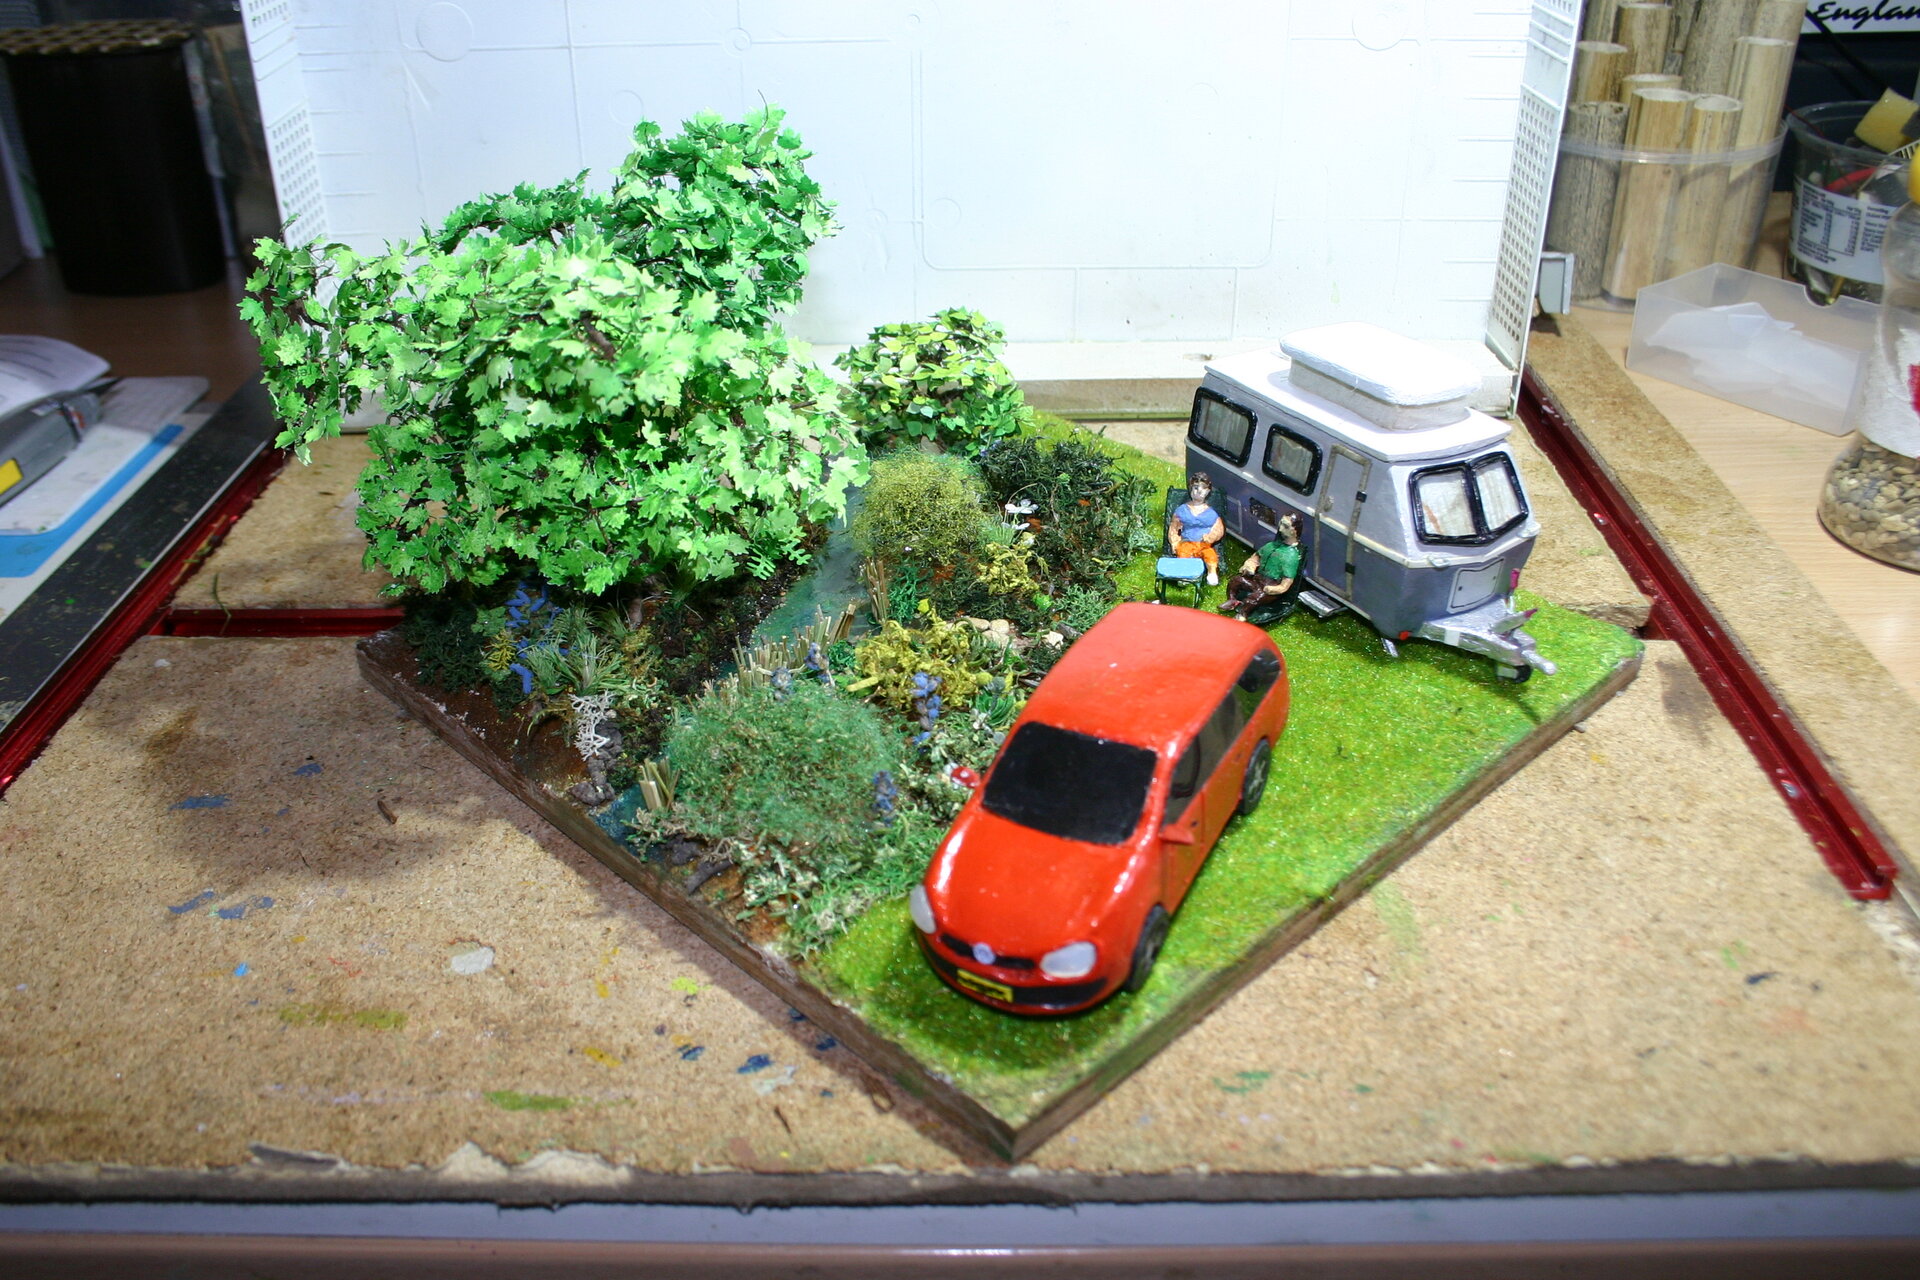
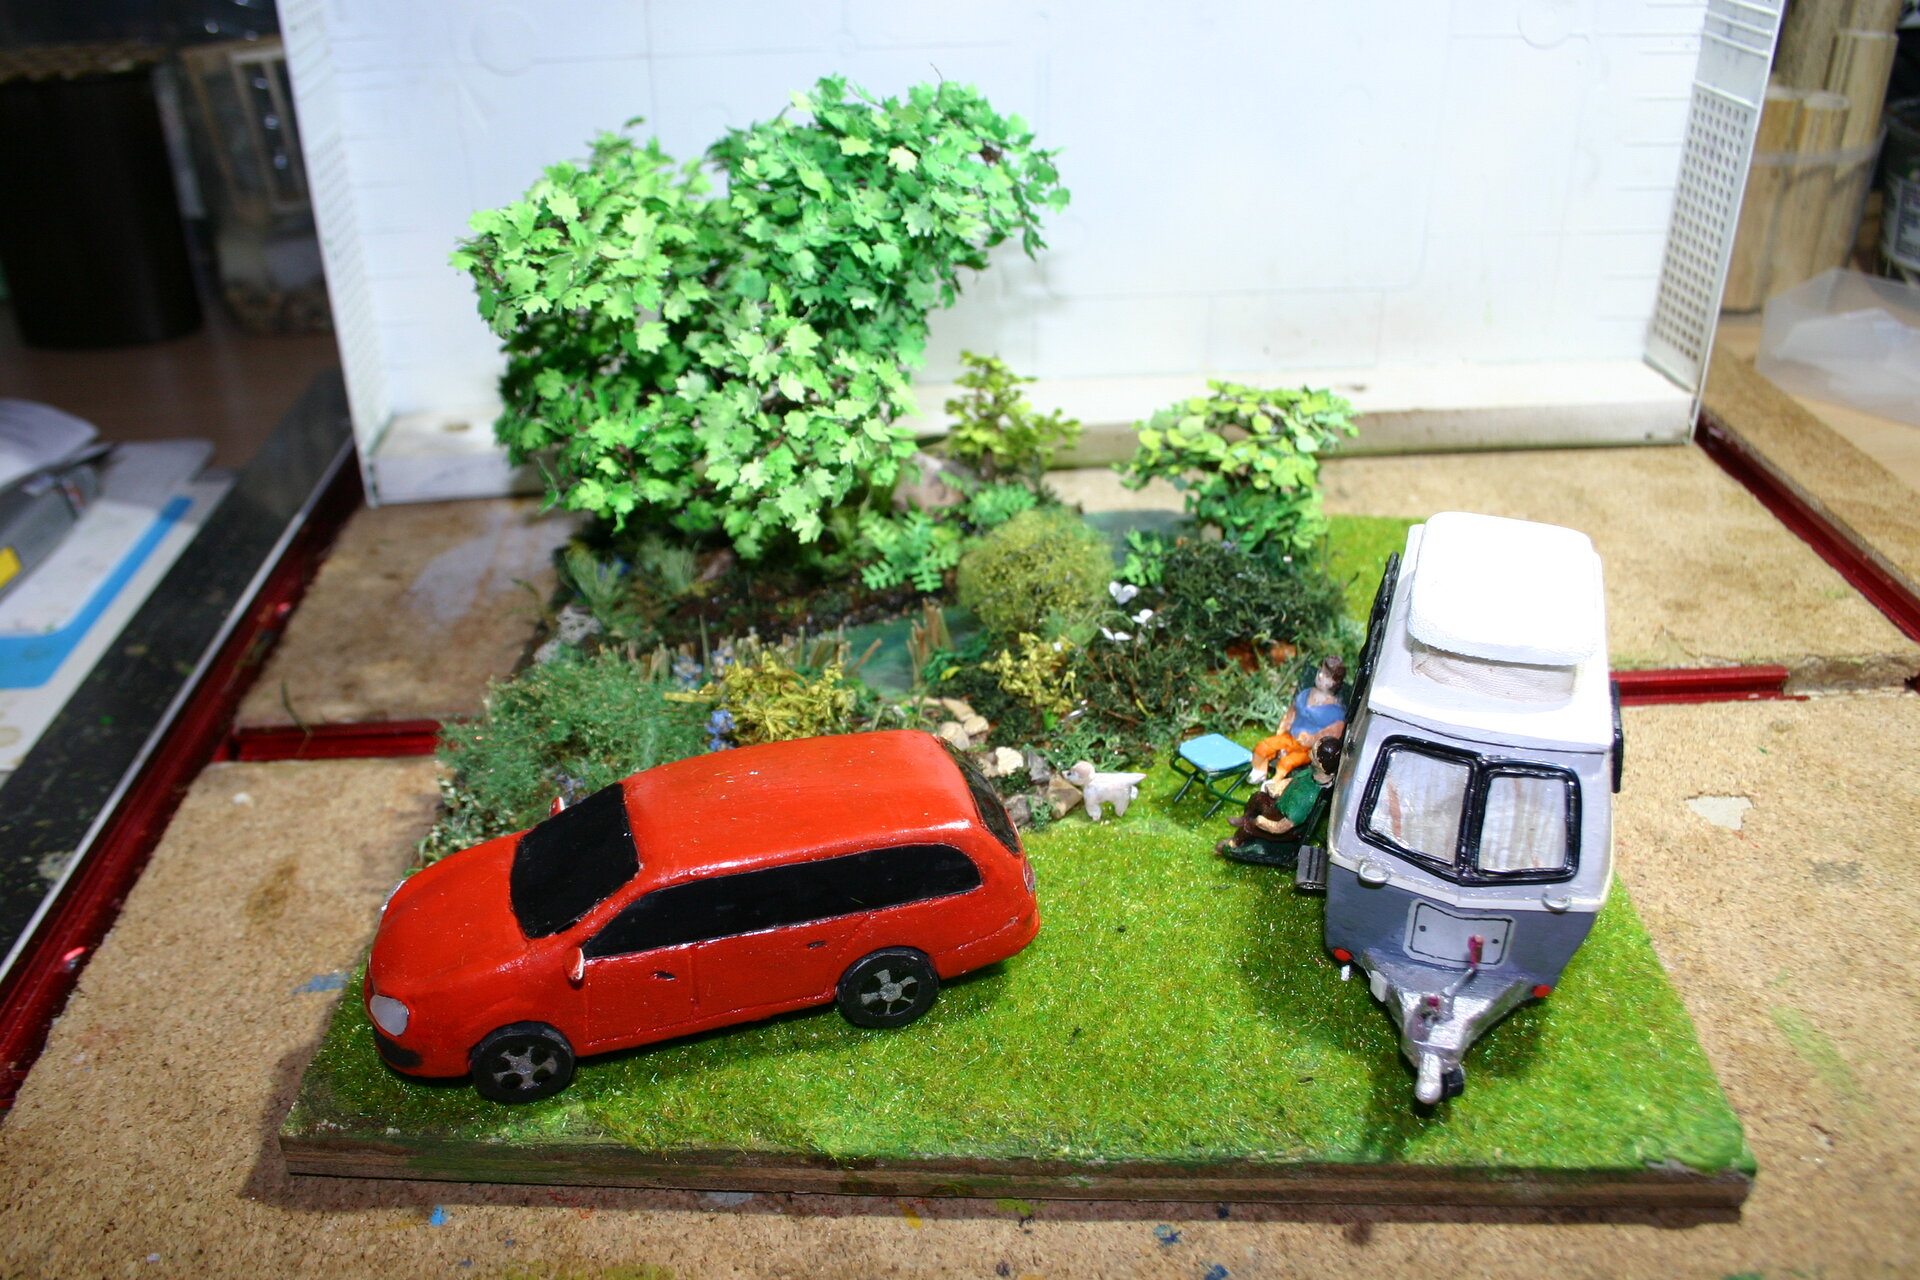
Chapter 9: Final Details and Assembly
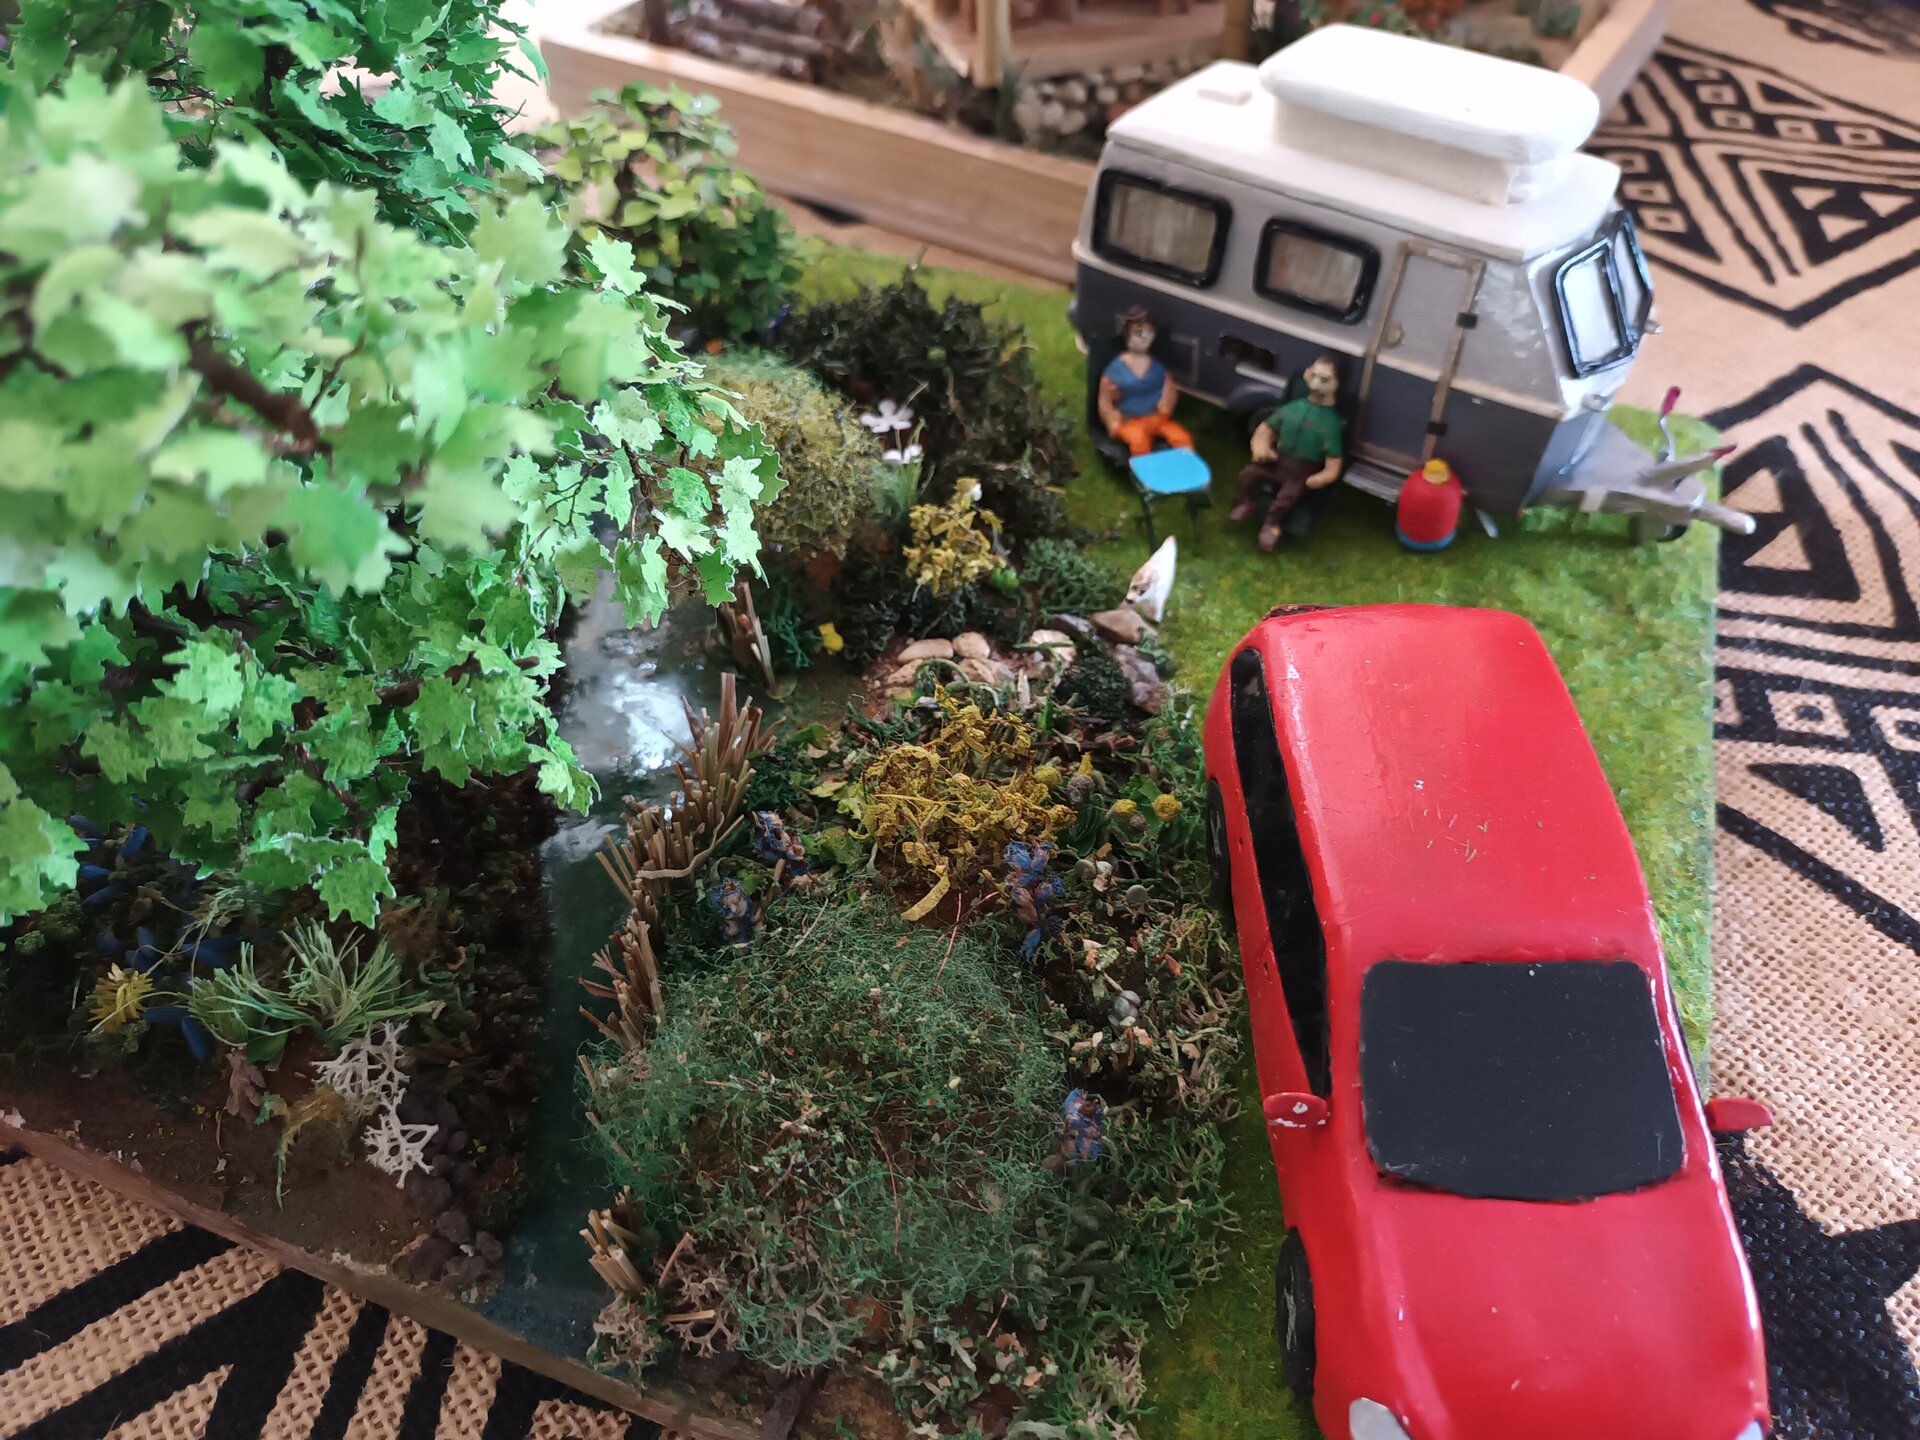
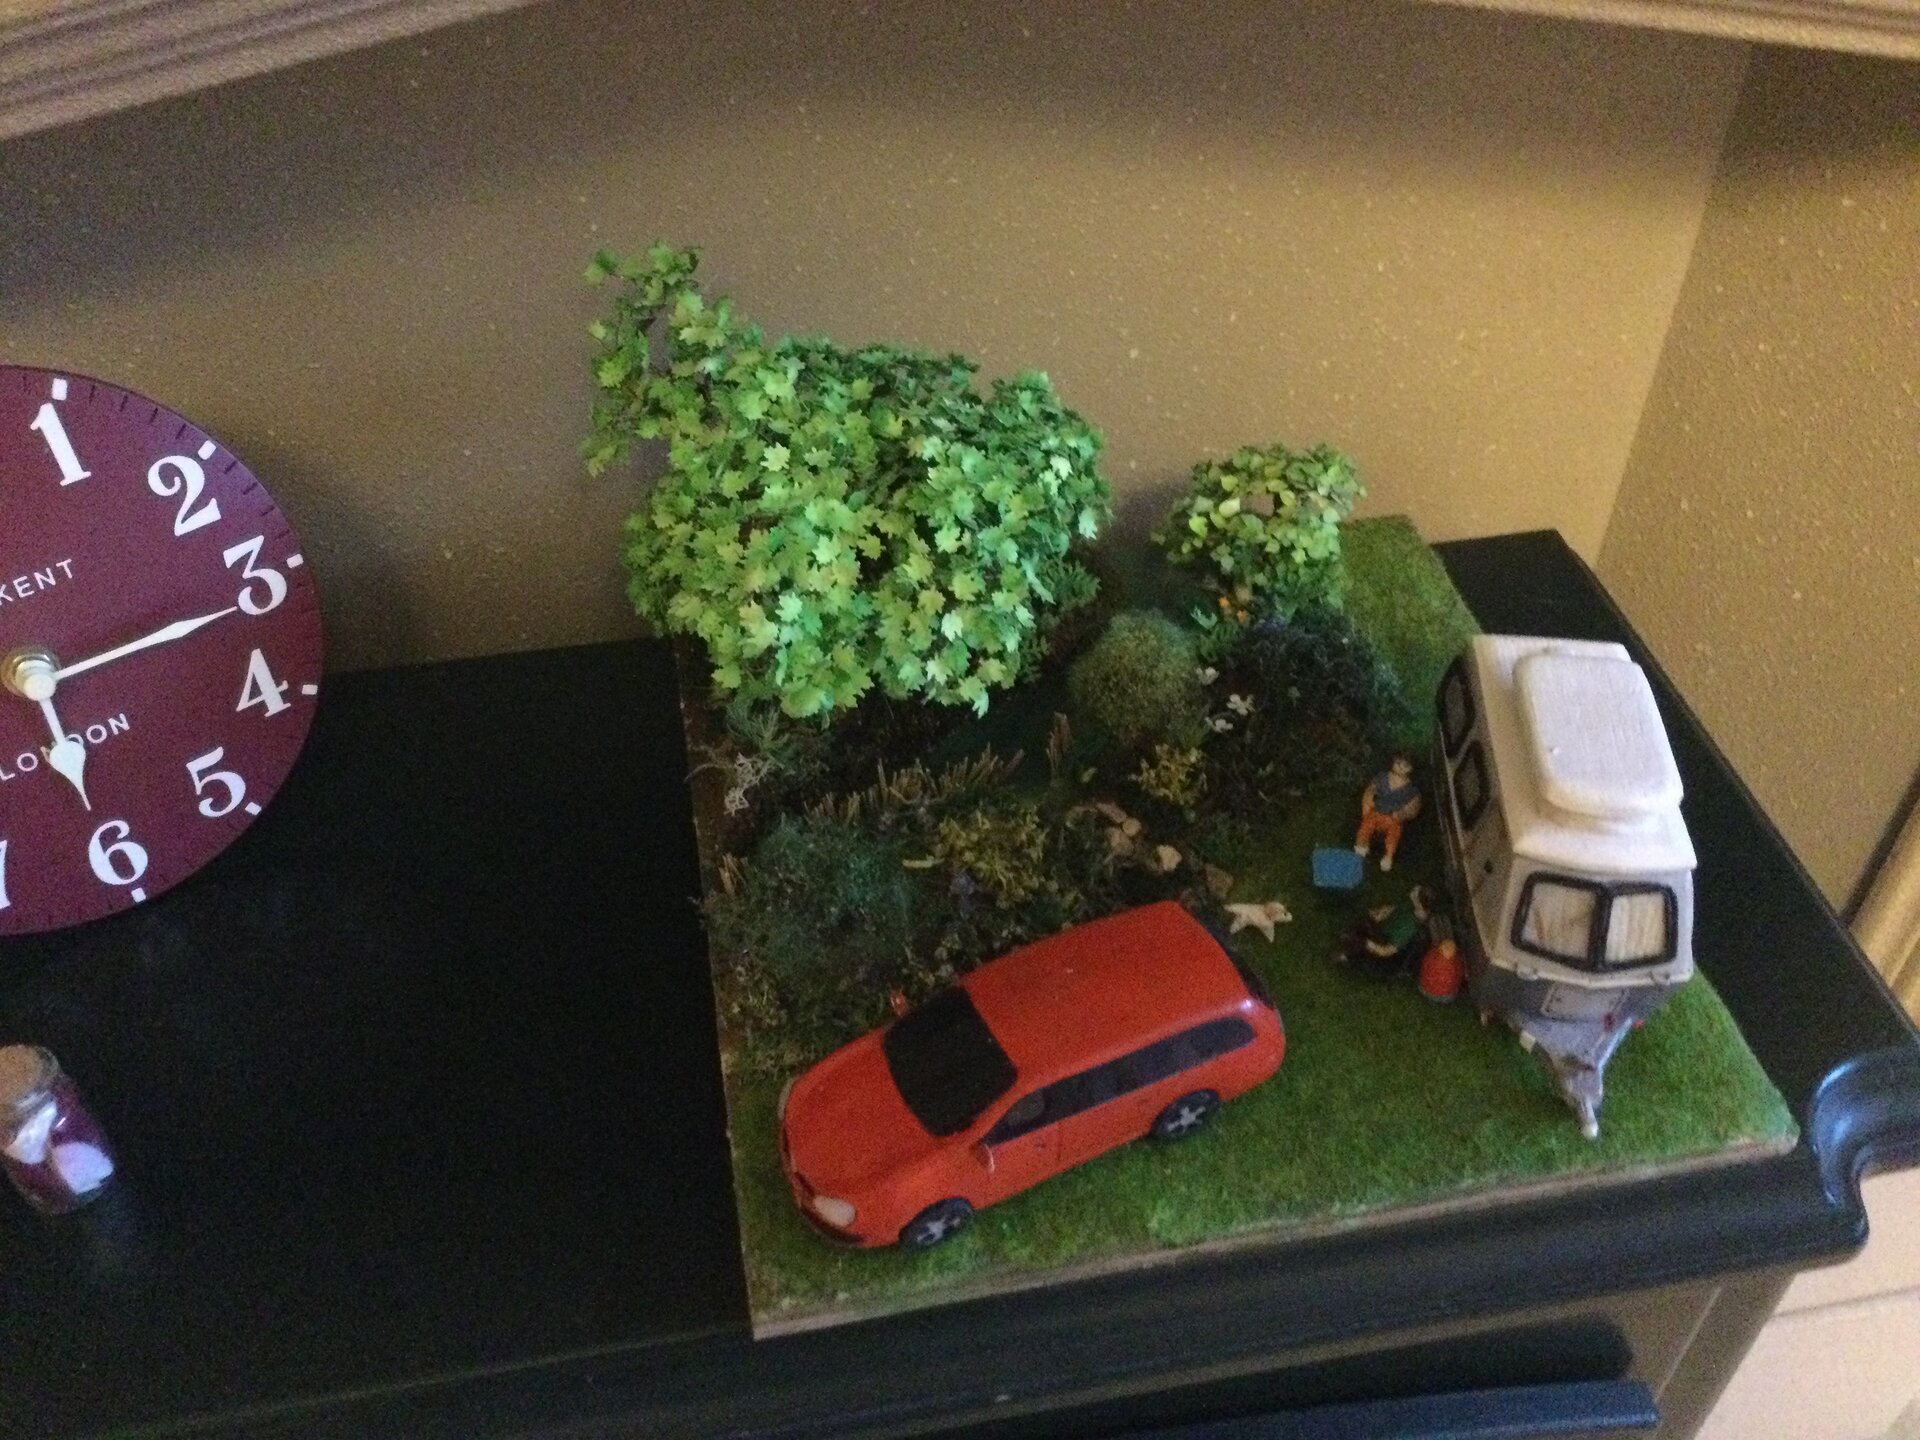
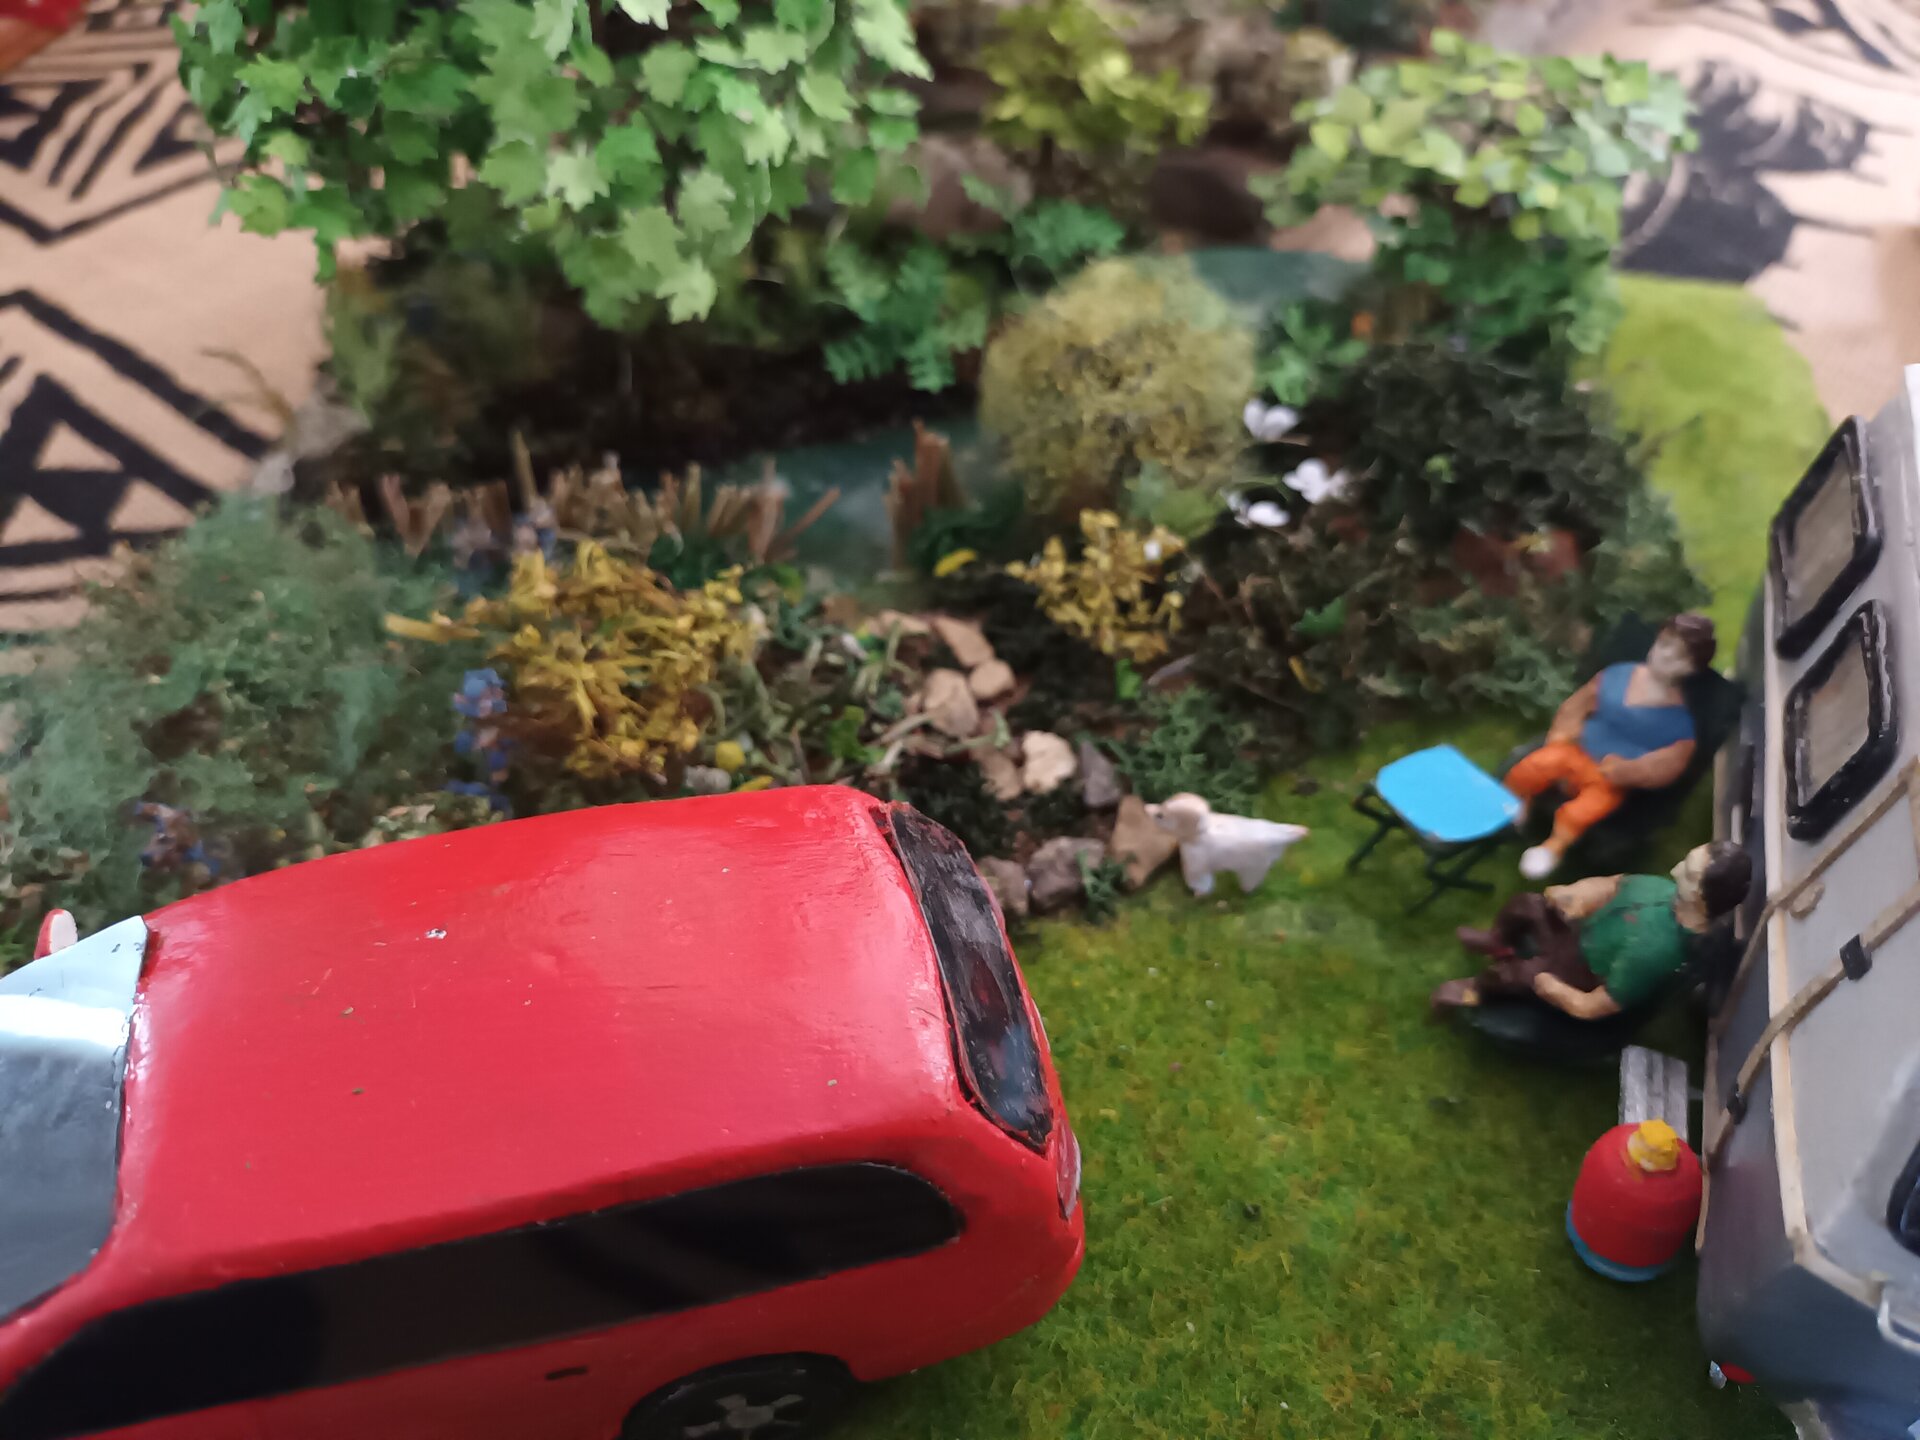
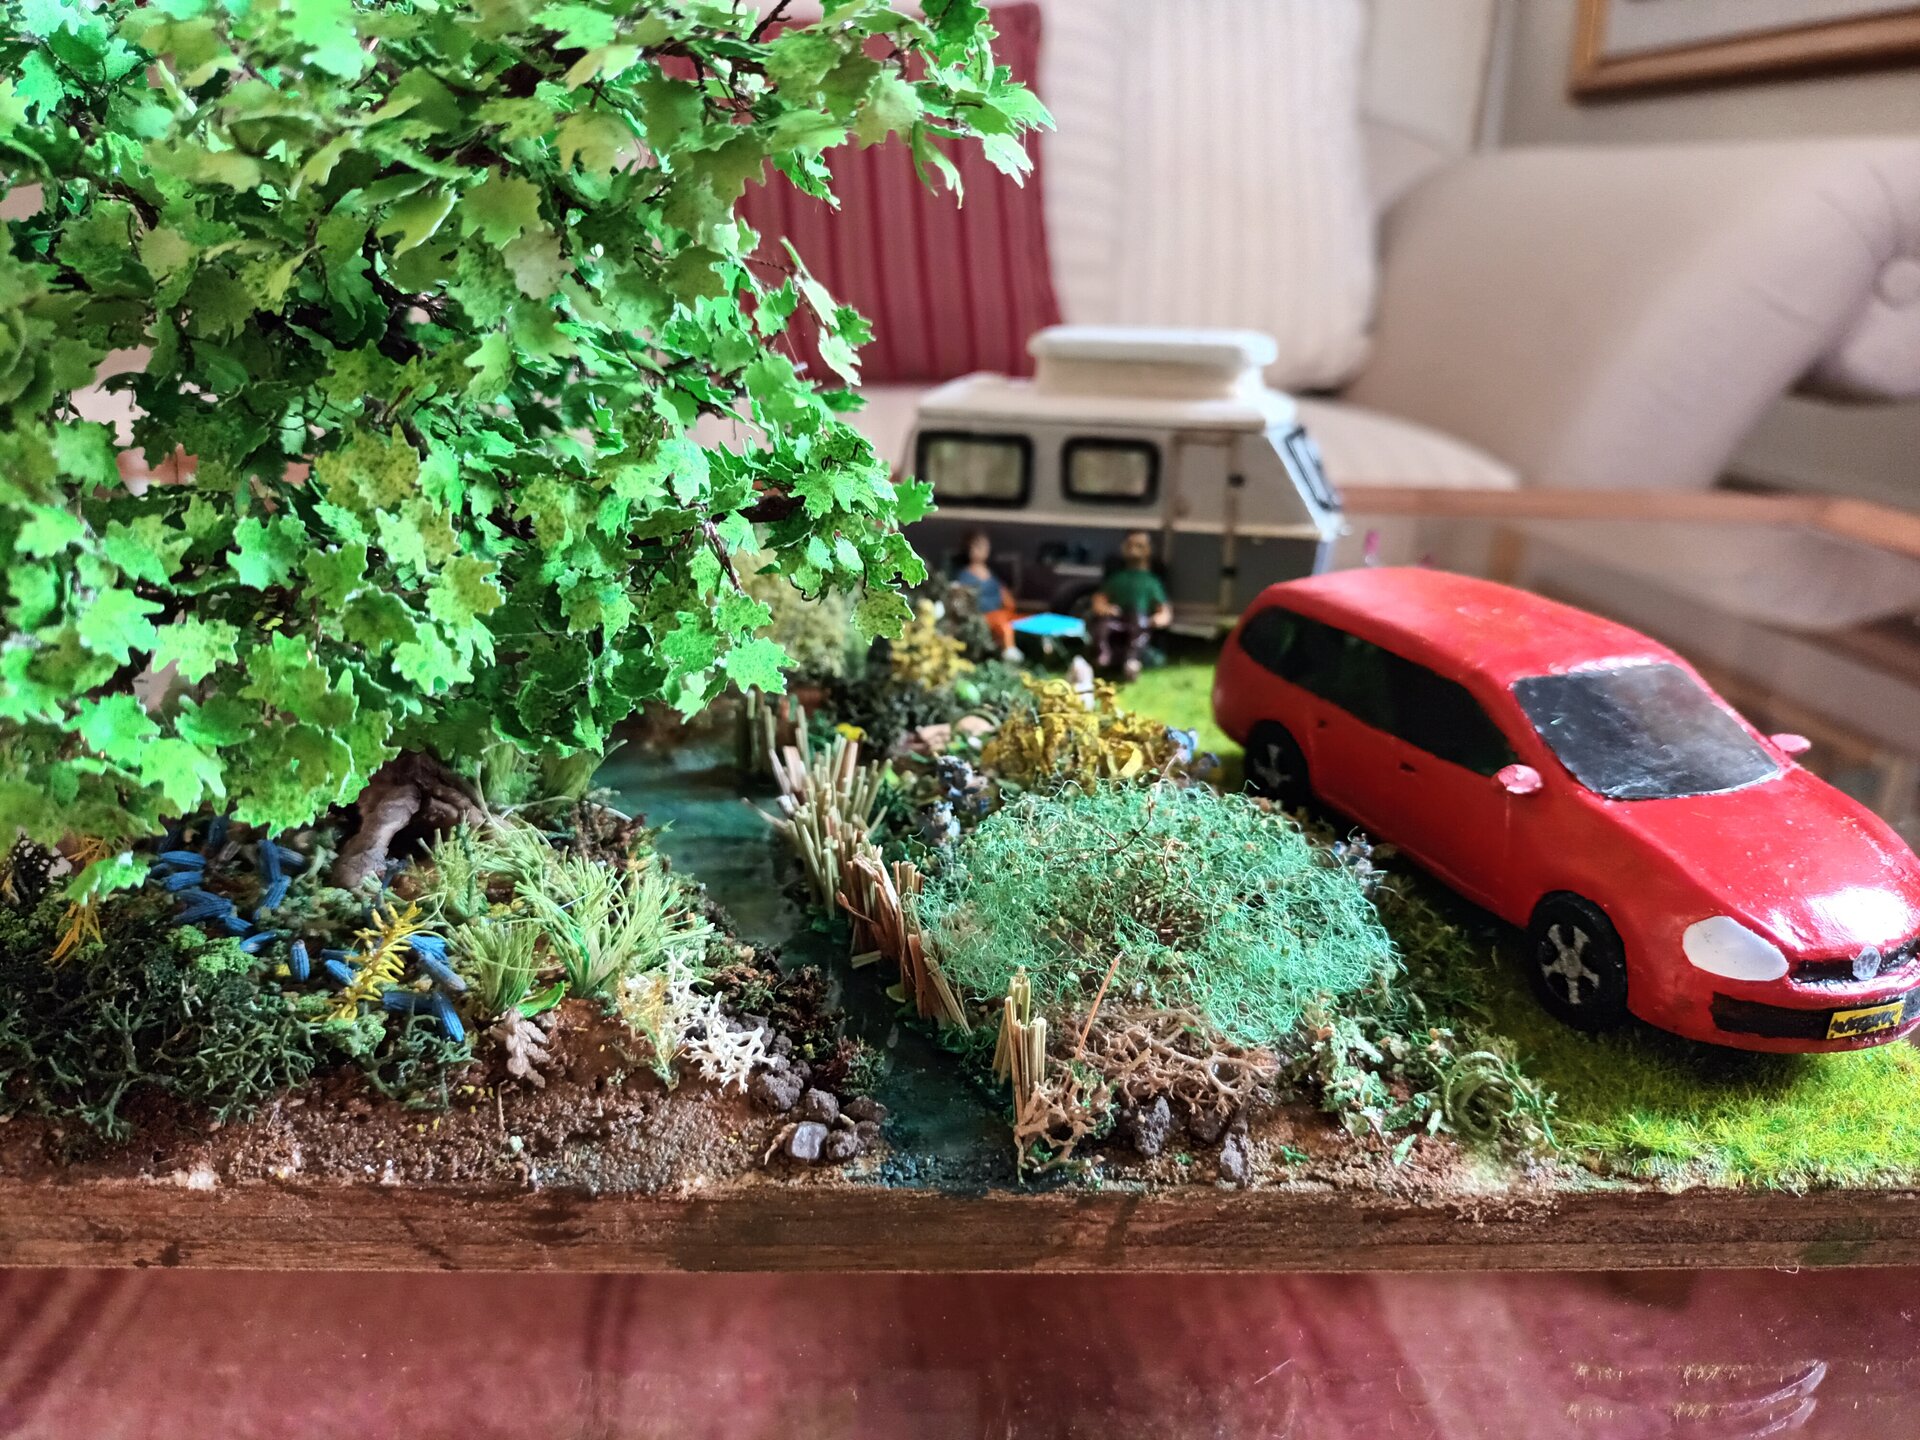
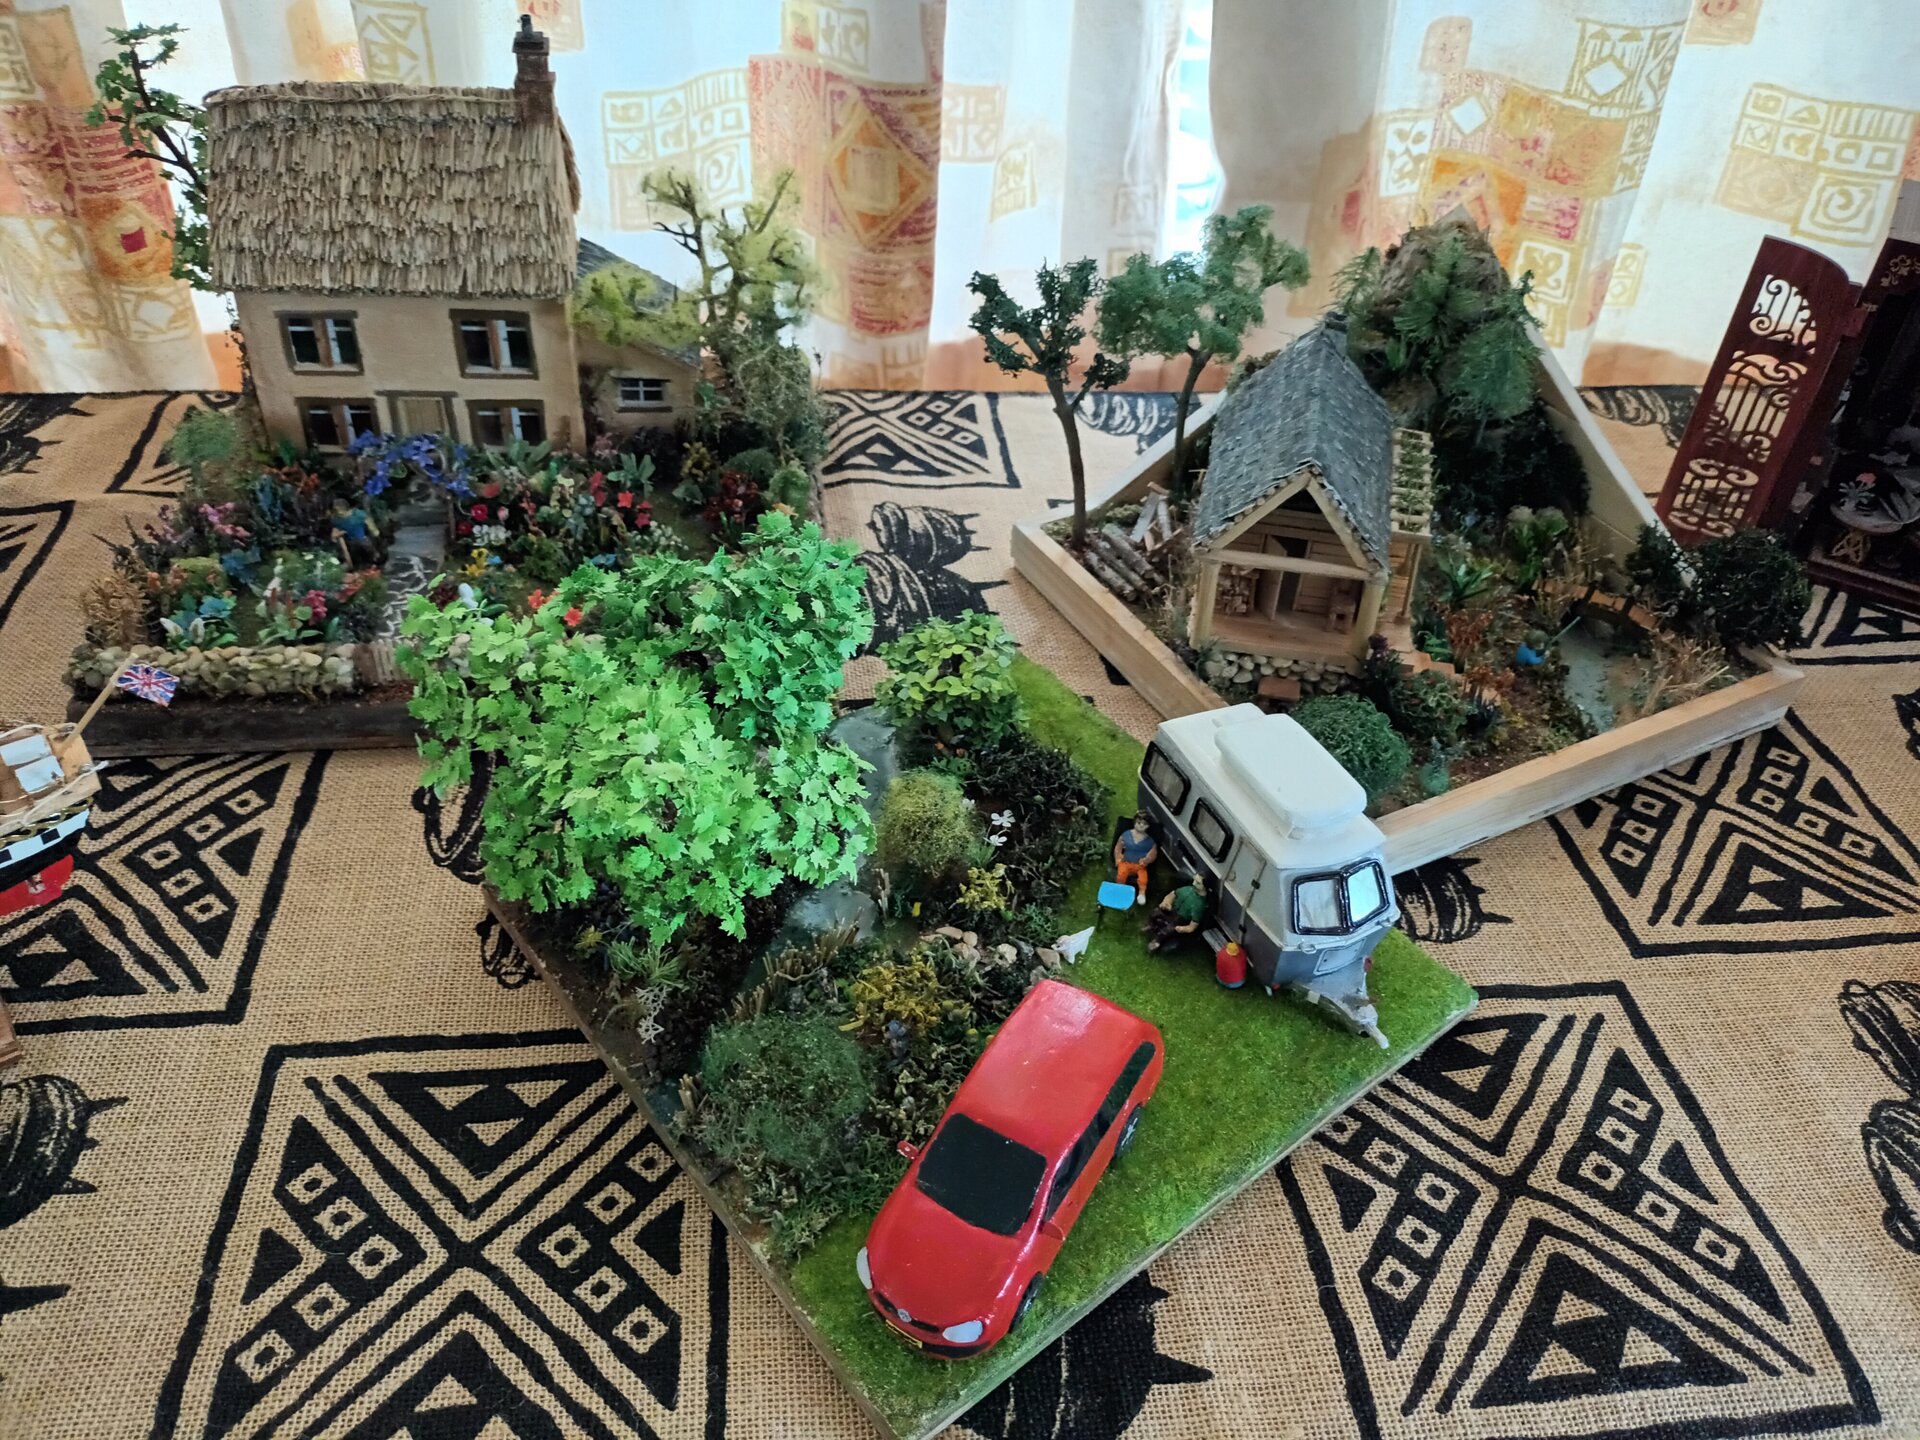
With all components completed, the final assembly brought everything together. Each element - the carefully built caravan, the challenging car build, the figures with Tilly, the Welsh countryside vegetation, and the improved river - combined to tell the story of this family’s camping adventures.
Pride of Place Among Peers
Before delivery, the completed diorama sat on my work table alongside other projects. Seeing it in this context - surrounded by the English Country Garden, Log Cabin, and other builds - reinforced how much this project pushed my skills forward. Vehicle modeling, figure sculpting, commissioned work under constraints - all new territory successfully navigated.
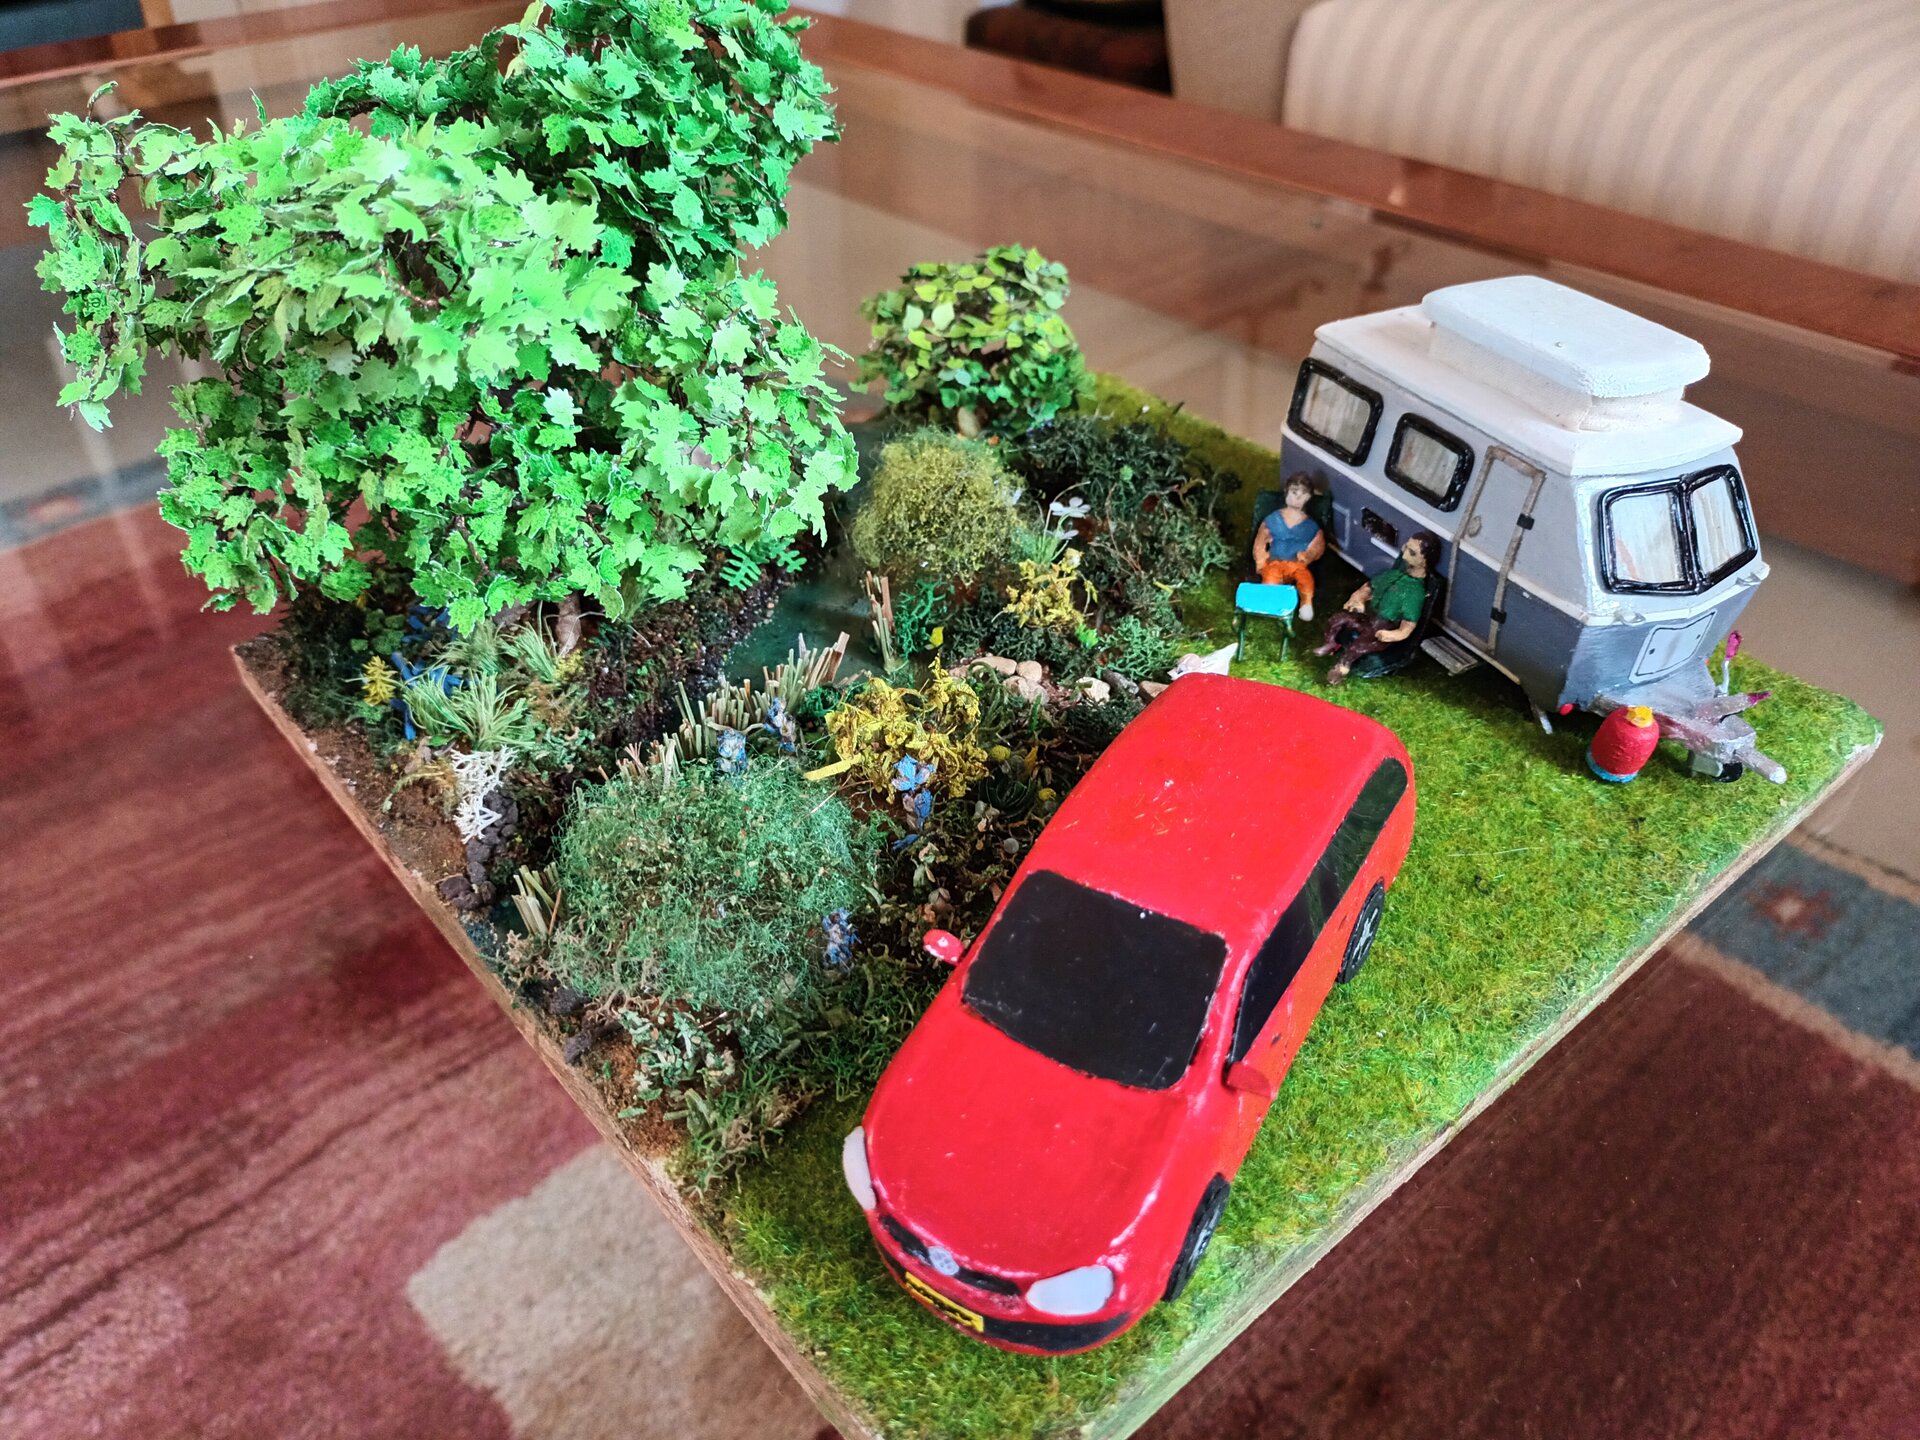
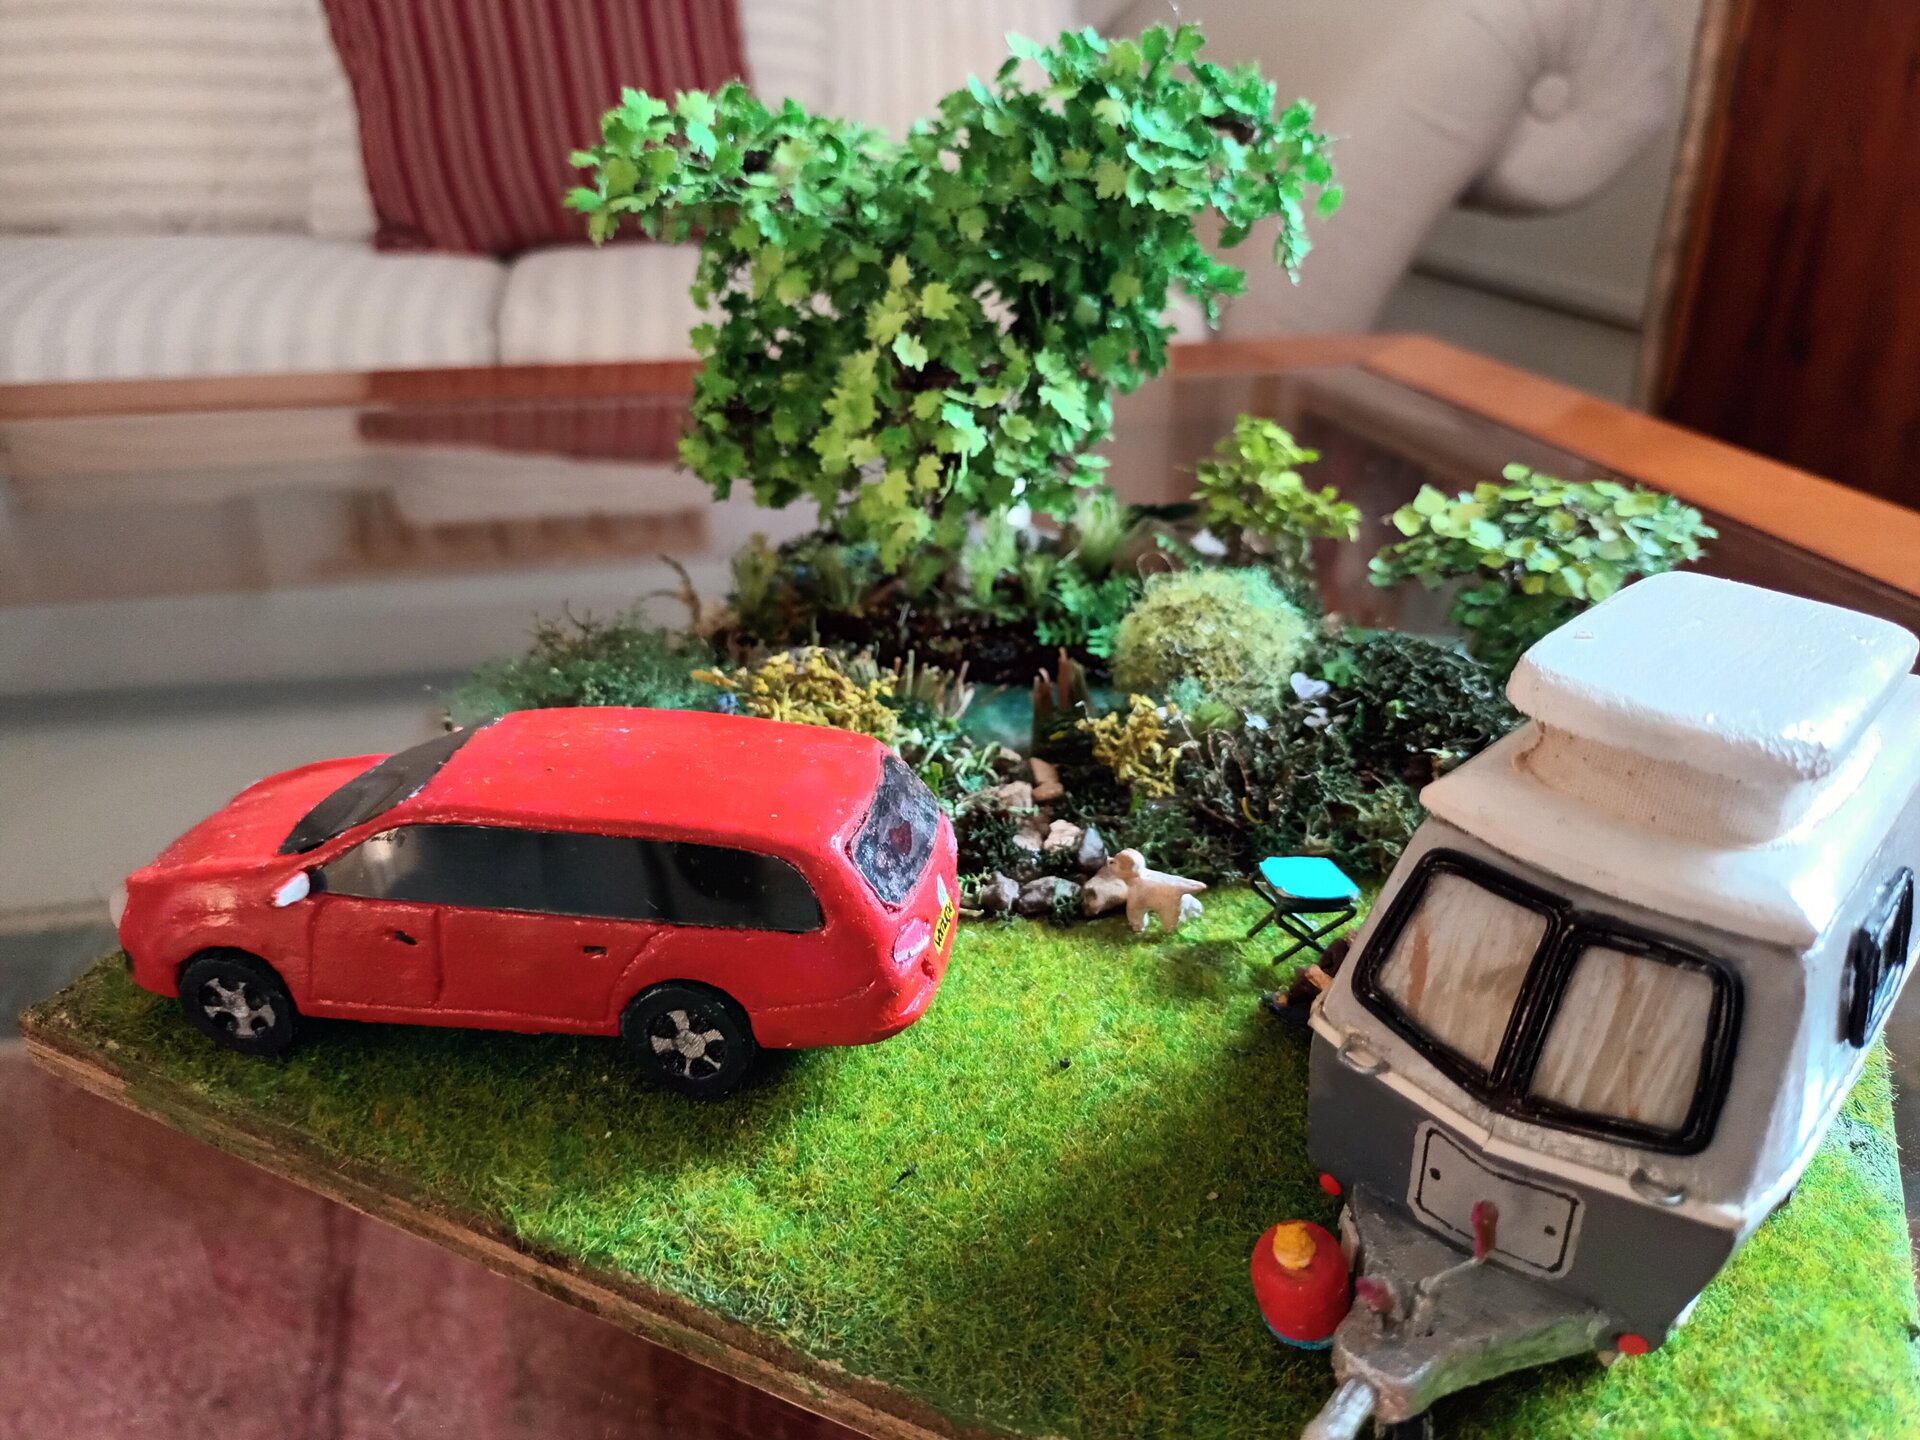
Chapter 10: Completion and Delivery
The commissioned work was completed in July 2025, seven months after that casual question over a relaxing evening. The diorama now sits proudly on my son’s mantelpiece, a miniature memory of their camping adventures with Tilly in the Welsh countryside.
Build Achievements
Technical Accomplishments:
- First successful vehicle models (both caravan and car)
- Detailed Eriba Triton caravan with accurate proportions and details
- VW Golf R Estate built entirely from scratch at 1:42 scale
- Custom-sculpted figures (ongoing learning area)
- Successful dog figure carved from wood
- Improved river and water effects using resin
- First use of static grass applicator for realistic grass texture
- Welsh countryside vegetation and scenery
Skills Developed:
- Working with air-dry clay for vehicle modeling
- Creating compound curves in miniature vehicles
- Window fabrication from wire and plastic
- Working to client specifications and space constraints
- Accepting “good enough” vs. perfectionism on timeline
- Managing rework and iteration on commissioned pieces
- Balancing accuracy with artistic interpretation
Materials Used:
- Balsa wood (caravan body structure)
- Milliput two-part epoxy putty (caravan shaping)
- Air-dry clay (car body, initial figure attempts)
- Aluminum wire (window frames, armatures)
- Bamboo (wheel construction)
- Wood (Tilly the dog, detail pieces)
- Clear casting resin (river water effect)
- Static grass (campsite grass)
- Hot glue (vehicle lights)
- Wire, paper, and paint (vegetation and scenery)
Reflections on Commissioned Work
This project taught me valuable lessons about working on commission versus building for myself:
Different Pressures:
- Client expectations and specific requirements
- Fixed timeline considerations
- Space constraints from the beginning
- Balancing accuracy with feasibility
- When “good enough” really isn’t - and when it must be
Creative Challenges:
- Capturing specific real-world subjects (their actual caravan and car)
- Creating recognizable figures of real people
- Working within constraints not of my choosing
- Managing the emotional investment in capturing someone’s memories
Personal Growth:
- Pushed vehicle modeling skills from zero to functional
- Improved figure work (though still developing)
- Better planning and scale calculations
- More realistic expectations about timelines and rework
- Accepting imperfection in commissioned context
The joy my son and his family expressed when seeing the completed diorama made all the challenges worthwhile. This isn’t just a model - it’s a memory preserved in miniature, a snapshot of happy times camping together.
What’s Next?
This commission solidified several things:
- I can tackle vehicle modeling (with patience and rework)
- Figure sculpting needs focused practice
- Working with air-dry clay opens new possibilities
- My improving water effects technique
- Commissioned work pushes skill development faster
The skills gained from this ambitious project will inform future builds, whether personal projects or potential commissions. Each project reveals new areas to explore and master.
Build Logs: Detailed step-by-step documentation coming soon to the Build Logs section
Related Projects:
- English Country Garden - Previous project that built confidence for this commission
- Log Cabin - Earlier scratch build with first river attempt
Skills Used:
- Scratch building techniques
- Vehicle modeling
- Figure sculpting
- Air-dry clay working
- Static grass application
- Resin water effects
- Wire tree construction
- Miniature plant crafting
Gallery

Have questions or feedback about this project? I'd love to hear from you.