Sea Rescue - Constructing the Fishing Trawler
Current Build Stage
Phase: Vessel Construction - Fishing Trawler
Focus: Building the small coastal fishing boat in distress that will be the subject of the rescue operation
Build Approach
Based on the research findings, the second option will be used by adapting plans and convert them to scale cutting sheets for the boat.
I’m constructing a small coastal fishing trawler approximately 13cm in length at 1:84 scale (representing a 11.4m vessel). This boat will appear weathered and in distress, listing slightly to add drama to the rescue scene.
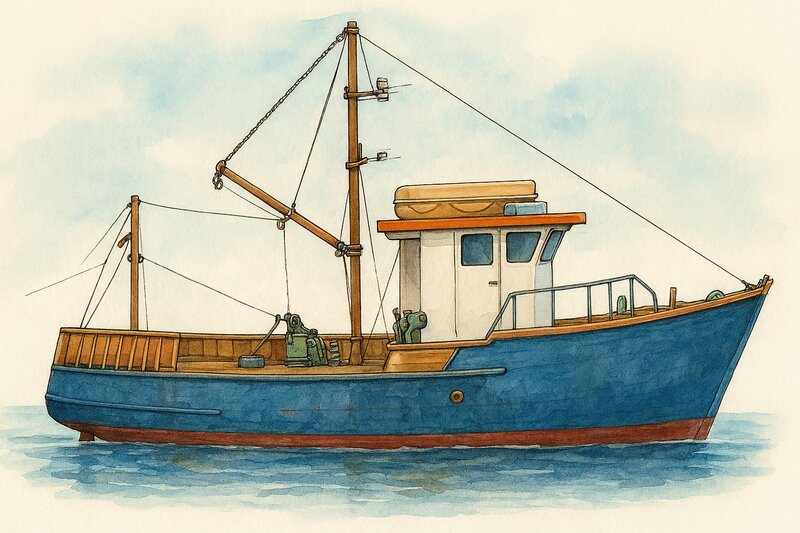 illustrative trawler from the plans
The main construction will be a mixture of wood strips cut from bayleaf and apple trees, balsawood and bamboo.
Plan conversion
The trawler plans are printed and then partly hand drawn to scale on graphical paper focussing on drawing all the parts to be manufactured.
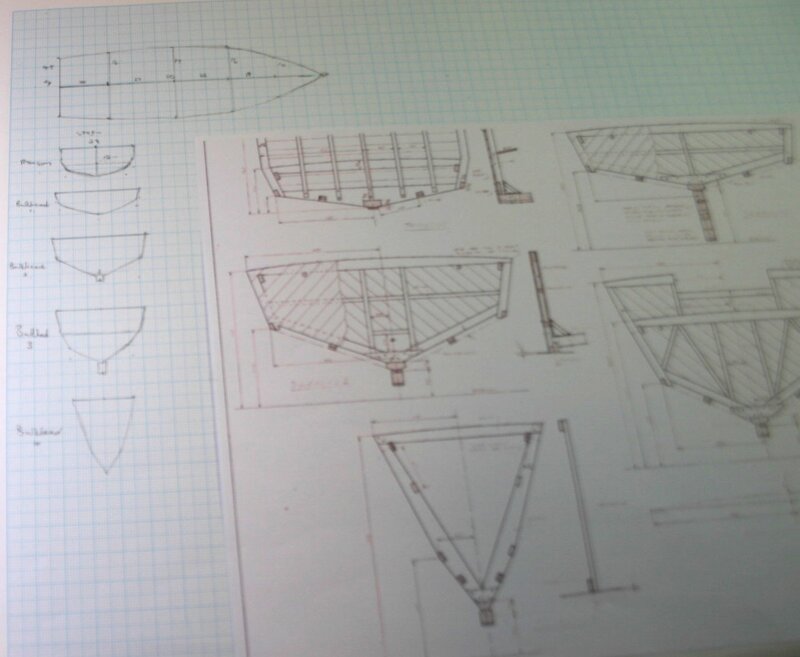 converting the plans to a cutting sheet
All the measurements are lifted from the plans and converted in tables to the scale.
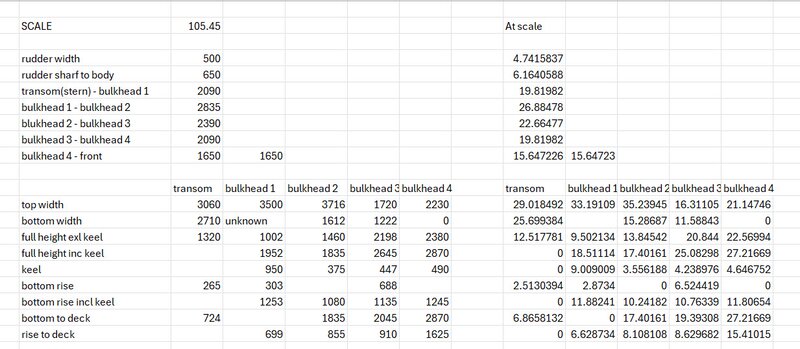 converting the main hull measurements from the plans to scale
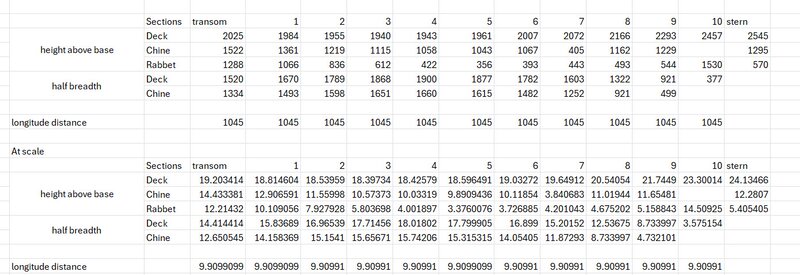 converting the segments of the hull measurements from the plans to scale
Parts list
Fishing Trawler Parts (Scale 1:75, ~10 cm length)
Hull & Superstructure
- Hull: Main body of the vessel. Approx. Size: 10 cm long, 3 cm beam, 2.5 cm depth. Material: Wood
The Bullheads are cut out of left over three ply sheets. First the items are traced to paper, and then cut out, making sure the two parts of each item is identical. Then glueing it to the three ply and cutting it out with the scroll saw.
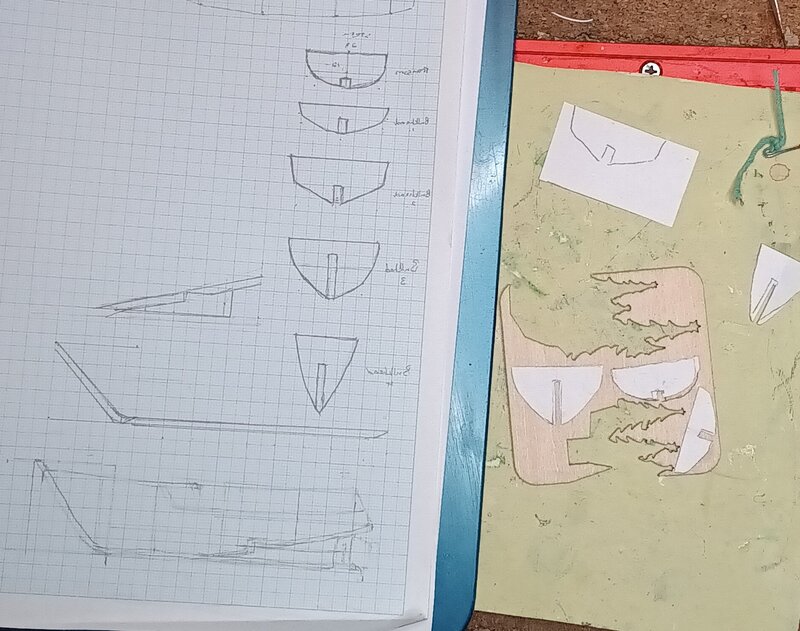 paper templates of cutting sheet
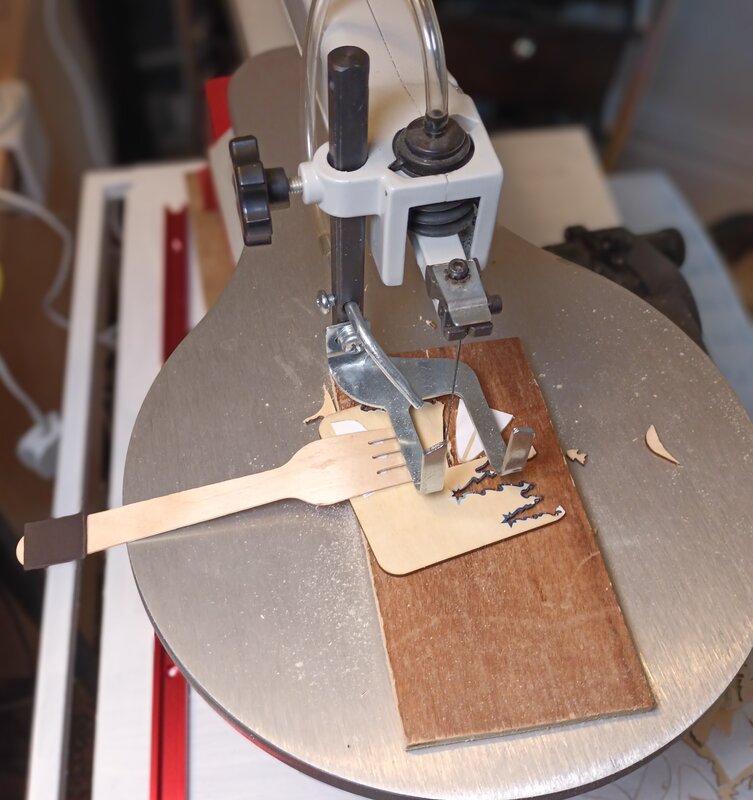 cutting the small pieces on the scroll saw using wooden fork as fingers to hold pieces down
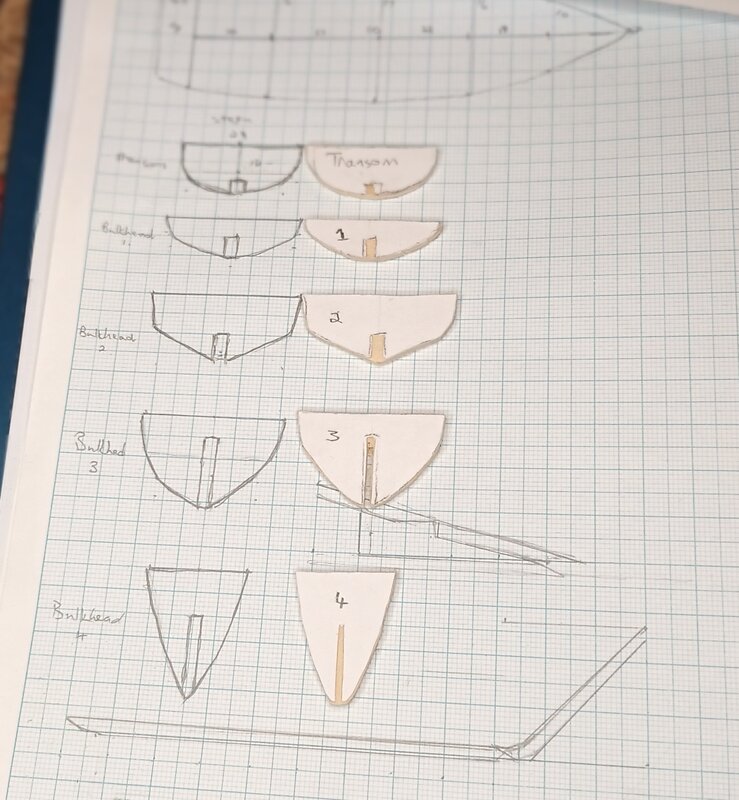 Bullheads after cutting
- Keel
The keel is measured and cut from strips of wood. The wood is planed to a consistent thickness of 5mm, sanded and then cut with a then cut to size with the correct angles with a miter shear.
 Strips of wood prepared in different sizes from apple tree and bayleaf tree
Using the cutting plan to get the lenghts and angles correct, the keel strips are glued together
 keel built up from individual strips
- Fitting the bullheads and deck
Testing the fit of the bullheads proved to be quite tricky. It keeps on falling apart.
bullhead levels tested
- Deck
Using the cutting template the main deck is cut out of Balsawood. The three bullheads then glued to the bottom, using side strips to increase to glue surface
bullheads fitted to bottom of deck.
- planking
Making and fitting the sides of the hull and the bulwarks proved to be very tricky. With the partial deck in place, the bulwarks could be visualised to get the angles and curves right. This was initially done by using paper to form and visual it. I then decided to use thin balsawood that allow bending the curve, the paper template was glued onto the balsawood to provide more elasticity and prevent it from breaking. The top railing of the bulwark was then cut out of wood slates from an old blind and glued to the bulwark.
bulwark pict
The planking for the hull presented the next main challenge. The hull has some sharp twists and beds to accomplish, and planking from strips of wood proved to be too brittle. After several experiments with different types of cuts and wood strips, decided to use heavy paper, paint and seal it with a mixture of PVA glue and paint on both sides, and then cut it into strips. These strips were then curved along the bullheads to form the outer shell of the hull.
fitting the sides
refer to techniques:
- Bulwarks & Gunwale: Raised sides for safety. Approx. Height: 3–4 mm above deck.
- Deck: Working surface. Fits hull interior.
- Wheelhouse / Bridge: Navigation and control. Approx. Size: 2 cm × 1.5 cm × 1.8 cm. Includes windows, roof hatch, door.
- Cabin Roof Details: Vent pipes, lifebuoy, radar dome, exhaust stack.
Masts & Rigging
- Foremast & Aft Mast: Support for trawl gear and lights. Approx. Height: 6–7 cm. Material: Brass rod or toothpicks.
- Booms & Spreaders: Hold trawl doors and net rigging. Approx. Length: 3–4 cm.
- Rigging Lines: Fine thread or fishing line.
Deck Gear
- Winches (Main Trawl Winch): Haul nets and warps. Approx. Size: 1 cm × 0.8 cm cylinder.
- Capstan / Windlass: Anchor handling.
- Towing Pins & Rollers: Guide cables.
- Net Drums: Store trawl nets. Approx. Size: 0.8 cm diameter.
Fishing Gear
- Trawl Doors (Otter Boards): Keep net open. Approx. Size: 1 cm × 0.5 cm each.
- Trawl Net (Codend): Catch fish. Material: Fine mesh or gauze.
- Floats & Weights: Net buoyancy and sinking. Material: Beads or wire.
Propulsion & Steering
- Propeller: Approx. Diameter: 0.8 cm.
- Rudder: Approx. Height: 1 cm.
- Shaft Housing: Brass tube or styrene.
Safety & Navigation
- Navigation Lights: Painted beads or styrene.
- Radar Mast & Antenna.
- Lifebuoys: Tiny rings from wire or card.
- Anchor: Approx. Size: 0.5 cm.
Crew Details
- Figures: Scaled to 1:75, ~2.4 cm tall.
Work Completed
Hull Construction
The hull forms the foundation of the trawler and needs to convey both the working nature of the vessel and its current distress:
- Hull Shape: Carved from basswood using the traditional boat-building approach
- Method: Roughed out overall shape with craft knife, refined with sanding blocks
- Design: Characteristic fishing boat lines - wider beam for stability, modest freeboard
- Distress Position: Built with slight list angle to suggest trouble
Superstructure & Wheelhouse
Small fishing trawlers have a distinctive wheelhouse forward of the working deck:
- Wheelhouse Construction: Built from styrene sheet (0.5mm and 1mm)
- Windows: Cut openings for wheelhouse windows, will add clear plastic later
- Roof: Slightly angled roof typical of working vessels
- Details: Door opening on port side
Deck Features
The working deck needs to convey the vessel’s fishing purpose:
- Main Deck: Balsa sheet planking with scribed plank lines
- Gunwales: Strip wood reinforcement along deck edges
- Hatches: Small hatch covers scratch-built from card and strip wood
- Bulwarks: Low side walls built up from basswood strips
Equipment & Details
Working vessels accumulate equipment and gear:
- Mast: Brass rod for a simple mast with derrick/boom arrangement
- Winch: Scratch-built winch housing from styrene scraps
- Cleats & Fittings: Small cleats formed from brass wire
- Rail Details: Safety rails from fine brass wire
Techniques Used
Carved Basswood Hull
Working with basswood for hull construction:
- Draw waterline and profile views on block
- Rough cut with craft knife, working from centerline outward
- Sand to smooth curves using progressively finer grades
- Seal with diluted PVA before painting
Scribed Plank Lines
Creating realistic deck planking:
- Rule pencil lines for plank positions
- Score along ruler with blunt needle or scribing tool
- Don’t press too deep - subtle is realistic
- Slight irregularities add character
Scratch-Built Wheelhouse
Building small structures from styrene:
- Cut pieces slightly oversize
- Test fit before gluing
- Use liquid poly cement for strong bonds
- Square up with set square during assembly
Challenges & Solutions
Challenge 1: Scale Accuracy at 1:72
The Problem:
At 1:72 scale, the trawler is only 9-10cm long. Details must be simplified while remaining recognizable. Too much detail looks busy; too little looks toy-like.
The Solution:
Focus on key characteristic features - wheelhouse shape, deck layout, mast position. Suggest detail rather than attempting every fitting. Paint and weathering will add visual complexity.
Lessons Learned:
Working at this scale requires restraint. “Suggestion” is more effective than precise reproduction.
Challenge 2: Hull Shaping Symmetry
The Problem:
Carving a symmetrical hull freehand is challenging. One side becoming heavier than the other throws off the look.
The Solution:
Frequent measuring with calipers. Mark centerline clearly. Sand both sides equally, checking frequently. Hold hull up to light to spot asymmetries.
Lessons Learned:
Patience with hull shaping pays off. Rush the sanding and you end up with problems that show even after painting.
Challenge 3: Tiny Wheelhouse Windows
The Problem:
Cutting clean window openings in 0.5mm styrene at this scale without cracking or warping the material.
The Solution:
Score outline heavily with new blade. Make multiple passes rather than trying to cut through in one go. Support material from behind. Use sharp punch for corners if available.
Lessons Learned:
Sharp blades are essential for small-scale work. Dull blades tear rather than cut.
Materials & Tools Used
Materials
- Basswood block (2cm x 3cm x 10cm for hull carving)
- Styrene sheet (0.5mm and 1mm for superstructure)
- Balsa sheet (1mm for decking)
- Basswood strip (various sizes for details)
- Brass rod (1mm for mast)
- Brass wire (0.3mm for rails and rigging)
- Liquid poly cement for styrene
- PVA glue for wood
- CA glue for brass fittings
Tools
- Craft knife with #11 blades (fresh blades essential)
- Sanding blocks (coarse, medium, fine)
- Metal ruler and set square
- Small files for detail work
- Pin vise and drill bits for rigging points
- Calipers for symmetry checks
- Scribing tool for plank lines
Next Steps
The fishing trawler hull and superstructure are now complete. Next stages:
- Painting: Base coat and color scheme appropriate to working fishing vessel
- Weathering: Heavy weathering to show hard-worked vessel - rust, salt spray, worn paint
- Rigging: Add fishing gear, ropes, nets (suggested rather than detailed)
- Final Details: Navigation lights, name board, registration numbers
- Crew Figures: Small figures to show scale and add life
- Distress Elements: Visual indicators of the vessel’s trouble (listing, damage suggestions)
Once the trawler is complete, it will be positioned on the diorama base to establish the rescue scene composition before constructing the RNLI rescue boat.
Time Investment
This Session: Approximately 8-10 hours
Breakdown:
- Hull carving and shaping: 4 hours
- Wheelhouse construction: 2 hours
- Deck and details: 2 hours
- Equipment and fittings: 2 hours
Total Project Time So Far: 12-15 hours (including planning phase)
Status: Fishing trawler hull and basic structure complete, ready for painting and weathering
Next Log: Construction of the RNLI B-class Atlantic 85 rescue boat
Estimated Next Update: Early January 2026
Have questions or feedback about this project? I'd love to hear from you.